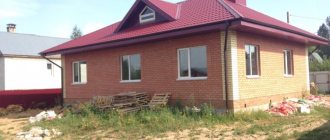
Verandas are usually used in the warm season as additional usable space. Based on the type of construction, they are classified into attached and built-in. The first ones are built after the construction of the house is completed. The presence of built-in ones is provided for at the design stage of a residential building. Also, verandas can be with or without glazing. In the second case, the site is essentially a terrace equipped with a canopy. Verandas with glazing can be used not only in bad weather in the summer and without fear of rain or wind, which previously interfered with quiet gatherings, but also in the winter if they are heated. In this regard, the premises are similar to attics, into which cold attics are converted. In the south, the veranda is most often used as a gazebo or dining room. On the hottest nights, you can set up a bedroom here, where the coolness of the night comes in abundance. In the outback, equipment for a summer kitchen is moved here if there is no free separate building for these purposes. A veranda can be called not only an extension to a house, but also a separate room on the site in which a greenhouse or a hall for receiving guests (formerly for dance evenings) is equipped.
The fashion for such spacious “gazebos” came from France. And the word “veranda” itself is of Bengali origin, which in principle is not surprising if we recall the close ties of Old Europe with the countries of South Asia. Balconies and loggias, in fact, are also verandas, but they belong to city apartments in multi-storey buildings. Suffice it to remember that they are also divided into “warm” and “cold”. We will consider options for glazing verandas in private houses.
Features and Benefits
Glazing a veranda is that rare case when, among the many advantages, the disadvantages are lost. The room can be warm or cold. In the first case, it can be used in winter as a residential space. If the glazing is cold, then the temperature inside the veranda will be only a couple of degrees higher than the temperature outside, that is, the difference is insignificant. This veranda can only be used in summer. The advantages of glazing a room include:
- Protection from wind and rain (for both cold and warm options).
- Noise insulation.
- Possibility of arranging a separate room. In the case of cold glazing we are talking about a “summer residence”. With warm glazing, the room can be used all year round, that is, another full-fledged room is added to the living space on a “permanent basis”.
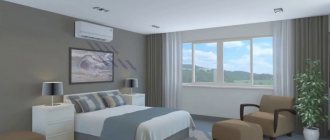
- Possibility of connecting to heating and using the room in winter (only for warm glazing). It is quite possible to arrange a bedroom, a small guest room, a winter garden, a storage room and a kitchen or dining room here. The choice of functional purpose depends entirely on the size of the veranda itself and its capabilities.
- Creating a stylish, unusual element of the interior and exterior of the house. Glazing can be different, and original solutions will emphasize the creativity of the design of the entire building as a whole.
If we mention the features of the glazing of the veranda, then it should fit well with the design of the house. This is a mandatory and most important condition. Next, you should pay attention to the area of the translucent sheet in order to provide it with proper support in the form of frames and at the same time not reduce the strength of the entire structure. The next stage is the choice of material for the frame, but we will talk about this in detail later. Modern glazing systems offer great opportunities for owners:
- Partial roof covering with sheets of heavy-duty glass.
- Exact repetition of the shape of the veranda.
- A variety of door and window opening systems.
- Adjusting the width and height of open door and window openings.
- Possibility of installing mosquito nets.
Now let's talk about the types of glazing, their disadvantages and advantages.
Attaching the roof of the veranda
The porch attached to the house is usually covered with the same type of roofing as the crowbar. There may be several options, and the organization of the roof connection depends on how and to which wall you attach it. If the roof is a continuation of the roof slope of the house, you need to join two rafter systems. In this case, they say that the roof of the veranda is adjacent to the roof of the house.
Then the procedure is as follows:
- The top trims are attached to the veranda posts.
- Transverse ceiling beams are nailed to the frame. The ceiling is then sewn to them.
- The long rafter legs of the house are shortened. They should not protrude beyond the wall.
- Veranda rafters are made from planed boards, which are cut at an angle from the roof side so that they adjoin the existing ones (see photo below). To make it easier to work, you can make a template, according to which you can then prepare the rafters on the ground. The rafter legs are attached to the house system through nails; metal reinforcing pads can be placed on the sides.
- To increase the rigidity of the structure, spacers (anti-snow supports) are installed between the rafters of the house and the extension. They are shown in the photo explaining the design.
Connecting the roof truss system of the veranda to the roof of the house
If the width of the veranda is more than 2 meters or heavy roofing material will be used, spacers are installed to prevent the support beam from sagging. It is better not to nail them on the side, but rather to insert them between the ceiling beam and the rafter leg.
In order to prevent the roof from sagging, spacers are installed between the ceiling beams and rafters
More often it turns out that the roof of the veranda attached to the house is adjacent to the wall. In this case, a groove is made in the wall, a special wall profile is placed in it, the other side of which is laid on the roof covering. The place where it joins the wall is sealed with sealant.
How to attach a veranda roof to the wall of a house
The second option differs only in the shape of the wall profile: it can be made independently from a sheet of roofing iron. This design is distinguished by the presence of a beam, which allows you to move the bend away from the wall of the house and cover possible errors when laying roofing material at the junction. Also, in this option, the apron is not attached directly to the wall material, but to a beam with a beveled edge, mounted in the groove.
The second option for connecting the roof of the extension to the wall of the house
Some questions may arise about how to attach the rafters to the outer top frame, because its dimensions do not allow making cuts, as on the mauerlat. The solution is the usual: using corners (see photo). Instead of corners, you can use small cross-section bars.
Method of attaching veranda rafters to the top frame
Maybe not the most elegant solution, but reliable. After everything is covered with roofing on top, clapboards will be added underneath, they will not be visible.
Types of glazing
There are quite a few classifications of glazing depending on its features:
- Warm and cold, which were already mentioned above.
- Frameless and with frames.
- Full and partial.
- Swinging and sliding.
Panoramic glazing can be included in a separate category. Let's talk about each type in more detail.
Cold and warm
Cold glazing is used when the owners have chosen “seasonal use” for the veranda. Suitable basic materials:
- Plastic single-chamber double-glazed windows.
- Aluminum profile as a frame, which also weighs very little, unlike heavy wood.
- Panoramic windows.
Cold glazing looks stylish and practical. At the same time, double-glazed windows reliably protect the veranda from precipitation, dirt and dust. In summer, the room can be used as a study, relaxation room, summer kitchen, and in winter it can easily be converted into a pantry for storing pickles or “gifts from the garden.” Warm glazing is usually carried out using plastic double-glazed windows that have special air chambers.
They act as a “buffer”, trapping heat in the room and preventing cold from entering from the street. Window sashes fit hermetically to the frames. Glass consists of several transparent sheets, the spaces between which are filled with a special absorbent that absorbs moisture. Such glazing does not allow cold, moisture and wind to enter the room. It reliably protects the veranda from the external environment and allows you to convert it into a full-fledged living space. If we talk about cost, then you will have to pay more for double-glazed windows, but this option provides many more advantages.
Full and partial
Depending on the functional purpose of the veranda, its glazing can be full or partial. The first option allows you to create warm or cold glazing, that is, the openings are completely closed with double-glazed windows and there are no “gaping” windows left in the walls of the room. Partial glazing is a simpler and cheaper option. It is appropriate in cases where, for example, the room needs to be protected on the leeward side. This veranda can only be used in summer.
Frameless and with frames
Glazing with frames is a popular and already quite hackneyed option. Sheets of glass are placed inside a special frame, which provides the structure with strength and stability. Relatively recently (just a couple of decades ago), the fashion for frameless glazing came to us, when the facade consists entirely of sheets of heavy-duty glass, which are sealed at the joints. The illusion of a completely open space is created. Sheets of glass are fixed with aluminum profiles at the floor and ceiling. This option cannot be called budgetary, but relaxing on such a veranda will truly take your breath away. It is appropriate to use frameless glazing only in cases where the room offers a beautiful view (of a garden, field, meadow, nearby river or sea coast). Although the structure looks fragile from the outside, in fact it will outperform any other double-glazed window in terms of strength. For frameless glazing, only tempered glass is used, which is almost impossible to break.
If a blow of enormous force nevertheless damages the surface, then it will only be covered with small cracks, but will not shower everything around with fragments. The design is equipped with additional protection against accidental opening. The only disadvantages that can be noted are low noise insulation and difficulty in maintenance. In order for the glass to retain its transparency and “gloss,” they should not be washed with substances with an abrasive effect that leave small scratches on the surface. You will also have to forget about the old “grandmother’s” method using crumpled newspapers instead of a sponge.
Panoramic
Panoramic glazing is carried out along the entire facade, that is, the windows occupy the entire space from the ceiling to the floor. This is a stylish, original solution that originates in the European traditions of decorating windows facing the garden. The veranda will offer a magnificent view of the nearby beauty. Panoramic glazing can be frameless or with frames. This option is popular not only for verandas, but also for glazing balconies and loggias in high-rise buildings with a slight difference: there the system is necessarily supplemented with a protective frame that prevents a person from falling onto the glass.
The only disadvantages noted are the rapid fogging and freezing of the transparent fabric in winter.
To avoid this, you must either install an additional heat source in which hot air flows are directed at the windows, or regularly lubricate the glass with a glycerin solution.
Sliding and hinged
The swing opening system is familiar to everyone: window or door sashes, after turning the handle, open inward (usually 90 degrees). Plastic double-glazed windows use a more complex swing system, which additionally allows windows and doors to be partially opened from above by pulling them towards you. This option is ideal for ventilating the room. Hinged glazing provides good tightness. With its help you can create both a cold and warm room. The sliding system works on a completely different principle: the doors are moved to the sides on special guides located below and above. They can only “drive” in a straight line (as in sliding wardrobes) or fold “accordion-style”.
In the latter case, we are talking about panoramic glazing with frames, when large “window-doors” are compactly assembled against one of the walls of the veranda. Sliding systems cannot provide complete tightness, therefore they are used only for cold glazing.
Pouring the foundation
The depth of the foundation for the veranda should be equal to the depth of the similar structure of the main house. This prerequisite will allow you to make a high-quality structure that will not depart from the wooden structure. Analyze the condition of the soil. You should not attach the structure to the house too rigidly; it should rest on special pillars. These products are placed under all corner posts. For a large veranda, you can additionally install columns under the intermediate posts.
First, special markings are made, deep holes (at least 1 meter) are dug for the posts. Then you need to fill in sand, 20 cm thick. For waterproofing, the structure is treated with hot bitumen. Next, you can begin to create a base of concrete, at least 15 cm thick. Only after the concrete has completely dried, you can begin laying brick pillars for the base. This type of work involves the location of the main structure slightly below the main floor covering in a residential building. Brick pillars are carefully coated with bitumen, and the internal cavity is filled with fine crushed stone. The outer surface should be as uniform as possible. A fence is installed between the main posts.
Construction materials
The glazing frame can be made of plastic, wood and aluminum. The materials are arranged by popularity, starting with the most popular. Of course, at first plastic began to be used everywhere in the glazing of city apartments. Gradually, it migrated to private homes, but wood and aluminum here continue to stubbornly hold their own. This is especially good for wood, which is involuntarily associated with the warm atmosphere of a country house and fits perfectly with the design in the chalet, country, and Provence styles that are so often used in the outback.
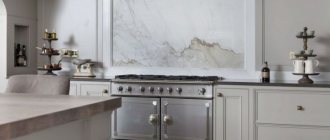
Aluminum
The main advantage of aluminum is its light weight. The material allows you to make the structure much lighter, but without compromising its strength. In terms of cost, aluminum also outperforms its main competitors. For comparison: the price of plastic glazing is twice as high as installing a similar aluminum structure. Unfortunately, the material did not become widely used due to its main drawback: the design retains heat very poorly.
A veranda with an aluminum profile can only be used in summer; in winter, it is most logical to install an “outdoor freezer” here. Although now manufacturers offer a rather expensive solution to this problem - thermal inserts and special liners that retain heat and create additional sound insulation. The aluminum profile is fireproof, so the risk of the structure igniting is reduced to zero, which becomes another advantage of the material when compared with wood.
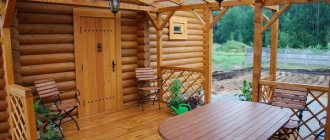
Tree
Previously, only wood was used for glazing houses (not only verandas). With the advent of alternative options, this material began to be slowly forgotten, but its advantages did not fade. Wood has high noise and heat insulation. Although, of course, the glass itself receives the main “blow” in terms of heat conservation, a lot also depends on the frames. Unlike plastic or aluminum, wood does not need additional thermal liners, since the material itself prevents cold from entering the room and warm air from escaping outside. Wood has micropores, which allows it to “breathe”. Manufacturers of plastic double-glazed windows state in their characteristics that the maximum minus for the material is 30 degrees below zero. At this temperature, PVC loses strength and becomes brittle.
For wood, there is also a frost resistance limit, but this figure is so sky-high (minus 120 degrees) that even in the conditions of the Far North it is impossible to verify it. From this we can conclude: wood is the warmest material. The wood is environmentally friendly, but it will catch fire when in contact with an open flame. The material is pre-treated with special impregnations, which increase its fire resistance and moisture resistance. Contact with liquid is dangerous for wood. Material that is not properly processed can become deformed, rendering the double-glazed window completely unusable. And the main advantage of wood lies in its beauty, which neither aluminum nor PVC has. Warm, homely, “cozy” material will ideally highlight the design of an Alpine chalet, simple country, French Provence and rustic Russian style.
Plastic
Contrary to misconceptions, high-quality plastic does not emit harmful substances during operation. PVC retains heat perfectly, thanks to special rubberized inserts around the perimeter of the window and door sashes, the veranda remains airtight. Plastic windows provide good sound insulation. They are ideal for warm glazing, but are heavy, so they are not recommended for use in dilapidated dachas or old country houses. PVC cannot be called fire-resistant, but upon contact with an open flame, they do not catch fire, but begin to melt, releasing caustic substances.
Perhaps the main disadvantage of plastic glazing is its high cost. If you need to install one or two windows, then the purchase and installation will not hit the budget much, but for a panoramic double-glazed window you will have to spend a lot of money. Wood and aluminum leave PVC far behind in this regard, luring buyers with tempting prices.
Attaching the joist to the harness
They can be mounted on top of the harness, or at the same level with its top edge. You need to decide exactly how you will do this at the very beginning of the work: this will determine at what level it will be necessary to attach the support beam to the wall of the house (the height of the joists is taken into account or not). Methods for attaching floor joists are shown in the photo below.
How to attach floor joists to the frame
Read how to make beautiful and inexpensive paths on your site here.
Glass materials
The transparent canvas occupies the lion's share of the area of the glazed area, so its characteristics have a greater influence on the quality of the structure than the features of the frames and profiles. On verandas, not only “classic” glass is used, but also other materials that also ensure free penetration of sunlight into the room and at the same time protect from bad weather. Let's look at their varieties and evaluate the profitability of using them in veranda glazing.
Glass
For glazing houses, it is better to use special materials that have increased strength. All of them are produced in the form of sheets and belong to the large category of sheet glass. The following types are suitable for glazing the veranda:
- Tempered. Ordinary sheet glass undergoes special treatment: the mass is heated to high temperatures, followed by rapid cooling. The technology makes it possible to create strong glasses that can withstand heavy loads (compared to ordinary ones) and are absolutely safe for humans, since when hit hard they are showered with small fragments with blunt edges that cannot injure, even if the pieces fall on open areas of the skin.
- Laminated or triplex. Belongs to the group of tempered glasses with increased strength. Triplex is a layered “pie” of several sheets that are glued together. There are two types of such glass: cast and film. In the first case, gluing of sheets is carried out using a laminating liquid, and in the second - using a special film. When hit hard, triplex does not crumble like regular glass, but becomes covered with cracks sealed between two protective layers.
- Energy saving. A new product on the double-glazed window market, which so far only wealthy home owners can afford. Externally, glass is no different from ordinary sheet glass. It even has a standard thickness (no more than 1 cm), but from the inside its surface is covered with a special coating. It “repels” heat, redirecting it indoors, thereby preventing it from leaking out into the street.
- Stained glass. Glass is a decorative composition that is assembled from pieces of different colors enclosed in a metal profile. Previously, this option was widely used to decorate cathedrals and rich palaces in Europe. Real masters put together small pieces using the mosaic principle to create whole pictures that will become the highlight of the veranda interior. They have only one drawback - they do not transmit sunlight well, so they are often used in conjunction with ordinary transparent glasses and play the role of accent decor.
In addition to glass, there are several other transparent materials that are actively used for glazing verandas and gazebos on sites.
PVC film
PVC film is better known as “soft glass”. It is used only for cold glazing, since the material cannot cope with the vagaries of the domestic climate and harsh winter conditions. PVC film is sold in rolls and can have different thicknesses and colors. It is ideal as an alternative to expensive glazing due to its low cost. The material can be given any shape. Soft glass is often used as “flexible curtains”, which are rolled into compact rolls and secured in this position with ribbons. If it starts to rain or the wind rises, the curtains are lowered, but the street can be seen just as well as without them. The film is durable. With constant contact with sunlight, it can be used for up to five years. If operating conditions are more gentle, then this period is doubled.
Polycarbonate
Polycarbonate is often used for glazing greenhouses, summer greenhouses and gazebos. The material is flexible and light. It is classified into two types:
- Monolithic. The sheets are more like glass, transmit light well, and have high transparency.
- Cell phone. The sheets consist of two layers of material, which in cross-section are similar to “honeycombs”, that is, the surface of the polycarbonate is decorated with “stripes” formed due to the cells inside. The material transmits light well, but it cannot be classified as transparent. Suitable for verandas that need to be hidden from the view of passersby.
From an aesthetic point of view, monolithic polycarbonate looks more solid and noble. From a distance it is generally difficult to distinguish it from sheet glass. Cellular material benefits in cost, as it is more accessible. Naturally, such glazing is not suitable for warm verandas.
Preparatory work
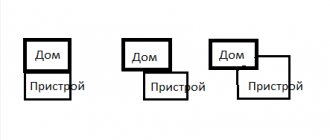
When planning to modify a domestic building, it is important not to lose sight of a large number of features. The extension is always organized from the door side, since it is its characteristics that determine the length of the selected structure
The width is determined directly by the owner, and depends on personal preferences, as well as available materials.
Drawing and site preparation
The layout of the base directly depends on the option of the extension and its approximate appearance, so you first need to decide on these parameters and sketch out ideas on a piece of paper. The next step will be to transfer all the preferences into a computer program for creating drawings - there are quite a lot of them, they are easy to use, so this stage will not take too much time. However, it is quite important because it helps to arrange all the components symmetrically and rationally in relation to each other.
A fairly simple way that does not involve a lot of time is to search for ready-made drawings on the Internet - often they are all for standard extensions, but you can also find quite unusual ones.
If you are not confident in your abilities, you can choose the simplest, but at the same time the most expensive option - contact a construction company. There, in a short time, you can get a finished project that is absolutely correct in all respects, without worrying that the site being built will collapse.
Find out whether the veranda and terrace are considered the area of the house according to SNiP.
When the sketch is ready, you can begin preparing the site. First of all, it is necessary to clear the desired area of land from weeds, debris, dry leaves, etc. Then arm yourself with a building level, wooden pegs and rope - with the help of these materials you will be able to trace the extreme points of the future structure. Next, the area for the extension must be cleared of the top layer of soil (20 cm), covered with crushed stone and sand so that each layer is 10 cm, plus small layer-by-layer compactors.
When done correctly, a square or rectangle will have equal diagonals. If the digital values of the segments do not coincide, under no circumstances should the structural elements be left in this form.
Required materials and tools
Regardless of the type of building, you will need the following building materials:
- wooden boards for making sheathing 25 mm thick;
- beams 50×50 and 100×100 mm;
- reinforcement, rods or mesh;
- flooring boards 3 cm thick;
- roofing sheets that match the material from which the trailer roof is made;
- any desired windows (if veranda);
- fencing and partitions (for terraces);
- ready-made railings and jibs or beams for their manufacture;
- control supports - 4 units (necessary if the area where you live has high humidity and the soil is prone to subsidence).
Important! Since the building is temporary, it is recommended to insulate it with inexpensive materials such as polystyrene foam or glass wool.
The amount of materials is taken from the calculation of schematic data. Screws, nails, straight and oblique metal corners, as well as self-tapping screws are used as fasteners.
Required tools:
- hand or chainsaw;
- drill;
- Bulgarian;
- screwdriver;
- electric planer, etc.
How to choose a glazing method
The choice of type of glazing for the veranda depends entirely on the functional purpose of the room. The first thing you need to decide is the time frame for its use:
- End of spring, summer, beginning of autumn.
- All year round.
You can already build on this when choosing the type of structure and materials. For “winter” verandas, durable wooden frames or plastic double-glazed windows, tempered glass or triplex are ideal. For cold glazing you can use aluminum, polycarbonate, and soft glass. Of course, a summer veranda will cost much less, but a “warm” one provides more opportunities.
Main construction
Frame. There are several ways to attach a veranda frame to a house. The most common materials used for construction are brick, wood, and foam concrete blocks.
Roof. The most common roofing option for a terrace is a single-pitch type of construction. It is recommended to use the same material from which the roof of the main structure is made.
The basic steps of equipping a roof in this way are:
- The boards are attached tightly to the rafters;
- Roofing felt is laid overlapping and fixed with galvanized steel nails;
- Additional fixation of the canvas is carried out with slats with a certain fastening pitch;
- The lower edge of the covering is folded and fixed.
An interesting material used in the construction of veranda roofing is transparent polycarbonate. This is a modern building material that is durable. In addition, the buildings, including the roofs, look quite stylish.
Interior decoration primarily depends on whether the terrace is open or closed. An open veranda is exposed to negative environmental factors: wind, rain, frost. In this regard, the finishing material must be resistant to temperature differences and moisture resistant.
The materials are varied, for example, wooden lining, panels made of MDF or PVC, as well as siding. All of the listed materials are quite diverse in color palette and texture, which pushes the creative boundaries of interior design projects. The photo of the veranda inside shows trends towards natural finishing materials and textures.
Floor covering. As a rule, the material for finishing the floor on the terrace remains classic - wooden boards. The boards are laid directly on the joists on top of the thermal insulation. Upon completion of installation, the boards are coated with paint and varnish.
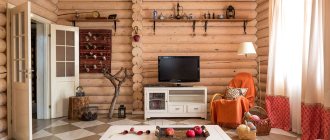
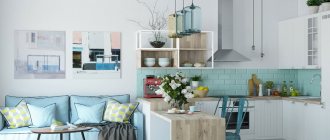
Design and decoration of terraces
The design of the veranda is selected to match the stylistic design of the house. The interior of this room should not stand out from the overall composition. Most often, verandas are used as a relaxation room. A wide sofa, armchairs, and a coffee table are placed here. The outside walls are covered with hops, grapes or ivy, and the windows are hung with light curtains. When the dimensions of the room allow, its interior is complemented with a couple of shelves with books and a cozy fireplace. If a loft is chosen as the main direction, then brick prevails in the decoration, and it is better to choose glazing with aluminum profiles. Similar designs are suitable for high-tech and modern style. Provence, modern, classic, chalet, and a number of ethnic styles are more impressed by wood. Plastic is universal and can be combined with any modern styles, but it is not suitable for luxury apartments, where every element of the interior should be associated with luxury.
Ladder
Once the floor is ready, it's time to tackle the stairs. The first step from above should be located at the level of the floor part. After this, the elements of the straight staircase must be attached to the bowstrings. There are two of them and they are located at a certain angle. The result should be the following: the level of the last step and the ground should coincide, the ends are tightly fitted to the bowstring and secured with nails.
Then inserts cut according to the template are installed. It follows the outline of the boards on the side. The inserts are attached to the same bowstring. Between the inserts there is a support board along with a riser.
Note!
Do-it-yourself garden path using a mold: a review of original and inexpensive ideas + step-by-step instructions with photos
Do-it-yourself gazebos for a summer residence - 300 photos of exclusive ideas. Instructions for building a beautiful gazebo (diagrams, drawings, foundation, roof)
How to insulate a veranda for winter living: floor, ceiling, walls. Examples of insulation from the inside and outside (instructions + photos)
The nuances of self-glazing terraces
You can glaze the veranda yourself only if you plan to use wood as frames. You must first carefully take measurements and create design drawings. The glass is inserted into special grooves in the timber, which are cut out in advance. No matter how good a craftsman the owner is, his work will still be much inferior to ready-made double-glazed windows, which are produced in factories and undergo strict quality control.
Walling
To assemble the frame, you need to take support pillars from timber, the cross-section of which is 120 * 80 millimeters. The pillars need to be placed at the corners of the veranda, and then between them in half a meter increments. On the lower trim, the supports are secured with steel angles. The supports near the wall of the house must be higher to create a difference in the height of the walls, which will result in a lean-to roof structure. You can increase the rigidity of the structure by connecting the pillars with horizontal beams, which will later serve as a support for the windows.
Installation of window frames
For the veranda, it is preferable to install low window sills, at a height of no more than 50 cm from the floor. The lower part of the wall is usually covered with clapboard or wooden panels. The wooden structure has excellent thermal insulation, so you can do without additional interior decoration. The external attractiveness of the building most often depends on the dimensions of the chosen window design. The veranda should be bright and well ventilated. To do this, it is necessary to install fixed windows and structures with sashes alternately. The window is inserted into a special opening and securely fixed with nails and wooden wedges. All cracks must be carefully filled with tow, covered with gypsum mortar and caulked with wooden trim.
Project
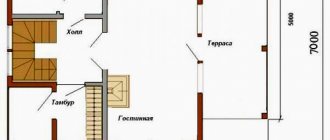
You can schematically designate the veranda at the design stage of the entire building. But the thought of adding to the main room usually comes later.
Creating a veranda project is necessary for accurate calculation of materials
Remember that any large-scale construction must be carried out according to a design that takes into account:
- functionality;
- design;
- architecture;
- organic combination of the structure and the house.
In addition, a building permit cannot be obtained without a project. The practical benefit of drawings is the ability to roughly calculate how much material will be needed. By doing the work step by step, the likelihood of errors is reduced.
To make a project, you need to know certain nuances. You can take on the drawing yourself, using the Internet and special programs as an assistant. Or turn to professionals, but it's not free.
The project indicates:
- location of the structure relative to the house;
- entry point;
- dimensions;
- other nuances.
Thanks to the drawings, you can schematically imagine what the building will look like.