Fans of countryside gatherings with barbecue and aromatic pilaf cannot do without a specially equipped place for preparing it.
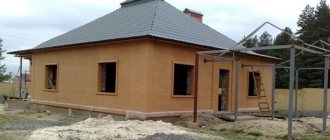
A good option for a brick grill with a cauldron
The owners of a country house, a dacha with a plot, are very lucky in that they can allocate part of the land near the house or in a picturesque place in the garden for a stationary gazebo or canopy, building a comfortable brick grill with a cauldron in it. In such a structure, spending time cooking will be a pleasure, even in rainy weather, even on a warm summer evening.
Features of a barbecue with a cauldron: appearance and location
The design comes in two categories:
- Single-zone . When the grill for frying meat and the place under the cauldron are combined. The principle of the Russian stove. This is a complex structure, the construction of which should be entrusted to a stove maker.
- Two-zone. It is more common because it is more convenient to use. All elements are located separately.
An outdoor oven with a barbecue and a cauldron is a stationary kitchen complex made of stone or brick that needs a foundation. To increase functionality, the following can be added:
- A tabletop for cutting meat and slicing vegetables.
- Sink.
- Smokehouse.
- Tandoor.
It is better to place a summer cottage with a barbecue within walking distance from the house. This will make it easier to connect to communications. Choose a place protected from the wind, level, without trees and bushes.
Requirements for the grill
But before you cut and cook, you need to decide.
First of all, take a critical look at your grill: is it strong?
A cauldron with a diameter of 300 - 350 mm can weigh 10 - 15 kg together with the dish. And this does not take into account the effort when mixing (and some do it so vigorously...).
Second: the width of the grill. The cauldron should fit the width of the grill.
Third: the depth of the grill. The cauldron is held securely if the ring fits almost under the handles. And in this position, there should be space under the cauldron for firewood or coals.
Some take a smaller ring and it turns out that the cauldron is wrapped in a ring in the lower half. But this is not reliable. Remember how well a wok collapses, the same will happen with a cauldron in such a stand.
Fourth: Grill legs. Considering the weight of the cauldron and the height of the center of gravity, it must be stable.
Advantages and disadvantages of the design
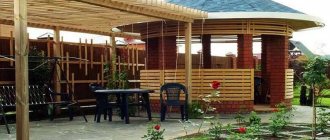
Having thought through the appearance of a gazebo with a barbecue once, tying it together with the design of the house and the site, you will get a harmonious design that will faithfully serve for many years and will be pleasing to the eye.
Pros:
- Long service life. Brick is a durable material that is resistant to deformation and destruction. He is not afraid of temperature changes, precipitation and wind. A properly built stove-barbecue can last more than 20 years.
- The presence of a chimney and an additional surface for culinary experiments.
- Possibility of supplying electricity and water.
- A variety of prepared dishes and improvement of their taste due to uniform heating in the cauldron.
- Capacity and seasonality. A brick barbecue with a cauldron, built under a roof, will make it possible to gather all your relatives and friends near the barbecue area, in any weather and season.
Minuses:
- Immobility of the structure. A cement base is laid under the barbecue, paired with a cauldron and other kitchen appliances, and a gazebo or canopy is built, so it will not be possible to remove or move it to another place.
- Weighty dimensions. Only the owner of a large plot can afford to place such a kitchen island with a barbecue oven and a cauldron on his property.
- Increased material and time costs.
- Difficulty in building a structure on your own.
Barbecue with a cauldron under a canopy
Sheet metal version
A strip of steel is used. Its width is equal to the height of the oven. Its length is calculated using the above method. The strip is bent by hand. Its two ends are welded.
The oven may move a lot when cooking in a cauldron. This disadvantage can be eliminated this way: in each corner between the formed petals on the top of the stove, an opening 2 cm long is made. All petals bend slightly outward. And their edges are up. The operation continues until the cauldron rests easily on the rim.
To create smoky dishes here, you need to place a large cauldron. It enters the oven to a maximum of 1/4 of its height. To create oriental dishes, use a smaller cauldron
How many materials will be needed: estimate
After you decide on the type and size of the building, draw a diagram with the order, it will become clear how much consumable material is needed.
Barbecue diagram
The quantity of bricks for construction and finishing can be calculated individually, summing up the quantity from each row. The estimate will consist of the costs of bricks, sand and cement, consumables, tools and craftsman services. Once you find out the prices for services and materials, you will receive an approximate cost.
Progress
A brick stove for a cauldron with your own hands should be designed so that the open fire is evenly distributed throughout the cauldron, along its outer surface
It is very important! The upper device, the stand for the cauldron, should be similar to a tabletop stand for boiled eggs, so that the cauldron itself fits at least two-thirds into the “mouth”
- Select and prepare the site, clear it and level the surface. Moisten thoroughly with water.
- Mix fireclay powder and fine sand on the base in a ratio of 1:3, making sure that the solution is plastic and not liquid. Break the lumps thoroughly, otherwise they will burn out immediately.
- Start laying the base by laying a 5-centimeter layer of the resulting solution. Level the resulting slab.
- Place the reinforcement on top with a grid. Maintain a distance of 10-12 cm between the rods, this way you will ensure the strength of the foundation slab even with strong temperature changes when the furnace is operating.
- If you do not wait until the base is completely dry, but immediately begin to create a fireplace, the bond will be much stronger. To make even seams, use slatted gaskets, and remove any mortar drips immediately.
- When laying out a stove for a cauldron with your own hands and using refractory bricks, follow the rules for bandaging seams. Start each even row with a half, odd row with a whole.
- After the solution has set, but not completely hardened, remove the spacers.
- Immediately after the first row of bricks, install the blower door, and also do not forget to leave a hole for the chimney. Continue laying in a circle.
- After laying out the third row, install a frame of metal corners, onto which the grille will then be welded. In fact, the blower compartment is already ready; the grate will ensure excellent penetration of fresh air containing oxygen into the firebox to ensure a high-quality combustion process.
Furnace order
- When laying out the stove under the cauldron with your own hands, do not forget about the space for the chimney, work according to a pre-drawn plan.
- After the first row, following the grate bars, install the firebox door and continue to cover it further - up to the full design height of the future stove.
- After the solution has dried, ensure that the joints are opened.
- Take a pre-prepared metal sheet at least 1 cm thick, corresponding to the dimensions of the oven. Draw a hole with a diameter smaller than the circumference of the cauldron by 1.5-2 cm. Using a grinder, cut a hole according to the mark. This is necessary so that the cauldron is lowered into the firebox by two-thirds, and not completely.
Factory sheet for the cauldron
Almost finished design
Building a brick grill with a cauldron: Do-it-yourself typical project
Drawing with dimensions
There is a ready-made procedure for a barbecue with a cauldron on the Internet. Explore several options and adapt the one you like to your size and wishes. All that remains is to carefully consider the height of the chimneys, the number of fireboxes and the width of the working surface. For additional convenience, include storage space for firewood and kitchen utensils into the project.
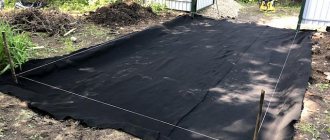
Making the foundation of the barbecue
After drawing up a plan, its approval and purchasing everything necessary, the construction of a brick barbecue begins from the foundation, or rather, from digging a pit for it. We fence off the area that is allocated for the dacha project with pegs and step back 50 cm to the sides. A depth of 25 cm will be enough. We compact the earth, pour a cushion of crushed stone, lay reinforcement for strength and fill it with concrete. We wait three days and remove the frame from the boards.
Foundation layers
Base waterproofing
Ground moisture penetrating into the brick walls of a barbecue oven can destroy it over time. To avoid this you need waterproofing. We make it from several layers of roofing material. We lay roofing felt on the first row and cover it with a second layer of brick, leveling the base.
Tripod
Making your own tripod is rational and easy. For the simplest option, you will need metal and a welding machine. More complex products have folding elements in their design. Of course, such tripods are the most convenient to use, but the manufacturing process is much more complicated than conventional ones. If you plan to install a cauldron in the country, you can choose a one-piece design. It is simple and has excellent stability.
Required materials and tools
What you will need to make a tripod:
- fittings;
- welding machine;
- electrodes;
- welding mask;
- welding mittens or gloves
When choosing the material for making a tripod, it is preferable to choose fittings. It is very stable and can withstand high temperatures well. The required amount of reinforcement is calculated only when the height of the finished structure is determined. You will need 3 identical cuts. The larger the cauldron, the higher the tripod should be. The most common tripod option has a height of 50 to 90 cm.
For example, for a cauldron with a diameter of 30 cm, the recommended height of the tripod is 120 cm from the ground (standing on three legs). It may be smaller, it all depends on your wishes, but it is the specified height of the tripod that will allow you to light a fire under the cauldron without any problems.
You will also need two sets of three jumpers of the same size. The first is necessary to connect the top of the tripod, which has a triangular shape. Despite the fact that the cauldron itself is round, if the dimensions of the pieces of reinforcement for a triangular structure are correctly calculated, its position will be stable. In this case, the cauldron is installed inside. The length of the reinforcement on one side of the stand (cauldron with a diameter of 30 cm) will be 21 cm. The jumpers are welded in the center of the tripod, for example, at a height of 60 cm. They provide it with stability.
Step-by-step manufacturing instructions
Making a tripod is very simple. If you wish, you can make your own drawings or use a ready-made one. Having made the necessary sections of reinforcement, they are welded. For convenience, it is recommended to carry out work with an assistant who will monitor the even arrangement of the parts and hold them.
After completing the welding work, it is necessary to clean the seams with a grinder. This is done for the beauty and finished look of the product. When cleaning seams, you can use the following tools:
- Bulgarian;
- cleaning circle.
Connecting rings and chain
Tripod Leg Connection
We clamp the stand so that the hooks do not fall out
Attach the hook
Adjusting the height
Ready
Advantages and disadvantages
A homemade tripod for a fire has the following advantages:
- Easy to make and use.
- Cheap manufacturing.
- The ability to make a product yourself, even a beginner can handle it.
In addition to the advantages, this design has the following disadvantages:
- Cheap look.
- Difficulty in transportation.
- Possibility of using a cauldron of a certain size.
Where to use
The tripod can be used wherever lighting a fire is permitted. However, it is not recommended to install it on a grill. This design is not reliable and may fall. People nearby may suffer burns and injuries. It is best used for cooking when installed in the country, on trips out of town, outdoors or in the forest. For safety, the tripod is placed on the ground and hammered with improvised means (hammer, axe, stone). It will be stable and allow leisure time to pass safely.
How to cook delicious food: basic rules
Food prepared and eaten in the fresh air always tastes better, and if you take into account some rules, it’s just a song.
In addition to pilaf, you can cook a lot of delicious things in a cauldron. Food does not burn in it, as it heats up evenly on all sides. The meat with vegetables turns out soft and juicy, and the pilaf is crumbly. The main rule of cooking is that during the stewing process do not open the lid and add spices before starting.
Meat (pork, beef, poultry) and fish are most often fried over an open fire. Dishes will acquire an unforgettable taste if:
- Take firewood from hardwood (apple, cherry). They give even heat. To save time, use ready-made barbecue coals.
- Keep the coals at an even temperature and rotate the skewers if they start to burn.
- Soak the kebab pieces in a marinade of spices and onions for a couple of hours.
- Eat the finished dish immediately, removing it from the heat. As it cools, it will lose some of its taste and aroma.
Conclusion
Having settled on the option of a brick cauldron grill, you will most likely need a specialist to bring it to life. When you take on the task yourself, do not overestimate your capabilities.
Without special knowledge in masonry, foundation, frame and chimney construction, there is a risk of getting a problematic and large object on the site that will not function properly. It will be difficult to use such a grill, and there will be little pleasure from cooking, with gatherings near the fire.
Which brick to choose?
Before starting construction, you need to know in advance which brick to choose for the barbecue oven. This is what we will do next.
| Facing brick. Mainly used for exterior decoration of barbecues. Use it for decoration only. | |
| Fireclay bricks are great for finishing a barbecue grill, the inside of a stove, and the lower tiers of a smoke box. This brick can withstand up to 1600 degrees. | |
| Vitebsk brick. Its use is typical for laying the outer verst of a barbecue, but not a firebox, because it does not have the same fire resistance as fireclay. |