Since their appearance on the market, relatively new plastic pipes have begun to squeeze out their main competitors - metal products. This “invasion” continues to this day, and quite successfully. The reasons are the low price of plastic, the absence of a threat of corrosion, durability and the possibility of self-installation. To connect sections of polypropylene pipes, special welding equipment is used, but the master does not always have it at hand, and the need for repairs or adding some kind of branch arises quite often. In this case, a completely reasonable question arises: how to cut into a polypropylene pipe without soldering. There are several answers to this, so you need to get acquainted with all the methods, and then choose the best option for a specific “work front”.
How to cut a PP tee into a PP pipe?
Good afternoon Please help me with advice. At home, all water supply and heating wiring is made of polypropylene. Heating and hot water are autonomous, from a wall-mounted boiler. I want to install a radiator in the bathroom myself and run PP pipes to it. The question is: is it possible to embed a tee from PP by cutting out a piece from a pipe running along the wall (smaller in length than the tee, naturally) and “weld” it, having previously bent the pieces of pipe? Or is it still more correct to insert an American one with adapters there? Sorry for the lame question, but I want to do it myself.
sandy wrote: and “weld” it, after bending the pieces of pipe?
IMHO, it depends on the length of the pieces that will have to be bent
BV wrote: IMHO, it depends on the length of the pieces that will have to be bent
on one side 20 cm, on the other 40 cm
sandy wrote: from a pipe running along the wall
what is the diameter of the pipe?
sandy wrote: and “weld” it, after bending the pieces of pipe?
You won't achieve anything by bending back.
Badger wrote: what is the diameter of the pipe?
Badger wrote: you won't achieve anything by bending back.
What do you recommend then? There is no possibility to change the nearest fittings (either they are bricked up, or a lot of elements will have to be re-welded from the boiler)
You can’t do without connectors, for example - in the gap in the main 2 there are these » > , and between the threaded tee » >
few . If it were larger, a welded seat could be used.
sandy wrote: What do you recommend then?
go to the thread and do it with an American or other detachable connection.
You can weld with two soldering irons if the pipe can be pressed to the welding depth.
sandy wrote: What do you recommend then?
If the ends are bricked up. The American one and the “sleeve nut” won’t work—it needs to be driven off. Coupling 20x1/2″ female, tee 1/2″x1/2″x1/2″, bend, coupling 20x1/2″ female. You just need to look for a tee. so that the long thread of the drive goes deep into the “main channel”
BOGA wrote: the American and the “cap nut” won’t work
while rolling - the nut moves back to its full thickness - no installation gap is needed
Thanks everyone! Well, now we need to figure out which option is more suitable: with a union nut or with a drive. It seems to me that with a union nut it will be more convenient, and it will be possible to tighten it without problems, because The PP bends a little, and it will probably be possible to stretch it out 5-10 mm in case of a shortage.
if your experience allows you to solder two couplings so accurately as to leave two precise gaps for the gaskets, then this is a +. which apparently the author of the topic does not have. And if he had such experience, he would weld a pp-tee and install just a detachable connection. something like" >
BOGA wrote: which apparently the author of the topic does not have.
Yes, unfortunately there is no such experience. I'll probably have to tinker with the cuts. Thanks everyone!
sandy wrote: which option is more suitable?
For even larger “dooms” - here’s an option without detachable connections at all (one PP): Completely cut out this piece of pipe (20+40), leaving 2 cm each, to which you weld the corners 45. Cut the removed pipe to the required size, weld the tee, weld the same 45-corners at the ends and small pieces of pipe in them (this, as you understand, is for connecting the corners to each other). Weld the section into place (it seems more convenient to weld it first at the top and then at the bottom). Simply welding the pipe into the coupling by bending the pipe is much more correct and convenient than “slipping the pipe”
Types of fitting connections
When inserting a tee fitting into a cut metal-plastic pipe, in most cases, such recognizable methods of making connections as crimping, crimping or thread fitting are used.
In accordance with the technique used, two types of fitting tees can be used, in particular:
- Compression.
- Crimping.
In addition to the indicated main modifications, combined tees can also be used for inserting into metal-plastic pipes, the working parts of which are designed for different types of connections.
Such a variety of connections used allows you to work with both detachable (crimp nut and thread),
and with one-piece (press sleeve) mounting diagrams, which increases the functionality of the equipped unit.
Thus, when using a tee with one internal thread and two crimp nuts, it will be possible to connect not only a washing machine or dishwasher to the system, but also any measuring device with a threaded fitting.
What are the features of connecting a pipe to a centralized system?
Work on inserting into a plastic water pipe, into a steel or cast iron pipeline is entrusted to water utility specialists or a qualified contractor (with the knowledge of the water supply organization).
Self-tapping, even into a public plastic water pipe, is prohibited by law. It is illegal to make an additional connection to the centralized water supply, bypassing the metering devices.
Note! Planning an individual connection to a centralized system should begin with obtaining official permission. Independent connection is punishable by material and administrative penalties.
You should apply for the appropriate permit from the department to which the required pipeline belongs. In the case of water supply, this is the city water utility or an organization that maintains water communications in a village or town. To obtain permission to tap into a pipe, you must have documents for the land plot and house with you.
The permit for tapping into a centralized pipe will contain:
- exact data on the insertion location;
- additional information depending on the purpose of the work.
indication of the diameter of the pipeline and outlet;
After receiving permission, you should contact the SES. After this, the insertion project is prepared and registered, and a work estimate is drawn up.
Scope of application of various tools
Polypropylene pipe products are widely used in many areas, but they are most in demand and important when installing water supply lines. The popularity of polypropylene pipes is primarily due to the fact that they are lightweight and easy to use, have excellent technological characteristics, durability and low cost. At the same time, professional installation of water pipes often costs much more than the cost of materials.
You can avoid such costs if you take on this work yourself. This is not a difficult task: with minimal skills and having read the assembly instructions, almost anyone can do it. All you need for this: a little desire and effort, the availability of the necessary materials and, of course, tools for installing polypropylene pipes.
When working with polypropylene pipes, you need to perform different actions, so the tools you have to work with are also different.
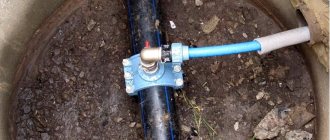
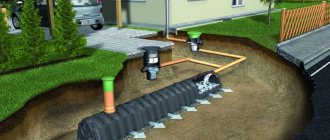
Scheme of connection to a centralized water supply system
If there is a collector well in the area where your house or plot is located, then tapping is carried out (if permitted) in this well. If it is located far away, then access to the pipe is carried out through an additional well.
- in the place indicated by the project, they dig a square hole measuring 1.51.5 meters;
- from the pit, towards the house, they dig a trench for future drainage;
- Upon completion of all work, an additional well with a lid is built above the insertion point for access to the connection point.
Connection to a centralized pipe, which is under pressure, is carried out in two stages:
- Installation of an outlet flange with a shut-off valve.
- Reaming the pipe body.
You can cut into a plastic water pipe either with or without welding. Connection to steel communications is usually made using a welded flange.
Note! The general rule for tapping a branch pipe is that the diameter of the pipe tapping is always smaller than the diameter of the central pipe.
Which solution is better?
If possible, welding is better. Does it make sense to use a solderless alternative? Yes, it is possible that such a connection will not cause problems for several years, especially in systems without pressure or in cold water pipelines. Many people consider the best way to use clamps. But for apartments, even this option is still advised not to be considered.
Replacing saddles (with the traditional welding of a normal tee) is recommended by the vast majority of craftsmen who come on call. Even if the owners discovered the problem in a completely different place.
How to cut into a polypropylene pipe without soldering? The following video explains one potential method:
Was this article helpful? We want to improve. Thanks for your opinion!
Methods for inserting into a plastic water supply system inside an apartment
Additional drainage from the central water supply inside the apartment is easier to implement than tapping into a common pipeline.
No permit is required for wiring inside the apartment. The only condition for independent intra-apartment connection is that all wiring throughout the house must be carried out after the water meter. The limitation may be considerations of expediency.
Note! Too many series connections to the water pipe will reduce the operating pressure. This leads to malfunctions of household appliances and uneven supply of hot and cold water to faucets.
There are the following methods of inserting into a plastic pipe:
- insertion of a special flange with a branch - tee;
- installation of a special saddle with a branch.
To install the tee, the water supply must be shut off. The saddle clamp can be installed on a pipe that is under pressure. For this purpose, special plastic electric-welded flanges are used.
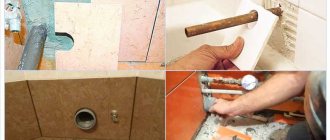
Tee insertion technology
Installing a tee on a water pipe is a classic way of inserting an additional outlet. Work is carried out with the water supply turned off.
The technology for inserting a plastic tee is as follows:
- Close the central shut-off valve at the service entrance to the housing and drain the water.
- In the intended area, a part corresponding in length to the tee being installed is cut out of the water pipe. This can be done using a grinder or a regular hacksaw.
- An electrofitting tee is inserted into place of the cut piece and welded to it using a special welding machine. You can rent such a device for one-time work.
- A locking device is welded to the outlet of the tee. If a dismountable connection is required, then the tee should be purchased with a thread. A metal valve is screwed to the thread. The issue of the presence and type of thread on the tee (internal, external) is decided at the planning stage.
- Further installation of the outlet can be carried out with the water supply turned on, turning it off with the installed tap.
Using a simple plastic tee and welding it with a classic plastic soldering iron (iron) can be problematic. The fixed position of the communication on both sides will not allow the pipe and fitting to be connected freely when welding the final connection. In addition, it can be difficult to insert a large soldering iron into the insertion point due to lack of space.
Note! A tee can be installed on a cold water pipe using cold welding.
To do this, the contact area between the fitting and the pipes is cleaned, thoroughly degreased, and coated with a special glue for plastic. This method of inserting low-pressure plastic communications is the simplest and most accessible for the amateur.
Electric welded saddle
The method of inserting into a plastic pipe using an electric welded saddle is the most convenient, practical and reliable. Such a connection can be made without turning off the water supply, to a pipe that is under operating pressure.
An electric welded saddle is a special plastic fitting consisting of:
- detachable part, which is installed directly on the pipe;
- built-in drill for plastic;
- side outlet for the locking device.
The detachable part of the saddle coupling is tightened with special bolts. To screw in the drill, use either a hex wrench of the appropriate size, or a drill (screwdriver), if you purchased the appropriate fitting.
Insertion method using an electric welded saddle:
- The insertion site is cleaned with a scraper and degreased.
- A saddle is placed on the central pipe so that the location of the outlet pipe is in the desired direction.
- Tighten the fastening bolts so that the part does not move.
- Using a device for welding work on electrical fittings, the saddle label is scanned. In this case, the device automatically sets the required heating time and temperature.
- After completing the electrodiffusion welding process, it is necessary to allow the joint to cool. Recommended time is at least half an hour. The result is an unbreakable connection of high strength, since the plastic is joined at the molecular level during the welding process.
- After the coupling has cooled, begin installing the shut-off valve.
- Drilling the central pipe is the final stage of tapping. It is carried out with the valve closed.
- There is no need to remove the drill after completing the work. A securely closed hole is maintained in this part of the outlet. The outlet itself is located below. Sometimes the pipe with the drill is provided with a cover, which is decorative and has no practical significance.
The cost of an electric welded saddle starts from 1000 rubles. A machine for welding plastic electrical fittings costs from 70 thousand rubles (it can be rented). However, the quality of the connection with this method of tapping into the water supply will ensure uninterrupted operation for half a century.
Crimp clamp
The method of inserting into a plastic pipe using a crimp clamp with a pipe is as follows:
- The crimp clamp is attached to the location of the future outlet, aligning the clamp pipe with the planned hole.
- Gaskets are coated with sealant for additional sealing. Often such protection is required when installing Turkish clamps.
- A ball shut-off valve is connected to the pipe.
- The central pipe is drilled through the open valve.
Note! When carrying out work, you should be careful about insulating electrical appliances from possible ingress of water.
Insertion using a crimp clamp can be made not only on plastic communications, but also on steel and cast iron. When working with cast iron, you should take into account its fragility and drill without pressure.
Insertion into pressure systems under pressure is carried out using only electrical fittings with built-in drills - electric welded saddles. Such parts are available in different diameters.
Installation of water pipes: techniques and nuances
Let's try to summarize all the main ways in which installation of water pipes, changing the configuration of the water supply system and its repair can be carried out.
Dismantling the old water supply
Installation of water pipes begins with dismantling the old pipeline. Traditionally, steel pipes go under the knife. The easiest and most convenient way to get rid of them is to cut them with a turbine.
Very neatly installed polypropylene water supply
This is much faster than disassembling all the threaded connections and then taking a long time to tear out a bulky structure from the wall, held together by a bracket welded to both pipes.
Under the root
Preparation of the work front
If you plan to replace valves, this should be the first step.
- We turn off and reset the water supply risers.
- Unscrew the old valves.
- We clean the line in the direction of the riser with a cable to ensure normal flow of the water supply in all areas.
It is clearly visible here that the cold water pipe located below needs cleaning
- Clean the threads with a wire brush.
- We wrap the thread with flax using paint or drying oil.
Tip: FUM tape and various synthetic threads are more convenient to use; however, it is enough to give the thread a slight reverse motion and it will begin to flow. The old method does not have this problem.
- We screw on the valve and carefully tighten it with an adjustable, open-end or gas wrench. Tighten CAREFULLY! Brass is a fragile metal, and it’s quite possible to tear off the threads on the eyeliner with great force.
- If wiring is done to several rooms, make sure that the holes in the walls are of sufficient diameter. Expand them if necessary.
- If you plan to completely or partially lay water pipes under the tiles (which is undesirable), make grooves.
Installing filters
This step is required. Ceramic faucets, automatic washing machines, and toilet tank fittings last much longer if the water is free of sand and scale. Choose the simplest coarse filters.
Do not try to disassemble the filters manually - such designs use short-lived rubber seals, and after several disassemblies you will still have to wrap them with flax or other material.
Advice: install filters with barrels - slag settling tanks - facing down. In this case, all the slag will accumulate in them, and not somewhere in an unspecified place in the water supply.
Two in one: valve with filter in one housing
Pipe preparation
It all depends on the type of pipes you choose. It is better to cut galvanized steel in advance with a turbine or hacksaw and cut (or weld) pipe threads. It is much more convenient to simply cut metal-plastic or polypropylene in place: here, mistakes with dimensions are not so terrible due to the flexibility of the pipes.
Assembly
The connection of water pipes can be carried out in two ways: through a manifold, which is a distribution to separate devices using its own shut-off valves for each, or a simple tee.
This is what a collector might look like
The methods of connecting pipes to each other and to fittings are different for each material.
Steel pipes
If you have welding at your disposal, it can be used for connections between steel water pipes. It can also weld threads and bends curved on a pipe bending machine.
In other cases, threads are cut on previously prepared bends and pipes on a lathe or, in its absence, manually - with a die and a special holder. The assembly of threaded connections is the same as with valves, using sealing with flax and paint.
Metal-plastic pipes
Here the connection method is fittings for metal-plastic pipes with union nuts. Having cut off the pipe, remove the chamfer from its inner side with a knife. We put a union nut and a split ring on the pipe.
We insert the fitting into the pipe (be careful not to displace the rubber sealing rings). Now carefully, without jerking, tighten the nut. In this case, the split ring compresses the pipe onto the fitting.
No more complicated than a children's construction set
Polypropylene pipes
In this case, for all work we will need an inexpensive soldering iron. Having chosen a suitable nozzle, we heat the inner surface of the fitting and the outer surface of the end of the pipe. And then we just insert one into the other and let it cool.
How to connect polypropylene water pipes to each other? Simply take the coupling and make two welded joints on both sides.
Pad
In the case of a steel pipe, it is willy-nilly combined with installation: the water supply system is a rigid structure. Often, steel pipes do not need to be secured additionally.
For long lengths, when fasteners are still needed, the easiest method of fastening is several steel rods driven into drilled holes of slightly smaller diameter. The pipes are simply laid on them, after which the ends of the rods are bent upward.
Laying water pipes made of flexible materials requires mandatory fixation along the entire length. For this purpose, plumbing stores sell special plastic fasteners. You just need to select fasteners for the pipe diameter you need. After proper installation, the pipe should not dangle or sag.
For any diameter
Laying water pipes along the ceiling requires more frequent fastenings: gravity pulls the pipe full of water down, trying to tear it out of the fastenings.
Insertion into a finished water supply
The choice of tapping method depends entirely on the material of the main pipeline. Most often it is, of course, steel. Moreover, it has a large diameter.
In this case, insertion into a water pipe is only possible using welding. After draining the pipe, a hole is cut in it and an outlet with a thread or flange is welded onto which the shut-off valves are mounted.
For tapping into thin steel pipes, special clamps with an outlet and a rubber seal are sold. A hole is drilled in the pipe, after which the device is attached to it with several screws, compressing the gasket.
Also an option... Just don’t forget to thoroughly clean the area to which the outlet will be pressed. It should be perfectly smooth.
Sometimes it is possible without welding
How to cut into a metal-plastic water pipe? There is only one way. We cut the pipe (with a turbine or even just a hacksaw) and place a tee fitting in the cut. In principle, the process of inserting a polypropylene water supply looks the same. The only difference is in the way the pipe is connected to the fitting.
Metal-plastic and polypropylene
Here, repair of a toatm water pipe may be required only after defrosting the water supply system or supplying undesigned pressure to it: these pipes are not exposed to dampness or aggressive environments. The repair method is no fundamentally different from the tapping method: the defective section is cut out, and a new section is mounted to the edges of entire pipes on fittings.
A couple of extra fittings will not spoil the aesthetics of the bathroom
Tip: When replacing a section of plumbing, use pipes that are the same diameter as the entire pipe. Any transition in diameter is a place where fine sand, scale and slag will accumulate.
Options for inserting into a plastic pipe
Let's look at how to cut into a plastic water pipe in different ways: by crimping a clamp with an overlay, connecting a manifold or tee, installing an electric welding saddle, and ensuring the cut through a pipe.
Installation of the trim clamp
This unit consists of two parts secured with clamps and bolts. The upper part is attached to the pipe through a sealing gasket that prevents water leaks. For good clamping, both parts of the pad must be selected to the appropriate size according to the markings.
In the first upper part there is a technological hole for connecting a new water supply line.
Possible connection via:
- Stopcock element,
- presence of a built-in cutter and safety valve,
- metal end in the form of a flange,
- Possibility of plastic end for gluing.
After placing the clamp with pads, I direct the upper part towards the planned branch of the new line. The assembly is fixed with bolts, which are pre-selected in size taking into account the diameter of the assembly. A special device is used to drill a hole in the line through the pipe of the mounted fitting.
This method also allows you to connect pressurized water to a plastic pipe. To do this, a built-in valve is installed in the unit, turning which drills a hole. After obtaining the desired result, the valve closes and the cutter rises.
This is a very beneficial way to solve water connection problems in cases where it is not possible to stop the water supply or it is extremely inconvenient. This solution simplifies the procedure and makes it possible to carry it out online.
Clamp or collector device
Installing a tee can be called a classic solution to the problem. Together with the installation, prepared by removing part of the pipe from both sides, a separate part is mounted in the form of a tee or manifold. Next is soldering.
Electric welding saddle attachment
This mechanism resembles the method of attaching the lining described above, but with differences. It, just like a tee, provides a tight and reliable fastening through soldering at the molecular level of the material.
This is achieved by installing electric heating coils in plastic, which are welded with a special welding device that has a program configured for each unit to prevent overheating. After which the plastic, heated to a certain temperature not exceeding the critical temperature, sticks to the plastic and ensures tight and strong contact.
Insertion through a pipe
A good method for low pressure pipes. The principle of fastening is that it is installed on pipes using a pipe and a clamp, without welding. The elements of the device of the required diameter are selected, otherwise the unit may leak water. The fastening will allow you to quickly and easily install the outlet.
Choosing the best solution
Without a doubt, the most versatile and effective method, given the complexity of installing the unit, is overlays. Compared to other methods, it provides reliability and flexibility in installation.
How to make a tap into a main water supply
Before starting the main water supply, you must go through all the permitting approvals necessary to obtain permission from the responsible institution (Vodokanal). Undoubtedly, it is better to go through this process legally than to receive a fine for an illegal connection, since sooner or later it will still be revealed during a routine inspection by the volume of water consumption
Before submitting documents, it is necessary to calculate the volume of water required in a house or apartment and, as a result, the size of the diameter of the supply line. Once all approvals have been received and permits are available, work can begin. Mostly, if possible, it is planned to tap into an existing well, but if this is not possible, then it is possible to install a new one, opposite the place of water supply.
The well is planned to be built to the depth of the main pipe route. The outlet should face towards the house. Next, after completing all the work, it is necessary to hand it over to the employees of the controlled organization in a certain way, with the sealing of the metering point and the tap that shuts off the incoming water.
What documents are required for tapping into the main water supply?
To obtain permission from regulatory authorities to perform the process, you need to prepare a package of documents:
- water supply connection project for the facility;
- diagram of the territory with all communications, fresh, on a scale of 1:500;
- documents confirming ownership of the plot or real estate;
- a letter to the responsible organization;
- technological connection conditions received from the operational owner of the networks.
In addition, it is necessary to send an application, along with the project, to the SES to receive confirmation of connection to the backbone network. The easiest way is to order a project from a specialized organization for correct and error-free calculation and execution. After receiving the documents from the SES, the package is ready for full approval by Vodokanal.
Do-it-yourself insertion
Necessary tools and materials.
The main tools required to perform work on inserting a bend from a plastic pipe:
- soldering iron;
- pipe cutter;
- construction pencil;
- welding machine (in the case of welding an electric welding saddle).
Materials used in the work process:
- plastic pipe;
- a tee of the appropriate diameter and another assembly.
Work progress
First of all, before starting work, it is necessary to prepare all the tools and material necessary for this. Having made sure that everything is fully equipped and, if necessary, the necessary permits from regulatory authorities are available, we begin to carry out the work.
Preparation and installation of a well for insertion into the main water supply network. The work is carried out with the involvement of special equipment and employees of regulatory authorities, since the work is carried out on a network under their jurisdiction.
At the same time, work is underway to prepare a trench for laying a new water supply and drainage line. If these lines also cross other people’s backbone networks and the project specifies to invite a representative during the work, then this will have to be done.
Next, work is carried out to insert into the main water supply network, using methods depending on the chosen option and device.
Connection to the mounted tap-in unit of the entire new water supply system line to the metering unit and the outlet tap, where representatives will put a seal.
Fixing pipes
When installing home plumbing, pipes are most often secured to the wall with special plastic clamps. They are simple latches that are attached to the wall with a regular screw.
It's easy to mount them on the wall
Obviously, in the case of wooden walls, installation on a frame made of galvanized profile or a block of tools, you only need a screwdriver and a screwdriver.
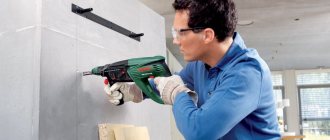
In the case of concrete or brick walls, the set of tools for fixing the water supply will be larger:
- A hammer drill with a drill or an impact drill with a Pobedit drill of the appropriate diameter;
- Hammer (plastic or wooden dowels need to be driven into the wall, right?);
- A sharp knife (the remaining dowel on the outside of the wall must be carefully cut);
- Again, a screwdriver or screwdriver.
Common Possible Errors
Often, when preparing for work, specialists or site owners inattentively prepare materials and components of components according to diameters and characteristics. It is important to consider the intended use both in terms of size and temperature characteristics.
The work must be planned, also depending on the weather conditions, taking into account the temperature regime of the surrounding air.
When soldering the material, carefully ensure that the existing pipe does not burn through, in order to avoid applying additional patches and unnecessary elements, as this will weaken the insertion site.
How to make the transition from a metal pipe to a polypropylene pipe
When installing and replacing utility networks, connecting or replacing equipment in a private house or city apartment, problems arise with joining pipes made of dissimilar materials. The transition will be as reliable as connecting identical pipes if the work is carried out correctly using one of the methods recommended by experts. The most common transition option is the transition of a steel pipe and a polypropylene pipe. Let's talk about how to implement it.
Connecting pipes using the crimp method
Often, repairs will require disassembling the pipeline. If the connection of the main components is made by soldering, which is reliable and durable, then disassembling it is almost impossible. Let's look at how to connect polypropylene pipes without a soldering iron, which cannot always be bought or rented from friends. In this case, you will need threaded fittings with a pressure ring, which are called collet fittings (crimp). And for good reason, because this kind of connection can withstand loads of up to 16 atmospheres.
When is it needed?
Here are the most common cases of connecting operations.
Replacement of water supply
Major renovation of housing in an apartment building involves the replacement and repair of sections of the water supply system, limited to the territory of the owner. Polypropylene looks more aesthetically pleasing and modern, and in old houses, where iron in plumbing networks “the old fashioned way” pleases the eye, apartment owners everywhere decide to replace pipes. Even if it is expensive to completely replace the metal part of the riser belonging to the apartment, the outlets to the consumer devices are in any case made using polypropylene.
Emergency repairs
If an emergency situation arises when repairing a burst pipe in the basement, the damaged area is replaced in most cases with plastic, since steel pipes are more expensive and heavier, and the procedures for eliminating the accident are more labor-intensive.
Radiator replacement
When replacing an old cast-iron battery with a modern steel or bimetallic radiator, you will have to switch from metal to polypropylene if plastic pipes are used in the heating system.
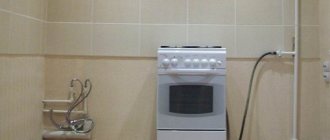
Replacing a heated towel rail
Installing a heated towel rail in the bathroom also involves connecting an iron pipe to a polypropylene pipe if the hot water supply is made of plastic.
Chamfering
Often, before connecting pipes with fittings, it is necessary to chamfer them at the ends from the outside. This is done so that the pipes, after melting at the ends, are inserted into the fitting easily, without clinging to the edges. Otherwise, the material of the heated pipe can become deformed very easily.
A regular steel knife can be used as a tool for chamfering polypropylene pipes. All that is required in this case is to properly sharpen the pipe bevel cutter before work. Another option is to use an emery disc or turbine disc to remove chamfers from polypropylene pipes by grinding their edges.
Methodology for performing the transition
In any engineering systems, both domestic and industrial, sooner or later the use of technologies for joining different types of pipes is required. They differ in the labor intensity of the process, the availability of professional skills, and the availability of special tools. Despite the significant differences in the physical and chemical properties of steel and polypropylene, there are several options for connecting pipes made of iron and plastic materials.
Threaded transition from iron to polypropylene
The method is used when it comes to manipulating pipes with a diameter of no more than 40 mm. The key element when making a connection are fittings. On one side, the pipe adapter has a thread for a metal end, on the other, a regular hollow hole for soldering with polypropylene. Naturally, the fittings differ:
- by diameter (15, 20, 25 mm, etc.);
- by thread position (internal or external);
- by the number of bends (tee, cross);
- according to the angle of withdrawal (45 0,90 0).
The variety of fittings for threaded connection of a metal pipe with a polypropylene pipe is so great that it can be used in pipeline diagrams of any complexity with any number of turns, branches, etc.
To carry out docking, in addition to adapters, the following are used:
- tools: pipe cutter, polypropylene scissors, plumbing soldering iron, die or tap;
- lubricant for pipe aphids, sealing materials: sealant paste, fum tape, tow.
Scheme of work:
- The end of the steel pipe is lubricated and the thread is made: external with a die, internal with a tap.
- The adapter is screwed onto the thread, which is pre-lubricated with a sealing compound. For tightness, fum tape and sanitary linen are also used.
- Using a plumber's curling iron, the polypropylene pipe is soldered to the fitting.
- At the end of the section, operations similar to the first three are carried out.
- The strength of the joints is checked empirically. If, when opening the tap, there are leaks at the connections, the work will need to be redone.
Flange connection of dissimilar pipes
The advantages of this technology are strength, reliability, the ability to re-install and dismantle as many times as desired, as well as application in a different temperature range.
Polypropylene and steel pipes have differences in determining diameters. The flange connector allows the connection to compensate for the difference in size as much as possible.
- The iron pipe is cut in the right place. The docking line should be drawn delicately;
- A flange is installed on the pipe.
- A coupling with a flange is also put on the polypropylene pipe.
- The flanges are secured to each other using bolts. The joint is sealed using a silicone or rubber gasket. The bolts must be tightened gradually and evenly. The operation involves a torque wrench.
- To make the structure more tight, you can repeat tightening the bolts after an hour or two.
- Finally, consolidation reliability tests are carried out.
A flange transition from metal to polypropylene is sometimes the only possible technological option when joining pipes with a large cross-section.
Transition without threads and welding
Work on joining dissimilar pipes can be performed without soldering and cutting operations. The functional element in this version will be a special coupling. The structure of such a connector contains:
- body (ideally made of cast iron or steel);
- nuts securing the body on both sides;
- washers located inside the coupling;
- gaskets in the housing to seal the connection.
- Insert the metal pipe through the nut into the coupling until it reaches the middle. The pipe must pass through washers and gaskets
- From the reverse side, insert the polypropylene pipe into the adapter in the same way
- Tighten the nuts tightly.
- Sealing occurs by squeezing the gaskets on both sides. The test is carried out in a simple way - by starting a stream of water.
This type of connection between steel and polypropylene is classified as compression. Its advantages:
- reliability and strength of the joint;
- independence from special equipment;
- speed and ease of installation;
- long service life.
Using the Hebo coupling
The compression fitting methodology is quite new. It ensures the reliability of the transition from a metal pipe to a polypropylene pipe with the possibility of implementing various branches and turns in the pipeline diagram. In the short time the method has spread, it has gained a lot of adherents, who note the following functional advantages of the method:
- The tightness and strength of the technology is given by the teeth, with the help of which the fitting cuts into the pipes of the system. The result is a rigid, impenetrable joint.
- Connection procedures using the Gebo coupling are fast and simple. Even an inexperienced amateur in such matters can carry out installation in practice: it does not require deep industry knowledge and skills.
- The unique design makes it possible to neutralize the processes of gradual accumulation of damage under the influence of stress in the system, and prevents the formation of cracks and deformations.
- The connection has a long service life, exceeding 10 years.
The Gebo coupling is a metal frame, inside of which the following are located:
- clamping nut;
- pressure and clamping rings;
- sealing ring.
Sequence of installation actions:
- The metal pipe is cut as straight as possible.
- It is imperative that the edge of the cut pipe be carefully processed. It must be cleaned of paint, dirt, growths, and rust.
- A clamp nut is attached to the end.
- The coupling is assembled: the above elements are placed in its body.
- The nut on the connector is tightened without excessive force. During tightening, the rings inside are clamped.
- The tightness of the joint is checked.
The Gebo coupling has found its application in industrial facilities; it is actively used in joining pipes of heating risers, water supply, and gas pipelines, where a working diameter of 15 to 50 mm is used. Digressing from the topic, it should be noted that Gebo’s functionality extends not only to connecting operations. With their help, pipeline leaks resulting from media freezing, corrosive damage, and mechanical deformation are eliminated.
Features of the technology
The mechanism of the process is quite simple. To cut into the pipeline, you need to drill a hole in the required area. If we are talking about any main option - a water supply or sewerage system, where there is no way to turn off the water, it is necessary to immediately solve the problem of shutting off the water at the work site.
That is, you need to achieve 2 goals at once: make a hole and shut off the water under pressure using some kind of shut-off mechanism. Moreover, the fittings must also provide for the possibility of installing the next branch.
Tapping into a plastic sewer pipe or, conversely, attaching a branch to a cast-iron main requires compliance with 2 main rules:
- the diameter of the pipe into which they are cutting is larger than the pipe being mounted;
- The diameter of the drill must exactly match the diameter of the piece being cut.
The design of such a device depends on the type of pipeline. In addition, it is necessary to take into account the scale of the work itself.
The main pipeline involves supplying liquid under pressure, which is quite noticeable, and this means the use of special equipment and special locking mechanisms. To get to the highway, you need to dig a trench, for which, as a rule, shovels are not enough, and you will need the services of an excavator. Any work on connecting to the main systems can be carried out only after obtaining a special permit confirming the qualifications of the master. All this makes the possibility of independently inserting into the highway an extremely costly and unprofitable activity.
You can actually insert a plastic pipe into household sewer and water supply systems yourself, both into plastic and steel pipelines.
Technology of installation in a metal pipeline
Today, private houses and apartments are served by cast iron and steel pipes. To install a new section in them, special devices are used - clamps. The design of the latter can be different, and the rules for working with metal alloys are different.
Tapping into a steel pipeline with your own hands requires the following recommendations:
- For work it is best to use a saddle clamp. They use different types depending on the system - sewer, water supply, heating. In addition to the seat itself - the part adjacent to the pipe, the device includes a drill and a shut-off valve;
- before installation, the surface of the pipeline is cleaned of rust and dirt;
- the device is secured with bolts and sealing gaskets are used;
- drill a hole and immediately install a shut-off valve;
- tighten the valve, shutting off the water supply. Install special equipment for drilling a hole for the pipe. The guide sleeve allows you to drill in the required direction;
- after this, secure the fitting or adapter and connect the new branch. The photo shows the moment of installation.
Cast iron is a more brittle material compared to steel. The insertion of a plastic pipe into a cast iron pipe is carried out according to the same scheme, but with additional requirements: bimetallic crowns and special types of devices are used for drilling. It is important not to allow the bit to overheat and only operate at low speeds. It is practically impossible to install a cast iron pipeline on your own.
Threaded
This type of plumbing connection is called “American”. Plastic is soldered on the coupling side. By the way, polypropylene, metal-plastic, polyethylene and polyvinyl chloride pipelines are considered plastic. The metal part is attached with a thread accordingly. Here's what it looks like in practice:
- Installation begins with unscrewing the coupling at the intended joint. If there is no coupling, then the pipe is simply cut off. After which it is necessary to cut a thread at the joint. To do this, it is recommended to lubricate the entry point of the thread cutter with oil or grease.
- The threaded connection must be made airtight to prevent possible leaks. This is done using fum tape or flax, which is wound between the threads. For greater reliability, silicone is applied on top. The amount of wound material should not exceed 1-2 turns. Otherwise, it will be difficult to screw on the fitting. It is necessary to wind flax or fum tape in a clockwise direction.
- Then screw on the fitting. This is best done by hand, without using a gas wrench. The fittings are made of a fairly fragile material, and excessive compression can damage the adapter. The best solution would be to slightly tighten the fitting if a leak is detected after water is supplied. But remember that you need to use the tool extremely carefully.
- The polypropylene pipe is welded on the smooth coupling side.
- Water is supplied to the pipes.
Advice. If the threaded connection is used for a heating system, it is recommended to replace the rubber gasket on the coupling side with a silicone one. Temperature changes will quickly destroy the rubber, and water will leak at the junction of the pipes. Silicone seems more reliable in this regard.
Insertion into a plastic pipe under pressure
This operation at the household level is quite easy to do with your own hands. The main advantage of installation in the house is the ability to shut off the water supply. However, even in cases where this is not possible, the problem is easily solved using an electric-welded saddle clamp.
The saddles are equipped with a drilling mechanism, a heating coil and are made of special, more durable plastic.
- The saddles have a barcode, the decoding of which provides complete information about the entered parameters: welding time, cooling duration, and so on.
- The device is secured with bolts.
- Connect the welding machine and weld the bends.
- After an hour, the plastic has cooled down during this time, holes are drilled with a special cutter and shut-off valves are installed. Then they begin to install the plastic pipe.
The video demonstrates how to use saddles for cutting into plastic pipes.
Summarizing
Installation of heating and plumbing systems using modern polypropylene pipelines is impossible without the welding (soldering) process. This process has nothing in common with welding metals; soldering polypropylene is much simpler. Thanks to this, even a novice plumber can cope with the task of joining a polypropylene pipeline.
The video in this article shows an example of proper soldering of polypropylene pipes.
Did you like the article? Subscribe to our Yandex.Zen channel