Most country cottages, not to mention houses in remote rural areas or on summer cottages, are deprived of the ability to connect to a centralized heating main and the owners have to independently solve the problem of heating their homes. If you have limited financial resources, one option is to organize heating in a private house using polypropylene pipes yourself.
Before installing the system, the owner will have to solve the problems of choosing a heating method, piping diagrams and connections to radiator heat exchangers, and purchasing the necessary soldering tools. To lay a pipeline of dimensions optimally suited to the operational characteristics of the system, it does not hurt to first find the required pipe size.
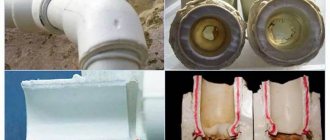
Rice. 1 sectional view of PP pipes
Features of heating from polypropylene pipes, pros and cons
The decision to equip the heating of a private house with your own hands from polypropylene has its own characteristics that must be taken into account before starting direct installation work:
- plan the entire heating system from start to finish (especially if the heating is in an apartment);
- select a boiler, radiator and expansion tanks;
- indicate their locations;
- plan the location of the pipes;
- calculate the required number of pipes (based on the number of rooms, connections, corners, walls).
Pipes for installation.
Reinforced polypropylene pipes.
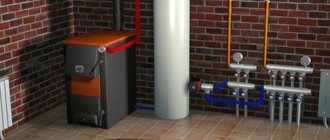
In private houses, it is convenient to use a separate room for the boiler if you plan to exhaust air through the chimney, that is, naturally, but only if the boiler design allows for such a solution. For houses and apartments, you need to choose reinforced polypropylene pipes that are made by reliable manufacturers.
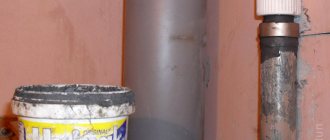
Separate room for the boiler.
Do-it-yourself heating in an apartment made of polypropylene is just as practical as in a private house. When choosing this type of heating, the owner of a house or apartment receives a lot of priorities:
- You can trust a self-equipped heating structure. It is reliable, since the owner independently selected the primary and related parts for the network.
- It is easy to install. The arrangement of this structure can be completed by a person who has never dealt with this kind of work before.
- The durability of the structure is confirmed by its materials and their quality characteristics.
- No risk of leakage. There is an opportunity not to worry about damaged repairs or complaints from neighbors.
- The cost-effectiveness of the installation is confirmed already in the first year of use.
- No extraneous noise will disturb household members while the system is operating.
- Heating made of polypropylene is relatively inexpensive.
The throughput of the pipes allows them to be used for their intended purpose for many years. The deposit of salts and heavy metals does not linger on polypropylene at all, and it is also not subject to corrosive processes. Such pipes are quite durable, but also lightweight. Arranging a private home with your own hands using such an installation will eliminate problems during the winter season for many decades.
Choosing a heating source
Before you begin installing a polypropylene pipeline, you should decide on the heating source. This will affect the overall design of the heating system and the selection of additional elements.
Gas
It is considered a very economical and environmentally friendly type of fuel. However, it is appropriate to talk about efficiency only if the house is already gasified or is at least located near the main gas pipeline. Otherwise, connecting to a remote network will cost the owner a tidy sum.
The best option for installing a heating system using gas fuel is a modern wall-mounted gas boiler, equipped with a set of necessary devices and protective mechanisms that ensure maximum automation of system control processes.
Another advantage of this solution is the ability to abandon the chimney that is so common in private households. Modern gas boilers are equipped with a closed combustion chamber, the supply of oxygen and the removal of exhaust air from which is carried out through a thin tube.
Electricity
Another environmentally friendly way to heat a room, although more expensive than gas. To ensure the operation of the heating system, you will need a special boiler equipped with safety equipment, a pump for circulating coolant (depending on the chosen scheme) and an expansion tank.
Solid fuel systems
They are characterized by a higher coolant temperature at the boiler outlet, which imposes increased requirements on the organization of the safety system.
The best schemes
The scheme by which circulation will be carried out must be chosen from two possible options:
| Schema type name | Characteristics of work |
| Top coolant supply | Suitable if there is a risk of power failures. The coolant circulates independently in the pipeline network. |
| Bottom coolant supply | Do-it-yourself heating in a house made of polypropylene according to this scheme is suitable for a multi-storey country house. The coolant is distributed throughout the pipeline network using a pressure pump. |
Experts suggest considering the option of a two-pipe system. With this scheme, pipes are laid around the perimeter in the walls of the house or in the floor. You can plan and make this option both in a private house and in an apartment.
If the boiler will be installed in a separate room, then it is advisable to cover it from the inside with a fire-resistant material. This will protect against the spread of fire in an emergency. Also, all fire safety requirements must be met in this room.
Varieties of radiator connection diagrams
It is typical that for good heating it is not enough that the boilers heat the water well. It is very important for the coolant to flow into the radiators to connect them correctly.
In practice, an unregulated series connection is used for a single-pipe connection. True, this problem can be avoided if you use a two-pipe system. This system also does not use a regulator, however, if the radiator becomes airy, the system will function since water will flow through the jumper (bypass). True, this option is not suitable for a system such as a warm floor.
Step-by-step assembly and installation instructions
For high-quality and correct installation, it is necessary to plan a diagram of the divorce system, which must be relied upon during the work process. Assembly work with pipes consists of several steps:
- Execution of the exact scheme.
- Calculate pipe sections of the required length, step by step for each section. Then the type of suitable fitting is determined.
- You need to know the welding time of pipes when connecting them. It depends on the diameter and type of pipe; you need to read about this in the instructions or check with the seller. Before working, place the pipes indoors for a while to equalize their temperature readings.
- It is convenient to mark the cut points using a marker.
- Relative to the surface, it is necessary to make perpendicular cuts with special scissors.
- The cut areas are wiped with an alcohol solution; make sure the pipe is clean - use a dry cloth.
- Select a nozzle from the soldering machine that matches the diameter of the pipe being installed. After degreasing it, place it horizontally and heat it to 256 degrees.
- The pipe with the fitting is placed in the heating holes, and after a certain period of time is removed, the pipe is inserted into the connecting element of the fitting and held for several seconds. The connections should not be subjected to mechanical stress until they have completely cooled.
Using this method, the remaining pipes of the entire heating system network are soldered. Do-it-yourself heating made from polypropylene pipes must be strengthened using clips, then there will be no sagging of the pipes. The coolant for this material should not exceed 60 degrees Celsius.
PP fittings for water supply systems
The term fitting is taken from English.
Literally translated: to mount, adjust, assemble. Structurally, the fitting is a component of a pipeline, in particular made of polypropylene. This component can take the form of an angle (90º or 120º), tee, cross, etc. There are fittings with threaded inserts for connecting shut-off and other valves. There are special bypass elements that allow you to carefully bypass the places where one pipe bumps into another.
Along with polypropylene pipes, a huge variety of fittings are produced. Mounting elements - fittings - significantly expand installation freedom and allow you to choose the most appropriate technology for constructing water supply systems
Using any of these mounting elements, it is convenient to build water supply wiring diagrams in almost any configuration. So, to connect one polypropylene pipe to another in a straight line, a coupling is used.
The same fitting is used if it is necessary to make a transition from a pipe of one diameter to a pipe of another diameter in a straight section. It is easy to connect pipes with a bend using corner fittings.
Fittings of various types are produced for the installation of water pipes with polypropylene pipes. If one type of such elements is intended for use for soldering, another type is used for mechanical threaded connections.
Fittings for mechanical threaded connections allow you to create a completely strong, reliable connection using force crimping, eliminating soldering technology from the process.
In addition to traditional installation methods - soldering polypropylene and mechanical connections, the technology of gluing circuit elements is used. The advantages of this technology are obtaining a high-quality appearance of the plumbing system due to the complete absence of any deformations
In addition to the threaded connecting technique, the technology of gluing water supply parts is often used. For example, using special glue, tees and polypropylene pipes, you can easily make a distribution manifold for cold water supply with your own hands.
The actions of a master plumber in this case boil down to the following steps:
- The pipe is cut to size and deburred.
- The surface of the pipe at the junction is degreased.
- A layer of glue is evenly applied to the surface.
- The end of the pipe is inserted into the fitting until it stops.
Glue drying time is 20-25 minutes.
Time delay for welding polypropylene pipes
| Pipe Diameter Size(mm) | Time (sec.) | Direct connection (sec.) | Cooling time (min.) |
| 1 — 25 | 5 — 7 | 4 | 2 |
| 32 — 50 | 8 – 18 | 6 | 4 |
| 63 | 24 | 8 | 6 |
| 75 | 30 | 10 | 8 |
For a clear and visual example, check out the educational video material.
Reasonable prices for materials and ease of installation work will help you set up a reliable heating system yourself. The proposed type of installation is considered a leader among similar ones. That is why it is so popular among owners of country houses.
Source
Step by step guide
Work on installing polypropylene heating begins with bringing the pipes inside the room to “acclimatize” them and eliminate the consequences of expansion or contraction in the heat or severe frost.
The main work when connecting pipes is welding polypropylene (solder). For these purposes, you should choose a soldering iron. The process itself does not take much time and is simple. The main thing is to quickly connect the heated ends of the elements, being careful not to overheat them. The duration of heating depends on the diameter of the pipe. The larger it is, the longer the heating should be. The cross-section of the soldering device nozzle must correspond to the diameter of the pipe.
Pipe soldering technology
Step-by-step instructions for assembling the heating pipeline are as follows
:
- a wiring diagram is drawn up;
- Markings are made on the walls for all areas, following which the elements of the heating system will be laid;
- fittings are selected;
- the time allocated for installation and welding work is determined;
- pipes are marked and cut into sections of a certain length, the cut is made at right angles to the axis;
- to degrease and remove dust microparticles, the ends are wiped with alcohol, the dust is removed with a dry, clean cloth;
- the soldering iron nozzle is degreased, placed in the working position and heated to +265 °C;
- a fitting and a pipe are placed in the nozzle, they are heated together and connected to each other;
- After waiting the necessary time for cooling, the connected section is attached to the wall using clips.
Do-it-yourself polypropylene heating also requires the installation of control equipment, a boiler, heating devices, an expansion tank, and a pump. Their installation is carried out according to the instructions and recommendations of the manufacturer.
Next material
An inexpensive and technologically advanced option for heating is plastic pipes.
They are durable, easy to install and inexpensive. A well-welded polypropylene system can last 30–60 years without repair, but there are factors that significantly reduce service life and reliability.
These are excessive temperature, pressure, prolonged exposure to direct sunlight. Polypropylene pipes should not be used when connecting a solid fuel boiler, on steam lines, in contact with hot metal, or in heating systems of multi-apartment high-rise buildings.
Classification of polypropylene hoses (4 classes)
Often four classes of hoses are indicated, since the third is practically not used, but GOST specifies five classes for polymer products.
Polypropylene hoses are divided into classes according to heat resistance and operating pressure values:
- Class 1 - hot water distribution systems up to 60 °C;
- Class 2 - hot water distribution systems up to 70 °C;
- Class 3 - underfloor heating, low-temperature radiators up to 50 °C;
- Class 4 - underfloor heating, low-temperature radiators up to 70 °C;
- Class 5 - high-temperature radiators up to 90 °C;
There is also a class “XB” - intended for cold water supply.
It is assumed that the system will operate in certain temperature conditions, which differ for each season and off-season. For example, for high temperature radiators, the system should last 50 years: 14 years at 20°C, 25 years at 60°C, 10 years at 80°C and 1 year at 90°C. This means that in a region with an extended heating season, the service life will be reduced.
The emergency temperature for classes 1-2 is 95 °C, for class 3 - 65 °C, for classes 4-5 - 100 °C. That is, pipes can withstand significant excess operating loads for a short time, up to 100 hours over the entire period.
The maximum working pressure of thermoplastics should be:
- 0.4 MPa;
- 0.6 MPa;
- 0.8 MPa;
- 1.0 MPa.
Types of polypropylene pipes
The manufacturer makes markings throughout the product. It indicates the type of material, nominal pressure, operating temperature, diameter, wall thickness, ultraviolet protection .
Depending on the wall material, pipes are distinguished:
- Monolithic. They are used to transport liquids at low pressure and temperature. Used for water supply and irrigation systems. Designated as PPH, PPB. Nominal pressure PN15, PN 20.
- Random copolymer. They are used in water supply systems and in the organization of low-temperature heating - warm floors. Designated PPR. Nominal pressure PN20 - PN 25.
- Heat-resistant reinforced - PPS . The strength of such pipes is higher than metal-plastic, and they are used in heating systems. Nominal pressure PN 25. Withstands temperatures of 95 °C, used in any heating systems of private houses.
- Reinforced. The walls of polypropylene pipes can be made either from monolithic polypropylene or reinforced with fiberglass or aluminum foil. Reinforcement is needed to increase strength, durability and reduce linear expansion.
In heating systems, the most versatile and widely used are fiberglass-reinforced composite products.
Security measures
When working with a heating device, it is necessary to observe personal protective measures:
- The soldering iron must be installed on a horizontal surface in a place free from materials.
- The technician must wear protective gloves (for working with hot tools) and comfortable overalls.
- Avoid bending over melting plastic as this process releases harmful fumes.
- The room should be relatively clean. The working surface is free from dust and debris.
- The connection between the soldering iron plug and the network must be tight and the cord must be loose.
We recommend that you read: How to choose a soldering iron for soldering plastic pipes?
The welding tool is preheated for 20 minutes if it does not have a corresponding indicator.
How to solder a heating system
A huge advantage of polypropylene pipes is the ease and manufacturability of joining. The connection is uniform and monolithic. Each type of pipe is connected using its own technology.
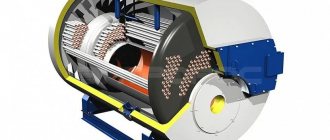
End connection
Used for large diameter main pipes . They are soldered using heated air and a filler rod. The process is similar to welding metal with an electrode.
An irresponsible joint can also be obtained with small diameters by heating the ends to 270 °C and joining the pipes. This method is not used, since the joint is weak, porous, and leaks are possible.
Electrofusion connection
Used for high-quality connections of high-pressure pipelines . The ends of the connections are cleaned and compressed with casing clamps. A coupling with electric heaters already sealed in it is installed at the joint. The clamps are loosened, a fixing and centering clamp is put on. A direct electric current is connected to the coupling contacts. Voltage, current and heating time are indicated on the coupling. After heating, the joint cools down, after which it is ready for use.
Socket soldering
Used for small diameters - up to 62 mm. To connect, you will need factory-made shaped elements: adapters, tees, couplings, taps, fittings, turns.
For soldering you will need: a soldering iron with Teflon tips, pipe cutters, clean rags, degreaser, ruler and pencil.
We cut the connected pipes to the required size using spring scissors. When measuring, a margin of 8-10 mm for the joint.
Photo 1. The process of socket soldering of polypropylene pipes. A special soldering iron is used for this.
We degrease and clean the ends and seats in the fitting. Dirt, grease and water interfere with the welding of polypropylene; a sealed, reliable joint will not work.
At the end of the pipe, mark the depth of the seat in the fitting. a few millimeters for excess plastic.
If we are welding a pipe reinforced with aluminum foil, we use a special “sharpener” ; it will evenly cut the reinforcement and the joint will be reliable.
The surface of the polypropylene being welded must be clean and dry. We use rags and degreaser. Be sure to remove water in case of repairs or alterations to the system.
Heat the soldering iron to a temperature of 260-280 °C. We attach non-Teflon tips to the pipe and coupling and hold for 5-7 seconds. After heating, connect the joint and fix it for 10-15 seconds.
Polypropylene is welded into a monolith during heating. Therefore, you should not adjust the position, tighten or press - the joint will turn out to be of poor quality.
If the inside of the fitting overheats, plastic residue may narrow or even block the fitting.
For excess plastic, a space of 2-3 mm is left in the mounting socket.
Therefore, the marking stage is also important.
The cooled joint can be used immediately.
The connection gains strength as it cools.
How to properly secure a pipeline
At the next stage, the fragments are cut and joined on the working surface. The finished structure is installed in the selected location.
To lay good wiring, it is not enough to connect the pipes to each other - it is important to correctly install and connect them. In this case, the pipeline will not sag on the wall or deform under the influence of hot liquid
The structures are fixed using special clips. These fasteners can be single, stacked and with a clamp, or made in the form of clamps. The latter variety comes in a wide variety - because of this, it is better to make the final decision at the point of sale. Clips are intended for free movement of products along the axis, and clamps are intended for firmly fastening structures in the selected position.
Under the influence of high temperatures, the length of the pipes changes by 10-15 mm/1m. If a rigid connection is used, the connection may fail at the soldering point. To reduce the voltage, you will need to use the following compensators:
- Z-shaped models.
- Ring.
- In the shape of the letter G.
- U-shaped.
After the final stage, it remains to check the functionality of the system.
Polypropylene for heating
Polypropylene pipes are used to transport coolant liquid from the boiler to the battery heat exchangers. When designing a heating system, you should pay attention to:
- Diameter. The larger the cross-section, the lower the hydrodynamic resistance and the further the coolant can be supplied.
- Material. For a “warm floor”, it is enough to use cross-linked polyethylene; for the installation of radiator heating, a fiberglass-reinforced pipe for hot water is used; for piping the boiler, it is better to use a heat-resistant PPS pipe. The piping of a solid fuel boiler is made of metal.
- Length of straight pipeline sections. Polypropylene has a disadvantage - linear expansion. When heated, the length of the pipe changes. Therefore, you should not rigidly fix corner connections, but design compensation loops and bends on long straight sections.
Polypropylene is used in any heating system.
It is suitable for both battery systems and heated floors.
Polypropylene is not suitable for use in systems with overheated coolant ( above 95 °C ) or high pressure ( above 10 atmospheres ).
Which pipes to use
Almost all polypropylene products are suitable for cold water supply, but with hot water the situation is somewhat different.
In order to use pipes for the delivery of drinking water, they must have a certificate of conformity. For hot water supply, first and second class hoses are used with operating temperatures up to 70 degrees. For heating and arrangement of heated floors, special products are used that have reinforcing and anti-diffusion (protecting against oxygen access) layers.
The pipes are marked accordingly.
It is necessary to take into account some features. For example, polymers are not used when connecting to solid fuel boilers. At least one and a half meters of the initial supply and return sections must be made of copper or steel pipes.
Prices for polypropylene pipes from different manufacturers
polypropylene pipes
How to choose the right diameter
To accurately select the diameter, a hydraulic calculation of the system is required, however, in houses up to 250 m² you can do without it.
The diameter directly depends on the total power of the radiators, and it should be understood that different sections of pipes serve part of the system, and not its entirety, so the supply often has a smaller diameter than the connection and return pipes.
For accurate balancing, it is still necessary to use a hydraulic calculation, with the help of which the diameter and length of different sections, as well as the radiator valves and circulation pump are selected.
As a result of the calculation, the following data is obtained:
- coolant flow for the entire system, kg/s;
- pressure loss in the system;
- pressure loss from the boiler (pump) to each radiator.
The coolant flow rate is equal to the ratio of the heat loss of the building to the product of the heat capacity of water and the temperature difference between the boiler supply and return.
The speed of movement of the coolant is equal to the ratio of the flow rate through a section of pipe (kg/s) to the product of the density of water and the cross-sectional area of the pipe in square meters.
The pressure loss is equal to the product of the specific friction losses in the pipe and the length of the pipe section. Friction information should be provided in the manufacturer's reference literature.
Resistance losses on fittings, fittings, and equipment are also calculated. The coefficient is indicated by the manufacturer of each fitting. To calculate, the coefficient is multiplied with the density and speed squared, divided by two.
As a result, the resistances of all sections are summed up and compared with the control value.
If independent calculation is difficult, contact a specialist.
How to make a heating system in a private house with your own hands
There are a large number of heating systems. Each system has its own characteristics and is used to solve specific problems. When choosing, you should pay attention to the following initial data:
- Number of storeys and area of the house. To heat several floors, complex systems are used that calculate hydrodynamic resistance. A distribution system with a riser, a “Tichelman loop,” is suitable. For a one-story building with a simple layout, the Leningradka single-pipe system, a simple bottom spill system, would be optimal.
- Layout and aesthetic considerations. To prevent pipes from spoiling the appearance of the walls or interfering with the installation of furniture, you can design decorative screens for the upper spill, or hide the lower spill in the walls or floor screed. Pipes should not pass under doors and should not interfere with walking. Heat is evenly distributed throughout the heated room.
- Energy dependence. If your home experiences frequent and prolonged power outages, it is better to design a gravity system with an open expansion tank. If there are no power outages, a more efficient closed system with a membrane expansion tank and forced circulation is used. Pipes may be of smaller diameter.
- Power . Depends on the heat loss of the house. The greater the power of the system, the larger the diameter of the pipes to facilitate coolant circulation.
Installation tools
To assemble the system you will need an inexpensive and accessible set of accessories.
- Tools for working with polypropylene. This is a soldering iron, pipe cutter, rags, ruler, pencil, degreaser. To remove aluminum reinforcement, you will need a reamer of the appropriate diameter.
Photo 2. Special soldering iron for connecting polypropylene pipes. The device has two holes of different diameters.
- A set of plumbing accessories - open-end and adjustable wrenches, fum tape, pliers.
- Set of construction tools: hammer drill, grinder, foam gun, mixer.
Stages of work, heating design diagram
The heating system is assembled in successive logical steps.
- Marking the installation of the boiler and batteries. Radiators are placed at the entrance and under windows to create proper convection currents in the room. The boiler can be installed in a boiler room; some types can be placed near any external wall.
- Determination of pipe locations. We definitely design compensation loops - the length of polypropylene pipes changes when heated.
- Hanging the boiler and its piping. If necessary, we connect water and gas to it. It is better to make the piping of a solid fuel boiler from metal. The gas boiler is connected with polypropylene pipes with heat-resistant characteristics.
- With a collector system, we connect a “comb” - a distributor. If the system is two-three-arm, you can get by with tees.
- We install the expansion tank and safety group. The volume of the expansion tank is calculated based on the volume of water in the system.
- We fix the fasteners to the floor or wall. If the system is with gravitational circulation, we observe the slopes.
- We install pipes and connect batteries.
- After installation is completed, we pressurize the system. We disconnect the batteries and plug all the outputs. We supply air under pressure of 8-10 atmospheres. If fistulas are identified, we eliminate them.
- We connect the batteries, boiler, expansion tank.
- We fill the system with water and remove air from the upper points.
- We are conducting a test run. We pay attention to pipes, joints, and connection points. We check the uniformity of heating of the batteries.
- We embed the pipes in a screed, wall or decorative box.
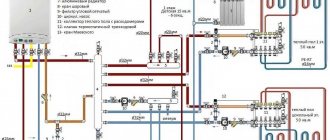
Photo 3. Diagram of the heating system of a two-story house using polypropylene pipes.
Source
Selecting the diameter of a heating pipe using tables and online calculators
In Internet resources you can find tables of the dependence of the pipe diameter on the speed parameters of the medium V and the heat output Q. Usually the speed does not go beyond 0.2 - 0.7 m/s, and the power of boiler equipment is in the range of 3000 - 40000 W.
To approximately determine the size of PP pipes based on Q and V, one is guided by the following considerations:
- For an individual house, the power of a thermal boiler is calculated based on the consumption of 100 W of thermal power per 1 square meter of heated area. For example, if a house has a total heated area of 100 square meters, then a 10,000 W boiler will be needed for heating.
- The speed of the coolant in gravity systems is assumed to be minimum of about 2 - 3 m/s, with forced supply by a circular pump - 4 - 7 m/s.
As a result, according to the table in Fig. 10 we find that to supply heat with a power of 10,000 Watts at an average speed of movement of the medium along the pipeline line of 5 m/s, PP heating pipes with a circumference of 25 mm should be used.
It is worth noting that a more accurate result can be obtained from tables that take into account the temperature difference between supply and return, as well as their readings (80/60, 75/60).
When calculating pipe diameters using online calculators, the following information is usually entered:
- area of the heated room;
- ceiling height;
- maximum outdoor temperature;
- the number of walls facing the street, sometimes their orientation to the cardinal points and relative to the wind load;
- the degree of thermal insulation of external walls or its numerical coefficient;
- thermal parameters of the flooring;
- thermal characteristics of attic rooms;
- number of windows, their dimensional parameters in height and width;
- type of glazing (sheet or chamber), number of sheets in packages;
- the presence of doors to the street, balconies and loggias, the degree of thermal protection of the latter (cold, warm).
Rice. 11 Table of the relationship between heat flow and coolant pumping volume with its movement speed and pipe diameter
It may be useful to read about Connecting the boiler to the heating system
Additional material: Heating boiler piping
There are two options for boilers - floor-mounted and wall-mounted. Connecting them has its own characteristics. The piping scheme common to all types of boilers includes:
- boiler;
- radiator;
- ball valves;
- nuts fixing the boiler;
- cleaning filters;
- thermal heads for batteries;
- tees, corners;
- Mayevsky cranes;
- different valves;
- measuring instruments;
- circulation pump;
- distributors;
- fastener
The piping scheme in the case of a wall-mounted boiler can be exclusively closed, since these boilers are autonomous. A floor-standing boiler cannot be placed at the top of the wiring, since it does not exhaust air. As a result, air pockets will appear. Most wall-mounted boilers have air vents, so they independently release air masses.
When piping a gas boiler with a polypropylene circuit, a large number of connections should not be allowed. The main condition is the presence of a rigid joint at the point where the gas is supplied to the unit. A feature of a solid fuel boiler is the lack of a heat supply control function. When forced circulation is turned off, pressure will increase and the system may fail.
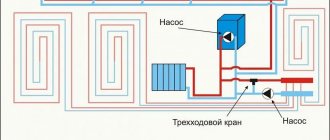
For such cases, there are emergency schemes. One of them is installing an automatic bypass. When the pump is running, the coolant flows through it, and the bypass is closed. When the pump stops, the fluid flow is redirected and passes through the bypass. For heating circuits installed in a private house made of polypropylene with a circulation pump, the feasibility of use and parameters of the latter are determined by hydraulic engineering calculations.
The principle of operation of the gravity system
One of the principles used in the operation of the system is known to everyone from a school physics course: this is the rise of hot water and air and their descent downwards - at low temperatures.
After the water warms up in the boiler, it begins its movement up the riser. As a result, it ends up in the heating radiator, where it transfers some of its heat, thereby becoming colder than in the drain. Cooled, the water begins to move downwards and enters the next radiator. This continues until the water returns to the boiler.
Polypropylene pipes in convection systems
Convection systems made of polypropylene pipes are very popular. The reason is the ease of processing of the material, resistance to freezing, high tightness, low thermal conductivity.
In closed-type “pumpless” systems, when heated, a lot of oxygen is released from the water. If the line is made of a steel pipe, it will very quickly become covered with a layer of rust. Polypropylene products do not have this drawback. The directed flow moving along polypropylene hoses does not encounter significant resistance. No deposits form on the walls of PP pipes.
Closed gravity system
Large pipe diameters require a large amount of coolant. And when any liquid is heated, it expands. For this purpose, expansion tanks are created. There are two types of such expansion tanks: open and closed.
Open containers where excess coolant is squeezed out of the system. For additional safety, to avoid overflow, install a pipe leading to the drain, which is called an overflow. This expansion tank can be made independently, or you can purchase it. This system is open, the liquid evaporates from the expansion tank, so only water can be used for such a heating system, since the antifreeze will quickly evaporate. Periodically it is necessary to add water to replenish the total volume and maintain its fullness.
Closed expansion tanks are containers divided into two parts by a special membrane. One half of such a tank is filled with excess coolant, the second half is filled with gas (air or nitrogen). Heated water is forced into the expansion tank, stretches the membrane, compressing the gas in the second cavity, when the temperature of the liquid decreases, the gas pressure and membrane return the coolant to the system. The result will be no loss of fluid, the heating system is always full, there is no need to add coolant, antifreeze can be used.
Gravity heating system
The classic gravity system folds:
- from the boiler;
- tank;
- pipes;
- radiators.
Its advantages include energy independence, self-regulation, and reliability. There is an opinion that polypropylene pipes are not suitable for constructing such a system, but this is not the case. You just need to meet some conditions during installation:
- The spill must be carried out at a uniform slope throughout.
- After the boiler, a short acceleration section called a collector is required. Here the water picks up speed and continues further circulation. It needs to be framed with a piece of steel pipe so that the coolant can be cooled.
- The radiator must be located as low as possible to the level of the boiler, or at least on a par with it.
- The solid fuel boiler is installed at a slight slope. The pipe is welded into it in the very top corner.
- The outlet pipe is also mounted with a slope at the lowest point.
- Taps with maximum flow are connected to the radiators. This will eliminate losses, and circulation will occur throughout all batteries.
If you plan to install a heated floor, form a gravitational pumpless system for the radiator, and arrange a separate loop with a pump for the floor. Since the system has limited pressure, it will not be able to push through additional complex contours naturally.
Diagrams by type of coolant supply
The radiator will work effectively if the coolant is evenly distributed across all sections.
Warm and cold water have different densities. The heated coolant always tends upward. In the system it is replaced by cold, denser water. This feature is taken into account when supplying coolant to the batteries.
Coolant supply diagram
Upper eyeliner
Each radiator has vertical channels connecting the horizontal upper and lower manifold. The presence of these elements allows the coolant to circulate in the device.
With the top connection, mainly only the top of the battery heats up. To prevent such an effect, a jumper is installed after the first rib in the direction of flow of the coolant. Therefore, the heated water first falls into the lower collector.
Then it passes through all sections of the radiator and enters the return pipeline. As a result, the top connection turns into a diagonal way to connect the battery.
If there is no jumper in the radiator, the supply pipe is connected at the top, and the return pipe at the bottom from the opposite end of the battery. This option is called diagonal strapping.
Bottom eyeliner
This is the easiest way to tie. The scheme involves installing the boiler in the basement or on the ground floor. From the heat generating unit, the main pipeline is led to the attic, where the expansion tank is installed. A starting line is laid from the tank, but not lower than 1.5 m to the first radiator.
The supply and return are connected to the batteries at the lowest points on opposite sides. All radiators in the system are connected to pipelines in the same way and installed in series.
When installing a heating circuit with natural circulation, the pipes are laid at an angle. The last battery must be located above the boiler. The height difference between the final radiator and the heat generating unit should not exceed 3 m.
Connection in progress:
- circulation pump;
- bypasses;
- shut-off valves;
- Mayevsky cranes.
Pumping equipment runs on electricity. When it is turned off, circulation of the coolant is possible only in a natural way. Therefore, it is better to lay pipelines at a slope.
Materials for heating system installation
The optimal diameter of a polypropylene pipe for installing a single-pipe system in a private house is 20 mm, for risers - 25 mm. For a two-pipe system with more than 8 radiators, a polypropylene hose with a diameter of 32 mm is used. The fittings are selected for the cross-section of the pipes so that their internal diameter matches the outer diameter of the line. They must be from the same manufacturer as the pipes and with the same markings.
A high-quality connection of polypropylene elements is obtained only by welding. Use a welding machine or soldering iron. Foil-reinforced pipes are suitable for high-temperature systems, and fiberglass for low-temperature systems.
The first ones are marked PN 25. They are designed for a pressure of 2.5 MPa. Working pressure for PN 20 is 2 MPa. In any heating system on radiators, Mayevsky taps are needed. They are embedded into the top of the battery. The holes at the bottom are closed with a stopper.
Fittings are used as transition elements for connecting radiators in heating systems made of PP pipes. These include:
- Couplings. They connect two identical pipes.
- Bends.
- Crosses. For branching on two sides.
- Adapters. Necessary for joining elements with different diameters.
- Tees. One-sided branches are formed.
- Fittings. Necessary for connecting the hose to a flexible hose.
- Plugs. Installed at the end of a polypropylene pipe.
Polypropylene hose fittings are environmentally friendly and durable. Under proper operating conditions they can last about 50 years.
Disadvantages and methods for eliminating them
- The main disadvantage of polypropylene pipes is their high expansion coefficient. At a coolant temperature of 100°C, 10 meters of pipe lengthens to 15 cm. This leads to deformation of the structure. In order to prevent destruction, flexible supports are installed and compensation loops are made. Later, foil-reinforced pipes began to be used, which significantly reduced the expansion coefficient. Nowadays, the most practical pipes are reinforced with glass fiber: under the same conditions they extend by only 1 cm.
- Polypropylene products, especially connecting elements, are inferior to metal pipes in strength. It is not even correct to compare them: when subjected to strong impacts with hard objects, polypropylene is deformed and may collapse.
Features of materials that need to be taken into account during installation
In order for the system to function correctly, during the installation process it is necessary to take into account some features of PP hoses. One of them is linear expansion. This phenomenon causes a change in external and internal temperatures. As a result of heating, the plastic sleeve begins to sag. The linear expansion is compensated by the correct laying of the pipeline, guaranteeing freedom of its movement within the limits of the linear expansion value.
For this purpose, fastening clamps and compensators are used, the design of which includes both moving and stationary parts. Sometimes sagging can be eliminated by chipping the wall and laying a sleeve into it or installing additional clips. If these actions do not help, radical measures are used - the sleeve is disconnected in the area of the “American women”, the sagging section is cut off, the American woman is resoldered, then twisted.
The process of soldering PP pipes
After turning on the soldering iron, you need to let it warm up for about 10 minutes. If there are dirt on the tips, remove them on a hot soldering iron with a non-synthetic cloth or paper. It is not recommended to remove dirt with metal objects - it will damage the non-stick coating.
The size of the pipe entry into the fitting socket depends on the specific product range and is usually 15 mm. for pipe D20 and 20 mm. for the following diameters. This size is best measured with a tape measure on a specific part - the socket in the fitting has clearly defined boundaries.
Immediately before welding, the pipe and the inside of the fitting are wiped with a clean, dry cloth - the surfaces to be soldered must be clean. Of course, you shouldn’t strive for sterility - there is no need to wipe the plastic with alcohol, as some advise.
The pipe and fitting are simultaneously placed on opposite sides of the heated nozzle and the required heating time is maintained. While the polypropylene is warming up, there is no need to rotate the pipe and fitting for faster fitting onto the nozzle! If the fitting is difficult to fit onto the nozzle, strain your pectoral muscles.
Some nozzles are designed in such a way that when soldering, the fitting fits very hard and is completely put on the nozzle after 3-5 seconds. When should I count the required heating time? The first step is to refer to the same document TR 125-02:
“Heating and melting time is the time counted from the moment of complete insertion of pipes and parts into the working elements of the electric heating tool and their melting.”
Since the pipe enters the nozzle with difficulty and it is difficult for a beginner to understand whether the pipe has gone all the way, it is first recommended to mark the marks on the pipes to which the pipe needs to be pushed into the soldering iron.
The exact depth varies slightly between manufacturers, so it is best to measure it in the fitting socket in advance.
For initial experience, this guide is quite suitable. Let me just say that with experience comes an understanding: with “tight” nozzles and standard warm-up time, excessive melting occurs.
Having removed the pipe and fitting from the nozzle, they are connected as quickly as possible and held motionless for several seconds (welding time in the table). Objectively - after removing the soldering iron from the nozzle, there are 1-3 seconds to make the connection. Even after the welding time has passed, care must be taken to ensure that no external forces act on the parts to be joined for several minutes. Even the weight of the soldered pipe itself can deform the soldering area.
During welding, you cannot rotate the pipe in the fitting; you need to connect them in a known correct position. For your own orientation, the pipe and fitting to be soldered can be marked with a dash - then during soldering it is more likely to connect the parts smoothly. Nevertheless, you should not unconditionally focus on the lines; you need to see the picture as a whole. Of course, during the connection process there is time for adjustments - no more than a second, when small flaws in the soldering can be corrected.
For well-soldered parts, a border (shoulder) should form around the pipe at the junction with the fitting. If you look inside the fitting, the edge of the pipe will also have slightly melted edges.
Some plumbers blow into the pipe after welding to make sure the pipe is not sealed. From my own experience, I can say that if the soldering temperature and heating time are observed, this never happens. Although theoretically you could get very low-quality polypropylene from an unnamed manufacturer.
Polypropylene pipes are new opportunities
Products made from PPR have optimal technical characteristics. They open up new opportunities for owners of suburban housing, where the heating system is powered by boilers. Their use reduces the complexity of installation. This option is not only economically beneficial, but also reliable.
Each person understands the word comfort in his own way, but everyone needs warmth.
You can provide them to your home without large capital and time expenditures by using polypropylene pipes, and awareness of heating issues will allow you to make the right decision. Source
PPR connection without welding
There are situations in life when the use of traditional soldering of polypropylene parts is excluded. For example, the joint is located in a hard-to-reach recess, or during installation the power suddenly turned off, and you only have to weld the last connection. There are 3 one-time methods:
- heating with a gas burner and subsequent docking;
- use of Gebo type compression coupling;
- planting elements on anaerobic glue.
Why are these options considered one-time use? Gluing and heating with a torch cannot provide the required reliability of the joint and are used only as a last resort on cold water supply lines. It is highly undesirable to connect heating and hot water pipes in this way. Gebo couplings are reliable, but too expensive.
The connection technology without a soldering iron is simple - the parts are degreased, gently heated with a burner flame, joined and fixed for 6-10 seconds. The technique is demonstrated in the video below.
Bonding is carried out according to the instructions on the packaging of the anaerobic sealant. The end of the pipe and the fitting socket should be cleaned, degreased and glue applied with a small brush. The elements are then fastened together using compression.
Design features
For a gravity system to work effectively, the following requirements must be met:
- the heat source is any non-volatile heat generator with outlet pipes with a diameter of 40-50 mm;
- at the outlet of a boiler or stove with a water circuit, an accelerating riser is immediately installed - a vertical pipe through which the heated coolant rises;
- the riser ends with an open-type expansion tank installed in the attic or under the ceiling of the upper floor (depending on the type of wiring and the design of the private house);
- tank capacity – 10% of the coolant volume;
- by gravity, it is advisable to choose heating devices with large internal channels - cast iron, aluminum, bimetallic;
- for better heat transfer, heating radiators are connected according to a versatile pattern - bottom or diagonal;
- special full-bore valves with thermal heads (supply) and balancing valves (return) are installed on the radiator connections;
- It is better to equip batteries with manual air vents - Mayevsky taps;
- replenishment of the heating network is organized at the lowest point - near the boiler;
- all horizontal sections of pipes are laid with slopes, the minimum is 2 mm per linear meter, the average is 5 mm/1 m.
On the left in the photo is the coolant supply riser from a floor-standing boiler with a pump on the bypass, on the right is the return line connection
Note. Slopes perform 2 functions - they help the coolant flow in the desired direction, and the air rises through the pipelines and leaves through the open expansion tank. A caveat regarding the radiators used: if the system is built correctly, steel panels also heat well.
Gravity heating systems are made open and operated at atmospheric pressure. But will gravity flow work in a closed circuit with a membrane tank? We answer: yes, natural circulation will continue, but the speed of the coolant will decrease and efficiency will drop.
It is not difficult to substantiate the answer; it is enough to mention the change in the physical properties of liquids under excess pressure. With a pressure in the system of 1.5 Bar, the boiling point of water will shift to 110 °C, and its density will also increase. The circulation will slow down due to the small difference in the masses of the hot and cooled flow.
Simplified gravity flow diagrams with an open and membrane expansion tank
Disadvantages of this wiring
- inability to regulate the heating temperature in different parts of the wiring. It is generally difficult to regulate, since reducing the temperature at the beginning of the wiring will lead to a minimum temperature at the end; if the temperature difference between the upper point of the wiring and the bottom of the riser is large, then below it may be necessary to install heating radiators with a larger number of sections and area than at the beginning riser. For normal operation, strong pumps are required, boiler heating costs increase, operational wear and tear increases, and there is a need for frequent replenishment of water.
Structure and types of systems with a natural type of circulation
Typically, a heating circuit without a pump includes a list of required components:
- heating device - a boiler or stove that can be heated with the type of fuel available in a particular region;
- expansion tank, which allows you to relieve excess pressure or add water to the heating circuit;
- pipes that form the circuit along which water will move in the system;
- batteries that allow you to heat the room more efficiently by increasing the area of the heat-transferring surface.
The diameter of heating pipes with natural circulation will be slightly larger than if a circulation pump is used.
Based on what kind of coolant will be used, heating systems with natural circulation can be water or steam.
Here are the distinctive features of each type of heating.
Main characteristics
Before you buy these communication devices, you need to calculate what indicators the pipeline should have. A heating system made of polypropylene pipes has the following characteristics:
- High pressure (from 10 atm);
- Tightness;
- Flexibility.
The marking of polypropylene pipes will help you make the right choice in order to organize heating; it indicates the diameters, coefficients and type of reinforced fiber
Attention should immediately be paid to the number following PN - this designates the maximum pressure in the pipes at a temperature of twenty degrees. Pipes PN 25, PN 20, PN 16 are very popular
At the same time, to provide heating for a small one-story building, you can buy PN 10 pipes. According to GOST, polypropylene pipes have their own unique designation for hot and cold water supply. If there is a red stripe on your communication, then it is for heating, if it is blue, then, accordingly, it is for cold water drainage. Sometimes “warm” pipes have the designation PPR. Such pipelines can operate in the range from 10 to 90 degrees.
Photo: heating pipes
In addition, manufacturers are required to indicate the section size, brand, batch number and company name in the labeling. General characteristics of polypropylene pipes (may vary depending on the brand) used for heating:
- The maximum permissible temperature is up to 150 degrees;
- Density 0.8-0.9 grams per cubic cm;
- The tensile strength is up to 25 Newtons per mm, and the tensile strength is up to 35;
- Thermal expansion coefficient – 0.15 mm;
- Thermal conductivity: about 0.24 Watt/mS (DIN 52612 if you buy DIN pipes);
- The service life of polypropylene heating pipes is up to 50 years.
Video on the topic:
To choose the right polypropylene pipes, you must consult with a specialist about what kind of thermal fiber they should be reinforced with. This indicator directly affects the thermal conductivity and durability of communication.
Example of marking of polypropylene pipes
The choice is quite large, but it is important to understand: if you choose the wrong material, the pipe will burst. Types of inserts for reinforcement:
- Fiberglass;
- Aluminum sheet, perforated sheet, continuous metal coating on the inside.
Cold water supply uses mainly fiberglass. At the same time, the layer of material is present only in the middle of the polypropylene pipe. Aluminum is used to strengthen heating pipes. It can be seen in the middle of the pipe, outside and inside.
Aluminum reinforced polypropylene pipes
At the same time, many craftsmen advise buying pipes with aluminum for heating. They are more durable, stiffer and provide a better seal than fiberglass reinforcement. Home craftsmen most often recommend using communications with aluminum reinforcement. They are easier to connect to the riser, and they are considered the most durable.
Table: how to choose a polypropylene pipe