To heat country houses near which there is no central heating network or gas pipeline, boilers operating on solid fuel are used. In particular, property owners in new cottage villages are faced with a similar problem, to which they usually plan to install the necessary communications in the near future. Because of this, almost all homeowners begin to heat their buildings with solid fuel units. Most often, long-burning solid fuel boilers are installed in the house.
When installing heating boilers, it must be taken into account that such systems are fire hazardous due to open fire, and therefore require safe operation and fire protection.
The article examines the step-by-step installation of a solid fuel boiler, and considers popular schemes for connecting it to the heating circuit. Thanks to this, you can independently organize an effective and safe heating system in your home.
Step-by-step installation of a solid fuel boiler
The standard installation scheme for a TT boiler consists of the following stages of work:
- Arrangement of the boiler room.
At this stage, it is necessary to cover the walls, floor surface and ceilings of the boiler room with non-combustible materials, arrange ventilation in it and install windows. It is also necessary to equip a solid foundation for the boiler in the boiler room. In addition, electrical wiring is carried out in this room to connect the boiler and lighting fixtures. - Installation of heating boiler and chimney.
The solid fuel boiler must be installed on a solid foundation so that it stands stable. To do this, pour a flat 12-centimeter concrete screed on the floor. It is advisable to place the expansion tank in the attic. True, it needs to be well insulated so that the water in it does not freeze in winter.
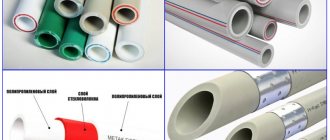
It is advisable to assemble a chimney for a solid fuel boiler from insulated sandwich pipes, because condensation will form in them less.
You can also insulate an iron pipe yourself using basalt wool.
3. Harness
. Provides for connecting the boiler to the heating circuit.
Boiler room arrangement
One of the main stages of work, which must be approached with special responsibility, is the arrangement of the technical room where the unit will be located. The boiler room must be equipped taking into account all fire safety standards.
The main ones:
- The solid fuel unit must be located in a non-residential premises with an area of at least 7 m². If it is impossible to allocate a room in the house for a boiler room, then the optimal solution would be to place it in the garage or basement. A prerequisite is the presence of a window in the room for ventilation and natural light. The size of the window is important - for every 10 m³ of room volume 0.3 m3, but it must be at least 0.5 m².
- For efficient operation of the boiler, this room must be equipped with supply and exhaust ventilation. This type of ventilation involves exhausting dirty and oxygen-depleted air outside through a ventilation duct using a fan, as well as introducing fresh air into the room through a supply duct or valve. The optimal size of the exhaust hole is calculated by multiplying the boiler power by 8, resulting in the cross-sectional area of the hole in cm².
- The floor, walls, and ceiling of this room must be covered with high-quality fire-resistant materials. It is best to use ceramic tiles for this. On the boiler room floor, it is advisable to make a concrete screed 120 mm thick, reinforced with a reinforcement grid made of rods with a diameter of 8-14 mm, with cells of 200 × 200 mm. Thanks to these measures, if an accident occurs, it will be possible to prevent the spread of fire throughout the house. To install the boiler, you also need to equip a podium 10-25 cm high.
- The boiler room also needs to be supplied with cold water and sewerage in order to quickly fill the system with water and drain it from the system if necessary.
- For fire safety purposes, it is necessary to leave a distance of at least 20 cm around the boiler from combustible materials with flammability degrees B, C1, C2 (according to ČSN 06 1008).
Installation of chimney and boiler
The solid fuel unit is very easy to install. It is required to install it on the foundation and set it strictly horizontally in level. This is done using adjustable legs or pads. The chimney pipe must be aligned with the hole in the wall or ceiling; in the first case, this requires turning the elbow in the desired direction.
It is advisable to equip the chimney for the boiler using insulated sandwich pipes, because less condensation will form in them.
As an alternative, you can insulate the pipes yourself using basalt wool.
It’s easier to assemble and install an attached chimney pipe on the street. It is simply connected with a tee to the boiler pipe. If the house is wooden, then passing the chimney pipe through the wall or ceiling is necessary in accordance with fire safety standards.
The chimney is installed in this case as follows:
- A square hole is cut out in the wall or ceiling in dimensions that are 38 centimeters larger than the cross-section of the chimney pipe on each side. For example, with a pipe cross-section of 10 cm and an insulation thickness of 5 cm, the hole is 10 + 38 × 2 = 86 cm.
- A passage unit (galvanized box) is built into the made opening.
- A sandwich pipe is passed through the hole of the installed box, then the voids in it are filled with basalt wool.
- The outer cover of the passage unit is installed and fixed.
If the house has a brick chimney, then a pipe for a modern solid fuel boiler is installed in it. To do this, a steel sleeve is placed in it, the pipe itself is inserted into it and the voids are filled with insulation.
During installation of the chimney, the following requirements must be met:
- It must be at least 5 m high (from the grate to the chimney cap), and there should be no more than 3 turns in the chimney.
- The horizontal section of the chimney should be made with a slight slope towards the boiler.
- It is imperative to install a condensate collector and an inspection hatch at the bottom of the chimney.
- The eaves on the roof must be bypassed using 2 elbows with a rotation angle of 30°.
- The pipe must be fixed with brackets so that they do not fall on the joints between sections.
- A cone-shaped cap must be placed on the top of the chimney.
The head of the pipe must be 0.5 m higher than the ridge so that the draft is normal.
If the chimney is 1.5-3 m away from the ridge, then it can be placed at the same level as the ridge or slightly lower.
If the distance of the pipe from the ridge is 3 m or more, the height is determined visually - a line is drawn from the level of the ridge at an angle of 10°.
How to properly install supply and exhaust ventilation
There are several objective reasons why ventilation in the boiler room is necessary:
- supplying a sufficient amount of oxygen to the boiler to maintain the combustion process;
- removal of carbon monoxide that accidentally entered the room from the furnace outside the premises;
- compensation of the amount of air used during the combustion process.
Please note that to burn 1 kg of firewood you will need 4.6 m3 of air, and burning coal requires about 8-9 m3, based on the quality of the fuel.
Here are some tips for arranging a ventilation system:
- Openings for air inflow and outflow should be located on different sides of the boiler room. The supply opening is made at the bottom of the wall as close as possible to the heat generator, and the exhaust opening is under the ceiling.
- If the boiler is equipped with a smoke exhauster or a blower fan, you should not place the hood next to it (read: “How to choose a smoke exhauster for a solid fuel boiler - types, differences”). Otherwise, the draft will reverse, and the exhaust hole will become a supply hole.
- If the door from a residential building opens into a furnace room, then it is advisable to install a grille for the inlet opening in the door leaf. Warm air entering the boiler will improve the combustion process.
- The size of the exhaust opening should be smaller than the supply opening, since most of the incoming air enters into a thermochemical reaction and exits through the chimney in the form of CO2.
You can calculate the required size of the hood if you multiply the boiler power by 8 - we get the hole area in cm2.
Boiler piping
House owners who install heating on their own most often choose the simplest scheme for piping the boiler. It involves laying one pipe around the perimeter of the entire house, to which heating registers are connected.
This tying method is good because it is autonomous in relation to the power supply. Even if there are problems with electricity, the heating will work normally.
The main disadvantage is that this option does not allow you to regulate the outlet water temperature, so the boiler and pipes gradually rust.
This wiring diagram is used to independently assemble a heating system in a residential building.
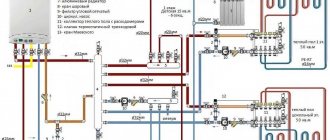
But there are also complex projects for piping a solid fuel unit that allow you to adjust the temperature of the coolant in the system, which should not fall below 60°C and at the same time the boiler should not boil.
Due to complex schemes it is possible to eliminate:
- A large temperature difference in the heat exchanger, which leads to frequent maintenance and repair of boilers, ultimately reducing their service life.
- Formation of air pockets in pipes and batteries.
- Formation of condensation inside the firebox. This phenomenon must be combated, because moisture with active chemicals gradually corrodes the walls of the firebox.
Standard strapping scheme
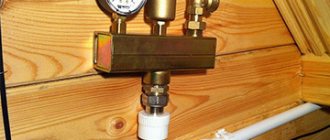
When choosing a scheme for connecting the unit to the heating system, it is necessary to pay special attention to the installation of safety devices and the mixing unit.
Safety devices include:
- Pressure gauge.
Allows you to monitor the pressure in the circuit. - Safety valve.
It releases steam and excess coolant from the system. - Air vent.
Eliminates the formation of air locks in batteries and pipes.
This safety equipment allows the heating circuit to operate normally, as the pressure in it is automatically reduced. The control and measuring device, air vent and valve are located on a common brass manifold.
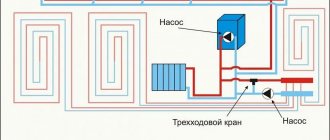
Installation of the mixing unit
After installing the safety unit, a mixing unit is installed - a jumper connecting the supply to the return.
After starting the boiler, the coolant first circulates, bypassing the heating registers, gives off heat to the room and again enters the unit for heating.
During normal operation of this circuit, after the coolant in the return cools below 60°C, the jumper automatically opens. As a result, hot water enters the return line, which immediately restores its temperature to the minimum value.
Build process
The process of creating a boiler includes several stages. When manufacturing each element, it is worth taking into account the special operating conditions of the product being manufactured.
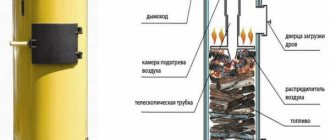
Air supply device
We cut a section from a thick-walled pipe with a diameter of 100 mm, the length of which will be equal to the height of the firebox. We weld a bolt to the bottom. From a steel sheet we cut out a circle with the same diameter as the pipe or larger. We drill a hole in the circle large enough to pass the bolt welded to the pipe. We connect the circle and the air duct pipe by tightening the nut onto the bolt.
As a result, we will get an air supply pipe, the lower part of which can be closed by a freely moving metal circle. During operation, this will allow you to regulate the intensity of firewood combustion and, consequently, the temperature in the room.
Using a grinder and a metal disc, we make vertical slits approximately 10 mm thick in the pipe. Through them, air will flow into the combustion chamber.
Housing (firebox)
The body will require a cylinder with a sealed bottom with a diameter of 400 mm and a length of 1000 mm. The dimensions may be different, depending on the available free space, but sufficient for laying firewood. You can use a ready-made barrel or weld the bottom to a thick-walled steel cylinder.
Sometimes heating boilers are made from gas cylinders for a longer service life.
Chimney
In the upper part of the body we form a hole for the removal of gases. Its diameter must be at least 100 mm. We weld a pipe to the hole through which the exhaust gases will be removed.
The length of the pipe is selected depending on design considerations.
Connecting the housing and the air supply device
We cut a hole in the bottom of the housing with a diameter equal to the diameter of the air supply pipe. We insert the pipe inside the body so that the air vent extends beyond the bottom.
The air supply pipe should end a few centimeters before the start of the chimney.
Heat Dissipation Disc
We cut out a circle from a metal sheet 10 mm thick, the size of which is slightly smaller than the diameter of the body. We weld a handle made of reinforcement or steel wire to it.
This will greatly simplify the subsequent operation of the boiler.
Convection hood
We make a cylinder from sheet steel or cut a piece of pipe, the diameter of which is several centimeters larger than the outer diameter of the firebox (body). You can use a pipe with a diameter of 500 mm. We connect the convection casing and firebox together.
This can be done using metal jumpers welded to the inner surface of the casing and the outer surface of the firebox, if the gap is large enough. With a smaller gap, you can weld the casing to the firebox around the entire perimeter.
Lid
From a steel sheet we cut out a circle with the same diameter as the firebox or a little larger. We weld the handles to it using electrodes, wire or other available means.
Considering that the handles can become very hot during operation of the boiler, it is worth providing special protection made of material with low thermal conductivity.
Legs
To ensure long burning, we weld the legs to the bottom. Their height should be sufficient to raise the wood-burning boiler at least 25 cm above the floor level. To do this, you can use various rolled products (channels, angles).
Congratulations, you have made your own wood-burning boiler. You can start heating your home. To do this, just load the wood and light it by opening the lid and heat dissipation disk.
Installation of a solid fuel unit with a heat accumulator
If the boiler does not have automatic loading of fuel, then it must be regularly added to the firebox yourself. This is inconvenient because the boiler needs to be fired according to a strict schedule.
This problem can be partially solved by a heat accumulator in the form of a tank of water, which is heated by the supply circuit.
Its installation allows:
- reduce the coolant temperature at maximum boiler operation;
- heat the cooled coolant when the temperature in the system decreases.
When choosing a buffer tank, it is necessary to take into account that for a house with parameters of 150 m² or more, a tank with a capacity of at least 1 m³ is required.
Installation of an additional mixing unit
Another such unit is installed between the buffer tank and the heating registers.
Thanks to this element, it is possible to avoid large temperature differences when water boils in the circuit.
Emergency circuit installation diagram
The main problem of heating a building with a solid fuel boiler is overheating of the coolant. It is necessary to prevent steam formation in the heating circuit, so it is necessary to cool the coolant in a timely manner.
There are 3 effective methods of cooling the coolant:
- Another heat exchanger is installed in the firebox. The first heats the coolant, and the second allows it to be cooled when it is very hot. The inlet pipe of the latter is connected to the cold water pipe, and the outlet to the sewerage system. To urgently cool the coolant, you need to open the tap on the pipe, after which cold water will flow through the additional heat exchanger.
- During the installation of the boiler, one heat exchanger is installed inside another, which allows you to quickly reduce the coolant temperature if necessary.
- 2 pipes are connected to the heat exchanger pipes, the first is connected to the cold water pipe, and the second to the sewer pipe. A valve is then installed to allow cold fluid to enter the system. As a result, some of the hot water will be discharged into the sewer.
All 3 methods allow you to achieve the desired result.
Mandatory rules for operation
- It is prohibited to use substances that emit toxic substances for kindling (gasoline, diesel fuel, scraps of chipboard, laminate);
- the width of the passage around the boiler must be at least 1 meter;
- fuel and flammable substances must be kept at a distance of at least 40 cm from the unit;
- equipment must be regularly inspected and slag and ash removed before each kindling;
- Clean the firebox and ash pan daily to avoid clogging the chimney.
With proper operation of the equipment, your home will always have a comfortable temperature.
Connecting a bypass to a solid fuel boiler
Experts advise taking into account possible problems with the electricity supply when choosing an option for piping a solid fuel unit. Because of this, the water in the system will boil sharply, which will lead to all the ensuing consequences. You can get rid of this problem by installing a bypass, which will isolate the de-energized pump from the system.
Shut-off valves are often installed on the bypass, which allows, if necessary, to redirect the water flow to the reserve line.
Combined boiler connection diagram
Today, a combined connection scheme for solid fuel boilers is often used, which allows heating the coolant when external problems arise. For example, a system with a solid fuel boiler can be supplemented with a gas and electric unit.
The electric boiler is connected to the system in parallel, that is, it is simply connected to the supply and return.
Shut-off valves must be installed at the junctions of two connections. To automatically turn on the backup electric boiler, install a room thermostat and check valves.
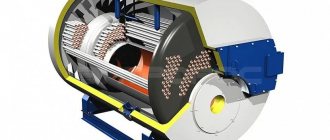
Purpose of the device
A long-burning solid fuel boiler is a complex unit that heats circulating water by burning various fuels (wood, coal, sawdust, peat, pellets, etc.).
The boiler can be single-circuit, used only for space heating, or double-circuit, capable of not only heating the building, but also heating water using a storage or flow method. For this purpose, a built-in DHW system is used.
Installation of gas heating boilers
Gas heating in many regions of the Russian Federation is the most affordable and effective.
Thanks to this, there is a wide range of gas boilers on the gas equipment market. This allows you to select a unit of the required power for any private home. All that remains is to install and connect it correctly, since the efficiency of the entire heating system depends on this.
According to the installation method, gas boilers are divided into floor-mounted and wall-mounted, so you need to disassemble their installation.
Requirements for installation of gas units
Gas boilers also need to be placed in non-residential premises. The boiler must be installed so that it does not interfere with passage and meets all fire safety requirements.
The room where the unit will be located must have effective supply and exhaust ventilation.
Air should be extracted from the boiler room through a ventilation hole located under the ceiling, and enter the room through a hole located at a height of 30 cm from the floor.
To heat a small private house, a boiler with a capacity of 20-30 kilowatts is sufficient. It can be installed in rooms with a volume of 7.5 m³. If the unit is planned to be placed in the kitchen, then it must have an area of at least 12 m².
Installation of a floor-standing boiler
Floor-standing boilers are installed in the same way as solid fuel boilers. They just need to be connected to the gas pipeline.
But such connection should be carried out exclusively by gas service specialists.
The main disadvantage of these boilers is that they take up more space in the room compared to wall-mounted models.
Installation of a wall-mounted boiler
When installing wall-mounted boilers, it is important to securely fasten them to the wall. Such heating equipment is very popular today among owners of private houses and apartments because it weighs little and is very compact.
When installing a wall-mounted boiler, it is also necessary to comply with fire safety rules and measures.
If the house is wooden, then the wall must be covered with heat-resistant sheet material before installing the boiler.
For this you can use asbestos or metal. Wall-mounted boilers look attractive, so they will match any kitchen interior.
To install a wall-mounted unit, a separate boiler room is not required, because its design includes all the necessary equipment: pump, shut-off equipment, expansion tank, automation, etc.
You just need to make a hole in the wall, install a coaxial pipe into it, fix the boiler to the wall and connect the heating circuit to it.
It is advisable to trust the installation of gas boilers, connections, piping and repairs to professionals.
This will allow you to avoid many mistakes, so you won’t have to fix them and spend additional money.
Foundation
It is necessary to say a few words about the base on which TT equipment is installed.
- For boiler units with a power of up to 50 kW, a screed can be used as a base.
- For equipment with a power of more than 50 kW, a separate concrete foundation is required, not connected to the foundation of the house.
- The foundation must protrude at least 250 mm beyond the boiler installation.
Installing a solid fuel boiler in a wooden house does not have any special requirements, with the exception of the use of floor materials.
The TT boiler unit cannot be installed on a wooden base. Advice: If a wooden house does not have a separate foundation for a boiler installation, then it can be made from fire-resistant bricks, on which a sheet of asbestos and metal is laid. The base must be larger than the boiler TT (minimum) by 150 mm. from each side. In front of the loading door, the metal must extend at least 200 mm beyond the heating installation.
The problem of arranging a separate foundation is associated with the large weight of powerful heating units and the vibration loads that boilers equipped with a screw conveyor for supplying fuel exert on the TT support.
Important! To ensure the required fire resistance (45 min.), combustion chambers must be made of non-combustible materials.
Features of installing a gas boiler in the bathroom
To place a gas boiler in a bathroom, the following conditions must be met:
- there should be a window in the bathroom;
- the boiler must have an open or closed combustion chamber.
A device with a closed firebox can be installed in a room without a window. Such units are equipped with a coaxial pipe. It simultaneously removes smoke from the boiler furnace through the inner pipe and supplies outside air into the combustion chamber through a channel located between this pipe and the outer casing.
When installing a boiler with an open firebox, a window is required. Otherwise, utility workers, firefighters and gas workers will not issue you permission for installation and will not connect the boiler to the gas pipeline.
Particular attention should be paid to the power supply of a gas boiler. Modern units are equipped with automation and electronics, so there should not be large voltage surges in the network.
Therefore, it is advisable to connect the equipment to the network using a reliable voltage stabilizer. This will protect the unit from damage.
Preparing material and tools
When starting to make a wood-burning boiler with your own hands and trying to complete everything in the shortest possible time, you should take care of the availability of:
- diagrams of the future boiler;
- steel pipes of various lengths, diameters (400, 500, 100 and 150 mm);
- steel sheet with a thickness of at least 4 mm;
- rolled products for making legs;
- two hundred liter barrel;
- heat-resistant mixture used for laying stoves and fireplaces;
- welding machine;
- electrodes of a suitable brand and size. As a rule, electrodes with a diameter of 3–4 mm are used to perform welding work;
- Bulgarians.
Installing a boiler in the kitchen
The kitchen room is often the best option for installing a gas boiler.
This is due to the following points:
- The premises meet all fire safety requirements and criteria.
- Kitchens always have a window, and sometimes several. There is a window in the window, which can also be used to effectively ventilate the room.
- The kitchen always has good ventilation.
- The walls in the kitchen are made of highly flammable materials and are often tiled.
conclusions
Regardless of the type of boiler, to install it yourself, you must have certain knowledge and skills, as well as adhere to all the requirements of SNiPs and fire safety standards.
Firewood quality
The best firewood for a solid fuel boiler has always been oak firewood. Due to its high quality, these raw materials belong to the elite class. The cost of oak firewood is high, so it is not affordable for everyone. But such firewood is often indispensable when it comes to the taste of baked bread, pizza or other pastries. Here oak logs are simply irreplaceable.
Let's look at the characteristics of firewood from different types of wood:
- Oak: an elite, expensive variety. Burns powerfully, giving off a huge amount of heat;
- Birch: Best quality/cost ratio;
- Alder: excellent firewood, the house warms up quickly. In addition, the ancestors considered alder firewood to be “medicinal”, since in a house heated with its help, people were less likely to get colds;
- Pine: hot and aromatic firewood that burns well due to its resin content.