To heat a small living space or a two-story private house, it is not necessary to use complex, expensive technologies.
The Leningradka heating system, known since the times of the Soviet Union, is today effectively used to provide heat to small residential buildings.
- Preparatory work for the premises
Design
The simplest version of the system consists of the following elements:
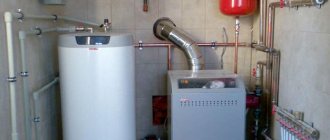
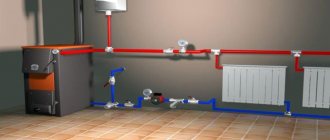
- Expansion tank . It is a reservoir with coolant. Installed above the heating elements and boiler to ensure water circulation through the pipes.
- Boiler . Connects directly to the expansion tank and the upper circuit. Heats up the coolant.
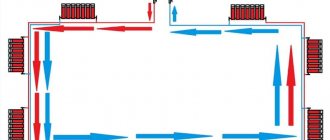
Leningrad heating system diagram
- Upper outline . Supplies hot water from the boiler to the tank and heating elements.
- Bottom outline . It removes the cooled coolant from the heating elements to the boiler for subsequent heating.
The main feature of the Leningradka is that the heating elements are not connected to the upper circuit in series, but are installed parallel to it. This is the main difference from a conventional single-pipe heating system.
To make the boiler work longer: advice from professionals
Some simple rules will help extend the life of your heating equipment.
It is necessary to provide:
- softened coolant without oxygen, even just boiled water;
- water softening station or polyphosphate filter;
- an oblique filter on the return, installed in a horizontal position so that it can be twisted to remove air from the expansion tank;
- compliance of the gas supply diameter with that recommended by the boiler manufacturer;
- grounding in the boiler room, voltage stabilizer to avoid the destructive effects of stray currents.
Principle of operation
The principle of operation of the “Leningradka” is generally no different from that in any single-pipe heating system.
The system operates as follows:
- the boiler heats the water and supplies it partially to the upper circuit, and partially to the expansion tank (excess coolant goes there;
- the heated coolant is lighter than the cold one, so it rises into the battery, displacing the cold one down;
- in the battery, the water gives up its heat and is itself displaced by the hotter one, which just came from the boiler;
- the cooled coolant enters the lower circuit, which leads to the entrance to the boiler;
- after cold water enters the boiler, the cycle repeats.
Pros and cons of the system
The advantages of “Leningradka” include:
- Simplicity . Despite some complications compared to the traditional single-pipe system, the Leningradka is very simple. Its installation can be done even by someone who does not have specific knowledge and skills in the relevant field.
- Economy . 20% - 30% less material is spent on “Leningradka”. But here we immediately need to make a reservation - the advantage is only relevant in comparison with a two-pipe system. If you take a single-pipe one, then it will turn out to be even somewhat more economical (due to the fact that the batteries are connected in series and no taps are made to them).
- Possibility of fine tuning . If you install a needle regulator on each bypass, it becomes possible to regulate the temperature of an individual battery.
- Easy to maintain . If we are talking about a traditional one-pipe system, to replace the battery it will have to be completely freed from water. In the case of the Leningradka, this is not necessary - it is enough to shut off the bypass. Water will continue to circulate along the lower circuit. True, for such an opportunity to arise, it is necessary to equip the bypasses with taps.
Expert opinion
Grebnev Vadim Savelievich
Heating system installer
Another plus is versatility. “Leningradka” can be implemented anywhere: in a country house, one- or two-story cottage. And even in a city apartment.
However, the system also has disadvantages. Here are the main ones:
- Uneven heating of radiators . Even a needle valve in the bypass does not solve the problem. True, it does not occur with all types of connections. But more on that later.
- Inability to connect additional heating equipment . For example, heated floors. But this is not a disadvantage exclusively of the “Leningrad” - the minus is typical for any single-pipe heating.
- The need to use large diameter pipes . The minimum should be at least 2.5 cm. If you take less, it will be difficult to select suitable bypasses for radiators. Because of this, the pressure in the system often drops. As a result, water cannot circulate normally. The problem is solved by installing pipes of smaller diameter, which create the required pressure.
Do-it-yourself single-pipe heating system for a private house
The problem of organizing a heating system for your own home is one of the key ones during construction, reconstruction, major repairs, etc. Even when purchasing a ready-made country building, you should pay close attention to this issue. And to do this, you must have an idea of the existing types of heating systems, their advantages and disadvantages, and operational features.
Do-it-yourself single-pipe heating system for a private house
Of all types of heating, water remains the leader in popularity - with pipes carrying heated liquid coolant from the boiler to radiators, convectors or underfloor heating circuits. Despite the cumbersomeness of such a system and the scale of work during its creation, there is no real alternative yet, if assessed by the joint criteria of “affordability - efficiency - cost-effectiveness”. Well, among all the water systems, the simplest to implement is the single-pipe one. How to plan and install a single-pipe heating system for a private house with your own hands will be discussed in this publication.
What makes a single-pipe heating system different?
The main feature of a single-pipe heating system is probably immediately clear from the name itself.
The circulation of the coolant here is organized through one main pipe, which forms a ring that begins and ends in the heating boiler. All heating radiators are connected in series or in parallel to this pipe.
Typical layout of a single-pipe heating system
It is not at all difficult to distinguish externally a single-pipe and a two-pipe system, even just by looking at the heating radiator.
Despite the difference in connecting the radiators, this is all a one-pipe system
Despite the variety of battery connection options shown in the figure, all this refers to single-pipe wiring. Options “a” and “b” show the sequential placement of radiators - the pipe seems to pass through them. In options “c” and “d” the batteries are placed parallel to the pipe. But in any case, both the input and output of any radiator “rely” on one common line.
For clarity, to make it easier to understand, we present a two-pipe wiring diagram:
Examples of connecting batteries to a two-pipe system
Always, with any battery insertion scheme, the entrance to it comes from the supply line, and the output is closed to the “return” pipe.
For more information about what a two-pipe heating system for a two-story house is, see the special article on our portal.
Even someone inexperienced in matters of creating a heating system will most likely immediately understand the main disadvantage of a single-pipe scheme. The coolant heated in the boiler, passing sequentially through the radiators located, cools down, and in each subsequent battery its temperature is lower. This difference will be especially noticeable if you compare the first heat exchange point, located closest to the boiler room, with the very last one in the “chain”.
There are certain methods that make it possible to neutralize this disadvantage to a certain extent - they will be discussed below.
Advantages of a one-pipe system
Be that as it may, the single-pipe heating system is quite popular due to its advantages:
- Such wiring requires a minimum amount of material - (we can safely say about 30 - 40% savings on pipes).
- Based on the first point, the scale of installation work carried out is significantly smaller.
- The wiring diagram is simple, and therefore most owners who have certain skills in plumbing work can cope with the task of self-installation.
- The single-pipe system is extremely reliable - once correctly installed and adjusted, it will not require intervention in its operation for many years. This does not require any complex adjustment units or equipment.
- Such a system is quite universal, and if desired, it can be installed both in a one-story house and on several levels, naturally, slightly changing the required equipment and adapting the connection diagram.
One pipe runs along the floor surface - it is not too conspicuous and is easy to decorate
- The main pipe always runs along the floor (with the exception of options with risers, which will be discussed below). This arrangement makes it possible to decorate the pipe without special costs, for example, by covering it, after appropriate thermal insulation, with a finishing floor covering. And, in the end, one low-lying pipe is not so conspicuous, and it is always easier to hide it than two.
Disadvantages of a single-pipe heating scheme
Single-pipe heating systems were actively used on an industrial scale, in the construction of residential and public buildings. The builders were probably completely satisfied with the ease of installation and cost-effectiveness in terms of material consumption, so the shortcomings of the system faded into the background. But in private construction, the “disadvantages” of a single-pipe system will have to be known and taken into account, since they are quite significant.
- The main thing has already been mentioned - in the most simplified form of wiring it is impossible to achieve equality of coolant temperatures in all batteries of the circuit. One way out is to gradually increase the number of sections from room to room as you move away from the boiler in order to achieve equal heat transfer by increasing the active heat exchange area. But at the same time, of course, it will be difficult to talk about saving on materials - radiators can cost much more than pipes.
There are other ways to equalize the temperature - we will discuss them below.
- If you are planning a heating system with natural circulation, you may encounter difficulties in meeting the mandatory required pipe slope. With a single-pipe system, the main line is located along the floor, and if the room is quite spacious, or the perimeter of the building is long, then it is sometimes simply impossible to cope with such a task.
Conclusion - a single-pipe system with natural circulation is suitable only for compact buildings. Otherwise, the installation of a circulation pump will become mandatory. However, they are now trying to install a pump whenever possible, and many modern heating boilers already have a built-in circulation unit.
- The single-pipe system completely excludes the insertion of “warm floor” circuits into it, in addition to heating radiators. If in the future the owners plan to organize water floor heating in any of the rooms, then it is better to immediately install a two-pipe system.
Read more about this in a special article on our portal:
Wiring diagrams for a single-pipe heating system
The general contour of a single-pipe system is most often located along the external walls of the house and runs parallel to the floor (or with the necessary slope). But the scheme for including heating radiators in this circuit may vary. Let's consider the possible options - from the simplest to the more complex and effective.
Since the basic diagram of pipe routing and general equipment does not change, the general numbering of nodes will be preserved from drawing to drawing, indicating only newly appeared elements.
You may be interested in information about how a hydraulic arrow works in a heating system
The simplest schemes
A. The simplest wiring of a one-pipe system:
The simplest and most imperfect option
The numbers in the diagram show:
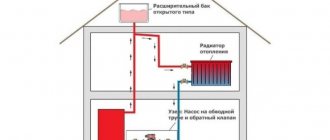
1- heating boiler. The main supply pipe goes up from the boiler (item 2). The diagram shows a version of an open-type single-pipe heating system, therefore an expansion tank is mounted at the highest point of the wiring (item 3).
Prices for different types of heating boilers
heating boilers
If the system operates on the principle of natural circulation, then a starting section is required for single-pipe distribution - the so-called “accelerating manifold” (item 4). It will prevent stagnation of the coolant in the system and will give an additional impulse to the circulation of liquid through the pipes. The height of this accelerating collector above the first radiator (h 1) is at least one and a half meters.
The heating radiators themselves (item 5) in the simplest circuit are installed in series with the lower input and output connections on opposite sides. It is clear that when laying a pipe to ensure natural circulation, a slope is observed (shown by brown arrows). Moreover, the excess of the last radiator in the chain above the heating boiler (h2) must be observed. The larger this value, the better, which is why boiler rooms are often located in basement rooms or artificially recessed floors are made at the installation site of the device. The maximum permissible h2 value is 3 meters.
To avoid all these difficulties, the optimal solution would be to install a pump unit (item 6). It includes the pump itself (item 7), a bypass (jumper) and a system of taps (items that allow, if necessary, switching from forced circulation to natural circulation (for example, if power outages are not uncommon in the area of construction).
Recommended circulation pump piping
It is necessary to provide for one more point - the possibility of releasing air pockets that may accumulate at the top point of the radiators. To do this, air vents are placed on the batteries (item 9).
On the left is the Mayevsky crane. On the right is an automatic air vent
They can be Mayevsky taps, which are periodically unscrewed to allow air to escape. A more expensive option is automatic air vents that do not require human intervention.
Prices for Mayevsky crane
Mayevsky tap 1/2
This radiator connection scheme is the most primitive, since all the shortcomings of a single-pipe system are reflected to the maximum extent in it. The last radiators in the circuit will always be significantly colder than the first.
B. The following diagram provides only one improvement - the radiators are connected diagonally (shown by purple arrows).
Diagonal connection increases heat transfer of radiators
This passage of coolant through the battery contributes to maximum thermal energy transfer and more uniform heating of all sections. But the temperature difference in the first and last radiator will obviously be even higher. In addition, such a scheme for inserting batteries significantly reduces the possibility of natural coolant circulation, and with a long overall circuit it will become impossible. This means that it will not be possible to do without a circulation unit.
B. For such wiring, an open or closed type system with forced circulation is more suitable. The diagram below shows an option with a sealed expansion tank.
The simplest scheme, but in a closed system with forced circulation
In this case, the pump is embedded directly into the main pipe (although the previously indicated wiring diagram may remain the same). The main difference is a membrane-type expansion tank (item 10), which is usually installed on the “return” not far from the boiler (there is no regulation here - the optimal location in terms of layout and ease of use is selected). And the second mandatory element is the “safety group” (item 11), consisting of a safety valve designed for a certain value of the maximum pressure in the system, an automatic air vent and a visual control device - a pressure gauge.
“Security group” assembled in one building
In the future, when considering the diagrams, only a closed system with forced circulation will be shown. This is done only to avoid overloading the drawings with lines. But in general, the home owner has the same choice - a closed or open expansion tank, and the circulation is natural, forced or combined.
All three of the above schemes have one common important drawback. It lies in the fact that if any of the radiators fails and is urgently dismantled, the system becomes temporarily completely inoperable, since the circuit is broken.
Therefore, if the decision has already been made to install a single-pipe heating system, then the optimal choice will be the “Leningrad” one, which allows you to avoid many of the characteristic shortcomings and provides more opportunities in terms of adjustments.
You may be interested in information about what types of electric boilers are available for heating a private home
A modernized version of the single-pipe heating system - “Leningradka”
Where this established name, “Leningradka” came from, is not known for certain. Perhaps it was in the Northern capital that specialists from the research institute developed technical regulations for such a heating system. It is possible that when large-scale residential construction began in the country, some Leningrad construction organizations were the first to put such a scheme on stream. Be that as it may, it was the “Leningradka” that was designed for mass construction, both low-rise and high-rise, and its design, while being economical in terms of material consumption and ease of installation, allows for quite efficient use of thermal energy in large heating circuits .
The main difference between the Leningradka is that the input and output on each of the radiators are connected by a jumper - a bypass. Or another option - branches are made from the main pipe to the inlet and outlet of each battery.
Bypass prices
bypass
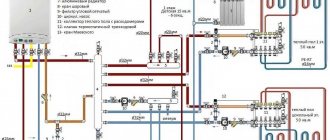
The schematic diagram of the Leningradka is shown in the figure:
Basic diagram of a single-pipe system - “Leningradka”
The presence of a bypass (item 12) makes it possible to distribute heat more evenly across radiators at varying distances from the heating boiler. Even if the coolant flow through any battery is interrupted (for example, a blockage occurs or an air lock forms), the system will still be operational.
The presented diagram shows the simplest version of the “Leningradka”, without equipping it with any adjustment devices. It was often used before, and experienced craftsmen already knew what approximately the bypass diameter is required on a particular battery in order to equalize the temperature at all points to the maximum extent. Thus, a completely insignificant increase in the number of pipes makes it possible to reduce the total number of battery sections in rooms remote from the boiler room.
You may be interested in information about how the bypass line is designed and how it works
The same option, but with diagonal insertion of batteries, improving their overall heat transfer:
The same, but with diagonal battery connection
But that's not all. Firstly, it is very difficult to independently calculate the diameter of the jumper for each battery. And secondly, such a scheme does not yet provide for the possibility of dismantling any individual radiator without breaking the closure of the general circuit. Therefore, it is best to use a modernized modification of the Leningradka:
Modernized circuit - with taps and control valves
In this option, each radiator is surrounded on both sides by taps (item 13). At any time, you can “cut off” the battery from the common pipe - for example, when the room for some reason does not temporarily need heating, or if there is a need for dismantling for repair or replacement. The operation of the system will not be disrupted in any way.
An example of connecting a radiator through shut-off ball valves
These taps, by and large, can be used to regulate the heating of a specific radiator, increasing or decreasing the coolant current.
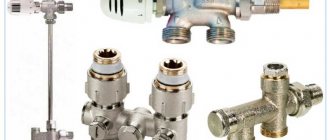
But it would be more reasonable to install ball valves here, which are designed primarily to operate in two positions - “open” or “closed”. And for adjustment, a needle balancing valve mounted on the bypass (item 14) will serve.
The same diagram - with a diagonal connection:
You can install radiators this way
And here is a similar connection in the photo:
The radiator is connected to the Leningradka
- Blue arrows – shut-off ball valves at the inlet and outlet of the radiator.
- Green arrow – balancing valve.
Such a modernized “Leningradka” system makes it possible, if necessary, to install the system not as a single looped circuit, but with dedicated sections - branches. For example, this way you can organize wiring in a two-story building, or in a house that has “wings” or side extensions.
"Leningradka" with an additional branch circuit
In this case, a branch is made from the main pipe (item 16), going to an additional heating circuit, and a tie-in into the return pipe (item 17). And on the “return” of the additional circuit (pos. 15), it is advisable to install another needle control valve (pos. 18), with the help of which you can achieve a balanced joint operation of both branches.
For a two-story house, another option is possible. If the layout of the premises is generally the same, then it would be rational to use a system of vertical risers.
System with vertical risers
19 – interfloor covering.
20 – supply pipe from the boiler.
21 – return pipe.
22 – risers, which include radiators according to the “Leningrad” scheme with an adjustable bypass.
There is, however, one interesting point here. Each drain itself is organized according to the principle of a single-pipe system (highlighted in green). But if we consider the system as a whole, then the risers are already included in the two-pipe system - each of them is connected in parallel to the supply pipe and to the return pipe (highlighted in brown). Thus, there is a harmonious combination of the advantages of both systems.
Video: Leningradka heating system
You may be interested in information about what bimetallic heating radiators are
Planning your heating system
When carrying out preliminary planning of any heating system, it is necessary to take into account many nuances that directly affect its efficiency. It is very important to correctly select the main elements - boiler, radiators, pipes for creating circuits, expansion tank, circulation pump. Ideally, such a calculation should be entrusted to specialists. But knowing the basics and being able to navigate such issues will never be superfluous.
What kind of boiler will you need?
The main requirement for the boiler: its thermal power must fully ensure the efficiency of the heating system - maintain the required temperature in all heated rooms and completely replenish the inevitable heat losses.
This publication will not dwell on the types of heating boilers. Each homeowner makes an individual decision - based on the availability and cost of energy resources, the presence or absence of boiler room equipment, fuel storage, taking into account their financial capabilities to purchase this or that equipment.
But the boiler power is a general parameter without which it is impossible to create a rational and efficient heating system.
You can find a lot of recommendations for the simplest independent calculation of the required power. As a rule, it is recommended to proceed from a ratio of 100 W per 1 m² of house area. However, this approach gives only an approximate value. Agree that neither the difference in the climatic conditions of the region nor the features of the premises are taken into account here. Therefore, we suggest using a more accurate method.
Its essence is to calculate the required amount of thermal energy for each room. Then, by summing up the result, you can find the minimum boiler power value for heating the entire house.
To begin, make a small table in which you indicate all the rooms of your home and their parameters. Surely, every owner has a building plan, and, knowing the features of his “possessions,” he will spend very little time filling out such a table. An example is given below:
| room | area, sq. m | external or balcony door | external walls, number, where they look | windows, quantity and type | window size | required for heating, kW |
| TOTAL: | 18.7 kW | |||||
| hallway | 6 | 1 | 1, C | — | — | 2.01 |
| kitchen | 11 | — | 1, V | 2, double glazing | 120×90 cm | 1.44 |
| living room | 18 | 1 | 2, S.W. | 2, double glazing | 150×100 cm | 3.35 |
| bedroom | 12 | — | 1, V | 1, double glazing | 120×90 cm | 1.4 |
| children's | 14 | — | 1, W | 1, double glazing | 120×90 cm | 1.49 |
| so on throughout all rooms | … |
Now that the data is prepared, go to the calculator below and calculate the heat energy requirement for each room and enter it into the table - it’s very simple. All that remains is to sum up all the values.
Calculator for calculating the required thermal power
Go to calculations
The amount received is the minimum value that will allow you to decide on the choice from the model range presented for sale. It is advisable to provide about 10 ÷ 15% power reserve.
Type and number of heating radiators
The modern wide range of radiators can confuse an inexperienced person in these matters. How to correctly approach the problem of choosing heat exchange devices and how many of them will be required?
What is important to know about heating radiators?
Our portal contains a special publication entirely devoted to these issues, highlighting all sorts of nuances. And the calculator built into the article will help you quickly and accurately calculate how many sections of heating batteries will be required for each room.
Pipes for heating system
Options are also possible here - heating can be created on the basis of metal, plastic or metal-plastic pipes. Each option has its own advantages and disadvantages. It is most convenient to present this in tabular form - this will make it easier to compare and make the right choice.
| Illustration | Advantages of pipes | Flaws |
| Conventional “black” steel pipes VGP | ||
| High strength to external mechanical influences | Requires external anti-corrosion protection | |
| Ability to withstand high coolant pressures | For the same reason of corrosion vulnerability - they are demanding on the cleanliness of the coolant | |
| relatively low linear thermal expansion | Complex installation - requires welding, threading, bending, etc. | |
| High temperature resistance | Large mass, complicating both delivery and installation | |
| High price compared to polymer pipes | ||
| Stainless steel pipes | ||
| Retains all the positive qualities of steel pipes | The cost of pipes and fittings for them is very high | |
| No corrosion, much more durable | Due to the characteristics of the metal, processing and installation are much more complex and expensive than conventional steel | |
| Externally they look much more aesthetically pleasing. | ||
| Copper pipes | ||
| Highest resistance to temperature changes (from negative to extremely high, up to 500 °C) and pressure, to water hammer | The most expensive of all options – both for the pipes themselves and for components | |
| With proper installation, the service life is practically unlimited. | ||
| Original, aesthetic appearance | ||
| Installation is much easier than with any steel pipes | ||
| Metal-plastic pipes | ||
| Aesthetic appearance | Afraid of freezing | |
| Smooth inner channel surface | The guaranteed service life is short - usually no more than 10 ÷ 15 years | |
| Corrosion resistance, quite acceptable thermal resistance for heating systems | With the low cost of the pipes themselves, the price for fittings and other components is quite high | |
| Easy to install - you can get by with a standard home set of tools | The possibility of wall delamination cannot be ruled out, especially if installation technology is violated. | |
| Low linear thermal expansion | ||
| Possibility of bending in compliance with safety requirements | ||
| Polypropylene pipes | ||
| The material is the lightest used for heating systems | High coefficient of linear expansion | |
| Service life is quite long: 25 years or more | Not resistant to ultraviolet rays | |
| Smooth inner surface | At temperatures above 90°, deformation and destructuring of the material may begin. | |
| Freeze resistance | Impossibility of creating curved shapes - installation of an additional shaped element is always required | |
| Installation is completely simple and can be mastered by any owner in a matter of hours | Violations of welding technology often lead to a narrowing of the passage diameter at the joints of parts | |
| Externally they look very aesthetically pleasing | Installation requires a special tool - a soldering iron for PCB | |
| The cost of both the pipes themselves and their components is low | ||
| PEX cross-linked polyethylene pipes | ||
| High degree of resistance to temperature and pressure changes | The cost of both the pipes themselves and their components is quite high. | |
| High material density | Installation requires special professional-grade tools | |
| Plasticity - during installation the pipe can be given the required configuration | UV instability | |
| Linear expansion coefficient is low | ||
| If you have the necessary components and tools, installation is simple. | ||
| Connecting units are highly reliable | ||
So, any of the presented types of pipes may be suitable for the heating system in question. However, some nuances should be taken into account:
- If the planned temperature in the heating circuit is above 70 degrees, then it is better to abandon the use of polymer pipes (this is especially true for polypropylene, and to a lesser extent for PEX).
- The piping of a solid fuel boiler is always carried out exclusively with metal pipes.
- If you decide to carry out the wiring according to a scheme with natural circulation and an open expansion tank, then the optimal solution would be to choose steel pipes with their open arrangement.
- If there is a desire to remove the contour into the walls, then stainless steel, polypropylene (PP pipe) or PEX are used. It is permissible to use metal plastic, but only with press fittings (threaded ones are prohibited from being placed into walls or floors). In any case, when walling up pipes, it is necessary to ensure their isolation from the chemical effects of cement-containing solutions. In addition, the possibility of linear expansion during temperature fluctuations must be taken into account, and thermal insulation must be performed to prevent heat loss due to unnecessary heating of the wall or floor mass.
It is difficult to give recommendations regarding pipe diameters - this parameter largely depends on the individual characteristics of the heating system itself. In this matter, the best solution would be to contact an experienced craftsman who has assembled more than one system with his own hands and knows many of the nuances well.
You may be interested in information on how to organize heating without gas in a private house
Circulation pump
How to properly tie a circulation pipe was shown above. Now it’s better to focus on choosing the right device.
It is clear that the pump must receive a 220 V power supply. Typically, the power consumption of such devices is small, and its impact on the total amount of electricity costs is insignificant. Therefore, the power consumption parameter in this case is not key.
Two other parameters are much more important.
- Firstly, this is the pump’s performance, that is, its ability to move the required amount of coolant per unit of time. The initial values for the calculation are the coefficient of heat capacity of water, the power of the heating boiler and the temperature difference between the supply pipe and the return pipe at the entrance to the boiler.
To carry out the calculations, we suggest using a special calculator:
Circulation pump performance calculator
— The boiler power is already calculated higher.
— The temperature difference may vary depending on the heat exchange devices used (radiators, convectors, heated floors).
— The heat capacity of water is a tabular value, and it is already included in the program.
- Secondly, it is very important to know what water column pressure the circulation pump should produce. The pressure created by it should be sufficient to ensure a stable flow of coolant along the entire length of the created circuit, and to overcome the hydraulic resistance of pipes and shut-off and control valves.
The initial data for the calculation are:
- the total length of all pipes in the heating system, including supply and return, bypasses, pipes, etc.
- coefficient of hydraulic resistance of pipes, expressing in numerical form what the average pressure loss per 1 linear meter of pipeline is. Since it is assumed that the system will be installed from new pipes with a smooth, not overgrown inner surface, it is quite acceptable in this case to take the average value of 150 Pa/m.
— Finally, it is necessary to take into account the resistance of fittings and shut-off valves. There won’t be a big mistake if we take a coefficient value of 1.3 - single-pipe systems are usually not oversaturated with control two- or three-way valves and other thermostatic equipment. However, if it is installed somewhere, then it is better to raise the coefficient to 1.7 - the extra supply of pressure created will not become a hindrance.
You may be interested in information on how to flush the heating system in an apartment building
Below is a calculator that takes these indicators into account.
Calculator for calculating the required pressure of the circulation pump
Go to calculations
Expansion tank
If an open-type heating system is being breaded, then there can be many options for the expansion tank. Some owners purchase ready-made tanks welded from sheet metal. For these purposes, they use old containers - barrels or cans, cutting pipes into them to connect to the system. Even an old large-capacity plastic canister can have a use.
The main thing is that the capacity of the factory or improvised tank corresponds to the volume of coolant in the system - usually 10 - 15% is enough for this. The tank itself should not be sealed hermetically, but a lid should still be provided to minimize the free evaporation of liquid into the atmosphere. A rational solution would be to install a pipe that will prevent overflow when filling the system or when the coolant expands during the first start-up - the excess will simply be discharged outside in an organized manner.
A simple open expansion tank is shown in the figure:
It’s easy to make such a tank yourself
1 – removable cover
2 – brackets for mounting in the selected location.
3 – hole for insertion into the heating system.
4 – overflow pipe, to which you can connect a hose that drains excess water into the sewer or simply onto the ground.
Another thing is a sealed expansion tank of the membrane type. This will require a more careful selection and calculation of parameters.
How to choose an expansion tank?
To avoid repetition, it would be logical to refer the reader to a special publication on our portal, which discusses this issue in detail. In addition, there is a calculator for calculating an expansion tank for a closed-type heating system.
Features of installing a single-pipe heating system
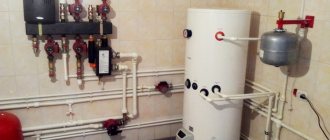
- Work begins “from the stove” - that is, by installing the boiler in a place prepared in advance for it. In the vast majority of cases, this work must be performed by a specialist, especially if the equipment was purchased new and is covered by a factory warranty.
- The most important step is marking. You should decide in advance where the radiators will be installed. Moreover, there is an important feature - in a single-pipe system on one floor, all radiators must be precisely placed at the same height. This means that you will have to work either with a laser or a water level to achieve uniformity in all rooms.
- The closed loop of pipes connecting the radiators is made with a slope. If natural circulation of the coolant is assumed, then the slope must be maintained at least 1% (1 cm per linear meter). With forced circulation, this value can be reduced to 0.3 - 0.5%, but the pipe should not be made strictly horizontal - a single-pipe system is already oversaturated with “lying” sections, and normal circulation needs to be helped.
Marking and installation of the main pipe
- If necessary, a vertical riser is made from the heating boiler to an open expansion tank and an accelerating manifold - they have already been discussed in the article.
- Radiators are hung in marked places. Perhaps you should not completely remove the original film packaging from them yet, so as not to damage them during installation work. Based on the placed radiators, the pipes for inserting them into the main pipe are marked. After this, the batteries can be temporarily removed.
- The layout of pipes in the system under consideration will not present much difficulty - this is, as a rule, a contour along the perimeter of the floor. Places for inserting tees for joining with radiators, installation locations for balancing valves and shut-off valves are immediately outlined. Typically, a pipe with an internal diameter of DN25 is used for the common line, and a pipe with an internal diameter of DN20 is used to connect each radiator.
- The pump unit is installed at the entrance to the boiler. The pump itself does not like very high temperatures too much, so the return is the optimal place to install it. It is advisable to install an “oblique filter” in front of the pump - it will constantly clean the coolant from dirt and solid inclusions, preventing them from entering the pump and the boiler heat exchanger.
Pumping unit and expansion tank on the “return” near the entrance to the boiler
- You can also install a closed expansion tank here. It is recommended to install a shut-off valve between it and the main return pipe - in the event that it becomes necessary to dismantle the tank, you will not have to empty the entire system for this.
- The technology for assembling the pipe circuit depends on its type. In any case, it is necessary to achieve complete sealing of all connections.
- If the pipes are supposed to be buried in the thickness of the wall or floor, then they must be insulated. Pipes hidden in grooves are sealed exclusively with gypsum mortar. Firstly, it is non-aggressive chemically. And secondly, the thermal insulation qualities of gypsum are an order of magnitude higher than those of cement mortar.
Pipes can be hidden in the wall, but high-quality thermal insulation will be required
- After installing the pipes, you can re-hang the radiators in their original places and finally connect them to the circuit. It would be useful to remind you once again - it is best to do this through the shut-off valves - it will always be possible to disconnect and remove the faulty radiator without violating the integrity of the rest of the system.
Shut-off ball valve (left) and balancing valve
- Simultaneously with connection to the circuit, air vents - automatic or Mayevsky valves - must be installed on radiators in a closed system.
Radiator connection. The Mayevsky crane has already been installed
- When the system is completely assembled, it is advisable to carry out control tests - pressure testing (the expansion tanks must be temporarily closed). To do this, it can be pumped with air or filled with water, and with the help of a special pump, the pressure in it rises to a value of approximately 1.5 of the calculated value. If no leaks or obvious pressure drop are detected, then you can fill the system with standard coolant and conduct a test run.
Checking the finished system by crimping
- All that remains is to accurately balance the system so that the heat is distributed throughout the rooms with the greatest possible uniformity.
As you can see, there is no excessive complexity in the process of installing a single-pipe heating system. This is very often the determining criterion when choosing a water heating scheme for your own home. Long-burning pyrolysis boilers you will find the answer in the link.
You may be interested in information about what a buffer tank for a solid fuel boiler is
Video: example of a single-pipe heating system for a small house
Type selection
Vertical connection
First you need to decide on the type of “Leningradka”. The differences come down solely to the type of battery connection.
Depending on this criterion, four types of system are distinguished:
- with bottom connection;
- with vertical connection;
- with top connection;
- with diagonal connection.
The lower one normally warms up only half of the battery. In addition, when using them, difficulties with coolant circulation may occur. They are solved by connecting an electric pump that will pump water through the system. But this reduces the advantages of the Leningradka to nothing. After all, the pump increases energy costs. Yes, and you will have to buy the device itself.
The best option is a vertical connection. It ensures uniform distribution of water in the system, which gives the best heating of the radiator. The diagonal connection has similar characteristics.
The top connection can also work without a pump. But during installation it is necessary to correctly determine the geometry of the pipes. If the acceleration section is assembled incorrectly, there will also be problems with water circulation. Proper installation requires a little more consumables. This also eliminates the advantages of the system over traditional options.
Some installation features
When designing a system, using information from the Internet and performing installation yourself, remember that a large amount of reading material and watching videos increases your chances of successfully completing what you started. But the most optimal way to organize heating with your own hands would be to involve, at a minimum, a professional practitioner for consulting support.
To ensure high-quality heating of the outermost radiators in the chain, the number of their sections should be increased.
For the gravity version of the system, pipes of significant diameter must be used. And the total length of the circuit should not exceed 30 m.
Installation of the supply main pipe must be carried out at a slight slope. The radiators themselves are installed at the same height and do not at all distort the “geometry” of the room.
Vertical wiring of the “Leningrad” and long “horizontal” will definitely require the introduction of a circulation pump into the system.
When installing a supply pipe deep into the floor with your own hands, you should remember the need to insulate it with heat-insulating roll materials. This will save you significant money during the operation of the system and will not lead to overheating of the “underground” space.
Photo of a needle type tap
Ball valve
Only needle-type valves should be used as shut-off valves on bypasses and auxiliary circuits of the system. They are able to smoothly regulate the flow of liquid through themselves. The use of ball valves is unacceptable here, since they are not intended for “half-open” operation. They are either closed or completely open. Only in these two positions is their long-term performance maintained. There are enough videos on this topic on the Internet.
Concluding a long stream of thoughts, we would like to note that the single-pipe “Leningrad”, which has long been proven over decades of use, with a modern “upgrade” with a circulation pump and control valves on the bypasses, allows you to obtain the advantages of a more complex heating system with its real simplicity and low investment. Ensure its correct installation with your own hands and spend the cold seasons in the warmth and comfort of your private home.
Materials
When choosing pipes, it is important to know the number of radiators
The choice of pipes to create a system depends on:
- number of radiators;
- warming up the system.
The diameter of the pipe must be such as to provide the required number of batteries with coolant. The more there are, the wider the gap should be. For 4 radiators you need at least 2.5 cm. For 5 - 6 - approximately 2.7 - 2.8 cm.
Expert opinion
Grebnev Vadim Savelievich
Heating system installer
If you do not plan to include a pump in the system, then the pipe diameter must be at least 40 mm.
Depending on the heating, the pipe material is selected. If the water in the system reaches a temperature above 90 ° C, it is better to use steel. The fact is that polypropylene melts already at 95o C.
Radiators are selected based on their operating efficiency. They must have maximum heat transfer. This is especially important because slightly cooled water enters the last batteries of the circuit. So for complete heat transfer they must have high efficiency.
Approximate calculation of the Leningrad heating scheme
Using the calculation example, it will be easy to see that designing this system is really not difficult.
Basic data for calculation:
- area of the building/apartment broken down by individual premises;
- ceiling height;
- information about the orientation of the external walls of the premises to the cardinal directions and the number of such walls;
- number, type and size of windows and doors.
A table for calculating a one-story house according to the proposed layout may look like this.
The required heating output is calculated using an online calculator for a ceiling height of 2.5 m and an outside temperature of -15 degrees Celsius. We believe that the thermal insulation of the walls is good, and there is a warm attic above the rooms.
| Room | Area, sq.m. | Presence and orientation of external walls | The presence of a balcony or entrance door | Availability, type and size of window | Required heating power, kW |
| Tambour | 5,45 | Three, S, E, W | Entrance | Single, double glazing, 1000x1500 mm | Not heated |
| Bathroom | 6,3 | Two, Yu, Z | No | Single, double glazing, 700x500 mm | 0,5 |
| Bedroom | 11,96 | Two, Z, S | No | Single, double glazing, 1500x1500 mm | 1,07 |
| Living room-kitchen | 23,02 | Two, S, B | No | Two, double-glazed windows, 1500x1500 mm | 2,05 |
| Utility room | 4,48 | Two, V, Yu | No | Single, double glazing, 700x500 mm | 0,36 |
| Total | 2,98 | ||||
With such low heating needs, the number of radiators for each room (except technical) is taken one at a time; the number of sections of bimetallic radiators is determined using an online calculator.
For the bathroom you will need 4 sections, for the bedroom 8, for the living room-kitchen 16. Considering that there are two windows in the living room, it is reasonable to divide the heating into two radiators - under each window, distribute one radiator of 8 sections.
Important: this calculation gives an approximate and, with a high degree of probability, an underestimated value of the required power of heating devices. It is advisable to increase the numbers by 10...15%.
Thus, we can assume that the bathroom will need 5 sections, in the bedroom and kitchen-living room - 9 instead of 8. However, radiators are usually produced with an even number of sections, so we accept 6 for the bathroom, 8 for the bedroom, 8 and 10 for the kitchen -living room
Next, you need to determine the total volume of coolant. To do this, you need to know the internal volume of each radiator, boiler and pipes. Without an accurate plan for laying communications and knowledge of the passport data of the battery and boiler models, this calculation cannot be performed. The volume of the expansion boiler is also added here, approximately 15% of the total volume of coolant in the system. Taking the data on average, we can assume that an electric boiler with a power of 6 kW has an approximate volume of 7...10 liters, the total volume of radiators at the rate of 0.39 liters per section is 13.5 liters. We add here the internal volume of the pipes and expansion tank - we get approximately 35...45 liters of coolant.
Carrying out work
Once you have decided on the connection diagram and selected materials, you can begin work on assembling the system.
They consist of the following stages (using the example of vertical connection of radiators):
- Preparation. At this stage, pipe holders are installed. If you plan to hide it in the walls, prepare grooves.
- Boiler installation. Install a heating boiler.
- Laying the main line. Two pipe circuits are laid from the boiler: upper and lower.
- Bends are made in the upper circuit. If we are talking about polypropylene pipes, then bends are created using tees. If the pipes are metal, then a hole is made in them, into which a bypass of smaller diameter is welded.
- If necessary, taps are installed in the bypasses to shut off access to the coolant or regulate the temperature of the battery.
- Radiators are connected to the bypasses.
- An expansion tank is connected to the outlet of the upper circuit of the system.
That's it, the work is finished. You can fill the system with water.
Methods for connecting a radiator to the main line
The heat transfer of radiators depends on the method of their connection to the main line.
There are three main types of connection:
- Diagonal;
- Lateral;
- Lower.
Let's look at the features of each of these methods in more detail.
Diagonal or cross connection
Diagonal, or cross, connection is the most effective. Maximum heating of the battery area is achieved, and there is practically no heat loss.
According to this scheme, the supply pipeline is connected to the upper radiator pipe, and the outlet pipe is connected to the lower pipe located on the opposite side of the device. For devices with a large number of sections, only the diagonal connection type is used.
Lateral or one-sided connection
Lateral, or one-sided, connection allows for uniform heating of all sections of the device.
For connection, the supply and discharge pipelines are connected on one side. Most often, this connection is used for heating installations with overhead wiring.
Heating heat transfer when radiators are connected sideways, with supply from top to bottom, is 97%. With the reverse movement of the coolant - from bottom to top - this figure is 78%
Bottom connection of radiator with pipeline
Bottom connection is not the most efficient heating scheme. However, it happens quite often, especially when the main pipeline is hidden under the floor.
The inlet and outlet pipes are connected to the lower pipes located on different sides of the radiator.
The heat transfer rate with bottom connection of radiators is 88%
Nuances of the work
If the system does not have a pump, the upper circuit should be positioned with a slight slope
While working, you need to remember the following features:
- If metal pipes are used, internal beads must be avoided when welding. They reduce the internal clearance and interfere with the normal movement of the coolant. If there are swells, the system will not work normally.
- After filling the system, you should not immediately conduct a test run. Before it, you need to wait 3 - 4 hours and check all sections of the pipe, its connections with radiators, boiler, tank. This will allow the leak to be identified and repaired in a timely manner.
- Before a test run, it is necessary to remove air from the system using Mayevsky valves located in the radiators. Otherwise, it will only partially warm up (in the area up to the air bubble).
If the system does not have a pump, the upper circuit should be located with a slight slope (approximately 5 - 10o). This will facilitate the flow of coolant and prevent the problem of water stagnation in a certain section of the pipe.
Questions and answers
Does it make sense to install a needle valve to regulate the temperature?
Yes, since the first radiator often gets too hot. The latter does not require a tap.
Is a pump required?
With a vertical connection - no. But if you incorrectly determine the angle of inclination of the upper circuit, water will not circulate normally through the system.
Is the temperature at the boiler outlet very different from the temperature at the last battery?
Yes. The difference can reach 45% - 50%. This is why it is so important to ensure proper coolant circulation.
Is it necessary to insulate the expansion tank?
Only if it's open. A closed one can work without insulation in an unheated attic.
Reviews
- Konstantin, Tula region
“I have a small country house. I often go there in winter, so I installed gas and decided to install heating. The choice was made on the Leningradka. A two-pipe system is too expensive for me, and a single-pipe system is inconvenient - it is difficult to maintain radiators, and you cannot turn off a separate battery. I didn’t take the pump, I connected the radiators diagonally. I’ve been using it for almost the whole winter now, so far there have been no complaints - I’m happy with everything. I can say one thing: “Leningradka” fully met my expectations.”
- Ivan, Novgorod region
“We brought gas to my parents’ village house. The question arose about installing a heating system. We decided to make “Leningradka”. The house is small - there are only 6 radiators. There is no point in a two-pipe system. So far everyone is happy. It heats quite well (I connected the batteries vertically). It works great without a pump, although many say it is necessary. Separately, I would like to say about savings - the expenses turned out to be very small.”
Leningradka
One of the popular and easy-to-implement schemes began to be widely used in Leningrad, hence the name. Its peculiarity is the way the radiators are connected - in series with bypasses for each battery.
Leningradka open type.
Leningradka closed type.
The scheme is suitable for open and closed systems, with natural and forced coolant circulation. The design can be implemented in vertical and horizontal layout.
Thus, Leningradka is a universal scheme for constructing single-pipe heating systems. It has all the described advantages, but its disadvantages limit its use in large houses.
Possible Solution! In branched networks, several heating branches are made with 3-5 radiators in each. For example, they separate the heating circuits of the first and second floors. For houses with a large area, it is more advisable to use two-pipe systems.