Providing running water in a dacha is not an easy task. Nobody wants to spend a lot of money on its installation, so almost all the work is done independently. When the system itself and the pumping station are already installed, you want to achieve maximum savings in energy consumption. To do this, you need to minimize the number of pump starts. In such cases, the only solution is to install the device we are considering. The article will discuss how to assemble a hydraulic accumulator from improvised means, what the pressure should be in the device, and photographic materials.
Why do you need a hydraulic accumulator, its difference from an expansion tank
Hydraulic accumulators are often confused with expansion tanks, even despite the fundamentally different problems that these devices solve. An expansion tank is needed in heating and hot water supply systems, since the coolant, moving through the system, inevitably cools and its volume changes. The expansion tank is set up when the system is “cold”, and when the coolant warms up, its excess, which is formed due to expansion, has somewhere to go.
The hydraulic accumulator is needed for completely different purposes: if it is not installed in the water supply system, the pump will be activated every time a tap is opened. If this happens often, then not only the pump, but the entire system wears out faster, since each time the pressure increases abruptly - a so-called water hammer occurs.
As a result, a hydraulic accumulator is installed with the aim of getting rid of water hammer and extending the service life of the system as a whole. In addition, the accumulator has other functions:
- Creates a certain supply of water (useful if there is a power outage).
If frequent interruptions in water occur, the hydraulic accumulator can be combined with a storage tank Source vecu.ru
- Reduces the frequency of pump startup. The reservoir is filled with a small volume of water. If the flow rate is small, for example, you need to wash your hands or wash your face, water begins to flow from the tank, while the pump remains turned off. It is activated after very little water remains;
- Maintains stable pressure in the system. In order for this function to be performed properly, an element called a water pressure switch is provided, capable of maintaining a given pressure within strict limits;
All the advantages of hydraulic accumulators make this device an indispensable element of any autonomous water supply system in country houses.
Materials
To create a hydraulic accumulator with your own hands, we will need a number of tools and materials outlined in the list below:
- A vessel consisting of food materials, its volume must be at least 30 liters, otherwise the efficiency of the accumulator will be low and it will not be able to perform its functions;
- A piece of rubber, for creating seals and gaskets;
- Washers and nuts for fastening elements;
- Pressure gauge;
- Food grade silicone sealant;
- Special tee and quarter for connection to the pipeline;
- Water taps;
- Air injection nipple;
- Pressure control sensor;
- Drill;
Design and varieties
A hydraulic accumulator is a special sealed metal tank, which inside is divided in two by an elastic membrane. The membrane itself is made in the form of a diaphragm or cylinder. The first one is mounted across the tank, and the bulb is mounted at the inlet near the inlet pipe.
Hydraulic accumulators are equipped with two-level protection - a pressure gauge and a mechanical valve Source montagtrub.ru
See also: Catalog of companies that specialize in water supply and sewerage.
Hydraulic accumulators have different purposes. First of all, devices are divided into those intended for hot and cold water supply and heating systems. The latter are painted red, and the water ones are blue. Tanks used in heating are usually smaller in volume and more affordable. This is due to the poor quality of the membrane material, because in a regular water supply there is drinking water, and in heating there is industrial water.
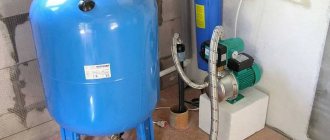
Hydraulic accumulators are also divided by type of placement - devices located vertically or horizontally. At the bottom of the vertical models there are legs with which they are placed on the surface, and some models provide special plates that allow them to be attached to the wall.
Connecting a hydraulic accumulator, as well as selecting its characteristics, is not the easiest task Source sharanavti.ru
Hydraulic accumulators installed in heating systems are equipped with radial membranes that look like plates. For plumbing systems, devices with a rubber bulb are more often chosen.
Blood pressure problems
This problem can be caused by a number of reasons:
- damage to the nipple - air escapes through it;
- incorrect setting of the pressure switch;
- damage to the tank body.
Sequence of actions for repair:
- First, you should check the integrity of the housing itself - if it is rotten, then the hydraulic accumulator may need to be replaced;
- If everything is in order with the housing, it is worth checking the operation of the pressure switch. It is quite possible that his settings have gone wrong;
- for this, it is worth trying different operating modes for the hydraulic tank - if the relay works, then you need to look for the cause elsewhere;
- Now you need to check the nipple - it may be bleeding air, if so, then the repair will come down to replacing it.
The pressure gauge may show incorrect values
Another reason is a malfunction of the pressure gauge. Those. it may show incorrect numbers. This point is also worth considering.
Principle of operation
The work cycle is divided into several stages:
- If there is only air inside the accumulator, then the pressure will be standard - 1.5 atm (factory or set independently, depending on the pressure in the system).
- When the pump is activated, water is drawn into the bulb, causing it to become larger in volume. The air located between the membrane and the tank wall is compressed as the tank fills.
- When the air pressure reaches the set pressure, the pump will turn off and the system will stabilize.
- If you open the tap, the pressure in the system will drop and air will begin to push water out of the accumulator. It will flow until the air pressure drops below the specified mark. Then the pump will turn on again and the cycle will repeat.
The system is configured in such a way that at high water flows, for example, if you need to fill a bath, the pump begins to pump water in transit, that is, without pumping it into the tank. The latter will be filled when all the taps are closed. An element such as a pressure switch turns the pump on and off.
A pressure switch will help regulate the water supply Source winplast.ru
Algorithm
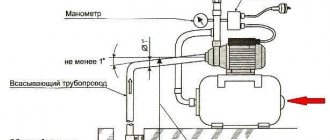
DIY hydraulic accumulator diagram
So, in order, we will outline how to make a hydraulic accumulator with your own hands:
- You need to make three holes in the vessel prepared for the hydraulic tank. One hole is made on the top, one on the bottom and one on the side.
- We attach a tap to the bottom of the tank, a tee is screwed to the tap, one end will provide a water supply, the other will be supplied to the hydraulic system of the house or cottage.
- A tap is installed in the side hole; it will be needed to relieve water and pressure in the hydraulic tank.
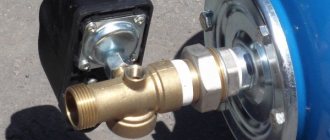
- A quarter is installed in the hole on top. The following are screwed onto it: a pressure gauge, a pressure sensor, a nipple for pumping air. The nipple is installed as follows. A hole is made in it, a nipple is inserted into it and everything is carefully filled with sealant.
Attention ! All connections should be coated with sealant, and gaskets should be placed between the taps and the tank.
Battery Installation
The connection diagram of the hydraulic accumulator to the pump and the water supply system may differ, since during the work not only a submersible, but also a surface pump is used. Each of the schemes has its own connection features.
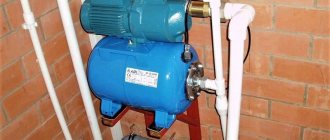
Scheme with surface pump
If water is pumped into the water supply system through a water supply system (that is, there is no need to submerge the pump), it is mounted directly next to the battery. The connection diagram is not complicated, but you should familiarize yourself with the nuances.
Before installing the device, an accurate calculation of the operating and minimum pressure is necessary. Different systems set different pressures, but if a standard, small system is considered, then the standard here is a pressure of 1.5 atm. It happens that a device is connected to the systems, which requires high pressure to operate, so the parameter increases up to 6 atm, but not more, as this can negatively affect the pipes and their connecting elements.
Scheme with a submersible pump
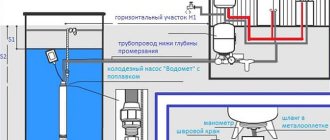
Scheme of installing a hydraulic accumulator in a water supply system using a submersible pump. This scheme is used if water for the system is taken from a well or when the pump, for some reason, is installed below the entire system.
Scheme of a water supply system with a hydraulic accumulator and a well pump Source oboiman.ru
This scheme has a key feature - a check valve is installed in the system. This device prevents backflow of injected water. The check valve should be installed before subsequent elements of the system are connected. Most often, the valve is mounted directly to the pump (valve inlet), and a pipeline leading to the accumulator is connected to the other (valve outlet). Some experts recommend connecting the check valve not directly to the pump, but adding about a meter of pipeline between them.
The procedure for connecting the battery to the pump is as follows:
- First of all, measure the depth to which the pump will be lowered (it should be located 30 cm above the surface of the bottom of the well or borehole). Distance is usually measured using a rope with a weight attached;
- The pump, to which the valve is already connected, is lowered into the well and secured with a safety rope;
- The pipe from the pump, which goes to the surface, is led to the location of the hydraulic accumulator and other devices. For further wiring, a special fitting with five connectors is used.
- A pressure switch, a hydraulic accumulator that consumes water supply and a control system are connected to the fitting. Based on this, a fitting with five connectors is most optimal. It is important that all connections are airtight, for which FUM tape or ordinary tow, which should first be impregnated with sealant, are excellent.
How to choose
The main working body of the hydraulic tank is the membrane. Its service life depends on the quality of the material. The best membranes today are made from food-grade rubber (vulcanized rubber plates). The housing material matters only in membrane-type tanks. In those in which a “pear” is installed, water comes into contact only with rubber and the material of the body does not matter.
The flange should be made of thick galvanized steel, but better - stainless steel
What's really important about bulb tanks is the flange. It is usually made of galvanized metal. In this case, the thickness of the metal is important. If it is only 1 mm, after about a year and a half of operation, a hole will appear in the metal of the flange, the tank will lose its tightness and the system will stop working. Moreover, the warranty is only one year, although the stated service life is 10-15 years. The flange usually rots after the warranty period expires. There is no way to weld it - the metal is very thin. You have to look for a new flange at service centers or buy a new tank.
So, if you want the accumulator to last a long time, look for a flange made of thick galvanized or thin, but made of stainless steel.
Video description
How to connect a submersible pump and a hydraulic accumulator, watch the video:
If you plan to install a hydraulic accumulator, it is important to know how to determine the critical pressure. Based on the operating value, you must first determine the minimum pressure, that is, the one at which the pump starts operating. The pressure switch is set to this value. Next, the pressure in the empty battery is measured. The result should be below the critical parameter by approximately 0.5 - 1 atm. Then the system is assembled. Its center, as in the previous situation, is a fitting with five connectors, where they are connected in turn: a battery, a pipe from the pump (it is connected to a water source), household water supply, a relay and a pressure gauge.
How to choose tank volume
You can choose the tank volume arbitrarily. There are no requirements or restrictions. The larger the volume of the tank, the greater the supply of water you will have in case of a shutdown and the less often the pump will turn on.
When choosing a volume, it is worth remembering that the volume that appears in the passport is the size of the entire container. There will be almost half as much water in it. The second thing to keep in mind is the overall dimensions of the container. A 100 liter tank is a decent-sized barrel - about 850 mm high and 450 mm in diameter. You will need to find a place somewhere for it and the harness. Somewhere - this is in the room where the pipe from the pump comes. This is where all the equipment is usually installed.
The volume is selected based on the average flow rate
If you need at least some guidelines to select the volume of a hydraulic accumulator, calculate the average flow rate from each water intake point (there are special tables or you can look at the data sheet for household appliances). Sum up all this data. Get the possible consumption if all consumers work simultaneously. Then figure out how many and which devices can work at the same time, calculate how much water will be consumed in a minute in this case. Most likely by this time you will have already come to some decision.
To make it a little easier, let’s say that the hydraulic tank volume of 25 liters is enough to meet the needs of two people. It will ensure the normal functioning of a very small system: faucet, toilet, sink and small water heater. If you have other household appliances, the capacity must be increased. The good news is that if you decide that the current tank is not enough for you, you can always install an additional one.
Video description
How to set up a hydraulic accumulator, see the following video:
To set up a pressure switch, no matter how trivial it may sound, first of all, remove the cover from the device. There is a plug on the cover itself, which many people mistake for an adjustment screw, but this is not so - the cover must be removed.
Under the cover we see two bolts - large and small - with springs placed on them, which in turn are secured with nuts.
To correctly adjust the pressure switch, you need appropriate knowledge and experience, so it is better to entrust this procedure to a specialist Source builld.ru
The tension of the larger spring is responsible for shifting the pressure range at which the pump will turn on and off. Those. if you remove the spring altogether, then it will be, for example, 1-2 atm, and if you start tightening the spring, then 2-3 atm, respectively, and so on.
The tension of the smaller spring is responsible for the width of the pressure range itself - if the spring is removed, it will be 1-2 atm, and if you start tightening it, then 1-3 atm, and so on.
In general, spring tension is responsible for turning the pump on and off when a certain pressure is reached. The standards noted in the instructions for the device state that the difference between the modes is 2 atm. The spring tension must be adjusted to achieve the desired value. This is done as follows:
- We weaken both springs as much as possible.
- We turn on the pump and look at the pressure gauge - at what pressure indicators it turns on and off.
- If the lower threshold is insufficient, then tighten a larger spring and check the pressure until it reaches the desired value.
- Checking the upper pressure limit. If it is insufficient, then tighten the smaller spring and check the pressure until it reaches the desired value.
- When adjusting the smaller spring, the lower pressure limit usually rises slightly and the tension on the larger spring needs to be loosened a little. But in any case, you must first look at the pressure gauge readings.
If you liked the article, please share it
Previously on the topic:
Share
Placement method
Before connecting, it is necessary to understand the installation method, or rather, location. The choice of location will depend on the power of the unit. To create the best possible pressure, it is recommended to choose the highest point in the house, for example, an insulated attic.
The selected location should be dry and free of air humidity. Otherwise, condensation will appear on the surface of the accumulator for the water supply system, which can cause corrosion. And although the tank is covered with paint and varnish, sooner or later rust will take its toll. Plus, the chosen surface must be durable and smooth.
Injecting water into the hydraulic accumulator
When the correct air pressure has already been set, you can connect the accumulator to the system. After connecting it, you need to carefully observe the pressure gauge. All hydraulic accumulators indicate normal and maximum pressure values, exceeding which is unacceptable. Manual disconnection of the pump from the network occurs when the normal pressure of the accumulator is reached, when the limit value of the pump pressure is reached. This occurs when the increase in pressure stops.
The pump power is usually not enough to pump the tank to the limit, but this is not even particularly necessary, because when pumping, the service life of both the pump and the bulb is reduced. Most often, the pressure limit for switching off is set 1-2 atm higher than switching on.
For example, when the pressure gauge reads 3 atm, which is sufficient for the needs of the owner of the pumping station, you need to turn off the pump and slowly rotate the nut of the small spring (delta P) to decrease until the mechanism is activated. After this, you need to open the tap and drain the water from the system. While observing the pressure gauge, you need to note the value at which the relay turns on - this is the lower pressure limit when the pump turns on. This indicator should be slightly higher than the pressure in an empty accumulator (by 0.1-0.3 atm). This will make it possible to serve the pear for a longer period of time.
When the nut of the large spring P rotates, the lower limit is set. To do this, you need to turn on the pump and wait until the pressure reaches the desired level. After this, it is necessary to adjust the nut of the small spring “delta P” and complete the adjustment of the accumulator.