Beautiful, stylish, original... many more adjectives can be chosen while admiring the beautiful two-level plasterboard ceiling. This is precisely the unusual design of these ceilings. The fact is that each ceiling looks different.
And the more imagination you show when developing sketches of the ceiling, the brighter it will characterize you and decorate the hall, bedroom, living room or kitchen.
How to make a two-level plasterboard ceiling
At first glance, it seems that only a tandem of a designer plus professional builders can create such beauty. But no, to install gypsum board ceilings you do not need to graduate from art school or have a higher education in construction. You don't need a set of special tools. You just need to have an idea of what kind of ceiling you want to make and get. And also get a little creative. The rest is a matter of technique.
Despite the fact that visually all ceilings are different, what makes them different is the final decoration and successful design. Some people are more concerned about the insulation of the ceiling, and others about the design, although these processes can be connected, complementing each other.
The technology for installing a two-level plasterboard ceiling is identical for each type (single-level, multi-level). And to make it easier for a beginner, this article will provide step-by-step instructions on how to install 2-level plasterboard ceilings. But first, a little theory...
How to make a two-level plasterboard ceiling - plan
First of all, there are several important points to consider:
- height of the room. A two-level ceiling design will reduce the height of the room. For residents of modern apartments in a panel house, even 5-10 cm is already a significant loss;
Advice. If you have a perfectly flat ceiling, then you can mount the second level of the frame directly on it. This way you will save space.
- distribution of accents. With the help of lamps built into the frame of a plasterboard ceiling, you can zone the space or shift the emphasis to any part of the room.
You can purchase lamps of any power. Plasterboard systems do not impose any restrictions on your choice. Such as, for example, suspended or plastic ceilings, where there is a danger of using powerful lighting devices (can lead to deformation and even fire).
- room humidity. It is not recommended to install such a ceiling in the bathroom, because the sheet may become deformed. Although, there is moisture-resistant drywall (GKLV), for example, Knauf, with proper installation and organization of high-quality ventilation, it can serve well.
Advice. To protect drywall from moisture, a primer is used in several layers.
- presence of assistants. A person cannot do this work on his own.
- complexity of the design. The more complex the design, the more difficult it is to calculate the amount of materials and install them, and accordingly, the longer the work will take.
Plasterboard ceiling projects
(single-level, two-level and multi-level)
Plasterboard ceiling projects
Tool for installing drywall and profiles
- metal scissors;
- hammer drill or drill;
- painting knife;
- square;
- roulette;
- plumb line;
- building level;
- planer for drywall;
- drywall float;
- narrow and wide spatula;
- gloves and glasses.
Features of color selection
There are several general recommendations that should be followed when choosing a ceiling color:
- For low rooms, you should opt for a dark floor covering and a light ceiling. This will help visually expand the space. If you swap the shades of the floor and ceiling, you can slightly reduce an excessively high room.
- Bright colors will add light to a dimly lit room.
- In a room flooded with sunlight, cool shades of different colors will help mute the brightness.
- In a monochrome interior, it is better to use a glossy ceiling to create a play of light.
The classic option is a simple white two-level stretch ceiling, but other colors can be added to create an interesting effect and stylish interior.
What color combinations are most common in modern interiors:
- White with black. The stylish combination adds volume to the room. Black is considered a rather dark color, but when combined correctly it will not create a feeling of pressure.
Classic color combination Source potolky.ru
- White with blue or turquoise. The ceiling looks fresh and light, adding coziness and tranquility to the room. This combination is suitable for rest rooms.
Combination of white and blue Source zabor.bz
- White with brown. Warm brown color helps you concentrate, improves your mood and well-being. Such a ceiling can be safely created in an office.
Unusual white and brown waves Source opora-stroy.ru/
- White with beige. This combination will visually enlarge the space and make it lighter. The design of the room becomes noble and emphasizes the status of the owners.
Combination of white and beige in the kitchen Source design-homes.ru
- White with green. A bright and bold combination adds an atmosphere of lightness and freshness to the room. The right shade of green helps improve mood and calm.
Bright kitchen with green elements Source stroyfora.ru
- White with red. A small amount of red will make the room stylish, it will be a bright accent that attracts attention.
Bright ceiling in the kitchen Source chudopotolok.ru
- White with yellow. Yellow color gives cheerfulness and makes the room bright and sunny. This combination should not be used in relaxation rooms, since the sunny color interferes with relaxation.
Bright living room Source dekormyhome.ru
- White with purple. The combination looks fresh and unusual. The color violet calms and induces relaxation.
Living room in an unusual color scheme Source potolki-nikomaks.ru/
Materials for plasterboard ceilings
This selection is needed so that you can calculate and know exactly what to buy, what this or that element looks like, and for what purpose it is used. We hope that thanks to such a detailed description you will not buy too much and save money and nerves.
Drywall Drywall.
As a rule, ceiling plasterboard is used. Its thickness is 9.5 mm.
For the second tier, which does not have lamps and sidewalls, you can use arched plasterboard. Its thickness is 6 mm.
Profile UD Profile UD
Profile CD Profile CD
CD connectorCD connector.
Designed for splicing two CD profiles.
Direct ceiling suspension or ES - bracket Direct ceiling suspension or ES - bracket.
The profile is attached to it to the ceiling.
Spring suspensionSpring suspension.
Used when the length of the direct suspension is not enough for installation. That is, the second level of the ceiling is lowered too low.
Two-level connector
Double level connector 2
Two-level connector.
For connecting CD profiles at different levels.
Advice. When installing, try to reduce the number of extensions of this type of profile.
Drywall crab
The plasterboard crab is fixed. The plasterboard crab is fixed.
Designed to connect CD profiles at the same level.
How to replace drywall crabTip. Crab can be substituted. How to do this can be seen in the photo.
Corner profile connector Corner profile connector.
Its purpose is to connect the CD profile perpendicularly and at the same level.
Dowel screw for fastening profilesDowel screw for fastening profiles.
Anchor wedge for fastening profilesAnchor wedge for fastening profiles.
The choice depends on the material from which the walls and ceiling are made.
Self-tapping screw for fastening drywall sheets Self-tapping screw for fastening drywall sheets.
Self-tapping screw “flea” Self-tapping screws for metal 3.5 by 9.5 mm. - “flea”.
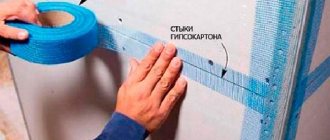
Serpyanka tapeSerpyanka tape (self-adhesive)
For gluing seams or interlining for completely covering the ceiling.
Putty for sealing seams and joints Putty for sealing seams and joints.
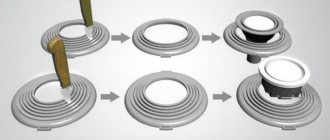
Recessed luminairesRecessed luminaires (ceiling, spotlight, halogen or LED).
Advice. The wiring for the lamps is started before the plasterboard work begins.
Lamps
Both recessed lamps and hidden LED strip lighting are installed after painting the ceiling and the coating has completely dried.
The luminaires are connected to pre-wired wiring using terminal blocks. To install the soffit, simply bend upward the spring clamps on the back side of its body.
Soffit installation
The tape is pasted after removing the protective film from its back side. As a backlight, they usually use LED strip with a low specific power (up to 7 watts per meter), so it can be glued directly to the gypsum board, without preliminary installation of a heat-dissipating aluminum profile.
In the photo - sticker of a backlight strip in the ceiling niche
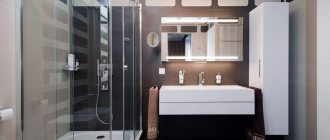
The power supply for the low-voltage tape is installed in a ceiling niche or (in the case of a bathroom) placed in a dry room.
Plasterboard two-level ceiling with lighting in a combined bathroom
Diagrams and sketches of two-level plasterboard ceilings
Knowing what you want to see on the ceiling will ultimately make it much easier for you to calculate the material and work.
Before making ceiling drawings, familiarize yourself with what types of two-level plasterboard ceilings exist.
Illuminated plasterboard ceiling - installation methods
The first method is to install a second level without installing the first. Used if you have an ideal ceiling surface. And the lamp is supposed to be placed in the frame.
Diagram of a two-level plasterboard ceiling - the first method
The approach is the same. But the lamps are also mounted on the side of the frame.
Diagram of a two-level plasterboard ceiling - second method
Installation of two frames. The lamps are mounted in the second of them.
Diagram of a two-level plasterboard ceiling - third method
The installation approach is the same. But the lamps are also located around the perimeter of the second tier.
Diagram of a two-level plasterboard ceiling - fourth method
Similar approach. But for side lamps, instead of a frame, a polypropylene profile is provided, which is glued to the second-level frame using putty.
Diagram of a two-level plasterboard ceiling - fifth method
Using one of the presented basic types of installation, you can easily create sketches of a two-level ceiling that will appeal to all family members.
Execution options
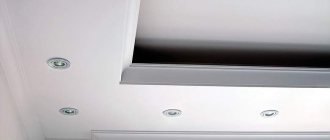
In most cases, the lower level of the ceiling is a box with a niche mounted around the perimeter of the room. Built-in lamps are mounted in it, and lighting is located in the niche.
The top level can be:
- Plastering;
- Plasterboard (with installation of gypsum boards on lathing or glue);
- Tension.
Combined two-level ceiling: the upper level is suspended, the lower level is plasterboard
Please note: in the latter case, the frame of the box is reinforced. The fact is that the tension film creates a horizontal load of approximately 70 kgf per meter on the baguette to which it is attached.
How to make a two-level plasterboard ceiling - installation instructions
It should be noted that there is disagreement among professionals about the order in which the tiers should be installed. There are two ways.
- In the first case, work begins with the installation of the first level frame. And then the frame of the second tier is suspended from it. Applicable if the area of the second tier is insignificant, because virtually the entire weight of the second frame falls on the sheets of the first.
- In the second case, the frame of the second tier is assembled first, and the frame of the first is made between its elements. More complex design.
We will talk in more detail about the first option for installing a two-level ceiling. This will give you basic installation information. The second option, more complex, will be described below and illustrated in the photo.
We make a two-level plasterboard ceiling consistently and in accordance with the instructions, then the work will be done efficiently.
The technology for manufacturing 2-level plasterboard ceilings involves performing work in the following order:
- Preparing the ceiling for plasterboard (preparing the workplace).
- We mark the ceiling for the plasterboard frame.
- Installation of a frame for drywall - first level.
- Installing a frame under drywall - second level.
- Finishing a two-level plasterboard ceiling.
Preparing the ceiling for drywall
Preparing the work area Finishing the ceiling is not like screwing in a light bulb - you can't do it without removing the furniture.
Clear out the room and the approaches to it, this will make installation easier. It is important to prepare the surface itself. Agree, it’s better to do something in the free space than to constantly go around, trim, and wash off any leftovers. All loose plaster should be removed. Some craftsmen leave it, but everything that doesn’t hold up well will sooner or later fall away.
Marking the ceiling for a plasterboard frame
To do this you need to take the following steps:
Measuring the height of the corners - measure the height of the corners in the room;
— determine the angle with the smallest height.
It will serve as a starting point for marking. After all, we need the structure to be level relative to the horizontal;
Marking the ceiling - make markings.
On the walls for the profiles we mark a straight line. We place dots on the ceiling for direct hanging. There is no need for extra markup; it will only confuse. For these purposes, it is convenient to use a laser level or a water level.
Homemade water levelTip. You can make a water level of the required length yourself using a nylon hose (for example, from a medical dropper) with a diameter of 10-15 mm. and filling it with water.
It may happen that in your room not only the angles are different, but also the length of the opposite sides. In this case, try to level it horizontally first. And then draw a clear pattern on the ceiling and level the structure around the edges. This way you can visually center the ceiling.
Installation of a frame for drywall - installation of the first level
Installing UD profiles
3.1. Installation begins with the installation of UD profiles.
They are guides and are mounted on the wall, along the perimeter of the entire structure. Fastening pitch – 600 mm. And also on the ceiling.
Method of connecting the profile on the wall The method of connecting the profile on the wall and in the corner is shown in the photo (right and left, respectively).
Method of connecting the profile in the corner
If you plan to form rounded elements, you need to draw a picture on the wall and attach the UD profile to it. But first, you need to make notches on the profile.
Fastening the UD profile according to the markings and fasten it along the line drawn on the ceiling.
Marking for suspension
3.2. We attach a direct suspension to the points placed on the ceiling.
Step for suspension At the same time, we observe the mounting step - 600 mm.
Recommendation.
If your ceiling surface is ideal, then you can skip this step. And start right away with the installation of the second level.
Attaching the CD profile to the suspension
3.3. A CD profile is attached to a direct suspension.
Fixed CD profile on the suspension
The resulting frame will look like the one shown in the diagram and photo.
Fixed CD profile on the ceiling
Crabs on a CD profile The use of crabs will give rigidity to the frame.
We sew up the frame with sheets of plasterboard
3.4. We sew up the frame with sheets of plasterboard.
Chamfer on drywall sheetsTip.
Where the sheet was cut, a chamfer must be provided. To do this, use a knife to cut off part of the material from the sheet of drywall.
Why chamfer on sheets of drywall? This is necessary so that the putty fits better on the seam. And the seam did not come apart over time.
Preparatory processes
Before work, existing chandeliers are removed, and if there are large irregularities, they must be eliminated. To start working on the ceiling, there must be a design project, a small copy of the ceiling on paper, which, in addition to the appearance, should also contain diagrams for the placement of lamps, and you also need to take into account the location of the curtains. It is very important to respect the ceiling proportions and scale. Lined paper is ideal for a sketch; this will be a lightweight option for transferring reference points - the starting points of the contours of bends or corners, from which the rest of the details and elements of the ceiling will actually begin to be built.
It’s worth picking up all the necessary tools in advance:
- drill;
- hammer;
- putty knife;
- screwdriver;
- metal knife;
- plasterboard knife;
- construction level;
- upholstery cord;
- construction thread;
- roulette;
- pencil;
- profiles;
- pendants;
- knitting needles;
- drywall;
- connecting fasteners and assemblies;
- electrical installation parts (lights, LED lamps, neon tubes or cords, etc.).
You can look at the cost diagram for 1 sq.m. and calculate it for your perimeter.
Installation of a frame under drywall - installation of the second level
Next, we move on to consider the phased installation of the second ceiling level.
4.1. Marking the frame for drywall.
Lines for the UD profile To do this, draw lines for the UD profile on the wall, and draw the future drawing on the ceiling.
Having a diagram on the ceiling will not only simplify the installation process, but will also help you understand what your structure will look like after the work is completed. And, therefore, you will have the opportunity to make the necessary adjustments.
4.2. Frame made of profiles for plasterboard
Frame made of profiles for plasterboard
We mount a ceiling frame made of a metal profile (UD profile), fixing it to the wall and ceiling.
We already know how to make a frame of the desired shape (round the profile).
Material prepared for the website www.moydomik.net
4.3. Lower the frame to the desired length.
To do this you need:
- cut the CD profile to the length to which you want to lower the frame;
- cut out “tongues” on one side of these pieces. To do this, you need to cut off the side parts of the profile. This will make it easier to install them.
- insert the cut pieces into the UD guide profile, which is already fixed to the ceiling. You need to insert it with the flat side.
- secure the pieces with a flea. The pitch between straight sections is 500-600 mm. A larger step will make the structure insufficiently reliable, a smaller step will make it heavier. The step between curved segments is 200-300 mm. This is due to the fact that the curved sheet needs to be fastened more often.
- “put” a UD profile on the hanging pieces and secure them with a “flea”.
Frame side As a result, you should end up with a frame side like this.
Then follows:
- cut the CD profile to a length that is equal to the distance from the side of the frame to the UD profile located on the wall;
- secure them with “fleas” on both sides.
Finished frameYou now have a finished metal frame. After which, it should be covered with plasterboard and proceed to finishing work.
Advice. When assembling the frame, look at the drawings. Otherwise, it may happen that the jumper will be placed in the place of the future lamp.
{banner_link_1}
4.4. Making an arch from plasterboard.
Making an arch from plasterboard - diagram The photo and picture show how to bend plasterboard for an arch and how the CD profile and sheet of plasterboard should be prepared.
Making an arch from plasterboard Their device is very simple; it is important to correctly make notches on the sheet without cutting through the front layer of cardboard.
4.5. Plasterboard covering of round surfaces
If it is possible to cut the required size from a whole sheet, the issue is easily resolved. If not, cut out the segments and install them in parts.
It should be noted that in this case the frame must be stiffer. Because each self-tapping screw is screwed into the profile.
The result of covering round surfaces with plasterboard. The result of your efforts should look something like what is shown in the photo.
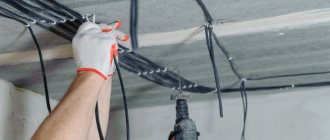
Making wiring for lighting
Before installing multi-level plasterboard ceilings, it is necessary to make wiring for lighting.
Attention: before wiring, you should calculate the cable cross-section. To do this, add the power of all lighting fixtures and determine the load on the line.
Do not take the wire cross-section end-to-end. Make allowance for the increase. The wiring must have additional margin.
If you plan to install 12 W elements, then you will need to install a step-down transformer in the line.
Choose a location so that you have easy access. Before installing lighting, you should turn off the lighting on this branch. Don't tempt fate!
We insert the wire into the corrugation and attach it to the ceiling surface with clips.
To connect the wires, we use terminal blocks - they will ensure reliability. At the locations of the lamps, make a wire outlet. Do this with reserve; Connect the lamps and turn on the power supply. We look at the distribution of light in the room.
Make sure to do this. If you make mistakes, you have the opportunity to freely correct the shortcomings. After fastening, this will be much more difficult to do.
Attention: When wiring, avoid twisting.
Use terminal strips. After installing the ceiling, it will be difficult to get to the wiring in case of malfunctions. Use high-quality material and do everything conscientiously.
Plasterboard ceiling finishing
Sealing the seams with serpyanka tape. We sew the seams with serpyanka tape.
Sealing seams with putty Apply a little putty to the tape with a small spatula.
Sealing seams and holes with putty We also apply putty to the screws.
This is necessary so that rust does not show up through the paint or wallpaper over time.
General putty Good to know. If you plan to paint a two-level plasterboard ceiling, it is better to putty the entire surface. Otherwise, unsightly seams will appear under the paint.
Processing and grinding The seam area (or the entire surface) is rubbed with a mesh grater or a grinding machine.
Processing and grinding cornersTip. Rub the surface especially carefully in the corners. To prevent the appearance of side grooves from the grater.
Decorating a plasterboard ceiling. Painting the ceiling is optimal and very popular. Painting a plasterboard ceiling should be accompanied by pre-treatment of the surface with a primer.
Covering the frame base
The plasterboard material is being cut. If you want to equip external sides for hidden lighting, the material is cut with allowances of 8-12 cm. Their ends are sanded and chamfered.
Note! The chamfer is removed at an angle of twenty-two degrees. It should occupy 2/3 of the sheet.
These sections are attached with self-tapping screws to the profiles through sheets of plasterboard material with a minimum pitch of 15 cm.
The video review below demonstrates the process of installing a frame base and attaching plasterboard material to it.
After the sheets are installed, the seams are sealed. To do this, prepare a putty solution and carefully fill the joints that have formed between the sheets.
After that, paper tape is laid on top, which is covered with a layer of putty. After drying, sand the surface and apply a layer of primer. The procedure for sealing seams is carried out at least twice. Sanding and priming, which are performed after each layer, are done only after the composition has dried.
The second method of installing a two-level plasterboard ceiling
In conclusion, as promised, we provide photo instructions for the second option for attaching the ceiling, when the frame of the second tier is assembled first, and the frame of the first is mounted between its elements.
Installation of a two-level plasterboard ceiling frame
Installation of a plasterboard ceiling frame
Sheathing a plasterboard ceiling frame
Covering the ceiling frame with plasterboard
Making a plasterboard ceiling
Plasterboard ceiling installation
Construction of a 2-level plasterboard ceiling frame
Construction of a 2-level plasterboard ceiling frame
Mounted frame of the 2nd level ceiling made of plasterboard
Fastening drywall
Drywall installation
Covering the profile frame with plasterboard
Ceiling covered with plasterboard
Plasterboard ceiling ready for finishing
Sealing joints
It is better to take ready-made putty. Using a spatula, using transverse movements, fill the joints. Then a thin joint of putty is laid along the entire seam. Masking tape is applied to it. When the first layer has dried, it is necessary to lay another very thin layer of putty on top of the painting mesh. The recesses from the screws are filled with gypsum putty, the excess is removed with a spatula. The ceiling is ready for painting.
Important! Perhaps the most difficult ceiling seam to seal is the one that connects the edge of the second tier protruding into the middle of the room. And here again lighting devices, or rather, light cords, can come to the rescue. They can be mounted both inside and outside. They do not provide bright light, but as a component of multi-level lighting, the cords help create a cozy atmosphere.
On video: master class on high-quality ceiling putty
Design of two-level plasterboard ceilings - photo
Ideas and inspiration for every color and taste
How to make a two-level plasterboard ceiling with your own hands
Two-level plasterboard ceiling - original design
Design of a two-level plasterboard ceiling
Example of a two-level plasterboard ceiling
Design of a two-level plasterboard ceiling