- rigid connection using reinforcement;
- expansion joint.
Each of the options for connecting the main foundation to the base of the extension has its own characteristics and nuances that should be considered more thoroughly.
Choosing the type of foundation for an extension
Experienced specialists strongly recommend that for the construction of an extension, use the same type of foundation that was used for the construction of the main building.
This is due to the fact that different foundations react differently to contact with the soil and also react differently to shrinkage of the building. Accordingly, if the main house is built on a strip foundation, and the extension is built on columnar piles, sooner or later the auxiliary structure will collapse. Thus, you should not skimp on things like connecting foundations under any circumstances.
If you plan to connect the building to the house, you can use different foundations. Most often we are talking about the following options:
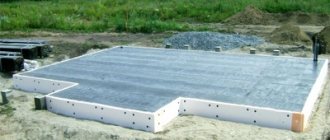
Strip foundation
For those who decide to use a strip foundation for the extension, the following list of work will be required:
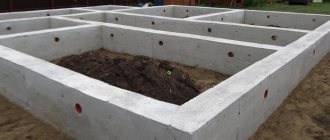
- make markings in parallel with the tracing at the site of construction of the base structure (this will require wooden pegs and an ordinary rope);
- dig a trench along the marking;
- secure the fittings;
- prepare a trench;
- fill in a sand cushion (approximately 100-120 mm) and carefully compact the bottom of the trench;
- lay a waterproofing film;
- install reinforcement structure;
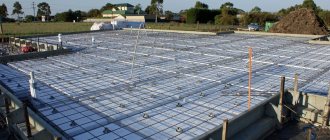
- Fill the trench with a solution of cement and gravel.
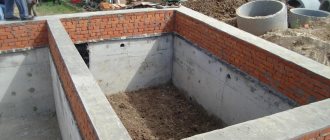
The pouring of a strip foundation should be approached as responsibly as possible. It is better to do the work in several passes. One third of the trench is poured as the first layer, and after drying - one second. The technology, in principle, allows the use of foam blocks, but not in all cases.
After the cement-gravel layer has completely dried, the formwork is built. The formwork is filled to the brim with concrete. After laying, the concrete is pierced simultaneously in several places. This prevents the formation of air bubbles. After the concrete has completely dried, the formwork is removed.
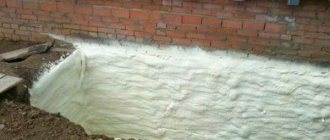
And finally, just before the walls are erected, the almost complete structure is covered with a layer of waterproofing material. Most often, roofing felt, tar, liquid rubber or bitumen mastic are used for this purpose.
Columnar foundation
If your plans include building a house that is small in size and light in weight, the use of a columnar foundation is quite acceptable. It is usually made of either concrete or brick. For a medium-sized building, 6 support pillars are most often sufficient.
To install such a base you will need:
- dig a hole (depth below the soil freezing level);
- pour a sand cushion on the bottom;
- install metal (or fiberglass) fittings;
- treat the reinforcement with moisture-proofing material (for metal reinforcing bars);
- install formwork;
- fill the base with concrete.
Construction can begin immediately after the concrete has hardened. If there is a need to increase the height of the pillars, you can lay a brick on top of the concrete.
Foundation on screw piles
A foundation on screw piles is the simplest and most cost-effective type of foundation. Please understand that it is only designed for structures that are not too heavy, as it cannot support much weight. But if you are going to add a wooden veranda to your house, this option is quite suitable.
This type of foundation in most cases does not require the participation of specialists. Even a person who has no experience in construction is quite capable of screwing in screw piles with his own hands. It is probably for this reason that many people choose a foundation on screw piles.
If the foundation on stilts is installed correctly, it can last for a long period of time.
Watch this video on YouTube
Seating area in covered passage
A tunnel is not always built to connect two parts of a house. It can also be a separate seating area. For example, in such a “leaky” New Zealand house, a third of the building is occupied by a tunnel. The open veranda is convenient for placing tables with chairs, barbecue facilities and sun loungers. If you are planning to organize a summer patio, then this option is ideal.
Options for connecting the base of the extension to the main structure
To make the foundation of an extension, you need to know two options for connecting it to the foundation of the main structure.
The joints of the foundation of a house are designed in two ways:
- Rigid connection with reinforcement.
- Expansion joint.
How to make a foundation with a rigid connection of bases?
Rigid connections are often used on soils that are not subject to heaving.
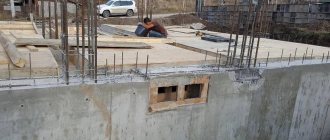
Rigid connection is used mainly in low-rise construction, where the extension is functionally connected to the main structure, being under the same roof with it. To make the base for the extension, a hole is drilled in it with a diameter equal to the diameter of the reinforcement and a depth equal to about 35 of its diameters. Next, reinforcement is driven into it with an outlet of the same length. If the extension is carried out according to a scheme where the estimated length of the reinforcement is greater than the width of the foundation, then the holes in the foundation of the main structure are made part of the width, and the reinforcement is mounted according to the principle of an anchor, with a wedging liner at the end.
In a closed loop, the holes are drilled in a staggered pattern at two levels, and the reinforcement used has an anchor wedge at one end and a welded washer at the other end. The amount of reinforcement, its pitch and diameter are calculated based on the conditions of its least resistance to shearing and crushing of the concrete underneath it. On average, a closed contour of a new foundation will require 20 rods per square meter of foundation. They are cut using an emery machine or grinder. With an open contour, the number of reinforcement bars is calculated separately in each case and depends on the width of the future foundation.
A rigid connection is used when the recessed strip base of the house and extension is made of monolithic reinforced concrete, and with a shallow type of foundation, the base and foundation form a single monolithic structure. and plinths do not provide a reliable connection, and with a columnar foundation, a rigid connection is possible provided that the height of the monolithic grillage is sufficient for installing anchors. A slab foundation allows for a rigid connection provided that there is a protrusion from the base no less than the thickness of the slab. In this option, you can expose the reinforcement frame of the house and connect it (weld, tie) with the reinforcement frame of the extension. A house with a basement can be connected to a basement-free extension with a rigid coupling if the base of the main building and the recessed walls are monolithic. Using an expansion joint
An example of an expansion joint.
Expansion joints are more often used in multi-storey residential and industrial construction, where under a long structure in different parts of it, the soils differ significantly in deformation characteristics and, under the same loads, settlements can differ significantly. Such seams are used for different number of storeys in different parts of the structure, thus giving different loads and different settlement deformations. Another case of using expansion joints is when another structure is attached closely to an existing structure. In the above options, expansion joints should be provided at the design stage. It is often easier and cheaper to use expansion joints in heaving soil.
An expansion joint is an insulation material placed in the gap between walls and basement floors, without adhesion to structures. Often simple tow is used as such insulation. The junction is enclosed with a decorative overlay attached only to the wall of the house. In heaving soil, when using an expansion joint, the floor level of the extension is placed below the floor level of the main structure by the amount of expected deformations.
The filler is removed from the expansion joint area to a sufficient depth for laying the sealant.
What you should consider to make a foundation for an extension using an expansion joint:
- the gap between the bases of the extension and the main structure should be about 5 cm. To comply with this requirement, before making the foundation of the extension, boards covered with waterproofing are applied to the base of the house. They will play the role of an expansion joint in the future;
- for a small one-story extension, the thickness of the expansion joint can be 2 cm;
- the seam can also be filled with thermal insulation material (foam or polystyrene foam is best) and sealed with weather-resistant sealant. From the outside it is closed with a decorative overlay.
Expansion joint connection
Instructions on how to properly connect the foundation of an extension, say a veranda or terrace, with the foundation of a house using an expansion joint:
- The soil is excavated to the depth of the foundation of the house or other structure to which the extension will be adjacent.
- At a distance of 30-40 cm, a foundation strip or extension slab is erected.
- Both structures are insulated using coating waterproofing.
- For an expansion joint, roofing felt is taken and mineral wool or boards are wrapped in it.
- The finished “filling” is installed in the gap between the two structures on a prepared backfill of crushed stone and sand.
- The remaining voids are foamed with polyurethane or a sealant with similar properties.
Preparation for construction
First, the landowner needs to think about the size and shape of the future terrace:
- You can independently transfer all the numbers to paper - draw a diagram of the future construction. In the future, this drawing can be loaded into a computer drawing program.
- A ready-made, and most importantly, correct drawing in all calculations can be ordered from specialists. True, this will require additional costs.
- Ready-made drawings of verandas can also be found on the Internet.
Calculations and drawing
The structure on supports is classified according to the depth of the pillars and depends on a number of conditions - the type of future construction and soil characteristics. Requirements for construction, depending on the type of soil, are specified in SNiP 2.02.01-83.
For lightweight free-standing verandas, non-recessed and shallow-recessed bases are more often used. For extensions to a house, the foundation must be more solid, especially if the building stands on heaving soils.
Based on the weight, including the snow load on the roof, and the dimensions of the building, the number of supports, the distance between them, and the total amount of materials are calculated. If the veranda is built on a turnkey basis, its cost will be calculated free of charge by specialists.
When constructing it yourself, you can use online calculators on construction sites. You will need to enter the initial data of the desired structure and soil type.
Tools for work
To build this base you will need:
- laser level or hydraulic level;
- shovels;
- rubber hammer;
- tamping;
- trolley on wheels;
- measuring tape;
- construction mixer and/or concrete mixer for self-mixing;
- screwdriver
You also need to purchase:
- reinforcement, ready-made concrete (or its components for self-mixing);
- sand;
- crushed stone;
- wire;
- waterproofing material;
- plywood or boards;
- screws and other fastening materials.
Installation of a shallow structure
This type of foundation is installed 0.4 - 0.7 meters deeper than the soil surface. It is used quite often when constructing a veranda. The formwork is made of brown concrete, plastic and metal pipes.
For a brick veranda, a pipe diameter of up to 0.2 meters is suitable; for lighter variations, a diameter of up to 0.1 meters is sufficient.
The construction of a shallow foundation consists of the following stages:
At the preparatory stage, we clear the area of rubbish and carry out markings. Places for installing poles are marked with stakes and rope. Holes are dug in designated locations to a certain depth.
It is important to add 0.15 meters for the arrangement of the sand cushion (the sand is watered and compacted). The bottom is covered with roofing material
Then, using a building level, the pipes are leveled
If the water is shallow in the soil, they are treated with a waterproofing base. Next, the pipes are filled with a concrete-gravel mixture to a depth of 0.3 meters. After which the support will rise by 0.15 meters, which will further protect the pillars from deformation when the ground moves. After the concrete has set, the pipes are lined with roofing felt and the holes are compacted with sand. At the end of the process, reinforcement is carried out and concrete is poured to the surface of the supports.
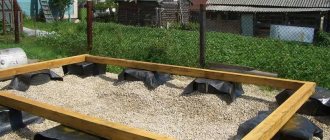
Installation of a non-buried base
Located at ground level. The difference between the installation of pillars varies from 1.5 to 2.5 meters. The sole, provided it is easy to construct, can be erected on non-heaving soils.
During construction, blocks with dimensions of 0.2x0.2x0.4 meters are usually used. Finding out the price of such a foundation is easy. The total amount of material required is multiplied by the cost of one block. Concrete and rubble stone are also used in construction.
The sole can also be made from brick, but we must not forget that ceramic and silicate bricks can be deformed at low air temperatures.
The construction of this type of foundation takes place in several stages:
- First, we clear the construction site and make markings.
- Then, by calculating the load on each support, we determine the number of pillars and the area on which they will be located.
- We carry out excavation work - remove 15 mm of the top part of the soil.
- We create a sand cushion under each support and install pillars. We apply plaster to their upper part.
- Finally, we protect the pillars from moisture with bitumen resin or roofing material.
Pile foundation construction technology
The first step is to choose a veranda project and draw its plan, deciding on the exact dimensions. After drawing up the drawing, you can already calculate the amount and weight of materials needed to mount the piles. You should also take into account the quality of the soil and the depth of water, the level of soil freezing. After this, you need to select the correct parameters and number of pile pipes, taking into account that their distance from each other can be 1.5–3 m.
The easiest way is to build an open veranda from wooden beams with your own hands. Snow loads by region can be found in the Building Code under Loads and Impacts. For example, in St. Petersburg, for every 1 m² of roof there is up to 180 kg of snow mass.
Required materials and tools
When constructing a summer veranda on a pile-screw foundation, you need to purchase the following materials:
- sand;
- crushed stone;
- cement;
- screw piles;
- wooden beams for joists and roof (100×50 mm);
- beams for grillage (metal, concrete or wood);
- boards;
- nails, screws;
- varnish or paint for wood;
- roofing material (selected in accordance with the roof of the main building).
For a light wooden veranda, it is better to use a profiled crown beam with a cross-section of at least 150×150 mm as a grillage. In addition to the above materials, it is necessary to treat the piles with anti-corrosion agents, for example, bitumen.
You should stock up on the following tools:
- shovel;
- collar for twisting;
- welding machine;
- deep compactor for concrete mixture;
- an angle grinder with cutting wheels (grinder);
- hammer;
- saw;
- screwdriver;
- tape measure;
- plumb line;
- level (regular and hydraulic);
- pegs and rope.
Gates for manual screwing are sold already with rods.
Preparatory work
First you need to clear the area where the extension is planned. Then you need to dismantle the porch and blind area. The soil under the screw foundation can simply be leveled with a shovel. After this, using pegs and rope, mark the perimeter of the veranda. Next, the installation sites for the piles are marked and small holes are dug in them for ease of screwing.
How to screw in screw piles
The procedure for installing screw piles is as follows:
- The rod tube is inserted into the hole with a blade and screwed in with a collar. It is best when this procedure is performed by two people. At the beginning of screwing in, it is necessary to constantly check the vertical position of the piles with a plumb line and correct it if necessary. If there is a slight deviation, the piles are cut, making the ends level. Usually 20–30 cm of pipe is left on the surface (depending on the height of the base).
- When all the piles are installed at the required depth, marks for the grillage are made using a hydraulic level at the above-ground ends.
- The rods are cut with an angle grinder at the marked level.
- Concrete is poured into the pile cavities and immediately compacted with a compactor.
- A steel rod is inserted into the middle of the cement mixture (this is necessary for a veranda with a wooden grillage). Then the lower crown beam is attached to it.
- The pipe is covered with a head and welded.
- Waterproofing is attached to the top.
When determining the parameters of the veranda adjacent to the wall of the house, a line is drawn. When applying it, take into account the thickness of the lumber that is laid on top.
Installation of grillage and floor
Along the boundaries of the extension, a crown beam is laid on the piles. If the veranda is of significant size, then the beams are hammered inside the perimeter and then tied. There, using a corner and screws, the logs are attached at intervals of 50–60 cm around the perimeter of the structure. At the bottom you can make a base from siding or slabs. Then vertical posts are installed in the corners, to which the canopy or roof will be attached. A flooring is made from boards across the joists. It is recommended to fill the voids between them with gravel.
Lastly, install the veranda fencing
Its foundation may settle slightly, so the structure must be independent. A gap of 2-3 cm is made between the veranda and the wall, which is filled with insulation (for example, mineral wool). A foundation made of screw piles for the veranda of a private house can be installed independently, without carrying out excavation work and waiting for the concrete to harden. This significantly reduces the time and finances for constructing an extension.
Peculiarities
The difficulty when adding additional premises is the presence of a ready-made old building, which has already undergone shrinkage and has certain defects and design features. All these points should be taken into account when designing an extension. It is necessary not only to build a room that is durable and harmoniously suited to the rest of the ensemble, but also not to harm the finished house or contribute to its deformation or destruction. Errors and miscalculations in the design and arrangement of the foundation are unacceptable; they lead to serious consequences and problems for the entire building.
There are two ways to connect bases.
- The expansion joint is simple to make, suitable for all types of foundations, and less expensive. In this case, both foundations are independent of each other under shrinkage or deformation loads. A layer of waterproofing and thermal insulation is laid between the main structure and the attached one, and an expansion joint is formed. The roof of the extension with this method must be separate.
- Rigid reinforcement is more reliable and durable; it is used for old buildings that have completely undergone shrinkage, over 15 years old, in the presence of a high-quality foundation. The connection is made using metal reinforcement. If a new and already finished building is planned to be combined under one common roof, then the connection must be made rigid. The only obstacle to using this method is heaving soils.
Why does deformation occur?
Deformation during foundation shrinkage
Different foundations behave differently when in contact with soils susceptible to heaving. Therefore, if the base is strip, then the new one should be the same. Another important rule: you cannot lower the new foundation below the main one.
How to determine the width of the sole of the strip base:
- You need to take a metal rod, the end of which is bent at a right angle.
- We push the rod under the structure so that the hook is positioned horizontally.
- After the rod passes the base, we unfold it so that the hook is positioned vertically, with the tip up.
- Pull the rod towards you until it stops.
- Let's make a mark.
- Unfold and pull out the rod.
- The segment from the mark to the fold is equal to the width of the sole.
Reasons for shrinkage of the extension:
- The main building has usually already settled down, but the new extension is just beginning to sink.
- Part of the attached foundation rests on imported soil, and part on “native” soil. This leads to complex deformation displacements, causing the formation of cracks in the most unpredictable places.
The consequences of natural shrinkage can be minimized by extending the construction period. To do this, we allow the foundation to stand for at least one season. The extra weight will cause some shrinkage, but not as much.
Open area around the pool
A terrace in a private house is often located next to or around the pool. This is especially useful for pools made from large, prefabricated fiberglass tanks. In this case, the terrace performs two functions at once - it provides a comfortable place to relax near the water and hides unaesthetic details (the side of the container, pipes for supplying and draining water, aeration, cleaning devices, and so on).
The principles of arranging the structure are the same as in previous cases: screw piles as a foundation, a cellular frame as a support for the flooring. In this case, the frame is made of metal; wooden elements near water require too serious and expensive protection from moisture
The installation process is discussed in more detail in the video below, but there are some nuances that are worth paying attention to:
- such large containers must be concreted, and the first row of piles (located closest to the side of the pool) may not be screw, but ordinary - installed in concrete;
- the metal frame is necessarily protected from corrosion, galvanized screw piles and stainless steel fasteners are used;
- the frame is positioned so that the flooring hangs over the water and at the same time it is possible to line the vertical fragments of the platform;
- For flooring, a special material is used - the so-called deck board (decking). It can be natural wood with special processing (usually larch), a composite material or pure polymer. A special feature of the board is its increased resistance to moisture and textured surface;
- Built-in lighting fixtures can be mounted flush with the sheathing in the decking.
It is also possible to install a deck below the edge of the pool, if this edge is properly designed.
For bowls of complex shape, the flooring is also usually made with a curved contour.
If the pool bowl is not completely buried in the ground, the terrace flooring is elevated, creating a kind of podium.
For an extension to a wooden house
To correctly fill the foundation for such an extension, it is necessary to carry out an error-free calculation. There are several types of connection - rigid connection or separate construction. The choice of a specific option is made taking into account the type of soil on the site and the dimensions of the extension.
Hard connection
This method can be rationally used under the following conditions:
- Non-heaving and slightly heaving soil.
- If the main structure “stands” on a shallow strip base, and the base forms a single whole with it.
- Predicted shrinkage of the building.
- When building an extension of several floors under the same roof as the main building.
If you choose a columnar structure, then the reinforcement is fastened to the base. But this is only possible provided that it has sufficient dimensions. If the length is not enough, then you should choose another method. If this rule is not followed, problems such as cracks and looseness may occur. Here's what polycarbonate terraces attached to a house look like, and how to build them. This article will help you understand.
In the video there is an extension to the house:
The construction of the strip base will be carried out according to the following plan:
- Dig a hole according to the required dimensions. Place a layer of sand on the bottom to provide stability.
- Drill holes in the base. Each subsequent row is drilled with a shift relative to the previous one.
- Install metal rods into the holes, which have a longitudinal slot at the ends. Install wedging wooden inserts into it.
- Using protruding pieces of reinforcement to form the foundation for the extension.
- When the frame is ready, you can pour cement mortar.
- Subsequent work can only be performed after the structure has settled.
When choosing a slab base, the connection process is carried out by analogy, only if its thickness is more than 400 mm. The possibility remains even if the slab protrudes beyond the base of the building. But only this protrusion should not exceed 300 mm. Weld the reinforcement to the metal frame.
Separate construction
If you choose a strip base, you will have to mark the area under the strip and dig a groove, the depth of which is 600 mm. Place a layer of sand or gravel on the bottom. Next, install durable formwork, adhering to the specified dimensions.
Perform reinforcement using metal rods. Finally, pour in the cement mortar. Due to the fact that the foundation will be separate from the house, this allows the extension to be durable.
Foundation for an extension to a wooden house
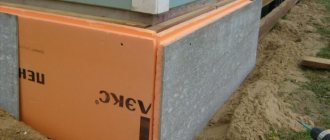
Using this option, you can find that a space has formed between the wall of the main house and the base of the extension. Its width can reach 100-150 mm. Lay waterproofing and thermal insulation material inside
It is important not to miss this moment and perform an expansion joint, which will prevent shrinkage and protect the base from damage. But what a summer kitchen attached to a house looks like, and how to make such an extension, information from the article will help you understand
The location of the new sole should be higher than the old one. Over time, shrinkage will occur to a depth equal to that of the main house. This will give the structure reliability and durability.
In addition to the strip base, a columnar base can also be used for an extension to a brick house. It will be closely adjacent to the main structure. The piles should be waterproofed in advance and installed on concrete pads. After this, the strapping of the required dimensions is installed. This method significantly reduces construction time, making it possible to continue construction work within a few days.
RuFundament.ru
Each of the options for connecting the main foundation to the base of the extension has its own characteristics and nuances that should be considered more thoroughly.
Rigid connection
To rigidly tie two foundations, you will need to connect them using reinforcement bars. You will need at least 20 rods per 1 m2.
To install metal rods, holes are drilled in the old foundation, reinforcement is placed in them and concreting is carried out.
Rods are also laid on the side of the new foundation and the joints are filled with concrete.
To rigidly tie two foundations, you will need to connect them using reinforcement bars. You will need at least 20 rods per 1 m2.
Which foundation is better to choose for an extension to a brick house: types of recommended foundations
Professional builders advise making the foundation for the added space the same type as the existing building. For example, if a house is built on a monolithic strip, then there is no point in saving and building an additional structure on a columnar foundation. The fact is that different types of load-bearing structures interact with soils in different ways, naturally, and their shrinkage is different. Therefore, you should not take risks by choosing different types of bases - it will be more reliable. In accordance with the above, the foundation for an extension to a house with your own hands most often comes in two types:
- Tape monolithic reinforced concrete.
- Columnar.
- Prefabricated foundation made of blocks.
For frame construction, another type of foundation is used - pile or pile-screw, but today we are not talking about it. The first two options show quite decent results in practice.
In certain conditions, a shallow belt structure is sufficient, the sole of which is located at least 60 cm below the ground level. The important factor here is the degree of heaving of the soil. Heaving soils include clay, loam and sandy loam.
If there is uniform soil on the site, the foundation for an extension to a brick house can be combined into a single structure. But only if there is no significant shrinkage of the built house. Otherwise, an expansion joint is used.
Separate supports
If there is a large discrepancy in the weight of the old and new structures, the degree of shrinkage of these structures will differ significantly in magnitude. In such cases, it is not recommended to make a rigid connection for the foundations - it is necessary to choose separate construction of the supporting elements. It is possible to attach other types of foundation to the existing foundation and to do this use the principle of connection through an expansion joint.
The weight of the ceilings and walls of the extension should be distributed over its own support area, without creating tearing forces for the main foundation of the building.
Depending on the operating conditions, the expansion joint can be:
The sedimentary option (in the absence of other significant influences) has a width of 1 - 2 cm. According to the conditions of the mutual influence of the supports, attachment to the load-bearing wall of an old house can be carried out with a deformation gap reaching 0.2 - 0.4 m, filled with elastic, moisture-proof material.
Piles can be placed next to the house
Frame wooden extensions are successfully operated on a pile foundation with a metal grillage, as in this photo.
Light verandas or summer kitchens can be built on screw piles, even if there are already several nearby buildings around. This is especially convenient if the site is located on a slope, slope or with uneven occurrence of hard supporting rocks.
At the design stage, the external design of expansion joints that visually separate the facade is envisaged, in an open or hidden form, for example, hiding the gap under a vertical drainpipe. On the façade side, they are usually covered with strips of a special flashing and sealed with low-strength decorative material, which will not prevent the outer walls of buildings from moving relative to each other with possible uneven settlement. Under the roof deck, gaps are bridged using a compensation device.
An extension to a house, installed on separate supports, is a much less labor-intensive process than installing a rigid link, requires significantly less time and financial costs, and can also be done with your own hands without ordering special equipment
A far-sighted solution is to provide for the possibility of an extension at the design stage of the main building of a private house. This will greatly simplify subsequent work and will contain ready-made design solutions, planned uniform settlement over the entire area of the foundation and will ensure the reliability of the foundation.
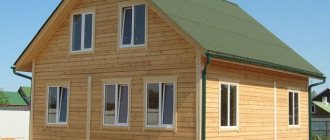
More than half of the owners of country houses sooner or later face the need to expand the area of their home. Naturally, this is easiest to do at the design stage of the building, but at this time, as always, the limited construction budget does not allow for a larger area. What should you do if you have received a residential building and want to build an extension to it? It is recommended to start with the most important stage - connecting a new foundation for an extension to the old one. Let's figure out what kind of foundation to pour for an extension, and how to properly combine the base of the house and the foundation of the attached module.
Content:
The need to join two foundations
Home owners often have a need to increase their living space. A convenient and practical option for expanding real estate is to add block modules, such as a veranda. Such premises are open, so time can be spent here only during the warm season.
Before constructing the module, it is necessary to take into account that an extension to the house is possible only if a list of conditions is met: obtaining the appropriate permits for the construction of new structures, maintaining all permissible distances to neighboring houses and plots, ensuring independent settlement of all elements of the house relative to each other.
Like any construction process, the construction of a veranda should begin with the development of a project. This module near the house must be positioned in such a way that you can get from it into the main room, so it is customary to build a veranda at the end of the house or near the main entrance.
Despite the simplicity of the design, the extension must be completed efficiently and competently, and one of the first problems that arises with this is the installation of a foundation for the building. The best solution when constructing a foundation for an extension next to a house is considered to be combining foundations. Otherwise, cracks may appear in the walls, subsidence of the floor and other troubles may begin.
Features of connecting the old and new foundation
To understand how to properly build a foundation for an extension, you should find out how the foundation under the house is made and what it is like. If the foundation is strip, then you need to know its width; if it is columnar, then the overall dimensions of the pillars, as well as its depth. Experts strongly advise against building a foundation for the extension, which is distinguishable from the foundation of the house. Thus, if your house is located on a monolithic reinforced concrete strip, it is better not to save money and not build a columnar base for the extension.
The bottom line is that different types of foundations interact with soils differently, and accordingly, their shrinkage is different. Therefore, in order not to want to take risks, it is better to bet on the same grounds. The depth of the foundation of the extension must match the depth of the foundation for the house - this avoids distortions. Measuring the depth is quite simple. To measure the width, take a metal rod and bend it at a right angle.
After this, hold the bent part horizontally in your hand and thread it under the foundation. Turn it so that the hook hooks on the opposite side. Next, make a mark on the rod and remove it. You can use the serif to measure the width of the base. In addition, the foundation for the block module must be connected to the existing one, because otherwise the new walls will move away from the old building after some time. And this provokes the formation of cracks and distortions.
An important point that you need to pay attention to if you are going to connect the foundations together is that in the spring there will be a decrease in the bearing capacity of the soil. As a result, its humidity increases. A building built on a new foundation will experience additional shrinkage in the spring.
Considering the fact that old and new buildings may have a significant difference in weight, it is worth understanding that subsidence of the foundations will occur unevenly. Therefore, to connect the foundations between them, you should wait one season before work and provide for a technological gap. Such a gap, as a rule, is a gap that is approximately 20 - 40 centimeters in size, in which pieces of reinforcing bars are placed that protrude from the foundations.
To expand the foundation, ordinary concrete mortar or reinforced concrete is used. In order for the old and new parts of the foundation to be firmly connected to each other and form a monolithic structure, before pouring the new foundation with concrete, it is necessary to strengthen the foundations: weld the reinforcement of these parts of the foundation or drill reinforcing bars into the old foundation.