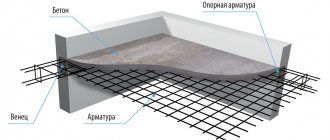
At the final stage of foundation construction, a reinforced concrete base is formed over the basement part of the building. To do this, a monolithic slab is constructed using formwork, or ready-made hollow-core panels are laid using a crane to install the floor. The second option allows you to reduce installation time. In this case, it is important to check the horizontalness of the foundation using a laser level and strengthen the structure with reinforcement, the diameter of which is selected based on calculations. Let's look at how to lay floor slabs on the foundation of a building.
Types of panels
Before you figure out how to lay floor slabs on a foundation, it’s worth getting acquainted with the main varieties. They can be solid, hollow and ribbed. Each type has its own characteristics, which should be taken into account when choosing the appropriate option.
Solid
Monolithic reinforced concrete products demonstrate a large margin of safety. The required strength characteristics are ensured through the use of high grade cement and reinforcement.
To form them, wooden formwork is used, inside which a reinforcing mesh is placed, and then concrete is poured. Monolithic floor slabs require four weeks to harden and gain strength. The timing may increase with high humidity or low temperature.
The choice in favor of a monolithic structure is made when the shape of the structure is non-standard. Finished products differ in size and configuration. It is worth immediately understanding how to correctly lay floor slabs on the walls in order to ensure the required technical characteristics of the assembled structure.
Monolithic technology requires an individual approach Source vse.kz
Attention! The high rigidity and strength characteristics of solid slabs make them in demand in the construction of industrial facilities operating in conditions of high vibration.
Monolithic slabs have the following advantages:
- minimization of transport costs, since monolithic floor slabs are formed directly on the site intended for the construction of the facility;
- smooth surface, simplifying finishing work;
- high heat and sound insulation characteristics due to the absence of joints between the elements being laid;
- corrosion and biological resistance;
- long service life;
- fire safety;
- the possibility of forming a slab that will have a shape that allows it to be used as a floor and an external element at the same time.
When choosing monolithic slabs, the configuration of the structure does not matter Source cdnvideo.ru
The disadvantages of monolithic products include:
- Difficulty of manufacturing. You must have certain knowledge to form a surface with the required characteristics.
- Difficulty in installation. Laying floor slabs on the foundation yourself is problematic. It is worth engaging professionals who have special equipment and tools at their disposal to prepare the solution and then pour it into the formwork.
- Long installation. Due to the long period of concrete hardening, construction work has to be postponed.
- Impossibility of reuse.
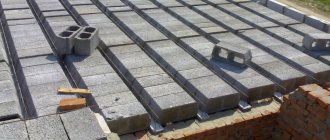
Void
Finished products are designed for less load than monolithic ones. There are special cylindrical cavities inside the structure. They are located along the entire length of the product, reducing its weight and worsening its heat and sound insulation properties.
Inside the hollow core slabs there are cavities of a characteristic cylindrical shape Source sdelaipotolok.com
Attention ! The cavities inside the hollow elements are used for laying communications.
Products are manufactured in factory conditions. To form them, heavy concrete and steel reinforcement with a suitable cross-sectional size are used. Before laying the floor slabs on the foundation, verification calculations are performed. Their result will allow us to assess whether the mounted structure can withstand the operational load.
The advantages of hollow products include:
- availability;
- ease of installation;
- sufficient heat and sound insulation characteristics;
- light weight;
- long period of operation;
- reliability;
- good resistance to wear;
- possibility of reuse.
Among the disadvantages it is worth noting:
- costs of transportation and storage of slabs;
- standard parameters, due to which the dimensions of the building have to be coordinated with the existing ones;
- impossibility of using buildings with unique architecture in the construction.
End surfaces must be sealed Source stroyimdom.com
Ribbed
Such floor slabs are often called U-shaped due to their characteristic cross-section. They have 1 - 2 stiffening ribs, depending on the design. Thanks to this, they are able to withstand large bending loads. Light and heavy concretes are used for their production. When manufacturing a product, preheated reinforcement and mounting loops are placed in the mold, and after that the concrete mixture is poured. The latter is compacted by applying vibration.
Attention! Ribbed floor slabs are not used in the construction of residential buildings.
Ribbed structures are relevant for the construction of industrial facilities, retail facilities, garages, and warehouses. In such buildings, protruding stiffeners on the ceiling being formed can be used for mounting various elements.
Ribbed slabs have a characteristic cross-section Source activen.com.ua
The advantages of ribbed elements include:
- high strength characteristics;
- light weight due to the characteristic curved shape;
- accessibility due to factory production;
- corrosion, biostability;
- preservation of properties under conditions of prolonged exposure to moisture;
- the ability to adjust the size taking into account the location and availability of free space;
- admissibility of repeated use.
Disadvantages include an unattractive appearance, which limits the area of use of the products, and difficulties during installation work.
The formed surface is difficult to decorate Source tildacdn.com
See also: Catalog of companies that specialize in designing country houses and villages.
Brief summary and tips
Proper laying of floor slabs will provide a stable and durable foundation for the building, but there are points that should be remembered so that everything goes well.
- The slabs must be ordered in advance, since this is a fairly popular product and is not made to stock. A month is the optimal period for producing the material.
- There are rules for transporting and storing slabs that must be followed. The presence of a backing and gaskets is required. All this is done to avoid damage to the slabs.
- The quality of the fixing solution is important; it should not be too thick or contain foreign objects.
- To reduce costs, it is better to carry out installation immediately after receiving the material, by which time the crane should also already be in place. Or plan the unloading of the material properly.
- It is important not to forget to seal the voids.
- All work must be carried out in accordance with safety requirements, with special care and in compliance with installation technology.
Laying rules
In order for the building to last as long as possible, you need to know how to lay floor slabs correctly. To achieve the best result, the following rules are observed:
- Laying is carried out on a prepared base. If there are deviations in height, a suitable alignment method is selected.
- The support area when laying on a reinforced concrete base must be at least 6 cm. When laying on brickwork, the size of the supporting surface increases to a minimum of 12.5 cm.
- Before installation work begins, the end parts of the slabs are sealed with insulation, which can be the remains of mineral wool slabs or polystyrene foam placed in polyethylene. Let's say laying penoplex (extruded polystyrene foam). The surface is covered with cement mortar. This helps to increase the strength characteristics of floor slabs.
- Installation is carried out in such a way that the extreme sides rest on the opposite ones. The side part is sealed using different methods.
The installation procedure is strictly regulated Source zonaremonta-ufa.ru
- A metal scrap is used to adjust the position of the plate. To achieve the best result, the work should be performed by several people at once.
- The foundation is coated with a 2 cm thick concrete solution. To prevent it from being squeezed out, reinforcement rods are laid along the tape.
- The location of the upper and lower surfaces is precisely determined in order to understand how to lay the floor slabs. Under the influence of operational load, the lower surface is actively stretched. To avoid its premature destruction, during the production process the lower layer is subjected to more active reinforcement. The top layer compresses during operation, and therefore manufacturers may refuse reinforcement.
- The slabs are adjusted to size along the bottom side.
- The solution that will be used during installation work is prepared in advance by mixing the components in a given ratio and achieving a uniform consistency.
The ratio of components of the concrete solution must be maintained Source gbs-78.ru
- The concrete solution poured into the space between the slabs includes a certain amount of limestone, expanded clay, and crushed stone. The presence of voids is unacceptable, since a large percentage of the solution used to form the concrete screed can escape through them, which will significantly increase the cost of installation work.
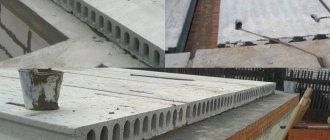
Attention ! You can distinguish the top layer from the bottom by appearance. When in contact with air, the upper surface becomes rougher. The lower one, due to contact with the formwork, turns out smooth.
We seal non-design joints up to 300 mm
If the width of the seams between adjacent slabs does not exceed 300 mm, sealing such a seam is relatively simple; there are several methods for filling the seams to choose from.
Method 1
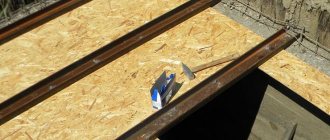
- At the bottom of the adjacent slabs, using spacers, we install a board or sheet of plywood that bridges the gap - this is formwork;
- You can lay a piece of roofing material or film on top of the formwork, then there will be no traces of concrete left on the formwork, and it can continue to be used;
- Fill the gap between the plates with mortar;
- We wait for the concrete to gain strength within 3-4 weeks and remove the formwork.
Method 2
If it is not possible to install the formwork from below, you can make permanent formwork from galvanized roofing steel 0.8-1 mm thick according to the size of the gap between the slabs, resting on the upper edge of the slab (trough). The profile of the side surface of the slabs will provide additional expansion and rigidity to the monolithic section.
Method 3
Another way to seal seams with permanent formwork is to make mounting parts from steel strips 4 mm thick and 5 cm wide, along the profile of the gap, as in the previous case, resting on the front surface of the slabs; lay these mounting parts every 0.5 m along the length of the slab. On the bottom (in the plane of the lower edge of the slabs) we place a strip of galvanized roofing steel, plywood or plastic, and concrete it. This method ensures reliable adhesion of the monolithic section to the slabs.
Method 4
If you come across a pair of defective slabs with incorrectly positioned side locks, when the recess is at the bottom, they can be installed next to a gap of 2-3 cm. Place the formwork from below using method 1 and pour concrete through the provided gap.
Installation procedure
To correctly lay floor slabs on the first floor, adhere to the following sequence:
- a set of preparatory measures, including a large list of works aimed at preparing slabs and foundations;
- installation itself using special machinery and equipment;
- sealing and reinforcement of the structure.
There are certain requirements for each stage, which can create certain difficulties when performing installation on your own. Specialists know how to lay floor slabs on the foundation, and therefore will be able to take into account all the necessary nuances.
Installation of floor slabs Source pm16.ru
Preparatory stage.
Installation work begins with preparing the foundation. To achieve a positive result, you need to properly prepare the foundation. Particular attention is paid to the horizontality of the foundation being formed. A laser or optical level is used for checking. The algorithm of actions is as follows:
- The magnitude of the differences in height is measured.
- The maximum value is determined, based on which the surface leveling method is selected;
- The base is leveled. If the difference between the heights is less than 50 mm, the base is leveled using concrete mortar with reinforcement of the formed layer. If the difference is greater than 50 mm, first a layer of bricks is laid or a concrete reinforcing belt of sufficient height is formed.
The base must be perfectly level Source gazobetoneco.ru
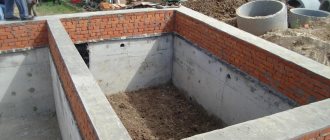
The foundation, for the manufacture of which prefabricated blocks were used, is reinforced with the help of an armored belt. The structure is formed around the perimeter. Its presence is mandatory, as it will allow:
- evenly distribute the load created by individual floor elements and transmitted to the base;
- will allow the strip foundation to better resist bending load;
- make the upper supporting surface of the foundation more even;
- increase the rigidity of the structure.
The thickness of the formed armored belt must be at least 20 cm. B20 concrete is used for its construction. The reinforcing belt is poured using monolithic technology. Reinforcing rods are laid longitudinally in two rows. Thanks to their presence, the poured structure will better resist bending stresses.
Filling of the armored belt is performed:
- once around the entire perimeter;
- layer by layer.
It is better to fill the armored belt in one go Source stroyfora.ru
What do anchor ties provide in construction?
Concrete floors are laid in buildings and structures on load-bearing walls, starting from the basement and on each floor for the floor and ceiling. After laying and anchoring the slabs, they are monolied, that is, they are filled with cement mortar in the form of a screed and the result is a solid box that is not subject to any shifts or distortions. In essence, this is the answer to the question about the need for anchor connections: the slab will not move across the floors even with a strong push. If you have ever seen with your own eyes or just in photographs a house after an artillery shelling, then you probably noticed that the floors, as a rule, are more intact than the walls, and all this is possible thanks to monolithic connections.
It is possible not to use anchoring of floor slabs only when a small one-story building is being erected in a seismologically safe area, but this only applies to slabs in the attic. But in most cases, a good owner will still not build a house, leaving the ceiling without such fasteners, especially since it is inexpensive.
This excerpt shows that the manual is advisory in nature Source marko.ltd
Video description
This video shows the algorithm of actions of specialists when installing floor slabs:
In the most general case, installation is done as follows:
- The foundation is covered with a layer of cement mortar 20–25 mm thick. A continuous layer of equal thickness is formed.
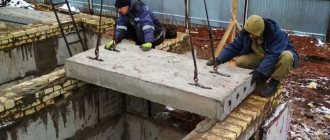
- The floor panel is strapped together and moved towards the base using special equipment. When lowering the element to the installation site, the slings are held in a tense position. This allows you to adjust the position of the element being laid by moving the lever to the desired position.
- After checking the size of the contact area, the slab is lowered onto the foundation.
- If necessary, its position is adjusted.
- The slabs are connected to each other using sling eyes and secured to the foundation with anchors.
To lift and move floor slabs, special equipment is used, which must be in place before work begins.
Sizing can be done in different ways Source stroyimdom.com
Tying slabs with reinforcement
To give greater rigidity to the resulting structure, you should use an effective method of strengthening.
To work at this stage you will need the following materials:
- Steel wire with a cross section of 3-5 mm.
- Smooth reinforcement with a diameter of 10 mm.
- L-shaped anchor with a bend of 30-40 cm.
The reinforcement is threaded through the mounting loops into which the sling is hooked, and the tie points are secured by welding.
Reinforcement of floor slabs is carried out according to the following scheme:
Tying slabs with reinforcement
- The outer slabs are connected diagonally using wire.
- Adjacent panels are made of smooth reinforcement.
- The connection between the slab and the wall is reinforced with L-shaped anchors, which are placed in increments of 2-3 meters along the wall.
- The joints of the slabs resting on the internal partition are reinforced with smooth reinforcement.
The procedure for covering large openings
If the opening is wide enough, floor slabs can only be laid on the foundation using additional elements. In order not to destroy the entire product, two methods are used. In the first case:
- determine the amount of free space that should be filled during installation, divide it by two;
- install the first slab, prudently departing from the edge a distance numerically equal to the obtained value;
- install all slabs in accordance with the requirements of the regulations;
- measure the remaining space, which should be numerically equal to the distance left earlier when installing the first slab;
- fill the gap on both sides of the structure, laying cinder blocks with their ends facing the main surface;
- control the position of the block holes, which should be directed to the side.
Blocks will help block free space Source stroyimdom.com
In terms of labor intensity, the second method is significantly superior to the first. In this case, having previously determined the amount of free space, distribute it evenly between the laid slabs. After installation is completed, the resulting gaps are sealed as follows:
- a board is attached from below between the slabs, which can act as formwork;
- reinforcement is placed in the space;
- concrete solution is prepared;
- the free space is filled with concrete mortar.
Surface preparation
1. The steps of the base must not have deviations from the horizontal. If the steps are narrow, you should not increase their width with tile adhesive - this will make the structure heavier. In this case, you should install wooden formwork and fill the steps with a mixture of small-caliber expanded clay, sand and crushed stone. The surface of a brick staircase is leveled in the same way.
2. Cladding wooden stairs with porcelain stoneware is not allowed. Some experts recommend using elastic glue or adding a plasticizer to it. This won't save the situation. The structure of a wooden staircase may not withstand the load that comes from facing the stairs with porcelain stoneware. Wooden steps do not have sufficient rigidity; this will lead to the fact that over time the porcelain stoneware coating will move away from the surface.
3. Prime the base with a deep penetration primer. The primer serves to reduce the absorption of the surface. Concrete absorbs moisture well; if it is not primed, the moisture necessary for good adhesion of the tile adhesive will be absorbed into the concrete and the adhesive base will become fragile.
4. You can start covering a new concrete staircase with porcelain stoneware only after two months from the date of its manufacture.
Video description
We suggest watching the following video, which will help you understand in detail the procedure for forming a hatch leading to the basement of a private house:
When cutting reinforcing elements with a grinder, you should act with extreme caution. The geometric parameters and characteristics of the tool used can cause the grinder to become jammed between the protruding parts of the reinforcement. This phenomenon may cause injury to the installer. In the absence of an autogen, a small cut is made on the sledgehammer, and then the cut site is hit with a sledgehammer.
Briefly about the main thing
Laying slabs may be required during the construction of buildings for various purposes. When performing work, the characteristics and type of mounted elements are taken into account. They can be monolithic, ribbed or hollow. The choice depends on the purpose of the structure being built, the characteristics of the foundation and a number of other factors.
Before installation work begins, a set of preparatory measures is carried out, including leveling the foundation and forming access roads for lifting equipment.
Then the installation itself is carried out, with the position of the plates adjusted and fixed relative to each other and to the base. With large opening widths, the space is filled in various ways, the choice of which depends on the characteristics of the structure being built.
Ratings 0
7) How to hammer in rusts correctly.
.
Rusts are the joints of slabs. Two slabs are mounted side by side, with the long side facing each other. Between them is rust:
You should always fill in rusty areas with mortar. Why hammer in rustications? The fact is that round-hollow slabs have locks on the sides, round recessed dimples (photo below):
When these recesses are filled with mortar, the slabs adhere to each other and the overlap becomes one. Thanks to the locks, the plates firmly adhere to each other.
.