The kitchen is the main place in the house for preparing food, and additional appliances that are powered from the mains help simplify the process. Electricity is considered a dangerous form of energy, so safety rules must be followed during repairs and installation. It is important to think through the placement of outlets in the kitchen so that it satisfies all needs. Be sure to take into account the height from the floor, standards for different equipment, the number of lines and other features that you will learn about from this article.
Which cable to choose for the kitchen
Next, you need to calculate the cross-section of the common supply wire of the electrical panel and the outgoing wiring to each pantograph. Follow the rules here:
- for device loads up to 3.5 kW - copper cable VVGng-Ls 3*2.5mm2
- for device loads up to 5.5 kW - copper cable VVGng-Ls 3*4mm2
- with a total load of all devices up to 10 kW - copper cable VVGng-Ls 3*6mm2
- with a total load of all devices up to 15 kW - copper cable VVGng-Ls 3*10mm2
Why there should be a brand VVGnG-Ls is discussed in detail in the article below:
Even if you have a house with an old grounding system (without a third protective conductor), still do the wiring with a 3-core cable. This will save you in the future from additional costs for reconstruction and replacement of wires.
As a last resort, the third wire will be a backup for zero or phase, in case of a possible break or other damage.
True design does not recognize small things.
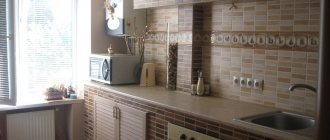
Of course, sockets in kitchens primarily serve a purely functional purpose; you cannot do without them when connecting all kitchen electronics. The convenience of the location of outlets is the dominant factor that determines the entire nature of their placement. Hence the main rule - be sure to design your entire space in advance, think about the location of furniture, all household appliances, and hence the location of kitchen outlets.
An outlet in the kitchen is an indispensable thing that should always be at hand, and then a food processor and microwave will appear on the table
First, make a list of all the kitchen equipment that will require power. We provide a complete list of such equipment, but everyone must choose for themselves a subset that more accurately reflects their preferences.
So, in the kitchen, power supply may be required for such essential appliances as:
- electric stove with a built-in oven (although you can often find independent designs of these devices);
- refrigerator;
- dishwasher;
- hoods;
- microwave;
- electric kettle;
- toaster;
- food processor;
- mixer;
- coffee makers
Among the frequently used, but completely optional devices:
- electric ignition of a gas stove;
- furniture lighting.
Among the desirable devices that help not only work, but also live:
- heated floors;
- TV.
Among the appliances that we also often pull into the kitchen:
- washing machine;
- iron.
Select from the entire list the most suitable and necessary devices for you. How many sockets do you need in the kitchen? In any case, the conclusion suggests itself - you can’t do without a plan, which will necessarily include the installation of 5-6 sockets around the perimeter of the entire kitchen.
Helpful advice! When purchasing sockets, be sure to take them with a reserve. Firstly, you never know how many of them you will need, in the end, and here it is better “one more than one less.” And, secondly, if with such a quantity one fails, you will always have something to replace without disturbing the overall design of the kitchen.
Layout of sockets in the kitchen
After choosing the wiring, you need to decide on the sockets.
Always plan the placement of outlets after the kitchen design is approved, otherwise there may be problems. For example, work area sockets can easily end up in the wrong place and end up hidden behind the refrigerator.
To ensure that your sockets and switches are in their places, take a plan for arranging your kitchen furniture.
After that, mark all the necessary sockets on it. You can even do this by hand.
On this plan, there is still no need to clearly assign installation locations and calculate dimensions and distances. Just count the number and purpose of each outlet.
Installation of electrical accessories
Once all electrical installation and finishing work has been completed, you can begin installing electrical fittings. Note that, subject to a certain sequence and safety precautions, almost any person can cope with the task.
Important! All operations related to stripping wires, connecting the socket, and installing it must be performed only after the network has been de-energized.
Brief sequence of steps for installing accessories:
- The insulation is removed from the end of the wire cores at a distance of 10–15 mm from the edge (in the case of a multi-wire cable, all wires must be twisted together and crimped with a sleeve).
- The ends of the wires (usually there are three, including the phase wire, the neutral wire and the ground wire) are inserted into the corresponding screw or spring terminals.
- The quality of contact is checked.
- Excess wire is placed inside the “socket box”.
- The socket is pressed tightly against the wall and fixed to the mounting box using spacers with a screw tightening.
- The decorative strip is installed and secured with a screw.
In the case of blocks with 2, 3, 4 or more sockets, the sequence is similar, with the exception that the metal mounting frames must be fitted end-to-end and to the same level. It is ideal if you can find the appropriate tool for stripping wires - a stripper, which allows you to safely and efficiently remove the insulation. Multiwire cables are crimped using sleeves and crimping pliers.
Attention! Before starting electrical installation work, you must make sure that there is no voltage on the phase wire. This can be done using a simple indicator screwdriver.
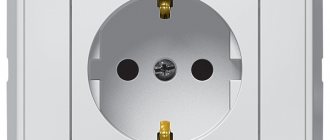
You should not skimp on sockets - you should always purchase options with grounding (provided that the electrical wiring in the apartment provides for this). At a minimum, in some dangerous situations it can save someone's life.
After installing the socket, you need to use a tester to check not only the presence of a phase, but also a neutral with grounding. This is done simply, by alternately checking the “phase + zero” and “phase + ground” pairs with the device. In both cases, the voltage should be in the range of 220–240 volts. If this is not the case, you need to look for and fix the problem.
Number of sockets
How many minimum outlets are required in the kitchen?
Here, follow the rule - for each stationary kitchen appliance, plan your own socket + 2 blocks along the edges of the countertop + 1 piece near the dining table.
The category of stationary appliances includes a refrigerator, range hood, hob and oven, microwave, dishwasher, garbage disposer.
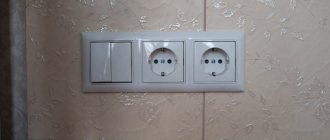
In addition, it doesn’t hurt to mount one socket immediately under or near the switch at the entrance to the room.
The area with switches usually remains uncluttered, and a free point where you can take voltage (for example, for a vacuum cleaner) is never superfluous.
Now mark the points on the apron for connecting non-stationary devices. Place at least two pieces on each part (right and left) of the kitchen.
This will include an electric kettle, blender, mixer, etc.
Advanced Options
Good sockets under the kitchen retractable type are much safer than competitors, they are very popular among buyers.
Most people perceive them as an alternative to extension cords; the ability to connect several devices adds positive qualities to this design option. Such elements can be easily hidden in a countertop or cabinet; thanks to such manipulations, dust and moisture will not have a detrimental effect on the wires.
High-quality built-in sockets for the kitchen are also at the peak of popularity; they look quite aesthetically pleasing and beautiful. A block of several separate grooves is completely invisible until the moment it is needed; it is pulled out by lightly pressing on a special place.
Distances and locations
When you have decided on the quantity, it’s time to move on to calculating the required sizes and indentations. To do this, draw something like a scan of the walls where the furniture will stand.
Here you will need the exact dimensions of the kitchen - length, height of the room. Gradually, in the form of rectangles, you draw the equipment and all the cabinets.
If the kitchen is corner, do the same with the adjacent wall.
Next, take your plan with the number of sockets and transfer them to the wall layouts. For each technique, follow its own rules.
Fridge
For refrigerators, manufacturers recommend placing the socket group under the appliance itself, that is, in the bottom row, so that the connection is not visible.
It is impossible to say unambiguously with 100% certainty at what height the bottom row of sockets should be made.
Based on IKEA recommendations, they advise placing them at a height of approximately 10cm from the floor, i.e. flush with cabinet legs.
This is explained by the fact that if you install it higher, the built-in equipment will rest against the forks.
If you intend to turn off the plug quite often, then the bottom connection for the refrigerator is not always convenient. In this case, you can place the whole thing at the height of the working area.
Sockets in the work area and above the tabletop
The height of the tabletop is usually 85cm, maximum 90cm. Then there is a partition with a height of 550-600mm and then cabinets.
Place sockets in this area 105cm from the floor.
In this case, they will not end up in the middle of the wall, and it will be convenient to cover them with the same microwave.
The minimum distance from the countertop should be at least 5cm so that the kitchen plinth does not touch them. Location: one set in any corner, plus between the hob and sink.
As mentioned above, at least two pieces. If you don't like the look of sockets above the kitchen splashback, consider the option of a pull-out unit from the countertop.
You definitely need to consider whether there will be built-in appliances in the upper cabinets. For example, a microwave.
You will also have to make a separate outlet for it. It is not feng shui to pull the cords from above to the tabletop area.
Hood
Also at the top, at a height of 1.9m-2.0m, there is an outlet for the hood. However, a lot can depend on the brand. If this is a cheap option, then you can get by with the cable outlet and then connect it directly inside the equipment.
But if this is an expensive model, then it comes with its own fork. And cutting off the factory plug will void the warranty.
Hob and oven
If you have a powerful hob, either a cable outlet is made, followed by connection directly under the panel contact blocks, or a special power socket is installed.
Ovens, unlike cooking ovens, come with regular forks, so there’s no need to be fancy here. Plug them into simple sockets.
When there are cabinets with hinged doors to the left or right of the cooker and oven, it is very convenient to place sockets directly inside them. Step back 15-20cm from the edge and mount it.
If this is not possible, then you will have to connect from the lower group.
If the oven is installed separately from the hob, for example at chest height, make a socket for it in the lower cabinet at a height of up to 750mm.
Dishwasher
According to SP 31-110 2003 clause 14.29, it is prohibited to install any sockets under or above sinks or sinks.
Therefore, always back off a few centimeters when installing a socket group near this plumbing fixture. This applies to both the lower placement and the working area at the top. It is also prohibited to place sockets behind the dishwasher and washing machine.
Near the dining table (if it is located near the wall and not in the center of the kitchen), it is advisable to plan one outlet.
On major holidays, when there is an influx of guests and relatives in the apartment, you will definitely need to connect something on the table - a mixer, a juicer, a food processor, etc.
And on simple days, you can easily attach a laptop there when working in the kitchen.
Working surface
How to properly remove power, and where is the best place to do it for small household appliances? Finding the answer to this question is a serious challenge for many.
Here it is necessary to take into account the possibility of simultaneously connecting the necessary kitchen appliances. For example, it is quite possible that you will need to turn on a kettle, toaster, coffee machine and mixer in one zone, so it is advisable to remove the block of 4 sockets in the appropriate place.
Naturally, it is impossible to provide for everything, so it is recommended to additionally provide for a reserve.
As practice shows, there are never too many sockets. It is considered normal to place blocks at 3–4 points at intervals of 1000–1200 mm along the entire length of the work area table top.
Please note that, for safety reasons, it is prohibited to install sockets closer than 500 mm from the gas pipe riser and wet areas, including the sink mixer.
In relation to the tabletop, electrical fittings should be placed at a height of at least 100–150 mm, which is 900–950 mm from the floor level. The final dimensions are determined taking into account the selected tile - so that the blocks fall on its center. If the electrical installation has begun, but there are no tiles, it is enough to simply separate the wires with a reserve, and install the socket boxes closer to the start of the tiling work.
Recommendations for wiring and circuit breakers
- for a group of sockets into which devices up to 3.5 kW are connected, a 16A circuit breaker is installed
- for devices up to 5.5 kW automatic 25A. Moreover, it is better to extend a separate group to this pantograph
You can also navigate using the following table for selecting machines and cables when connecting a hob:
- since the kitchen is a wet room, plus a huge number of objects with a metal case, it is mandatory to install an incoming RCD with a current of 30 mA in the panel in front of all machines
- all sockets must have a grounding contact, for a rated current of up to 16A, for hidden wiring
- A separate socket is installed for each pantograph
- do not use carriers or extension cords in the kitchen
This is not only an additional load on the wiring, but also a potential short circuit (due to spilled tea or other liquid).
Main equipment power
Before determining the installation locations for sockets and proceeding with installation, it is important to perform calculations. The first step is to register all the equipment that is planned to be used, and its approximate power.
The averages are:
- refrigerator - up to 1 kW;
- boiler - from 1.5 kW;
- hob - 1-1.5 kW;
- washing machine - 1.5 kW;
- oven - from 2.5 kW.
The data described applies to large equipment, which creates the main load. Small appliances in the form of a kettle, blender, etc. draw 300–800 W; separate places should be allocated for them in the drawing.
Laying wires
Having selected the cross-section of the wire for the hood, stove, dishwasher and decided on the electrical circuit, you need to understand the issue of proper cable installation in the walls.
If you plan to use corrugation (which is recommended), the width of the groove must be at least 20 mm. Open wiring can be placed in special plastic cable channels (usually not used in modern apartment renovations). In all other cases, it is recommended to adhere to the following recommendations:
- In the grooves, a puncher makes 6 mm holes in increments of 30-40 cm to secure the wire with special plastic clamps or dowel brackets.
- Before installation, the cable is “stretched” in the corrugation.
- After fixing the wire, the entire electrical system is checked to ensure there is no break.
- At the end, the grooves are sealed with gypsum or plaster mixture.
Important! The use of corrugation will allow, if necessary, to replace the wire without disturbing the finish of the walls.
Electrical panel installation
Electrical wiring for the kitchen begins with the installation of a distribution panel. Since a corresponding machine is installed here to power all the wiring. The rating of the machine for powering the wiring in the kitchen should correspond to the most powerful devices, so it can be as close as possible to the input unit.
For large kitchens that include built-in appliances and furniture, a large number of connected devices, you can install a separate electrical panel in the kitchen. It will simplify access to various devices and make it possible to de-energize some node in the wiring for repairs while the rest are available for use. It will also help localize emergency situations by disconnecting only the section of wiring in the kitchen where the short circuit occurred.
Rice. 2: Kitchen distribution board
TOP 5 common mistakes
When performing electrical installation work with your own hands, serious mistakes are often made. Which can lead to additional costs for their elimination or expose household members to the danger of electric shock. To avoid this, let's look at the most common mistakes:
- The cross-section of the wires supplying the kitchen does not correspond to the connected load. In this case, the wiring will overheat and may fail, or even cause a fire.
- Installation of sockets before drawing up a plan for the arrangement of furniture in the kitchen. In this case, there is a high probability that some outlets will be closed and you will have to be content with fewer resources. Or install new ones after finishing the finishing work.
- The locations of the sockets are not consistent with the water pipe laying plan. Then when gating walls, drilling, etc. you can damage the pipeline and flood the room.
- The permissible socket rating does not match the equipment being connected. As a result, the device will overheat and may melt or burn out.
- The dimensions of the socket do not allow installation of the desired device or interior element.
Is it possible to place a refrigerator next to an oven?
A modern kitchen is distinguished by the presence of a variety of household appliances that make life easier for the owners. In a small, cramped room, devices have to be placed close to each other. It is possible to install a refrigerator next to an oven, but certain conditions must be observed.
It’s possible, but not right next to each other; the optimal distance between the refrigerator and the oven is half a meter.
A short answer to the question posed
- Is it possible to place the oven next to the refrigerator?
- Why are the refrigerator and oven not the best neighbors?
- Separate equipment
- Built-in technology
- What can be used as insulation?
- Heat Reflective Foil
- Furniture partition
- The best inexpensive refrigerators under 20,000 rubles
- ATLANT XM 4214-000
- ATLANT XM 4208-000
- ATLANT XM 4011-022
- The best models in terms of price, quality, reliability
- Bosch KGV36NL1AR
- LG DoorCooling+ GA-B509CQWL
- Samsung RT-22 HAR4DSA
- The best devices with a No Frost defrosting system
- Samsung RB-30 J3000WW
- Hotpoint-Ariston HF 9201 B RO
- ATLANT ХМ 4426-000 N
- The best refrigerators with energy class A++ and A+++
- LG DoorCooling+ GA-B509 PBAZ
- Liebherr CN 4015
- The best two-chamber refrigerators with drip defrosting
- Liebherr CUel 2831
- Stinol STS 150
- Biryusa 649
- Refrigerator next to the radiator or heating pipes
- Built-in refrigerator
Is it possible to place the oven next to the refrigerator?
Sometimes they put a dishwasher next to the oven, but is this possible? This is a question that must be asked before placing them nearby. The answer is clear - you can’t do this back to back . If it is not possible to avoid such proximity, this may lead to a deterioration in the appearance of the unit. The walls of the refrigerator will gradually turn yellow, and the plastic parts will begin to crack and change shape. The equipment will take on a dull appearance, and you will have to buy a new one. Close proximity will negatively affect the operation of the refrigerator. According to the instructions, the distance between them should be at least 0.5 m .
Why are the refrigerator and oven not the best neighbors?
Homeowners are often tormented by the question: is it possible to place a dishwasher next to the oven? Experts believe that such a neighborhood is undesirable . Well, there are different reasons. First of all, this is the heat generated by both devices. In the refrigerator, even in models with the No Frost system, the back wall heats up from the operation of the engine. And in the oven, cooking occurs under the influence of high temperature, so its heating is inevitable. The heat emanating from it forces the compressor to work in increased mode. As a result, energy consumption increases, the refrigerator wears out faster and fails earlier. Simultaneously operating appliances can greatly heat the room. It will become unpleasant to be in the kitchen. Due to high temperatures, especially in winter, wall coverings may become unusable.
A refrigerator and an oven can only be placed next to each other if certain conditions are met.
Separate equipment
It is advisable to install kitchen appliances separately. It is best to place the refrigerator on the edge and other equipment in the center. Owners of a small-sized kitchen often choose a place for it on an insulated loggia or in the corridor. In accordance with safety regulations, electrical units that generate heat must be placed at a distance of 50 cm from each other. If there is no other way out and they are installed too close, then a heat-insulating layer a fire-resistant glass screen placed . If the insulation is incorrect or there is no insulation, in the event of a breakdown of one of the devices, the specialist will not carry out warranty repairs. Therefore, the nuances of installing equipment should be taken into account.
Built-in technology
Devices to be built in can be installed close. All units built into cabinets and walls are isolated from each other by partitions and equipped with special cables. The latter will prevent voltage surges. The advantage of built-in equipment is high-quality and reliable insulation .
Manufacturers complete built-in devices:
- a layer of insulation;
- heat-resistant cardboard;
- fan.
The most modern and expensive models have an emergency shutdown function . Oven models whose doors are equipped with triple glass perfectly retain heat inside the chamber. Built-in refrigerators and ovens can be placed side by side.
What can be used as insulation?
It is also worth considering whether the oven can be placed next to the refrigerator without damaging the appliances. If there is no need to build in the equipment, it is recommended to isolate the equipment yourself. Suitable for this:
- foil;
- special cardboard;
- glass and wood panels.
These heat-resistant materials look aesthetically pleasing. For example, you can purchase wood panels that match the material of your kitchen cabinets. If you look at the photo of the foil film, it becomes clear that it looks good on white and steel-colored refrigerators.
Foil film is one of the most reliable heat-insulating materials
Heat Reflective Foil
According to reviews on the forums, with the help of this material, the refrigerator and oven can be placed more tightly. The heat-reflecting foil contains isolon , which retains heat from the oven. The foil surface has the property of reflecting thermal radiation. Thanks to this insulation, the walls of the refrigerator practically do not heat up.
This method of thermal insulation looks great in a kitchen decorated in the style of:
- classic;
- futurism;
- high tech.
Heat reflective foil is thin and light, so it also saves space.
Furniture partition
You can separate the refrigerator from the oven with a furniture partition , which should be the same height as one of the units. It is made to order. A wooden partition has insulating and heat-conducting properties. When these two devices are located close together, it is simply inserted between them. No need to pin it. The partition must have a width of at least 5 cm.
The best inexpensive refrigerators under 20,000 rubles
Secrets of the electric oven
Modern ovens are equipped with so many functions that it seems they were prepared for a flight to Mars. Various modes, timers, sets of auto programs, grills, delayed start, automatic shutdown, heating from above, from the side, from below, etc.
Which of these modes is needed in real life? What hidden features do our ovens have? Let's figure it out.
Oven modes
Modern electric ovens have many modes: “Convection”, “Top heating”, “Bottom heating”, “Grill”, “Top and bottom heating plus convection”.
Be sure to read the instructions for your electric oven and select the appropriate mode when preparing dishes.
Some models of electric ovens have 2 fans installed at once: this is very convenient and allows you to cook two dishes at the same time at different levels, because the heat spreads constantly and evenly in the oven.
If you are just choosing an oven to buy, then I recommend choosing exactly this one, this will give you the opportunity to save time and energy on preparing two different dishes, for example, a golden brown pie and baked meat with vegetables.
“Grill” mode – it’s hard to imagine modern ovens and even some microwaves without it!
In order for grilled meat to cook well and remain juicy, the pieces must be of the same thickness, at least 2-3 cm.
Place the pieces directly on the grill. Additionally, place a universal pan on level 1. The roasting juices will drain into it and the oven will remain almost clean.
You can also bake meat, chicken, and fish using the “Convection ” mode, and 5 minutes before the end of cooking, turn on the “Grill” mode and the dish will get an appetizing golden brown crust.
Remember the smoke point of oils. If you set the temperature to high (above 240 degrees) and turn on the “Grill” mode, the oil may catch fire and black smoke will come out of the oven.
The automatic cooking program makes cooking very easy. You need to select a program and indicate the weight of the products.
For example, my oven has the following programs: defrosting, cooking vegetables, potatoes, fish, pizza, etc.
But you need to carefully study the instructions for your oven to understand which program number is responsible for what. For me it looks like this:
Timer
This is a very important and necessary function for your oven! Therefore, take your time and figure out all these clocks and numbers.
What can a timer do? Not only show the current time.
- You can use the timer like a regular household one . It works independently of the oven. The timer emits a characteristic sound, letting you know that the set cooking time or time on the timer has expired.
You can set the cooking time in the oven . When the cooking time has expired, the oven switches off automatically. At this time, you may not even be at home; the timer will turn everything off.
You can delay the start of cooking by specifying the time at which the dish should be ready. The oven will automatically turn on and the dish will be ready at the specified time. Products can be placed in the cooking chamber, for example, in the morning, so that the dish is ready in the afternoon.
Oven temperature
Before starting cooking, the oven must be preheated to the temperature required to prepare a particular dish. Most often it is 180-200 degrees.
Try not to use a high temperature, as a dish placed in an oven that is too hot will burn or stick to the baking sheet or baking pan faster.
It is better to keep the dish in the oven longer at the optimal temperature, controlling the process of baking or stewing the dish, than to overbake and then correct the consequences.
Oven position
The oven chamber has several guides for positioning baking sheets and racks at different levels. The most optimal position is to place the dish on the middle level, because this is where the product is cooked evenly and correctly.
During baking or stewing, the dish can be moved downward if the top is too browned or upward if you want a crispy crust.
Selection of cookware
Today there is a huge selection of baking dishes on sale. You don’t need to buy the entire arsenal; it’s enough to know only the bare minimum that you’ll need.
I recommend having in your arsenal a flat baking tray, a deep baking tray for preparing lasagna, casseroles, roasts, cast iron dishes for long-term stewing (duckling or goose pans), ceramic forms for portion serving and a glass dish for baking dishes.
The universal rule when choosing cookware is this: it must withstand heating up to 250 degrees.
Alas, some ceramic molds may not be heat-resistant enough and may crack if there is a strong temperature difference, so if there are no other options, they should be placed in a cold oven.
Additional accessories: parchment paper, foil, baking sleeve
All these means serve to make using the electric oven more comfortable, as well as to maintain a special temperature in the middle of the dish.
Parchment paper prevents the dish from sticking to the baking sheet or pan. Most often used for baking. I recommend using good quality parchment paper with a thin silicone coating. Nothing sticks to such paper and it does not need to be additionally lubricated with fat (vegetable oil or butter).
You can bake meat, fish, poultry in foil or cover baked goods with it so that the delicate dough does not bake too quickly. It should be remembered that food that contains acid (for example, tomatoes, dishes with lemon juice) cannot be cooked in foil.