A blind area is a special building element under the walls of a house that looks like a path.
Its purpose: to remove precipitation from the walls and foundation, to create additional thermal insulation. The design also prevents the growth of the root system of bushes and trees, which can damage the base of the building. Drainage is a mandatory addition around the blind area of a house in regions where there is heavy rainfall.
At what distance from the blind area to make a drainage system, how to lay it around and under the structure with your own hands, read on.
Why is a drainage system needed?
No matter how strong and reliable a house is, water can cause significant damage to it. And although this does not happen quickly, the damage will be noticeable in 5-10 years. The foundation is protected from groundwater by waterproofing, which was created at the first stage of construction. But it may not be enough.
In addition,
precipitation is uncontrollable and can cause significant damage:
- dampness on the lower floors;
- soil erosion with subsequent subsidence;
- the appearance of cracks on the foundation and walls, chips on the base part;
- the appearance of microorganisms, mold;
- threat of deformation and collapse of the building.
Drainage of the blind area becomes an obstacle to the occurrence of these consequences. But for many builders, it does not seem to be such a necessary element; they forget about it or refuse to do it for some reason. In modern construction, this element is part of the general drainage system on the site.
There are several direct indications for the need to install blind area drainage:
- the soil on the site is clayey or heaving, prone to deformation, and reacts strongly to excess moisture;
- the house is in a low place;
- groundwater passes near the foundation;
- the blind area is not monolithic (made of bricks, paving slabs), water flows into the cracks between the covering elements;
- the foundation is not deep, above the freezing level of the soil.
If groundwater passes close to the earth's surface, a drainage system for the foundation and blind area must be present, otherwise the structure will not last even 5 years.
What it is?
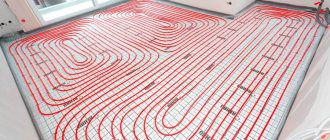
A blind area is a structure that is erected around permanent buildings to drain excess moisture. For a long time it was believed that the concrete (rigid) version of the structure was better suited for these purposes. But over time, soft blind areas have gained popularity, allowing for a long-term solution to the problem of draining water falling with precipitation or flowing from the roof. The flexible tape distributes loads more evenly; it is installed around the house both for buildings on screw piles and for options with a solid monolithic foundation, and the hidden part of such a multi-layer “pie” is always noticeably thicker than a classic concrete one.
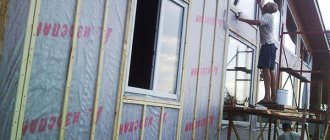
Installation of a soft blind area is possible not only in the local area. It can also be arranged around a well or a country cottage, a warm chicken coop or a utility block. Like other types of drainage structures, soft blind areas have their advantages and disadvantages. Let's start with its obvious advantages.
- Resistant to temperature changes. When the soil freezes, the multilayer structure does not move.
- Stable geometric parameters. The flexible blind area does not shrink, therefore it eliminates possible cracking of the base and supporting elements. It practically does not require repairs or restoration throughout its entire service life.
- Compatible with membrane materials. This layer makes it possible to improve the waterproofing properties of the structure and increase its heat capacity.
- Ease of arrangement. The costs, both physical and material, in this case are not too high.
- Aesthetics. You can use various materials for decoration, plant a lawn on top, or create a flower bed.
Types
Several drainage placement systems relative to the blind area allow you to create the most effective drainage that is safe for the structure and building itself.
Under construction
Its second name is parietal . The main task: to reduce the influence of groundwater on the foundation.
Parameters that must be observed when creating drainage under the blind area:
- The pipes should be sloping towards the drain well. The degree is calculated when creating a project; it corresponds to the soil. The speed of water movement through the pipes is approximately 1 m/s.
The installation of the drainage system should be lower than the freezing depth of the soil. This value depends on how severe the frosts are in a particular area (otherwise the pipes may freeze with the onset of cold weather and cease to perform their functions). In central Russia 50-80 cm.- It is necessary to provide another drainage system in case of breakdown of the main option. For example, install a pump.
- The place where the water is drained should be either in the lowest part of the site or beyond its borders. Install a well or run a pipe to the nearest body of water.
It is recommended to coordinate the drainage system in the house design initially, when it is created.
Annular
It is used to drain water that appears due to precipitation . The systems can be combined and used both at once. The second name for drainage around the blind area is ring. There are 3 types of them:
Surface
In execution it looks like ditches located around the entire perimeter of the blind area. Their width usually does not exceed 20-30 cm, maximum depth 70 cm.
Advantages:
- easy to create with your own hands;
- with its help, errors during the construction of the blind area are corrected (for example, if, due to incorrect calculation of the slope, water accumulates at the side and forms puddles);
- inexpensive, quick installation.
Disadvantages: If the region experiences heavy rainfall, such a system will not be sufficient.
There are two types:
- Spot. They look like shallow wells with a bottom covered with rubble. They are placed under drainpipes so that precipitation from the roof flows directly into the drainage without violating the integrity of the blind area.
- Linear. Ditches are dug along the perimeter of the blind area, a sand cushion is created inside, drainage is carried out (using pipes cut lengthwise, special trays or concrete), and protected from above with a grate.
Digging a trench should be carried out in accordance with the project, geodesy of the site and take into account the locations of other communications.
Backfill
Similar to the previous option, the inside of the ditch is filled with gravel on top.
Advantages:
- simple installation;
- inexpensive option;
- looks aesthetically pleasing.
Disadvantages: Difficult to clean if clogged with debris or silt.
Drainage work around the blind area is carried out after the construction of the house is completed. This is one of the very last, final stages .
Deep
Suitable for areas where groundwater runs close to the surface and clay soil. It is considered mandatory if the house design includes a basement floor.
Advantages:
- inconspicuous;
- effective if there are frequent heavy rains or a lot of snow accumulates during the winter.
Flaws:
- labor-intensive creation process;
- expensive.
This option is the most effective; it is laid according to the principles of wall drainage, only at a greater distance from the foundation.
Connection of gutters and drain riser on the facade
Installers make such connections using funnels and adapter elbows. Their number is determined by the area of the roof, as well as the diameter of the drain. It must be sufficient to drain the collected water into the storm drain.
If the pipe diameter is 87 mm, and rectangular gutters are installed on the eaves, one drain riser is used for every 80 m2 of roofing.
If the pipe diameter is 100 mm, one riser is used for every 150 m 2 of roofing.
When using round gutters to install funnels, a V-shaped cut is first made in their bottom using a hacksaw. With a rectangular shape, an X-shaped cutout is made, the edges of which are folded down. The connection area is sealed with mastic. Additional compaction is not required if a pipe bend is immediately installed in the descent section (without using a funnel).
Requirements
When creating drainage, you need to consider:
- proximity of bodies of water to the site (probability of floods);
- how high the groundwater is (and the likelihood of its quantity increasing);
- how much precipitation falls on average per year;
- site development plan (neighboring buildings, communications);
- type of blind area (how much water can pass through the coating);
- site structure, slope;
- geodetic soil parameters (composition).
Only after receiving all this data can you clearly imagine what drainage will look like in a particular area. Next, you need to follow all installation rules.
Parameters that need to be taken into account when installing drainage under the blind area:
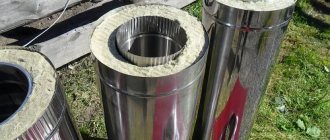
The slope of the pipes depends on the diameter of the pipes that will be placed. For large-sized elements the degree will be less. For example: for 4-5 cm the slope is 3 cm/m, for 8.5-10 cm the slope is 2 cm/m, for 15 cm the slope is 0.8 cm/m.- Polymer perforated pipes are considered the most convenient to use. The holes in the pipe should be smaller in diameter than the diameter of the crushed stone with which the trench will be filled.
- To see the condition and monitor the functionality of the drainage system, inspection wells are installed. The distance between them should be about 12 m.
- Depth - below the freezing level, at the level of groundwater passage, width - 10 cm more than the diameter of the pipe.
Inspection wells can have a solid bottom, but it is preferable to leave an empty base and fill it with crushed stone. The same system is used in a common drain well.
The trench for backfill and surface drainage has parameters that directly replicate the tray or part of the pipe that will run inside.
The deep ring drainage system must meet the following parameters:
- a layer of sand cushion of at least 5 cm, preferably 10;
- crushed stone up to 15 cm, under and above the pipe;
- It is recommended to use perforated pipes of at least 11 cm in diameter;
- At the finish line, the soil is covered with a thickness of 20-30 cm.
In all variants of drainage systems, a slope towards the drainage well is maintained.
How to make drainage on a site with your own hands: choosing a system
Drainage systems are conventionally divided into two large categories: surface and deep. If the installation of a deep system may require certain knowledge and the help of specialists, then the installation of surface drainage in a summer cottage can be done independently. This type of sewerage can be called the simplest way to solve the problem of excess moisture on the site.
On a note! There are certain restrictions regarding the installation of surface and subsurface systems. Some conditions do not allow the organization of one or another type of sewage system. Be sure to carry out a preliminary analysis of the conditions of the proposed construction area.
To develop a preliminary drainage plan for a site, its territory should be inspected and key points identified. All factors that may influence further work on drawing up a site drainage project are considered.
Installation of drainage system.
To create a diagram, the following information is required:
- A plan of the territory indicating all buildings, the nature and density of plantings, as well as the boundaries of the site.
- Topographic data reflecting the features of the relief (not needed if the site has a flat surface).
- Dendroplan (the diagram is necessary if there is a large number of plantings on the territory or their planting is expected, since the plants are dependent on water).
- Road and path grid (layout of future paths and paved areas that require drainage).
- Communication system diagram.
- Hydrological data (level of water balance of the territory).
On the one hand, hydrological data influences how to do drainage in dacha-type areas, so they are very important. On the other hand, loamy soil types have the same structural structure, so such information may not be needed.
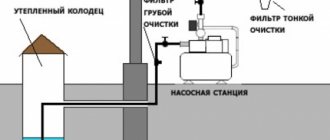
As already mentioned, to create a storm drainage system, also known as a surface water drainage system, basic knowledge in construction and data about the territory being developed are required.
Storm sewerage is gravity-flow, i.e. is arranged at an angle and includes the following elements:
- Roof drainage;
- Drainage drainage system;
- A sewer or drainage discharge point.
Roof drainage receives precipitation at the roof level, through trays, gutters, funnels and sends it to the surface drainage system.
Tools for work
Creating a drainage system with your own hands is not difficult if you know all the features of the site in advance. For work you will need:
- shovel;
- drill (if you need to create a drain well);
- level or laser level.
It is recommended to drill a well with the help of specialists. If this is not possible, you can dig it out yourself and strengthen the walls, for example, with tire covers. A level will be needed to create the correct slope.
Step-by-step instructions for arrangement
The difference in the arrangement of a buried drainage system under the blind area and near it is only in how close it is to the foundation.
Procedure:
Dig a trench at a depth at the groundwater level. The width is determined by the diameter of the pipe plus 10 cm.- Place a sand cushion on the bottom and compact it.
- Lay geotextiles so that the edges extend beyond the boundaries of the trench by 20 cm.
- Fill in a layer of crushed stone and lay the pipe. On top there is still the same crushed stone layer.
- Wrap the geotextile and lay a layer of sand on top.
- Cover with living soil and lay a lawn.
At bends, pipe connections are waterproofed and a small additional well is dug under them to collect water that may leak out.
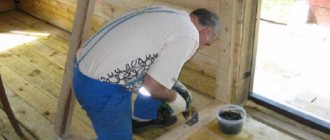
If you need to make a ditch for a surface drainage system:
- dig a ditch;
- cover it with a thin layer of stone, strengthen the walls;
- lay waterproofing;
- concrete/lay half of the pipe/tray;
- put a grate on top, which will allow you to monitor the condition of the drainage and clean it in time.
Precise adherence to the sequence of actions protects against mistakes and, as a result, penetration of moisture into the soil to the foundation.
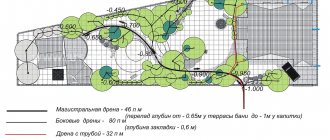
The video will show you how to make drainage around the blind area of a house:
Blind area and drainage around the house
Often homeowners decide to make a blind area around the house. One of the main purposes of the blind area is to drain water away from the house. In fact, a blind area one meter wide cannot fully cope with the task. Water will still accumulate at the edge of the blind area and seep into the foundation, threatening to begin to destroy it over time. And if the house has a basement or cellar, the accumulation of moisture can lead to the formation of mold and mildew.
One of the options for guaranteed drainage of water from the house is to increase the width of the blind area to 3-4 m, which is rarely found in practice. Therefore, to solve this problem it is worth resorting to installing a drainage system.
Possible errors in the process
What to pay attention to:
- Lack of a prepared place for draining water from the drainage. Pipes cannot simply be routed outside the site. There must be a place suitable for these needs: a slope, a ditch with a stream, a sewer. For convenience, a drain well is created.
- The required slope has not been formed. The drainage will have to be relocated, since it will be of no use, water will accumulate inside the system and will bloom.
- We bought regular pipes. You can do the perforation yourself, the main thing is to comply with the sizes of the crushed stone fractions.
- Geotextiles were not installed. It is necessary so that the crushed stone does not mix with sand. Some builders wrap the pipes themselves in it to prevent granules from falling inside through the holes. It is recommended to excavate the system down to the pipe and redo it.
Average device price
The price depends on the volume, complexity of the soil, and the depth of the trench. A separate cost is assigned for creating a drain well:
| Type of work | Moscow and Moscow region, rub/pg.m | St. Petersburg and Leningrad Region, rub/pg.m | Krasnodar, rub/pg.m | Kazan, rub/pg.m | Rostov-on-Don, rub/sq.m |
| Deep drainage, up to 80 cm | From 1200 | 1100 | 1100 | 990 | 900 |
| Deep drainage, over 80 cm | From 2500 | 2500 | 2500 | 2500 | 2500 |
| Surface drainage | From 900 | 900 | 800 | 750 | 800 |
| Drain well | From 20000 | 20000 | 20000 | 19000 | 20000 |
The most important and useful information on the construction of blind areas is collected in this section.