- Preparation of adhesive solution
- Actions that violate the integrity of structures
Having decided to build a house from aerated blocks or use this material for planning premises, many decide to carry out the work themselves. The reason is quite clear - by refusing the services of hired workers, the owner is trying to reduce the cost of building walls. In this case, instructions on how to correctly lay aerated concrete blocks with glue will be very helpful.
Composition of special glue
Adhesive for aerated concrete blocks contains the following components:
- High quality Portland cement.
- Fine grain sand.
- Polymer substances to improve properties.
- Auxiliary modifiers for better strength and other characteristics.
Previously, when aerated concrete blocks just began to be actively used, their laying was done using ordinary mortar. However, the concrete drew out the liquid very quickly, causing the strength to decrease significantly. When specialized adhesive for aerated concrete appeared, the situation changed for the better.
The special composition began to take up less space, and mixing became easier. But despite all this, the cost of the work has not increased, because the consumption of improved glue is much less.
The composition of the aerated concrete masonry adhesive ensures optimal fluidity for filling small pores, which makes it possible to fasten the blocks together with high quality. What’s also good is that manufacturers add various modifiers to the composition to improve quality.
Reference! Additional elements that are included in the glue reduce the thermal conductivity of the mixture. With a layer of 3 mm, heat loss through the connections is minimal.
However, for high-quality work, the blocks themselves must meet a number of requirements. For reliable fastening, their surface must be smooth. The glue layer itself is very thin, so it will not be possible to level the surface and hide visible defects.
Introduction to the topic
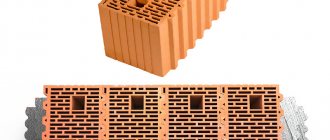
The widespread use and popularity of blocks is caused by the good technical and operational characteristics of cellular concrete materials. Brickwork is inferior to blocks because it requires a lot of time and puts a significant load on the foundation. The building blocks are large in size, but have minimal weight, so the installation speed increases significantly. Foam blocks and gas silicates can be installed on any type of foundation, including shallow foundations, and can be used to build low-rise buildings. The advantages of using building blocks are obvious:
- Minimum load of wall structures on the base.
- Prompt construction of residential buildings and other buildings.
- Economical consumption of adhesive solution for installation.
- High strength of buildings made of cellular (porous) concrete.
- Low thermal conductivity and vapor permeability of the material.
Adhesive for blocks fixes structural elements together as firmly as possible, thanks to the introduction of special components into the composition. Using adhesive compositions, monolithic load-bearing walls, interior partitions, and internal walls made of gas and foam concrete are erected. Lightweight building material is gradually replacing traditional buildings made of brick and wood.
On a note! The use of reinforcement belts between aerated concrete and foam blocks allows the construction of not only one-story buildings, but also houses with a height of two and three tiers.
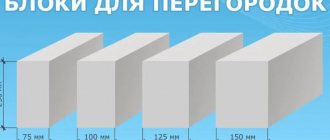
Types of glue
Modifiers in the composition of adhesive for aerated concrete blocks give individual compositions unique properties, which allows them to be used in certain conditions. For laying blocks, there are 2 types of adhesive mixture - summer and winter. The last option is all-season; it has no restrictions for use in the warm season. As for summer, its use is permissible only at above-zero temperatures, which limits the scope of use.
Summer
The adhesive for summer blocks contains white cement. The finished seam practically does not stand out against the background of the gas block, which looks neat and aesthetically pleasing. This feature makes it possible to do without additional finishing. Representatives: MixMaster, Kreps.
The use of summer glue for blocks is permissible at a temperature of at least +4 degrees. At a minus value, crystallization occurs and the quality of the mixture deteriorates greatly.
Reference! When during construction there is a possibility that the temperature will drop below 4 degrees Celsius, winter glue should be used.
Winter
Winter glue already contains modifiers that prevent the liquid from freezing and increase the plasticity of the finished mixture. Can be used down to -15 degrees. The downside of the composition will be longer hardening, which prolongs the working time. After mixing, it can be used for several hours, but ordinary glue loses its properties after half an hour.
Winter adhesive for gas silicate and aerated concrete blocks cannot boast of aesthetics. After hardening, it becomes dark and differs significantly from the base material.
Reference! In winter, at sub-zero temperatures, glue consumption increases, but this is only a plus for the strength of the connection.
Execution of work
The technology for laying aerated concrete blocks with glue differs significantly from work carried out using a cement-sand based mortar.
The process consists of several stages:
- preparation of block material;
- preparing an adhesive solution;
- applying glue to the block surface;
- laying and leveling the block;
- removing excess glue.
The peculiarity of the masonry is that the block surface must be clean; it is prohibited to apply glue to the material covered with a crust of ice.
Additional moistening of the blocks during laying is not required. An exception may be cases when work is performed on a hot day.
Preparation of glue
Manufacturers indicate the proportional ratio of glue and water on the packaging material. It must be remembered that the masonry mixture for aerated blocks should not contain a lot of water.
A mass of homogeneous consistency is obtained if stirring is performed with special attachments attached to an electric drill. After completing the first batch, you should wait ten to fifteen minutes for the glue to “infuse.” During this time, the additives contained in the glue will completely dissolve. Before use, the glue is mixed again.
The prepared glue can be used within two to four hours. The production time depends on the brand of the composition. If the adhesive mass begins to harden, there is no point in adding water - the solution has lost its qualities.
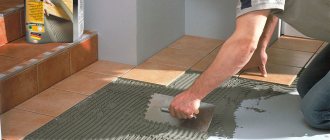
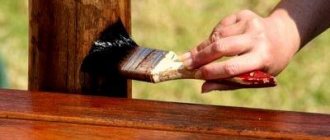
Application
How to properly place the mass prepared for work?
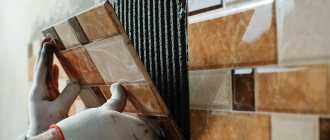
The glue is applied to the block surface using a spatula with teeth or a carriage intended exclusively for this type of masonry composition.
The positive result of using a special set of tools implies a significant reduction in glue consumption, improved adhesion and a reduction in construction time.
The thickness of the glue layer will depend on the teeth of the spatula.
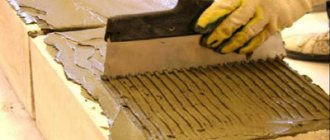
To prevent the wall from collapsing, a cord should be pulled along the masonry row and the work should be controlled at the building level. You can level the blocks with a rubber hammer so as not to damage the block surface. Excess glue is removed with a trowel after hardening.
Proportions for preparing the solution
Features of preparing high-quality glue for blocks:
- You should read the instructions for the product, even if you have previously had experience working with it, because different manufacturers may have different properties and preparation methods.
- For 10 kg of mixture, take about 1.5-2.5 liters of liquid.
- First, water is poured into the container, then the powder is poured. If you do the opposite, lumps will form, and removing them will be problematic.
- For mixing, it is better to use a construction mixer, which is turned on at low speed.
- After obtaining the desired consistency, you need to wait a few minutes and then mix again.
Reference! After preparation, the mixture can be used within 30 minutes, for winter formulations - 2-3 hours. After this time, the properties of the solution begin to deteriorate.
The glue should be mixed in portions, because if it is not used at the specified time, a new solution will have to be prepared, which significantly increases consumption. At any time of the year, it is recommended to maintain the glue temperature at least +10 degrees.
Material consumption is individual for each individual brand. The air temperature during operation also matters. The average consumption is about 15-20 kg per meter. At the same time, some mixtures are used in significantly smaller quantities - up to 2 kg per meter. Consumption will depend not only on the characteristics of the adhesive, but also on the quality of the blocks themselves.
Tools
To prepare the solution you will need:
- container for mixing dry composition with water;
- an electric drill with an attachment used for kneading;
- measure for maintaining proportions;
- a notched trowel or trowel for aerated concrete adhesive, which is used for masonry work.
The best manufacturers of adhesives
There are many companies that produce glue specifically for aerated concrete blocks. However, some manufacturers are the most popular, including Ceresit (Henkel), Knauf, Kolmiks, Volma, Prestige, Kreps.
Review of adhesives from well-known and trusted companies:
- Henkel. Produces materials under the Ceresit brand. Special glue is popular in many countries and there is no doubt about its quality. Ceresit ST 21 is used for laying blocks. The company produces winter and summer versions of the product. With a layer of 2 mm, the cost is approximately 17.5 kg.
- Colmix. Produces Stroy Moment SMK-10. Can be used for work in winter; the product contains auxiliary components that prevent freezing. Consumption - about 20 kg per meter.
- Volma. “Blok” adhesive is produced for cellular concrete. Consumption is about 1.4 kg per meter, which is very little for a 1 mm seam.
- Craps. KGB Kreps is being prepared specifically for blocks. For masonry you need a 2 mm seam. After mixing, you can use the solution for 4 hours. Suitable in conditions from -10 degrees.
- Prestige. Mixtures for foam concrete and aerated concrete are being prepared. The finished solution retains its quality for 3 hours. Seam thickness – 5 mm.
- Aerok. The plant prepares adhesive for various blocks. There are 2 composition options in the range, which allows you to use the manufacturer’s products in winter and summer at temperatures from -15 to +35 degrees. The layer is applied 3 mm thick. Consumption – 15-18 kg per meter.
- Eunice. In addition to laying aerated blocks, the composition can also be used for plastering. The product allows you to correct minor defects, chips, cracks.
To preserve the quality of the glue, it should be stored in an airtight container. In the room where the composition is located, the moisture level should not be higher than 70%. In winter, glue should be left in a heated room. Open packaging must be protected from moisture to prevent petrification. The diluted solution is not stored, it is suitable for use within 2-3 hours.
Ceresit
Ceresit ST 21 is an adhesive made specifically for silicate and lightweight concrete blocks. It has high quality indicators. Among the positive aspects are water resistance, frost resistance, and use indoors and outdoors. It adheres well to cellular concrete, providing additional thermal insulation.
The glue is produced in 25 kg bags. The composition contains polymer components, mineral fillers, and cement. Application temperature range – from -5 to +30 degrees.
Preliminary preparation of the surface is required - cleaning from dirt, eliminating chips and damage. You can level the base with the same glue from Ceresit. Each row of blocks should be carefully sanded using coarse sandpaper. Don't forget to remove dust.
Cooking features:
- The mixture is slowly poured into the liquid at room temperature.
- Mixing is done with a drill with an attachment or a mixer.
- The finished solution is infused for 5 minutes.
- Re-mixing is done.
- The solution can be used up within 2 hours.
Reference! The advantages of ST 21 glue will also be environmental friendliness and safety for humans.
Knauf
Knauf glue is one of the most popular building materials on the market. It is produced in packages of 15 and 30 kg. Knauf Perlfix is a mixture on gypsum with additional components. Suitable for various surfaces, including concrete, foam concrete, brick slabs. Can only be used indoors.
The product is made from environmentally friendly materials. The glue is safe for humans both during operation and after hardening. The company has a quality certificate for each product. At the same time, glue also has some disadvantages. The mixture takes a relatively long time to dry, which is due to its special composition. It will take a week to completely harden. During this time, the adhesion strength will increase.
Ivsil block
Another high-quality glue for blocks is Ivsil Block. It contains fractionated sand, cement and auxiliary polymers. Suitable for grooved and grooveless blocks. A distinctive feature will be increased plasticity. After application, it is possible to adjust the position within 10 minutes.
For masonry, a 2 mm layer of glue is required, which significantly saves its consumption. There are summer and winter versions of the mixture. A small layer of application also prevents freezing of the wall and the formation of cold bridges. After mixing, use within 3 hours.
Experts recommend choosing proven brands of glue for blocks that receive good reviews. When using, you must follow the instructions provided by the manufacturer.
Using glue for aerated concrete blocks (2 videos)
Adhesive for aerated concrete blocks (18 photos)
Advantages and disadvantages
Adhesive for laying gas silicate blocks has high performance characteristics and is valued for its ease of use. Key advantages of the building material:
- increased level of adhesion and excellent plasticity indicators;
- resistance to moisture and low temperatures;
- non-shrinking adhesive material and high setting speed.
The product is of interest due to its budget price and economical consumption. Although the universal dry concentrate costs twice as much as a classic cement-sand mortar, the glue consumption for gas silicate blocks is 5 times less: the mass is applied with a minimum layer thickness not exceeding 2-3 mm. It also helps:
- increasing the strength of the structure, since the minimum thickness of the seams ensures the solidity of the structure;
- improving the thermal insulation of the building by reducing heat loss through the seams, since the effect of cold bridges is leveled.
Thanks to the minimum thickness of the seams, the laying of gas blocks turns out smooth and beautiful.
In addition, thanks to the minimum thickness of the seams, the laying of gas blocks turns out smooth and beautiful.
The presence of water-retaining components in the adhesive composition eliminates the formation of mold between aerated concrete blocks, which has a positive effect on the operational characteristics of the structure.
The disadvantages of adhesive for gas silicate include the demands on the evenness of the treated surface and high prices for products, although due to the cost-effectiveness of consumption, the high cost of the building material is offset.
Useful tips
All the steps listed above can be completed independently without any problems. However, if you do not have the skills to work with building materials, as well as tools for laying aerated concrete with your own hands, it is recommended to entrust the laying of at least the first row to professionals. This will avoid the most serious problems, which are the hardest to fix. Also, to simplify the process of constructing a building from a similar material, it is worth:
- Use blocks that have clear and uniform dimensions;
- Mix the glue using electronic tools. This will reduce the likelihood of lumps and uneven consistency;
- Place blocks on each subsequent row according to a clearly chosen pattern. Start doing this from the corners, and then lay out each wall level;
- It is worth reinforcing not only external walls, but also joints with internal ones;
- Using a plane, grind the blocks in order to achieve their maximum compaction.
Reinforced concrete belt for supporting the roof truss system
Approximately half of private houses are built with an attic. To increase the volume of attic rooms, a house structure with attic walls is often used, which are a continuation of the load-bearing walls of the house on the attic floor. The height of attic walls is usually in the range of 0.7 - 1.2 m.
The roof truss system of a house with an attic rests on attic walls. To ensure the stability of the attic walls of the attic when exposed to roof loads, along the top of all load-bearing walls
perform a monolithic reinforced concrete belt. The Mauerlat of the roof truss system of a private house rests on a monolithic belt of the attic wall.
| Monolithic reinforced concrete belt of the attic wall of the attic. The Mauerlat and roof truss system are attached to the belt |
The design of a monolithic belt for supporting a roof is in many ways similar to a monolithic belt at the floor level.
The height of the monolithic belt is not less than 15 cm. The minimum cross-sectional area of the monolithic belt is not less than 250 cm2. A monolithic belt is often made across the entire width of the outer wall if the wall is insulated from the outside. If the wall is without insulation, then on the outside there is space left for laying a layer of insulation, which eliminates the cold bridge through the concrete belt.
For a hipped roof, the belt along the outer walls is made a continuous ring, as in the figure. If the roof is gable, then in the belt you can leave gaps in the gable walls for installing windows.
Aerated concrete masonry technology
The technology will be as follows. First, the foundation of the structure is made, on which the first row of masonry is placed. The base on which you will place the aerated concrete should be raised from the ground surface by about 50-80 cm. Waterproofing must be done between the foundation of the house and the masonry. See what types of waterproofing there are here.
The first row of masonry should rest on the mortar laid on top of the waterproofing. Laying aerated concrete walls always begins at the corner of the building being constructed. In the corners for laying each row you need to pull a mooring cord. It is along this cord, checking everything with a building level, that the correct placement of each block is monitored. The position of each block is adjusted using a rubber hammer. If the blocks have a tongue-and-groove system, they are connected to each other without the use of an adhesive mixture. After laying each row, any irregularities that appear must be removed by rubbing the surface with a sanding board.
Reinforcement of aerated concrete masonry
The reinforcement of aerated concrete masonry is determined only by the designer at the planning stage. This must be done if:
- additional load will be placed on the walls;
- the length of the walls is significant, i.e. it is necessary to provide resistance to wind loads;
- The first row is reinforced and laid directly on the foundation of the house.
It is necessary to reinforce all support lintels whose length is 900 mm or more. Reinforcement is required at the bottom seams of window openings, and the length of the rods must be at least 900 mm on each side of the opening. When laying walls, the reinforcement is made from reinforcing bars of type A-III, their diameter is 8 mm. The blocks are pre-cut with special grooves for the rods. The groove is first filled with glue, then the reinforcement is laid, after which the next row is laid as usual. Such grooves should extend 60 mm from the outer surface of the blocks.