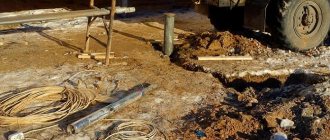
Let's pay attention to the current drilling tool, which you can make yourself. We will figure out how to properly make a bailer for cleaning a well with your own hands, and drawings, photographs, design options and the materials necessary for their implementation will also be considered in the most detail. We will try to provide as much useful information as possible so that you can organize a fence from a source on your site without unnecessary difficulties.
Let us immediately note why it is needed. It is a budget alternative to modern impact equipment, which is often expensive and irrational to rent or buy, especially for one-time work. This is a solution for those who would rather spend time than money, that is, enthusiastic DIYers, and it has the obvious advantage of saving money.
How does a bailer work?
According to the gravitational principle, using its property of large weight, as follows:
- she is abruptly thrown into the shaft from a considerable height; at the same time, its pointed edges loosen the contaminants lying at the bottom of the sleeve;
- its valve opens and fills with sand and silt, after which it closes;
- they take it out, and then throw it down again, and so on several times - for maximum effect;
- then the contaminants that have accumulated in it are removed from it.
This cycle is repeated many times until the well is completely cleaned.
Attention, the method gives good results when the soil is loose and incoherent. And bringing it to life is work that requires significant physical effort. Therefore, it makes sense to make your work easier and install an electric winch - then it will be much easier to pull out a tool filled with silt and sand.
Tips and tricks
As a cleaning tool, the bailer will need to be used to clean wells several times a year. To avoid various kinds of difficulties associated with the process of self-cleaning wells, it is worth monitoring the condition of the well walls.
Drilling with a bailer is recommended only on a certain type of soil. It is more advisable to use the piston model on soft, sandy soil. In all other cases, it is better to entrust the work to specialized equipment under the guidance of specialists.
There are several tips regarding working with a bailer:
- the device should be immersed no more than 10 cm in sandy soil;
- When drilling, it is necessary to supply water into the shaft to strengthen the walls of the shaft;
- to collect sand that is too wet with a bailer, you should use a special chisel;
- the bailer must be raised every half meter traveled to avoid the element body being filled to the maximum;
- When working with soft types of soil, there is not always a need to use a valve, since most often the rock accumulates in the device.
The back side of the pipe body is tightly welded, a branch is made and a special fitting is placed there, which will be used to drain the hose. A pump is connected to the hose. You should use a device model designed to work with contaminated liquid media.
With this principle of operation, all collected contaminants will be pumped out by a pump, thereby eliminating the need to lift the bailer each time for cleaning. A cleaning device with a pump will be quite simple to lift and lower back in order to move liquid and collected rocks around the body. Such optimization will become effective in case of severe contamination and siltation of the well. For normal regular cleaning, the use of a pump is not necessary.
How to drill a well, see the video below.
Bailer device (with photo)
In fact, this is a powerful and therefore heavy pipe 1.5-2 or even 4 meters long, with the following elements:
- a shoe with a cutting edge or even teeth - in the lower part;
- a valve with a limiter (opens, allows a certain amount of contaminants to accumulate, closes) - located in the same place;
- protection against soil spillage, made in the form of a jumper or mesh made of thick wire;
- Eyelets (handle) for securing the metal winch cable are located on top.
All of them are either welded to the body or fixed using threaded connections.
Assembly steps with ball valve
Follow this order:
- A seat for a metal ball is screwed or welded to the lower edge of the pipe. This can be a conical funnel turned by a lathe or a washer with an internal hole corresponding to the ball. A concentric commercial adapter used to connect pipes of different diameters is also suitable for the seat. This part is inserted inside the product with the side with a smaller diameter and scalded.
- A metal ball is inserted through the top.
- Then a ball lift limiter is made in the device body. It is attached above the saddle at a distance of 3–4 sphere diameters. It is better to use a screwed-in bolt as a limiter.
- A restrictive grid (for large fractions of soil) and a loop for connecting to the cable are welded at the top of the body.
- The provided pointed teeth are welded to a ready-made bailer. This can also be done at the stage of assembling the glass with the valve seat.
Which pipe is suitable for making a bailer?
Its diameter plays a key role - it needs to be approximately 40 mm smaller than the section of the casing, so that a gap of 2 cm remains between their walls during the work. If this distance is not observed, there is a risk of mechanical damage to the shaft when lowering the device into it or even the possibility of jamming in the sleeve, especially if it is not perfectly straight, but slightly curved.
The correct length is also important: if it is too short, the teeth, when lifting and lowering, will definitely touch the casing, scratch it and become dull; if it is too short, it will make the structure heavier. The optimal option is 60-150 cm, although where work needs to be done quickly and it is planned to use a winch, the body can be made at 200-300 cm.
You should also pay attention to the thickness of the walls: again, they should not be too thin for the device to remain strong, but at the same time they must provide sufficient internal volume for soil intake. The standard is 2-4 mm, although 8 and even 10 mm are also acceptable, but in specific situations.
Types of bailers for percussion-rope drilling
There are two types of their design, the main difference between which is the body:
- solid - relevant when the soil is sandy and dry; quickly picks up soil, and to pour it out, you just need to turn the shell over;
- perforated - with a longitudinal cut, a “window” in the upper part, convenient for collecting viscous and moisture-saturated clay or silt.
In the second case, to increase the effectiveness of the tool, teeth should be cut on its shoe and even slightly spread apart so that they can bite better. In the center of the body, you can weld a tube with a sleeve so that, if necessary, it is easy to put on (and securely fix) the next section and thus increase the total length of the device. It also makes sense to punch several through holes in different places - the accumulated mass will not spill out of them, but the reinforcement can be inserted there without problems.
Water purification from iron and lime
Purifying iron from well water is a fairly common problem. Because most often its content exceeds the permissible sanitary standard of 0.3 mg/l. In fact, this does not pose a threat to humans, but it has a negative effect on household appliances.
There are several methods for purifying iron from a well:
- aeration;
- reverse osmosis;
- filters for cleaning.
Aeration
The aeration system for purifying water from a well is based on enriching the water with oxygen, due to which the iron contained in the water oxidizes and precipitates. There are two types:
- pressure - in this case an aeration column is used. Water enters it and air is pumped into it by a compressor. Typically, this cleaning method is used when the iron content from the well is more than 30 mg/l;
- non-pressure - based on the principle of a sump; a compressor is also used to pump air.
Non-pressure water purification system from iron:
- a large capacity is required to settle the water, usually more than 500 liters, an aquarium compressor can be used, a float switch for the pump;
- it is necessary to provide for the possibility of draining water at the top of the tank, for example, if the float switch does not work and the pumping station does not stop in time;
- compressor divider, installed approximately in the center of the container;
- It is also necessary to implement a system for cleaning the container from sediment.
Schematic diagram of iron removal
The aeration system for purifying water from iron solves another issue - removing hydrogen sulfide from the liquid. Due to contact with air, sulfur oxidizes and settles on the filters.
Reverse osmosis
Purifying water for the home using reverse osmosis is based on the use of membranes that are able to retain the smallest impurities. Those. Such systems have a very high degree of purification.
Peculiarities:
- high water consumption - about a third of the water enters the water supply system, the rest is spent on cleaning the membrane system;
- The output is distilled water - it needs to be mineralized;
- such water purification systems from wells are expensive to maintain;
- cannot be used if the iron content is more than 20 mg/l.
Reverse osmosis
When using this method, consumption points are most often divided:
- Reverse osmosis is used for drinking water;
- For other needs, a different filtration system is used.
This allows you to significantly save on system maintenance.
Thus, the easiest way to remove iron from water from a well is to use a gravity aeration system.
Lime removal
Unfortunately, getting rid of lime in water is not easy. To date, there are no simple and accessible ways to solve this issue.
Cleaning water from a well from lime is done using special catalytic filters. But, you first need to do laboratory tests to determine the content of impurities.
Based on analyzes and load calculations, a suitable filter for lime water and its operating mode are determined.
Today there are enough ways to clean a well with your own hands. When the bottom becomes naturally contaminated, mechanical methods are used
It is important to remember that the main cause of severe pollution is infrequent prevention. If the water is saturated with iron, lime or other trace elements, you cannot do without a good filtration system
Making a valve for a bailer with your own hands
This is a relatively complex element that performs a simple task: it lets sand, silt, and dirt inside and prevents the soil from coming out or pouring out until the right moment.
MBFT-75 Membrane for 75GPD
SF-mix Clack up to 0.8 m3/h
SF-mix Runxin up to 0.8 m3/h
It must fit really tightly so that the device effectively captures and holds not only dense and dry dirt, but also moisture-saturated and even liquid ones. Although on some soils it is quite possible to do without it, it is better to still have it - as insurance against unpleasant surprises.
There are two possible designs for this damper – let’s look at each.
Petal design
It is characterized by ease of execution, low cost, but not the highest durability. Essentially, it is an oval plate made of metal or polymer material with springy properties. Installs and works as follows:
- It is attached to the center of the projectile.
- Under the influence of the collected medium, the edges of the ellipse move apart and allow soil to pass inside.
- When the device is lifted, the petals immediately close under pressure.
The operating mechanism is simple, but intensive use results in rapid wear. As an alternative, you can use a powerful spring to make a good bailer for quicksand.
Ball valve
By design, it is a funnel with a mouth tightly closed by a rolling body of suitable diameter. The latter should be large enough to completely cover the cross-section of the pipe, and heavy so that it can be quickly lowered if necessary. The optimal size is 60-75% of the double casing radius.
Where can I get such an element? You can disassemble some large bearing, order it from a turner, or make it yourself. The last option is for craftsmen, which means it’s definitely ours, and we’ll consider it.
- You buy a rubber or plastic ball, as well as shot, at a gun store, and at a construction store, buy waterproof glue, preferably epoxy.
- Cut the toy in half, fill it with lead, fill it with adhesive and put it together.
- Wait until it dries and sand.
In addition to a suitable ball, you will also need to install a thick metal washer and cut out a funnel-shaped seat in it. Then the rolling body will be located in a kind of “saddle” that reliably covers the projectile when lifted from the shaft.
Operating principle and device
Any bailer is a hollow pipe, at one end of which a check valve is installed, and the other side has holes or ears for attaching the cable. There are two main versions of the valve: in the form of metal valves and a ball. In a design with plates, a transverse pulley is installed in the center inside the pipe, on which two petals are attached, blocking the passage channel.
When the device is lowered into the borehole, pressure from the liquid fractions of sand and clay is applied to the valves, and they rise upward, while the internal space is filled with a mud mass. When rising upward, the sedimentary rock puts pressure on the plates, they fall down, blocking the passage channel and preventing dirt from escaping out. After curing, the pipe is turned over and freed from dirt by pouring it onto the area or into a container, then the lowering operation is repeated again.
The second popular design option for a bailer is placing a ball inside the pipe cavity, which plays the role of a check valve. In this design, one end of the pipe is rolled, a metal ring is welded on the outside or inside, which reduces the flow area of the channel, and a lightweight metal or polymer ball is placed inside. The principle of operation of the device is similar to the design with a damper - when lowered, the dirt squeezes out the ball, it rises up and the internal cylindrical cavity is filled. When lifting the pipe, the ball lowers, blocks the outlet, preventing the flow of dirt back into the shaft, then on the surface the device is freed from the raised sediment, and the excavation process is repeated.
Design and installation of bailers
What materials are used
To make a bailer for a well with your own hands from a pipe you will need:
- hollow rolled product for a body with a length of 60-150 cm and a diameter of 5 cm;
- valve ball with a cross-section of 4 cm;
- flat funnel-shaped washer - to create a persistent bottom;
- steel wire - for connecting individual elements to each other;
- a thick nylon cord or a full-fledged metal cable (depending on the total weight) - for attaching the projectile to the winch.
Types and principles of operation of valve mechanisms
Currently, the most common types of compressors are screw and piston units. At the same time, screw compressors, for example, those produced by the Belarusian plant REMEZA, are widely used in various industries, and piston compressors are used in everyday life. The latter can be found both in garages of car enthusiasts (compressors such as SO-7B, Forte VFL-50, etc.) and in life support systems for fish in aquariums (Resun compressors, etc.), as well as in household pneumatic tools.
Piston compressors are characterized by a simple design and a relatively small number of parts and components. There are many different designs of such compressor units, equipped with special plate valves that regulate the process of suction and injection of air during operation. Depending on the purpose of compressor units (their performance, power and operating pressure), three types of valve mechanisms can be found:
- disk - their plates can be made of both metal and high-quality polymers, including reinforced ones;
- ring - parts for them are made of cast iron, steel or non-ferrous metals (the choice of material is determined by the type of compressor);
- disc valves - plates for this type of valve are made of polymer materials and are used in compressors operating with contaminated media.
Read also: Design and principle of operation of a magnetic starter
Inlet and exhaust valves
Inlet and outlet valve assemblies play such a role in the operation of compressor equipment.
- The movement of the piston to bottom dead center causes air to be drawn in through the open suction valve.
- When the bottom point is reached, the piston begins to move in the opposite direction. At the same time, the suction valve closes, and the air in the sealed chamber begins to decrease in volume under the influence of piston pressure.
- When approaching top dead center, the discharge valve opens and air compressed under high pressure begins to flow into the receiver.
- Having displaced the air from the chamber, the piston again begins to move to the bottom dead center, and the working cycle is repeated.
Unloader and safety valves
Thus, the compressor pumps air into the receiver cycle by cycle until the specified pressure value is reached. This process is monitored by a special pressure switch (pressostat), which controls the operation of the electric motor by turning it on and off depending on the degree of air compression. As a rule, the pressure switch also includes a starting unloading valve. A pressure switch is connected between the output of the compressor head and the check valve (return valve), which is connected to the receiver and holds the compressed air there.
The necessary pneumatic equipment is connected directly to the receiver, which can be additionally equipped with various devices (separators, filters, pressure equalizers, etc.).
How to calculate parameters
All sizes must be selected individually - for a specific casing, for a specific soil and climatic conditions. You should also conduct theoretical training, that is, see how someone has already done similar work before you. Remember: when you decide how to make a bailer for drilling a well with your own hands, drawings and videos of other craftsmen are your assistants who will show you what mistakes to avoid and what techniques to adopt.
Please also consider the following important points:
- The major axis of symmetry of the oval petal blank should be 20 mm wider than the minor one, which, in turn, should remain slightly smaller than the internal cross-section of the pipe.
- The ball needs to cover up to 75% of the projectile diameter, and for this it needs to be 10-15 mm narrower.
- A wall thickness of 2-8 mm is sufficient for reliable and long-term operation.
- The calculations should be based on the dimensions of the casing; it is necessary that a gap of 20 mm be maintained between the moving device and the shaft - if it is larger, productivity will decrease; if less, there is a possibility of damage to the hose or even jamming.
How to make a case
It is important to make it durable - for effective cleaning of the well with a bailer and ensuring long-term operation of the projectile. Therefore, a cast iron or steel pipe is suitable for it, but since the first one will have to be welded in a special way, the second one looks preferable.
SF-mix manual up to 0.8 m3/h
AMETHYST - 02 M up to 2 cubic meters/day.
Aeration unit AS-1054 VO-90
A good choice would be a section of water or gas pipeline, since it is perfectly straight (and bends are strictly contraindicated), with fairly thick walls, and threads and teeth can be made along its edges without any problems.
- take it 1 m long, if you plan to use a winch, then 2-3 m is possible;
- level the surfaces at both ends;
- make a “window” in the upper part using a grinder or drill holes around its perimeter, and then simply knock out the unnecessary area.
Useful recommendations from experts
If the depth of the water exceeds the length of the drill, then it can be extended by joining another pipe on top. They can be joined using a threaded coupling or a welding connection. When using small diameter pipes, bolts or cotter pins can be used. However, such a connection is not very reliable, and with a large rotational force, the bolt can be sheared and the rods will become disconnected. Getting the drill remaining in the well can be very problematic.
Before starting to design the device, it is recommended to draw up a drawing of the drill for the well. This will give you the opportunity to have a visual example of what should come out in the end. Attempting to create a drilling mechanism using the “scientific poke” method is more exciting for some home craftsmen, but takes too much time and effort.
An easier manual version of drilling a well is using a bailer bit. Raising and releasing the impact tool requires less force than rotating a buried drill. In addition, even one person can drill using the percussion method. True, this method is very long, and the work can drag on for several days.
If you cannot lift the auger drill out of the well yourself, you can make the task easier by building a device for the lever. For example, placing a barrel next to it and throwing a block over it. Tie one edge of the block to the drill, and apply physical force to the other edge.
Helpful2Not Helpful
How to make a cutting edge
A shoe with a pointed edge cuts better into sticky and frozen soil, which greatly simplifies the work. And there are two options for its suitable form:
- Flat - you need to sand it on the outside and grind it inward on the other side, making it look like a cone. It is great if the steel is also hardened - this prevents breakage or dulling.
- Toothed - a “herringbone” is made, and each of its protrusions is processed in the same way as the entire edge in the previous case, only separately. To protect the contact surfaces, you can then apply paint or primer.
How to make a limiter and handle
The rational design of a well bailer requires the presence of an element that is convenient for the winch hook to hook onto and is not difficult to grab onto. To set it up, just punch two holes and insert a strong steel wire between them. It is a little more difficult, but more reliable, to weld across reinforcement of the same diameter - it is also good because it will perform a double role: it will prevent soil from spilling out, and will allow you to thoroughly take hold of it. The simplest fastener is the lugs, which are sold ready-made: all that remains is to fuse them with the body.
A coarse metal mesh will work well as a simple but quite effective limiter: to create it you only need to cross-weld thick wire, for example, in a 4x4 format.
If you don't have a welding machine
Let's look at how to make a bailer with your own hands and ensure reliable quality of connections when it is not possible to solder the elements together. To do this you should:
- take a suitable pipe;
- drill 2 holes in its upper part, thread a steel wire and fix it;
- make a petal valve from a plastic bottle (we will explain how below separately) and secure it to the shoe with a 6-8 mm bolt of the appropriate length.
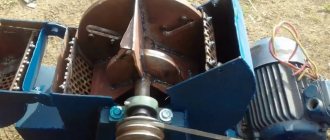
Gelonding scheme with pump
Constantly moving the tool up and down the sleeve is long and tedious, and cleaning it also takes effort and time, so the existing design can be modernized. To do this you should:
- completely weld the back side of the body;
- put a fitting there and connect the outlet hose to it;
- connect a pump, which will pump out liquid with a large proportion of mechanical impurities.
All that remains is to slightly lift and lower the projectile to loosen the soil, without having to pull it out completely. This is a fairly effective method in conditions of heavy sanding or silting of the source, requiring minimal costs. Watch how to caulk a well; the video will help you draw conclusions about the simplicity and convenience of the process.
Features of use on different types of soils
When drilling sandy soils with a bailer, it is necessary to use casing pipes - without them the well will fail. When drilling in such soils, you need to ensure that the projectile does not go deeper into the sand without a casing pipe for more than half its length. This can lead to a collapse, the bailer will fall asleep, and you will not be able to pull it out.
To make it easier to pass sand, water is poured into the well, it prevents landslides and makes work easier. If during work the sand is compacted and not grabbed, use a chisel.
They work with quicksand sands only by constantly deepening the casing pipes. Moreover, only if the aquifer is located below the quicksand layer, otherwise the well may turn out to be inoperative.
To pass quicksand, a bailer of at least 2 meters long is used. It should have a flat, well-fitting valve with a leather sealing gasket. You need at least two people to work: when pulling the bailer out of the quicksand, you need to turn the casing pipe, lowering it down. The faster the casing is lowered at this moment, the faster this layer will be passed. At first the casing is lowered easily, then it becomes more and more difficult. Sometimes there comes a time when they stop moving completely. In this case, almost the entire pipe is filled with sand. In this case, the pipes are lowered under pressure. To do this, a platform is installed on the pipe on which a load (sandbags) is placed. And all this happens together. Usually this method is quite effective.
https://youtu.be/0N_KOvdK2xU
When passing through pebble and gravel layers, a chisel is used in conjunction with a bailer . First, a chisel is lowered into the shaft, crushing the rock, then it is removed with a bailer. The bailer on such soils rises only 5-10 cm, the blows are small and frequent.
For faster passage, a platform is made on the casing pipe, the worker does not stand on it. It is located above the well, gradually raising and lowering the bailer. As the soil is collected, the casing pipe is lowered under the weight of the worker.
In viscous clay soils it is possible to work without casing pipes. If the clay is too dense, first they also use a chisel, loosening the soil by about 50-70 cm. Then it is removed with a bailer. A flat valve with a rubber or leather seal is also used.
If the clay is dry and dense, each time you pull out the bailer, pour several buckets of water into the well. Once water appears from the aquifer, there is no need to add it from above.
If the rocks are very soft, sometimes the valve is removed. And they drill only with the pipe itself, raising it 2-3 meters above the bottom and dropping it.
Drilling Features
The tool for it should be long - 3-4 m - and with a petal (plate) valve. To facilitate excavation, a “window” should be cut in the upper part of the body.
The best closing element in this situation would be a petal on a spring: during operation, it will provide a gap that will let in the maximum possible volume of contaminants for one dive. The ball runs the risk of quickly clogging, which will result in a sharp drop in labor productivity to almost zero.
Main table dispenser AquaPro 919H/RO (hot and cold water)
Main table dispenser AquaPro 929CH/RO (cooling/heating)
Floor dispenser AquaPro 311 (empty, without cooling)
Watch how to drill a water well with your own hands; the video gives a complete picture of the complexities of this matter.
Your own hydrogeologist: soil assessment
No matter how simple the process of driving a needle is, careful preparation for the work is still necessary. It is not enough to stock up on rods and a starting unit with a filter, rent or make your own pile driver. We need information about the geological and hydrogeological situation in the area where the Abyssinian well was constructed.
Where and how to get them? We can literally get information about the groundwater level from a neighbor’s well or borehole.
We will measure it ourselves with a clapper or ask the owner of the source about the depth from which he pumps water. At the same time, we will find out what kind of soil was lifted from the face when they drilled or dug a working.
The driver and the barrel for the needle well are not produced by industry; the installation with all the accessories can be purchased ready-made or ordered to be manufactured
In flat areas, rock layers lie almost horizontally with a slight bend or slight slope. The groundwater table is approximately at the same absolute level. The difference in the depth of the existing and planned well can only be expressed due to differences in relief.
Do not forget that the Abyssinian well reveals the perched water or the following aquifer, covered by clay or loam, but not rock aquifer. Those. The water level in the mine will definitely be unstable - depending on the volume of precipitation.
During the period of snowmelt and rainy season, the groundwater table will be higher than in the dry weather season. You should find out from the owner of the existing water intake point what the maximum and minimum differences in water level are, so that during a dry summer the Abyssinian well does not turn out to be empty.
If the walls of the excavation are composed of stable, non-crumbling soils, the well can be partially drilled using a manual drilling rig with an auger
The question about the breeds being developed is not at all idle. For example, in the Leningrad region, water is extracted from large sands with a significant number of massive boulders.
Often, due to the inability to crush and remove a huge stone, drillers displace the water well. It is worth doing the same if there are similar soils in the region where the Abyssinian well was constructed.
It makes no sense to carry out driving in high-lying rock and semi-rock massifs. If the neighboring area receives underground water, common in fractured dolomites, sandstones, limestones, then the idea of constructing a needle well will have to be mercilessly abandoned.
Detailed information on conducting geological surveys is presented in the article - Where and when is it better to drill a well on a site: general rules + advice from experienced drillers
For those who decide to make an Abyssinian well with a pit, information is needed about the structure and condition of the soil layers lying at the depth of the pit. If the section is composed of sandy loam, loam, or their alternating layers, it is not necessary to strengthen the walls of the pit.
Loose, unstable walls of the pit should be strengthened so that the wellhead of the needle well and pumping equipment are not covered with loose soils
If the pit is dripping in sand, the walls should be reinforced with boards or concrete. Sandy sides are unstable and can collapse and cover the water intake point along with the pumping equipment.
Questions about the upper layers of soil are also necessary for those who plan to go through the upper part of the excavation with an auger. Auger drilling will significantly speed up the process, but may not bring the planned result. For work, use a simple device - a purchased or homemade drill.
If the sand walls collapse, it will be necessary to install a casing pipe, which will reduce the economic priorities of the Abyssinian well.
Plastic bottle valve
A suitable plate can be made using a plastic container.
- To do this, you need to cut an ellipse from its wall with sides of, for example, 90 and 70 mm. The smaller number must be equal to the internal diameter of the projectile.
- Then insert two wire rings - 6-8 mm - into the middle part of the oval.
- Next, drill a couple of parallel holes in the pipe.
- Well, then slightly bend the petal, carefully push it inside the body and secure it with a bolt with the appropriate double radius, passing it through the seats.
Kinds
By type of valves there can be:
- Ball.
- Flat folding.
Ball type is a very convenient and common option.
The ball moves freely inside the pipe when it is squeezed out by silt, but under the influence of gravity, it clogs the hole again. More suitable for small diameter pipes.
If there is simply no suitable ball, a flat part is made from any available materials (corresponding to the inner diameter of the pipe), which is hinged to one of the inner edges. Water resistance opens the flat valve. The hinges must be corrosion resistant. In addition, to ensure that the valve closes well, you can make a bumper pin inside the pipe. It will limit the plate opening to 70-80°
The ball model must have an internal limiter. If this is not done, the ball will “flush” too high and most of the collected sludge will flow back out.
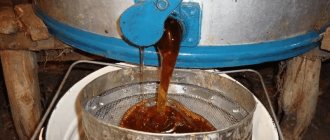
The sequence of cleaning a water well with your own hands using a bailer
In general, the problem is solved in the following order:
- You lower the projectile to the bottom of the shaft, lift it 1 m and sharply hit it on the ground - as a result, the dirt rises and settles inside the tool.
- Repeat this procedure several times until the device is half filled with sand and silt.
- Remove the tool from the sleeve, and carefully, without shaking or jerking.
- Pour out the accumulated sediment - usually more than 0.5 kg (if you read without liquid).
The winch and especially the pump greatly simplify the work. Work should be carried out until the device stops scooping up dirt.
First cleaning with a compressor immediately after drilling
As soon as a well is drilled, it must be cleaned immediately, because not only water will flow into the pipes from the aquifer, but also all the garbage that is in it. Installed filters cannot retain the smallest particles, which make the water cloudy and undrinkable. Depending on the depth of the well, the flushing process after drilling can take from 10 hours to several weeks.
If the drilling was carried out by specialists, then they flush the system using a flushing installation. If you drilled the well yourself, you will also have to clean it of dirt yourself. To do this, you will need a compressor with a capacity of at least 12 atm and several pipes, which must be connected to each other and inserted into the well so that they reach the bottom. In this case, the diameter of the pipes should be smaller than the diameter of the well, so that there is empty space between them.
The compressor forces air into the well under high pressure, so dirty water can fly out at high speed and splash everything around
Let's take a step-by-step look at how to clean a well yourself using a compressor:
- We insert the pipes into the well. It is advisable to reinforce the top with a rope, because under high water pressure the structure can bulge upward.
- We put a vacuum adapter on the pipe, securing it with self-tapping screws.
- Pump up the compressor to maximum pressure.
- We put the compressor hose on the adapter.
- We turn on the unit and release all the air into the well.
- We repeat pumping several times.
Air under pressure will push dirty water through the interpipe space. So don't be surprised if everything around you is covered in dirt.
If you do not achieve clean water using air, repeat the procedure, replacing air blowing with water washing, using the same pipe system with an adapter. To do this, find some large barrel, place it next to the compressor and fill it with water.
Using a water compressor, drive this water under maximum pressure into the well. But be careful, because heaps of dirt will fly towards you, pushed out by this water. Clean the well until the container is drained. Then flushing should be repeated until dirt stops being thrown out from the interpipe space.
Using blowing and washing, the well is cleaned of silt or sand. But salt deposits on the filter cannot be dislodged in this way.
Maintenance, tips for proper use
Before you begin cleaning, visually assess the well. If it is narrowed, seriously silted, or if its walls are severely damaged or deformed, this can become a problem. In such cases, it is worth using the tool with hooks welded to it: if it breaks, you can get it out without much difficulty.
Also, be sure to check the projectile itself: whether its surfaces are smooth, whether the cable on which it is suspended is strong, whether it moves up and down freely (it is important that it does not jam).
If possible, try to use a winch mounted on a tripod. This will not only make the work easier, but will also allow the device to move along a strictly vertical trajectory.
When you watch how to clean a well with a bailer yourself, the videos give an idea of each stage of the process, but usually their authors do not tell what to do next. We correct this defect: after solving the issue, you should thoroughly clean all the cavities of the instrument, removing any remaining contaminants. The “window” in this case becomes a real salvation - it makes care easier.
And finally, you should regularly check the condition of the stored projectile, that is, at least once every 4 months, see if it is in order.
Features of operation on different types of soils
Be sure to consider the nature of the soil:
- On sand, it is necessary to provide a supply of liquid to strengthen the walls of the sleeve and first of all immerse the casing, making sure that it is always 10 cm in front.
- On quicksand, a flat valve is useful; it is more reliable, and the shaft pipe should be turned when lowering.
- On pebbles and gravel, it is worth additionally using a chisel to break large stones with it.
- On old deposits it is necessary to make frequent movements with the tool, with a small amplitude of 10-15 cm.
- In dense formations it is also necessary to use hydraulic equipment.
Features of cleaning a well through a bailer
Carry out preventive cleaning at least once a quarter. Especially if you have not used the well for a long time. Before starting work, perform a visual inspection of the internal walls of the shaft. Refuse the procedure if:
- the inner surface of the well was deformed;
- the mine shaft has lost its integrity;
- the bottom is too silted.
Before you start cleaning, check the condition of the bailer , make sure that the cable is intact, its fixation loop is securely fastened, and all moving elements are in working order.
Advice! If you place a tripod with a load over the shaft, the work will be easier.
When lowering, keep the side attachment in a vertical position. Upon completion of work, remove any remaining dirt from the tool. Store the bailer in a dry place to prevent the pipe from rusting.