When we hear the words “suburban area,” we imagine a cozy house, a smooth lawn, spreading trees, and green beds. But it is impossible to turn these dreams into reality without drainage of the site. In the article we will talk about different schemes of drainage systems that make it possible to protect the area from unwanted accumulation of water.
Drainage is a mandatory measure that protects the site from the accumulation of atmospheric, flood, and groundwater. A dangerous consequence of neglecting site drainage is rotting of tree roots and damage to the foundation of a house and other buildings located on the site.
What to do with excess water
In the spring or autumn seasons, soil saturated with moisture will have a lot of weight. Consequently, the pressure on the foundation will increase. In winter or early spring, frost often alternates with thaw, this greatly affects the foundation of the building. Water penetrates into the smallest cracks, eroding and increasing their size. This can be avoided by organizing proper drainage.
In such a situation, it is best to contact specialists who can design a drainage system, but the price for this service is high. In the absence of extra material resources, we can do this ourselves. It is important to understand that the drained water should not accumulate in puddles on the site or paths. It’s better if she leaves your territory altogether.
What forces destroy the foundation?
Moisture in contact with a concrete strip causes a number of destructive processes:
- Erosion of the sand cushion, which results in subsidence and damage to the integrity of the foundation.
- Water soaks into concrete and destroys it from the inside in winter.
- When the temperature drops, the moisture in the soil layers surrounding the tape freezes, expands and begins to put pressure on the base or foundation walls (frost heaving of the soil).
Most often, these factors act simultaneously, which increases the danger to the foundation and the entire house. The waterproofing gradually fails , the insulation peels off, exacerbating the destruction process and changing the microclimate in the house for the worse.
The situation is dangerous, since all processes proceed slowly and secretly, the results become noticeable only when destruction, cracks and other signs of failure of the foundation appear.
Types and types of drainage
Modern drainage can be of two types:
- Perfect type drainage. It is made on waterproof water. Water enters this type of drainage from the top and sides. This means that this type should be sprinkled on top and sides.
- Drainage of imperfect type. It is made above the waterproof level. Water enters it from above, below and from the side, which means that such a foundation must be sprinkled on all sides.
Video on the device:
Today there are several types of drainage from the foundation of a detached building:
Ring foundation drainage. It is used to prevent flooding of basements of detached buildings built on sandy soil. Water easily penetrates through this type of soil, and only ring drainage can save it. What is important to consider when choosing this type of drainage:
- the action of such drainage implies a ring, the inside of which will be isolated from water;
- if water comes from one specific side, then such drainage can be laid in the form of an open circle;
- such a system is installed below the floor level of the basement room that must be protected from moisture;
- Such a system should be laid at a distance of 5-8 meters from the wall itself. If this distance is less, then care must be taken to remove, weaken or settle the soil of the building itself.
Wall drainage. This drainage is used to prevent flooding of the ground floors and basements of buildings built on clay or loamy soil. Water penetrates through such soil quite difficult. What is important to know when choosing this type:
- It is often used as a preventative against water;
- This drainage system is often used with a mixed source of groundwater;
- Such drainage is laid outside the building. The distance from the wall to the drainage system is equal to the width of the foundation of the building itself.
- Such a system is laid no lower than the level of the base of the foundation;
- If the foundation depth is too deep, the drainage may be slightly higher.
Reservoir drainage. This type of drainage is usually used in combination with ring or wall drainage. What is important to know when choosing such a system:
- It is advisable to use such a system when there is a large amount of groundwater on any type of soil;
- placed for prevention in clay and loamy soil;
- To interact such a system with external drainage, special pipes are laid through the entire foundation of the building.
The main difference, of course, between a ring drain and a wall drain is that it is located directly next to the foundation itself. A roundabout —
at a distance of up to 3 meters from the foundation. Otherwise, in principle, they are similar.
Classification of drainage structures
In practice, various types of drainage are common. They are divided by design, depth and installation method.
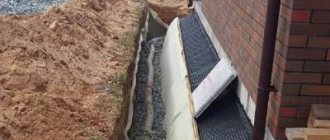
Example of a drainage system
Their classification is presented in the table.
| Separation criteria | Kinds | |
| burial depth | superficial (external) | underground (internal) |
| design | linear and point | vertical, horizontal and combined |
| installation method | mounted along the contour of the structure | ring, wall and layer |
Additionally, you can also highlight biodrainage.
The integrated use of horizontal and vertical types of drainage in construction (combined version) leads not only to maintaining the hydrological level, but also promotes the rational removal of moisture from the surface of the serviced area.
The device of a classic drainage system, what is it?
[ads1]
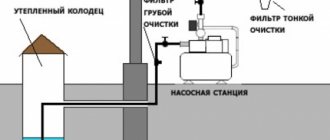
The drainage system is a system of pipes that are interconnected and have a closed device system.
Lay the drainage system with your own hands below the lowest point of the building level. The entire device is laid at a certain angle to allow water to drain. At each corner section of such a system, a reservoir is made, which is called a well. These wells are installed so that you can visually assess the condition of the drainage and if there is a need to easily clean the system.
All excess water enters the pipe structure and from there into the wells. From such wells, water is discharged outside the site. The method of draining water from the building depends on which drainage project is chosen.
Such a system easily neutralizes the mechanical load from groundwater. It is worth noting that even with the most proper drainage system, it is difficult to avoid moisture in the basement, especially on the walls 100%.
To completely prevent water from entering the device, which is located below ground level, it is necessary to waterproof the foundation itself.
Classic drainage system diagram
The classic do-it-yourself drainage system is the system around the foundation of the house. Drains are installed at an angle of 5-8 degrees. The entire perimeter of the building is surrounded by such a system, starting from the highest point to the lowest. At the end there is a drainage well in which the pump is located.
When building such a system with your own hands, use pipes with a hardness of SN6 or more, but in no case less!
The entire perimeter system is equipped with reserve wells. At every 90-degree angle, it is imperative to install such wells with sludge collectors. Otherwise, the system will often silt up. Each type of foundation has its own drainage features.
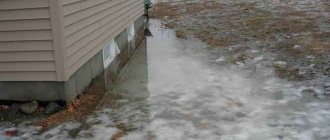
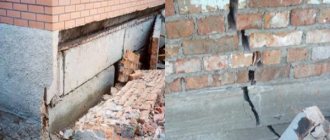
Negative effects of flooding
The foundation of the house is constantly exposed to moisture from water penetrating from outside. Routes of penetration may be different:
- accumulation of water during bad weather in the absence of storm drainage;
- drainage of rain and melt water into the lowlands of the area where the house is located;
- location of groundwater near the house.
Penetrating into the foundation and basements, moisture creates many problems for home owners:
- dampness and unpleasant odors in the basement;
- covering walls and building structures with fungal mold;
- washing the supporting parts of the base;
- cracks and destruction of the foundation as a result of freezing and subsequent thawing of water inside the soil.
The final result of exposure to groundwater and melt water will be the gradual destruction of the home and complete unsuitability for habitation.
How to install the system yourself?
Ground water level
Of course, before any construction work is done, its design is drawn up. Having drawn up a project, it will be easier to calculate the material used and calculate how much the work will cost. The price for such a project in companies is high. But you can greatly reduce the price by calculating everything yourself.
Then you need to find out the occurrence of groundwater in your area. To do this, you can use special equipment or call specialists. You can do this yourself.
To determine the water level, dig a test hole in the area, approximately 2.5 meters deep. You will be able to see the layers of soil. You will see their structure, and also recognize their character. Only then can you begin the main work.
Preparing the foundation of the building
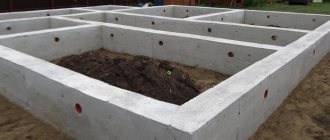
The foundation itself also needs careful preparation before making a drainage system. For this:
- We dig up the old foundation around it and remove all remnants of waterproofing from it. If they exist, of course.
- Drying the foundation. This can be done using a heat gun or on a sunny and warm day, then the foundation will dry out on its own (but this will take much longer and may take a day or
two). - Now we apply new waterproofing:
- coating;
- penetrating;
- made of polyethylene;
- lining (bitumen)
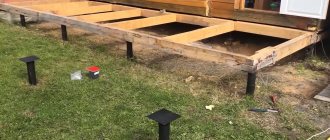
For shallow foundations
For this type of foundation, it is best to do drainage at the initial stage of construction according to the scheme. The pipes need to be placed around the perimeter on the outside of the foundation in a circle. Swarm a trench no deeper than the base of your foundation. Wells are dug in the corners to contain water tanks.
Monolithic foundation drainage
Such a foundation is built from monolithic watering. The slab can move when the ground moves. With such movements, the structure itself may move. To prevent this, it is worth considering the drainage system at the stage of designing the house. A slab can become a reliable foundation for your home only with a high-quality drainage system. When constructing such a drainage, a ditch is dug around the house into which the drainage system itself will be laid. The ditch should be at least 3 meters from the slab. The bottom of such a trench is filled with broken bricks. Then the drainage perforated pipes themselves are installed. They are covered with geotextiles on top, which will act as waterproofing. At the same time, water drains are made.
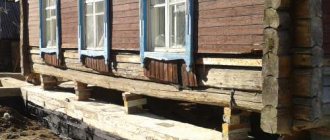
Strip foundation drainage
The system of such drainage is practically no different from the system of all other types of foundation. A ditch is dug around the house along the perimeter of the foundation, the depth of which should exceed the depth of the foundation itself. Then broken bricks are also placed on the bottom. Make a covering of branches that will strengthen the main floor. Then everything follows the general rules of dismantling.
Necessary calculations
After preparing the materials, you can begin making the drainage. But first you will need to calculate some parameters of the drainage system. For example, you need to know at what depth to lay pipes and dig wells.
If you decide to limit yourself to only drainage around the foundation of the building, then the depth of the pipes should be at least 0.3 meters below the supporting structure. Thus, the trench itself digs even deeper than this mark.
The slope of drains on a flat area is 20 mm per linear meter of the structure. In this case, water will flow through the pipes by gravity and will not stagnate in the system.
The drainage well is placed at the lowest point of the site on which the building is located. If there is a natural slope, this will be a plus for drainage. But in cases where the plane of the site is absolutely flat, you will have to install the pipes at an angle, using a building level.
To make trenches and wells you will need shovels, a wheelbarrow for transporting building materials and removing soil.
DIY drainage system
Equipment
You will need:
- Drainage pipes. Now there is a wide range of them in construction stores:
- from low-density polyethylene (HDPE);
- made of polyvinyl chloride (PVC);
- made of polypropylene (PP);
- high density polyethylene (HDPE).
They are produced with a complete set for them. They differ in rigidity and holes (full or partial perforation). You need to choose depending on the hardness of the groundwater flow. The price for them varies depending on the manufacturer from 1000 to 3000. It all depends on the type and manufacturer of the pipes. If the price scares you, you can make the pipes yourself from PVC pipes. Just drill holes in them around the entire perimeter.
- Crushed stone or broken brick. Crushed stone will cost more, but will also last a long time.
- Sand. A regular river one will do.
- Plastic barrel (for absorption well). The larger the barrel, the larger and deeper the final drainage hole should be. This issue can be studied in more detail in the article on the cesspool.
- Rotary wells (Special components for drainage pipes or PVC pipes with a diameter of 30 cm or more);
- Copper PVC Pipe Clamps
- Geotextiles
Step-by-step installation diagram
The work itself is done in several stages:
- To build a ditch around the perimeter of the building, it should have a slight slope starting from the top point. The tilt angle is approximately 5-8 degrees. The width should exceed the width of the pipes by 20-30 cm, this is done to cover the area where the pipes are covered with crushed stone.
- At the corners, the ditch should be slightly widened; this is done to lay inspection wells.
- The bottom of the ditch is covered with sand to a depth of approximately 20-30 cm, the sand is carefully compacted at an angle for the drainage of the system.
- Geotextiles are laid on the bottom of the ditch so that its edges can be easily secured to the edges of the ditch.
- Crushed stone or broken brick is poured on top, approximately 10 —
20 cm. - Then the drainage pipe system is dismantled. Each turn is equipped with small bends. The inspection wells will be dismantled here. They will set the direction of water flow and will help in the future to clear the system of silt. They are made from PVC pipes with a diameter of 30 cm or more. It is possible from special sewer connections. Drill holes for pipes in them at a distance of approximately 8-10 cm. Secure the pipes with copper clamps.
- At the end of the system a large absorption well is dug. It has a depth of approximately 0.7 meters. The entire pit is also lined with geotextiles. A polyethylene barrel will be inserted there. The sides of the barrel must be drilled. It should look like a big colander. The bottom of the well is also covered with broken bricks or crushed stone.
- Connect the pipe system with rotary wells and bring it all to the end point (barrel). We insert the pipe into the barrel, drilling a special hole for it on the side.
- Remember, the pipes must be on a slope.
- We fill the installed system with broken bricks or crushed stone on top, so that the edges of the geotextile can then easily connect and wrap the entire system as if in a cocoon. Approximately 10-20 cm.
- We cover the entire system with geotextile fiber so that there are no unjoined areas (overlapping).
- We lay branches on top, this will give the system greater rigidity.
- We again fill the top with sand, then soil.
- A drainage pump is inserted into the barrel, which will pump out excess accumulated water.
Your drainage system is ready. But do not forget that without waterproofing the main foundation during its laying, it is impossible to completely protect your structure from moisture.
Work order
The production of tape drainage is organized in the following sequence:
- digging out the foundation of the house;
- dry the base of building structures;
- carry out waterproofing work;
- crushed stone or gravel is poured into the trench;
- make a blind area;
- ditches are dug along the perimeter of the building, at a distance of about 1 meter from the house;
- they make a cushion of sand up to 10 cm thick and provide the required slope of the structure;
- Geotextiles are placed on the bottom and walls of the ditch in such a quantity that they can be used to cover overlapping drains;
- a drainage pipe is laid on the geotextile;
- the remaining space in the trench is covered with crushed stone;
- the backfill is covered with geotextiles and decorated with turf, sand or fertile soil;
- manufacture inspection wells and collectors;
- install drainage pumps (optional);
- check the performance of the system by supplying water from a watering hose into it.
When making a short drainage on a flat area, you can do it yourself. But if the area has a slope or is very wet, then it is recommended to use the help of specialists to eliminate possible errors when installing drainage
Slope Definitions
The slope of drainage pipes is regulated by SNiP and is determined by the minimum speed of movement of wastewater.
Pipes of different diameters allow you to get your own angle of inclination:
- With a pipe diameter of 150 mm, a slope of 8 mm per 1 m of length is allowed.
- With a diameter of 200 mm - 7 mm.
- In some areas, an understatement of up to 5 mm per 1 m of length is allowed.
At the same time, there is an upper limit to the slope. For pipes with a diameter of 150 mm it is 150 mm. For unrated sections with a pipe diameter of 40-50 mm, a slope of up to 30 mm/m can be made, and for pipes from 85 to 100 mm, a slope of no more than 20 mm/m can be made.
For trays, it is necessary to provide a slope that promotes self-purification of water (settling of dirt, sand, small particles). This will reduce the degree of contamination of pipelines, avoid the occurrence of traffic jams and congestions in the outlets of drainage wells.
Preparing the trench
The trenches for the drainage system have a depth corresponding to the level of the pipes. In order to be able to organize the desired slope, the depth is made with a small margin.
The direction and configuration of the trenches is determined by the type of drainage system chosen, and the width is usually made such that pipes with a layer of filler and insulator can be freely placed.
Usually they dig to a width of 30-40 cm, so that it is more convenient and the walls do not crumble.
OUR WORK IN 2021 ON DRAINAGE ARRANGEMENTS OF AREAS
Drainage installation in Lytkarino
Description:
Drainage installation on a site in Voronki
Area:
44 m.p.
Duration:
2 working days
Construction of drainage and storm sewerage in Krasnoarmeysk
Description:
Installation of storm drainage around the house
Area:
160 m.p.
Duration:
3 days
Drainage installation in Voronki
Description:
Drainage installation on a site in Voronki
Area:
44 m.p.
Duration:
2 working days
Installation of a drainage system in Pervomaisky
Description:
Installation of drainage sewer
Area:
Length of drainage sewer - 86 m.
Duration:
6 working days
Installation of storm sewer and drainage Babaikha
Description:
Installation of storm and drainage sewerage on the site Area
:
Drainage 80 m.p.
storm drain 68 m.p. Duration:
4 working days
Installation of storm sewerage and drainage Novoaleksandrovo
Description:
Installation of storm and drainage sewerage on the site Area
:
Drainage 68 m.p.
storm drain 98 m.p. Duration:
4 working days
Storm and drainage sewerage in Krasnaya Polyana
Description:
Installation of storm and drainage sewers
Area:
Length of drainage sewer - 146 m.p., length of drainage sewerage - 87 m.p.
Duration:
6 working days