Design Features
The reliability of the design of lightweight systems is ensured through the use of several layers of modern building materials. The design is called “Chimney Sandwich” in honor of the English sandwich, in which several ingredients are combined in layers. It consists of two pipes made of high-quality steel alloy.
The diameter of the outer pipe is significantly larger than the diameter of the inner one. A layer of thermal insulation material is laid between them, usually non-flammable stone wool. The outer pipe provides protection against damage and mechanical stress. The inner tube can withstand high temperatures. A cushioning layer of mineral wool compensates for the difference in temperature conditions. The thickness of the thermal insulation layer depends on:
- differences in diameters of the inner and outer pipes;
- temperatures during operation;
- the diameter of the stove opening to which the chimney is connected.
Important! Stone wool is a non-flammable material. Therefore, in the event of deformation of the internal steel contour, it will be able to protect against combustion products from entering the chimney.
Sandwich chimney pipes Source i1.wp.com
The principle of assembling a chimney is identical to that of a constructor. You can invite a specialist, but after learning how to make a sandwich pipe for a chimney with your own hands, you can carry out a complex of work yourself. The system consists of parts that are equipped with fasteners for a strong connection with each other. The elements have two types of connections that allow installation using:
- corrugated end elements, which allow easy assembly, but require the use of expensive sealant;
- socket connection, complex due to the need for careful adjustment of parts, but more airtight if installed correctly.
A properly installed sandwich chimney will last 15 years or more. But you need to remember that to prevent soot outbreaks, the system must be cleaned regularly.
Assembling a sandwich chimney with your own hands Source klimatlab.com
How to reduce the temperature of flue gases in a chimney
The combustion of natural gas produces carbon dioxide, steam, sulfurous salt-forming oxides, etc. The optimal temperature of the flue gases at the chimney outlet should be 100–110 °C.
If the temperature of the flue gases is below the dew point, that is, the condensation temperature of the air, then the water vapor contained in the combustion products will settle on the walls of the chimney. If this happens constantly, the chimney can quickly collapse.
If the temperature of the flue gases is too low, condensation will form at the outlet of the chimney, and the outer part of the pipe will begin to freeze.
In addition, the presence of constant condensation in the smoke channel leads to a weakening of natural draft. Therefore, it is so important to monitor the temperature of the flue gases, which directly depends on the cross-section of the chimney.
From the above we can conclude that with correct calculation, the temperature of the flue gases will be in the region of optimal values. If the temperature is too high and needs to be reduced, this directly indicates that the cross-section of the chimney does not correspond to the power of the gas boiler. To reduce the temperature of the exhaust gases, it is recommended to reassemble the smoke exhaust system taking into account the standard values.
Video: condensation in the chimney
Advantages and disadvantages
Technological progress has made it possible to move away from the use of heavy foundations when building a house and to build on prefabricated pile-screw and drill-fill foundations. And if previously heating a house could only be done using a heavy Russian stove or fireplace made of brick, now they have been replaced by modular structures made from a portal with a firebox weighing about 500 kg.
Sandwich chimney in a bathhouse Source spskamin.ru
When wondering how to assemble a chimney for such systems, you need to know the advantages and you need to know their advantages and disadvantages:
- When used, only the internal part of the system becomes very hot. Thanks to the compensation layer of mineral wool, the outer pipe has an acceptable temperature, which significantly reduces the risk of burns;
- after heating the chimney, the draft increases significantly;
- the steel surface of the chimney is not susceptible to soot settling as in systems made of brick or ceramics;
- due to the rapid removal, combustion products do not accumulate in the chimney, which does not lead to the accumulation of condensate on the walls;
- the design of the chimney provides maximum protection: on the outside it is protected by the outer diameter of the pipe from deformation under direct influence, the inner pipe does not allow heat and combustion products to pass through, and mineral wool is a protective layer from fire since it is not hot;
Installed sandwich chimney Source petropech.ru
Since the sandwich chimney system is relatively light in weight, its installation does not require the installation of a special foundation. It is advisable to strengthen the structure of the subfloor with additional lags, but if this is not possible, this may not be done. With proper care, the system will last a long time, but after about ten years, areas with partial depressurization may appear in the seam area.
How to check and adjust the draft in the chimney of a gas boiler
Draft is a decrease in pressure in the place where fuel combustion occurs. The pressure decrease occurs due to the removal of combustion products through the smoke channel. Speaking within the framework of this article, draft forces fresh air into the combustion chamber, where there is a reduced pressure that occurs due to the fact that gas combustion products are discharged outside.
The presence of draft indicates that the chimney is designed and installed correctly, and the equipment is working properly. The lack of draft may be a direct or indirect confirmation of the need for preventive maintenance or repair of equipment and the chimney system.
The speed of air flow in the chimney can be measured with a special device - an anemometer
The following methods are used to check the draft level:
- visual inspection - there should be no smoke in the room where the heating equipment is located;
- using improvised means, for example, a sheet of paper. It is brought to the inspection hole. If there is traction, then the sheet will deviate towards the hole;
- measurement with a special device - an anemometer. It is used to control air speed.
To control traction, it is better to use the latter method, since only it will show the exact value. When measuring natural draft, the flue gas velocity should be in the range of 6–10 m/s. The value is taken from SP 41–104–2000 “Design of autonomous heat supply sources.”
If it is necessary to reduce the draft level, then this will require reassembling the chimney based on a chimney of a larger cross-section. To increase traction, it is recommended to check the quality of the installation joints and mechanically clean the smoke channel using a steel cable with a brush attachment.
If this does not help, then the only way out is to replace the chimney with a preliminary calculation of the chimney cross-section. In this case, it is desirable to reduce the number of rotating elements to a minimum or remove them altogether.
Why does the boiler blow out and how to fix it
The main reason why the burner in a boiler blows out is the backdraft effect that occurs due to problems with the chimney.
Before starting any measures, you should check the height of the chimney above the ridge level and the presence of an installed deflector, which reduces the penetration of wind flows into the chimney. If the pipe installation is not carried out according to the rules, then after the steps described below, you will need to extend the pipe and install a deflector.
Sometimes, in order to increase draft, you need to clear the chimney of soot
In order to solve the problem with the boiler blowing out, you will need to do the following:
- First of all, you need to check the draft level in the pipe. It is better to use an anemometer. If you cannot find it, then with the boiler running you need to lean the paper against the outlet of the chimney. If the sheet is attracted to the chimney, then there should be no problems with draft.
- If you find that the blowing occurs due to a loss of natural draft, you will need to check the chimney joints. A thermal imager is used for this. If the pipe allows air to pass through, the device will show a strong temperature difference between the main pipe and the junction of the two modules.
- If the chimney is assembled correctly, then it is necessary to clean the smoke channel using a cable with a nozzle. The diameter of the nozzle is selected to match the cross-section of the chimney pipe. To remove soot, tar and other combustion products, an inspection hole is used at the bottom of the chimney.
- After completing these simple steps, you will need to check the traction level again. If natural draft has not improved, then it is necessary to carry out work to correct the height of the chimney and install a deflector. During installation, heat-resistant sealant and crimp clamps are used.
In cases where the work described above does not produce results, you should contact the gas service to check the gas equipment. Perhaps the problems with blowing are associated with hypersensitive automation.
Calculation of sandwich chimney pipe sizes
Diameter
To determine the optimal pipe diameter size for a sandwich chimney, you need to know the conditions under which the operation will take place. The heating power of the furnace depends on how large the area is, as well as what the planned temperature range is.
As a rule, in order to heat 10 square meters they take 1 kW. Accordingly, in order to heat an area of 100 square meters, you need to purchase a 10 kW stove. Having decided on the power, you can choose a model for individual parameters.
Chimney facing the street Source santehnika-otoplenie.ru
If a system is needed to remove combustion products from a heating boiler, then you need to know the type of fuel and the power of the boiler itself. The higher the temperature of the gases passing through the chimney, the stronger its heating will be. The lowest temperature is for gas boilers, which heat up from 120C to 200C, and the highest for coal boilers, where the temperature of combustion products reaches 700C.
The choice of sandwich should begin with the diameter of the inner pipe. The more powerful the stove is planned to be installed, the wider the diameter should be. For example, if a 3.5 kW oven is installed in a room of 4 square meters, then the width of the outlet from it will be 158 mm. And for an area of 90 square meters with a 9 kW oven, a hole of 220 mm is suitable.
Despite the fact that open fireboxes are not currently recommended for installation, they also have their own standards. The outlet channel in this case should be no more than one hundredth of the total volume of the boiler. If this rule is not observed, the draft in the system will be weak with potential turbulence of air masses with combustion products.
Sandwich chimney inside the house Source pechivrn.ru
Height
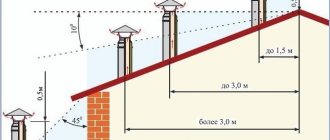
To ensure safe removal of smoke away from people, it is necessary to maintain height standards. The total length of the structure should not be less than 5 meters. If the condition is not met, reverse draft may occur, as a result of which the residential area will be subject to smoke. In addition to the overall length, you must also follow the rules for venting the chimney through the roof.
If the roof is pitched, then the upper edge of the chimney should be at least 0.5 meters above the ridge if the middle of the pipe is at a distance of 1.5 meters or less from it. At a distance from the chimney of 1.5 to 3 meters, the chimney should end at the same level as the ridge in a horizontal plane. When removed by more than 3 meters, the top edge should be 10 degrees below the ridge.
Rules for installing a sandwich chimney on the roof Source stroy-good.ru
If the sandwich system is installed on a flat roof, then the height of the upper edge should be located at a distance of 0.5 to 1.5 m. Since the total size of the chimney should not be less than 5 meters, if the dimensions are insufficient, you can increase the length of the outlet through the roof to 30 cm, making sure to use special reinforcement braces.
What to look for when installing steel chimney systems
Holes in ceilings, walls and roofs
When the installation parameters of the DS are determined (height, location, type of connection), you need to make holes in the ceiling, wall and roof. When making holes, it is necessary to take into account that the chimney will heat up during operation and this can lead to burns or fire. In this regard, it is necessary to strictly observe the clearances from combustible structures.
Ilya Manaev
It is important to know! Even if the chimney pipe passes through non-combustible structures, small gaps must be left, since the chimney system is a self-supporting independent structure. Its rigid fastening (clamping) to building structures is strictly prohibited!
Before installing the DS and making holes in the building structure, check the fire safety distances specified in the manufacturer's instructions. Russian standards state that the manufacturer of chimney systems must indicate safe distances to combustible structures.
SP 7.13130.2013 Heating, ventilation and air conditioning clause 5.27 The dimensions of grooves and offsets for heat-generating devices and factory-made smoke ducts should be taken in accordance with the technical documentation of the manufacturer.
But today, not every manufacturer can provide such information, and there are even fewer who can confirm it with certificates and test reports. By the presence of these documents, you can distinguish a bona fide chimney manufacturer from those who produce low-quality products.
Fireproof indentations
How to choose
Since different boilers produce different combustion temperatures, in each case the composition of the steel from which the inner and outer pipes are made can play a role. After burning, sulfur, sulfuric and hydrochloric acid may remain on the walls of the chimney. Temperatures also differ depending on the type of fuel used.
Sandwich chimney details Source www.stroimdom.com.ua
When learning how to properly assemble a chimney from sandwich pipes for a home or bathhouse, you need to know that different grades of steel react differently to aggressive influences. The most common:
- AISI 304. High temperature resistant steel alloy. It has a high content of nickel and chromium. It is used at elevated temperatures up to 1000C, since at low temperatures around 600C it becomes brittle;
- AISI 316. High alloy molybdenum stabilized alloy that is acid resistant. Characterized by the absence of corrosion;
- AISI 321. High alloy steel alloy stabilized with titanium. Suitable for use in the average temperature range, up to 800C. Corrodes when interacting with sulfur;
- AISI 430 . It is used at low temperatures, as it has a low level of resistance to aggressive influences. May be corroded. It is used in the use of inexpensive budget models.
Sandwich chimney components Source www.rus-dimohod.ru
Since it is most often impossible to determine the type and grade of steel with the naked eye, a magnet can be used to determine the type. When learning how to properly assemble a chimney from sandwich pipes for a stove or boiler, it is necessary to take into account the characteristics of steel. If the steel is of high quality, then it will not be attracted, but if the alloy is of low quality, then attraction will arise.
What is it and what is it for?
A chimney is a system of pipes, connecting fittings, fastenings and structural protection elements.
In any heating circuit with a stove or boiler in the form of a heater, including those running on gas, this system performs 2 main functions:
- Discharge of combustion products into the atmosphere.
- Ensuring the supply of fresh air for complete combustion of fuel.
If the chimney does not cope well with at least one of its tasks, that same dangerous carbon monoxide will inevitably enter the human body.
With proper design, the chimney facilitates the operation of the boiler, increases its efficiency, provides a comfortable microclimate in the room and safety for the residents of the house.
Type of chimney placement
If you are interested in how to assemble a chimney from sandwich pipes, you need to carefully analyze the place where you plan to install it. Depending on the area of the room, the location of the furniture, the level of humidity and other factors, it is necessary to choose the type of placement of the sandwich chimney. Installation is possible indoors or outdoors.
Outdoor installation
A chimney that is assembled from the street side significantly saves space inside the house or bathhouse. Having studied how to install a chimney in a bathhouse from sandwich pipes, you can assemble such a structure with your own hands. There is no need to make a decorative box for it, which significantly saves money.
Main types of chimney assembly Source otopleniehouse.ru
The system consists of assembled elements of the required length, which are connected to a structure located indoors with a special through pipe. To ensure good traction, it is necessary to follow the rules when the length of the passage section should not be more than 100 cm.
During installation, a technological slope of 3 degrees must be observed so that condensate does not accumulate in the boiler or furnace. In this placement, the roof must be more than 50 cm from the edge of the steel outer pipe. The best answer to the question of how to properly install a sandwich pipe in a bathhouse, outside or inside, would be installation from the street side.
Important! If continuous use is not planned in winter, it is advisable to insulate the chimney to avoid freezing and deformation from temperature changes.
External installation of a sandwich chimney Source fluesystems.ru
See also: Catalog of companies that specialize in the installation of stoves, fireplaces, grills and barbecues.
Indoor installation
The chimney, which is installed in the room, consists of an internal part of the system, located perpendicular to the floor, and an external part, discharged through the roof. The structural parts must be joined together in open areas so that inspection can be carried out. A joint located in the interfloor ceiling does not provide such an opportunity and is considered a potential fire hazard, since if the seal is broken, the wooden floors, floor materials of the second floor and ceiling of the first will overheat.
The placement in a completely vertical position gives a good level of draft, and in addition, such a chimney is easy to maintain. If during installation it turns out that when installed vertically, the chimney rests on the ceiling or rafter, then in order not to interfere with the structural part of the house, it is better to bend the pipe using special connecting elbows.
Installation: recommendations and diagrams, main stages of chimney installation
Chimney installation is divided into several stages - preparatory work, installation itself, then connection, startup and, if necessary, debugging of the entire system.
General requirements
When several heat-generating installations are combined, each of them creates its own chimney. In exceptional cases, a tie-in to a common chimney well is allowed, but a difference in height of at least one meter must be maintained.
First, the chimney parameters are designed and calculated, which are based on the recommendations of gas boiler manufacturers.
When summing up the calculated result, the internal cross-section of the pipe cannot be less than the diameter of the boiler outlet pipe. And according to testing according to NPB-98 (fire safety standards), the initial speed of the natural gas flow should be 6-10 m/sec. And besides, the cross-section of such a channel must correspond to the overall performance of the unit (8 cm2 per 1 kW of power).
Installation steps
Chimneys for gas boilers are mounted outside (attached system) and inside the building. The simplest is the installation of the outer pipe.
Installation of an external chimney Source astroyresurs.ru
Installing a chimney on a wall-mounted boiler is done as follows:
- A hole is cut in the wall. Then a piece of pipe is inserted into it.
- The vertical riser is assembled.
- The joints are sealed with a fireproof mixture.
- Fixed with wall brackets.
- An umbrella protecting from precipitation is fixed on top.
- An anti-corrosion coating is applied if the pipe is made of metal.
Proper installation of the chimney guarantees its impermeability, good draft, and does not allow soot to accumulate. Installation performed by specialists will significantly reduce the cost of maintaining this system.
When constructing an opening for a pipe in the roof of a house, special boxes with aprons are used. In this case, the design as a whole is influenced by such factors as:
- The material from which the pipe is made.
- External design of the chimney.
- Type of roof covering.
The main factor influencing the choice of design is the temperature of the gas that passes through the pipe. At the same time, according to standards, the distance between the chimney pipe and combustible materials must be at least 150 mm. The most advanced assembly system is considered to be in segments, where all elements are assembled using the cold forming method.
Sandwich pipe connection options
If you are interested in the question of how to assemble a sandwich chimney, another question will probably arise: how to join the system pipes together. There are two possible options, and each of them has its own name:
- “By smoke”, when the lower pipe goes inside the upper one. In this case, combustion products have no way out and are freely discharged upward;
- “Ppo condensate”, when the inner upper pipe is inserted into the lower one. External pipes are assembled with the top side facing out.
It is believed that in the second case the risk of moisture getting into the insulation is reduced, but if the tightness is broken, then some of the combustion products may enter the room.
Connection for smoke and condensate Source www.rusovent.rf
Attachment option
This type of connection of the chimney to the OP is conventionally called an economical option, since the installation of the entire system requires less fasteners when compared with other types of connections. Here the pipe stands and rests directly on the heating device. The connection is simple, but has serious drawbacks. In the mounted version, flue gases are removed by direct flow from the furnace. Because of this, excessive draft is created, which makes the fuel combustion process uneven and also increases its consumption.
Top-mounted chimney connection option
The next problem with a top-mount connection is condensate drainage. During the operation of heating devices, condensate forms, which must be removed from the firebox. Otherwise, condensation or moisture from atmospheric precipitation will fall directly into the firebox, which will lead to a reduction in its service life or destruction. And while a windproof umbrella will protect you from precipitation, there is practically no protection from moisture condensing in the channel.
Another disadvantage of a push-on connection is that it makes cleaning the chimney system more difficult. In this case, to clean the chimney, you need to dismantle the lower elements and securely fasten the upper part of the pipe. Another option is to remove soot from the firebox, if, of course, such a function is provided in the heating device. All this leads to an increase in the cost of cleaning and maintaining the diesel engine.
Sandwich system kit details
Once the location of the chimney has been chosen, whether outdoors or indoors, you need to understand what parts will be needed to understand how to properly assemble the chimney. To compile a list of the necessary parts, you can independently contact a specialized store or request a commercial offer via the Internet. But it’s better if you have an independent understanding of the process and what parts will be useful during assembly.
Manufacturers produce chimneys with all the necessary components so that a full assembly cycle can be carried out. If there are differences between manufacturers' models, they relate to decorative or connecting functions. The list of elements is usually the same. Therefore, having decided on the names, you can choose a manufacturer based on the criteria of reliability or availability.
Sandwich chimney parts Source pech-kamin.ru
Maintenance of the assembled system
During operation, soot growths may appear on the walls of the sandwich chimney, reducing its cross-sectional area, which can lead to smoke in the room and a fire. Therefore, it is necessary to clean the duct at least twice during the heating season. It is convenient to carry out cleaning through the inspection hatch in the plug; if there is none, you can open the plug completely for these purposes by unfastening the clamp.
The condensate collector also requires regular inspection to ensure timely discharge of accumulated liquid. If the condensate drain is connected to the sewer system, then the condition of the connecting tube must also be examined: clean it if it is clogged and replace it if it fails. To clear a clogged drip line, you can use a thin, strong wire.
Required Tools
After carrying out all the necessary calculations and deciding how to make a chimney pipe yourself, you need to prepare all the required elements. In addition to the list of parts of the sandwich system itself, you need to have on hand a list of the following items:
- clamps for tightening;
- support brackets;
- necessary hardware fasteners;
- heat-resistant sealant;
- grinder, metal scissors;
- spatula for sealant;
- roulette;
- square;
- screwdriver;
- drill and hammer;
- building level.
You also need a marker or construction pencil for marking. When assembling, the joints of the parts must be secured with clamps. The entire resulting structure is fixed vertically along the wall using brackets in increments of 1.5 to 2 meters.
Principle of operation
The operating principle of any chimney is based on a simple law of physics - warm air and vapors are always lighter and tend to rise, while cold air is heavier and, accordingly, settles below.
Due to the difference in temperature between the street (outside the pipe) and hot gases (inside the system), draft appears. Thanks to it, combustion products do not disperse throughout the room, but escape into the atmosphere.
Chimney assembly
If you decide to implement the question of how to make a sandwich chimney correctly with your own hands, you need to once again make sure of the quality of the system and check the availability of the passport before starting the installation. This document must be handed over upon purchase and it indicates a possible assembly diagram, as well as some technical parameters of the composition of the chimney.
When the heating device is already installed, you need to insulate the wall with calcium silicate or mineralite. This must be done immediately, since after installing the chimney there will be no access to the wall. Also, you immediately need to mark and drill holes for the bracket for connecting the mono-pipe and pipe.
Elements of a sandwich chimney assembly Source pandia.ru
When starting assembly work, you need to coat the parts of the outlet of the heating device with sealant. After this, a tee is connected to the boiler or furnace pipe, which contains a plug and a device for collecting condensate.
On the opposite side, a mono pipe is connected to the tee. After the tee is firmly seated on the pipe, it is pushed in all the way and tightened tightly with a clamp. After screeding, you need to apply a building level and if everything is normal, then you can secure the first element with a support bracket to the wall.
Next, the pipes are connected to each other in the chosen way: “through smoke” or “through condensate.” All joints between parts are fixed with heat-resistant sealant. To apply it you need to use a spatula. After application, the composition is distributed in an even layer over the entire surface of the edge of the element.
Support bracket Source topijar.ru
The sequence and list of necessary parts depends on how the chimney will be located. When the installation is carried out indoors and in a vertical position, it is advisable to install a tank for heating water or a specialized mesh heater.
If you place the sandwich elements at once, then exposure to high temperatures may cause the thermal insulating mineral wool layer to sinter, which will cease to perform its functions. The steel can subsequently burn out quickly.
If the question arises of how to assemble a chimney from sandwich pipes into a bathhouse and the system must be taken outside, then first a pipe is installed, and after it a section is immediately placed in a horizontal plane. The passage section must not be installed in a completely horizontal position or with a slope towards the premises, as accumulating condensate can get inside the heating device, which can lead to its deformation.
Chimney indoors Source dizajninterer.ru
Wall and floor options
These types of connections are similar, except that the weight of the chimney is supported not by the heating device itself, but by fastening elements (console) located on the wall - this is a wall-mounted option. In the floor-standing version, the chimney stands on the floor.
Wall and floor-mounted chimney connection options
This connection option has significant advantages and also simplifies the operation of the chimney system and heating device:
Advantages of wall connection
Roof passage
When learning how to properly assemble a chimney from sandwich pipes for a bathhouse or home, special attention should be paid to the place where the sandwich chimney passes through the roof. It is extremely undesirable to crash into the rafter structure as this can negatively affect the roof structure as a whole. The holes should be:
- with a pitched roof of oval or round shape;
- on flat roofs or sheathing with frequent square or rectangular pitches.
The opening is cut with a jigsaw after applying the appropriate markings. The distance from the wooden roof elements should be 13 cm or more. If the chimney gets into the rafter, then you need to use your knees to take it to the right place.
Passage through the roof Source stroy-podskazka.ru
After the chimney is brought outside, there will be a gap between the roofing material and the sandwich pipe, which must be securely and hermetically closed. For this, the best option would be to use a master flush. Its design includes a flanged base reinforced with aluminum for a complete seal and a silicone cone-shaped cuff located at the top.
After installation, the master flush will reliably protect the roof and under-roof space from precipitation and dust. For maximum tightness, before installation, you need to trim the top part so that it is 20% smaller than the chimney pipe.
After this, the master flash is put on the pipe, lowered down to the roof and fixed with silicone glue. Then the upper edge is tightened with a clamp, and the lower edge is treated with sealant. To complete the installation, a head is placed on the upper edge of the pipe and secured with self-tapping screws.
Do-it-yourself chimneys for gas boilers
As with other heating equipment, a chimney for a gas boiler can be purchased in specialized stores. This will be a standard modular product, which is selected taking into account the type of boiler and its power.
What to make a chimney for a gas boiler from
A chimney for a gas boiler can be made from various materials. The main thing is that the material is non-flammable, resistant to chemically aggressive environments and does not allow gases to pass through the smoke duct.
For the manufacture of steel chimney parts, steel with the addition of molybdenum, titanium and nickel is used
Taking into account regulatory requirements, the following materials are used for the manufacture of the chimney:
- brick is a traditional material for making chimneys for solid fuel stoves. For laying the chimney, fire-resistant bricks of class A or B are used. When using gas equipment, a combined approach is often used, when a steel or asbestos-cement pipe is used as an internal channel;
- steel - used to create chimneys of any configuration. The quality and heat resistance of a material is determined by its alloy, which is indicated by a special marking. Thus, for the manufacture of chimneys, products made of AISI 316i, AISI 321 or AISI 310S steel are better suited;
- ceramics - a fired mixture of clay and sand, from which combined chimneys are made. The internal channel is made of a ceramic pipe of a certain cross-section. A box made of expanded clay concrete shell or brick is used as a protective casing.
If we carry out a detailed comparison, the best material in terms of price and quality ratio is galvanized steel AISI 321 and AISI 310S. Chimneys made of such steel are designed for flue gas temperatures up to 800 and 1000 °C, respectively.
Ceramic chimneys have high performance characteristics, but their cost is noticeably higher than their steel counterparts
The average service life of steel chimneys is 13–17 years, but due to the high standardization of parts, there is no need to completely change the design. During repairs, only part of the burnt-out modules are replaced.
Ceramic chimneys have high performance characteristics and a service life of more than 50 years, but their cost is noticeably higher than their steel counterparts. Therefore, this type of chimney is recommended to be used only if there is a sufficient amount of funds and you want to build a structure for a long time. The use of brick chimneys in conjunction with gas equipment is unjustified both in terms of labor costs and the final cost of the structure.
How to calculate chimney parameters for a gas boiler
In order to correctly select or manufacture a chimney, it is necessary to calculate the cross-section of the chimney, as well as its height relative to the level of the ridge. The total height of the chimney is selected in accordance with the regulatory rules specified in SNiP 2.04.05–91.
Table: dependence of the chimney cross-section on the power of the gas boiler
| Chimney cross-section, mm | Peak power of gas boiler, kW |
| 120 | 24 |
| 130 | 30 |
| 170 | 45 |
| 190 | 55 |
| 220 | 80 |
| 230 | 100 |
To calculate the pipe cross-section, the following formula is used - F = (K ∙ Q) / (4.19 ∙ √ˉ N), where:
- K is a constant value, the value of which varies from 0.02 to 0.03;
- Q is the maximum performance of gas equipment specified in the specification;
- H is the estimated height of the chimney according to SNiP.
For gas boilers, the minimum height of the chimney must be at least 5 m. The height relative to the ridge is selected from the rules described at the beginning of the article. Let us remind you that the minimum height relative to the ridge must be at least 0.5 m.
After the pipe area has been calculated, it is necessary to compare the obtained value with the data shown in the table. If necessary, the calculated diameter of the smoke channel is rounded to a larger value.
DIY chimney installation
To assemble the chimney, single-circuit steel pipes or special sandwich pipes of the required diameter are used. If the first option is chosen, then after assembling the chimney it is recommended to insulate it. In the second case, there is no need to insulate the chimney.
When using a sandwich chimney, additional insulation of the chimney is not required
As an example, we will give the technology for installing a steel chimney for a gas boiler. To assemble the chimney, you will need straight steel pipes 50 or 100 cm long, 30° chimney outlets, a passage box for walls and ceilings, a deflector, crimp clamps and heat-resistant sealant.
If the diameter of the outlet pipe does not match the diameter of the chimney, then an appropriate adapter is used. It is better to use basalt wool as an insulating material.
Installation of a chimney for a gas boiler is carried out in the following sequence:
- A single-wall or insulated pipe is connected to the outlet pipe of the gas boiler. To do this, the pipe is coated with a heat-resistant sealant, after which an adapter is put on it, which is tightened with a crimp clamp.
- A similar approach is used to connect the adapter to the pipe. First, the mounting end of the adapter is treated with sealant. Next, a straight pipe is placed on it to the required depth. After which the connection is tightened with a clamp.
Before assembling the chimney, it is recommended to check its completeness for the presence of all modules and fasteners - To bring the chimney through the ceiling, you will need to cut a square hole in it. The size of the hole is selected so that there is a distance of at least 20 cm from the chimney to the ceiling.
- A steel box is mounted into a hole cut into the ceiling. For fastening, steel screws 30–50 mm long are used. Then a pipe is passed through the box, which is mounted on a module connected to the pipe. The space between the pipe and the box is filled with mineralized insulation. The top of the box is closed with a steel plate.
The outlet of the chimney through the ceiling must be insulated with a steel box - If, after introducing the pipe into the inter-attic space, its displacement is required, then a 30° elbow is installed according to the scheme described above. In other cases, a straight section of pipe is installed.
- To remove the chimney through the roof, similar actions are performed. First, a square hole of the required size is cut out. Next, a mounting plate with a hole for the pipe is installed. Then a straight section of the chimney is installed. Finally, a conical additional element made of steel or non-flammable plastic is put on the chimney.
A deflector must be installed at the chimney outlet - At the final stage, the remaining section of the chimney is installed. A head and a deflector are installed at the end of the pipe. After assembly, the functionality of the assembled structure is checked. To do this, it is enough for the equipment to operate at 50–60% of maximum power for one hour.
When installing an external chimney, a 90° rotary elbow is used. The elbow is connected directly to the adapter, which is also mounted on the gas boiler pipe.
To remove the chimney, you will need to cut a hole in the load-bearing wall. The size of the hole is selected in the same way as in the case of the ceiling and roof. Next, a steel box is mounted in the wall through which the pipe is passed. Basalt or mineral wool is used to fill the box.
To re-rotate the pipe, another 90° elbow is installed. A special support with a bracket is used as a supporting structure, which is installed under the rotating elbow. The installation step of the hanging brackets is 1–1.5 m. Further steps are similar - you need to assemble a chimney from straight products that are connected using clamps and sealant.
Briefly about the main thing
Installation of sandwich chimneys is carried out according to the assembly type of the designer.
The type of steel in the pipes must be selected depending on the fuel.
Installation can be done indoors or from the street.
The system can be assembled “by smoke” or “by condensate”.
You can do the installation yourself by preparing the necessary tools. During installation, special attention should be paid to the passage through the roof, walls and sealing the joints between parts.
Ratings 0
Requirements for chimneys and installation rules
Installation of a chimney and ventilation for a gas boiler occurs in compliance with the chimney installation standards SNiP 2.04.05, and the manufacturer’s recommendations are taken into account:
- The size of the channel is chosen to be the same as that of the boiler socket or slightly larger. The height of the pipe is at least 5 meters.
- In rooms with traditional hoods, the exhaust air is replaced by air coming from the street and partly from other adjacent rooms.
- The chimney is made of non-combustible material.
Important! It is prohibited to use the ventilation duct to exhaust smoke.
After putting a gas boiler or other equipment with a chimney into operation, a chimney inspection report is drawn up.
Maintenance and cleaning
When operating a gas chimney, less soot is formed than when operating solid fuel boilers, but still the chimney pipes periodically become dirty and need to be cleaned. There are 2 ways to clean chimneys of gas equipment (boilers, dispensers):
- Mechanical
Cleaning is carried out using special brushes, scrapers, and rollers. It is necessary to choose tools that cannot damage the internal walls of the chimney. The most popular means of mechanical cleaning nowadays is a vacuum cleaner.
- Chemical
It consists of spraying special compounds onto the internal walls of the chimney.
Expert advice
In conclusion, here are some tips from experts.
How to properly insulate the chimney pipe of a gas boiler?
Under the influence of outside air, the pipe cools and the temperature of the exhaust gases decreases, as a result, the draft decreases. These problems can be avoided by insulating the chimney pipe.
Insulation of chimneys is done in different ways:
- Brick chimneys are protected by applying a layer of plaster, or (if the attic is not insulated) with stone or basalt wool. To ensure the safety of the insulation, it is covered with foil on top.
- Metal chimneys can also be insulated with non-combustible insulation.
- Ceramic smoke exhaust systems are insulated with expanded clay blocks and mineral wool.
- Asbestos pipes must be insulated with extreme caution. When overheated, this material explodes.
