Crushed natural stone has earned the recognition of landscape designers due to the fact that it amazingly combines all the advantages of natural stones with a wide range of possible uses.
Small pieces of stones, sorted by fraction size, exactly replicate the color of the natural mineral and give a lot of scope for imagination.
Steps made of decorative stone chips
In addition, decorative chips for landscape design can be subjected to additional processing - sanding, painting, which further expands the possibilities when designing a site. This is a relatively inexpensive material. It does not require additional equipment or special work on the formation of foundations. All this makes the idea of using decorative stone chips a favorite among landscapers.
Decorative chips in landscape design
Advantages and disadvantages of decorating with stone chips
Most often, crushed stone is used to decorate homestead areas. The popularity of this material is explained by its advantages, among which it is worth highlighting the huge variety of shapes and sizes of crushed stones, as well as a wide selection of colors and shades. In addition, the affordable price can also be considered an advantage.
It is also impossible not to notice that natural material fits perfectly into the overall atmosphere of the garden’s wildlife. Another advantage is the mobility of the decoration. If necessary, the stone installation can be moved to another location.
This type of decoration has practically no disadvantages, except for difficulties in care. It is difficult to keep the crumbs in order because the small particles constantly bunch up and form bumps on the surface of the paths. In addition, it is difficult to remove debris and fallen leaves without damaging the mosaic pattern.
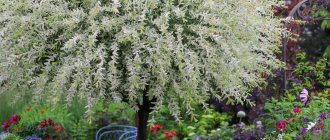
Did you know? The Alice in Wonderland landscape style allows you to visually enlarge a small area. To do this, the garden area is planted exclusively with dwarf plants.
Decorative mill with waterfall
The murmur of water and the rustle of spinning blades in the evening garden create an indescribable feeling of comfort and tranquility. A decorative water mill with a waterfall will be a wonderful addition to the design of your garden plot.
Working principle of a water mill
If in a windmill the force of the wind is used to move the blades, then in a water mill the flow of the river is responsible for this. The heart of such a mill is a wheel installed on the shore of a reservoir under a trench through which water flows.
The ideal place for installation is a flowing pond. Water flowing naturally will create a constant twisting force. If there is no river or stream in your garden plot, but you really want a mill, you can artificially recreate the force of the flow.
Possible options:
- Place the mill wheel under the gutter. In this case, it will spin when it rains.
- To create a flow, use a hill on the terrain. At the highest point of the site, a water collection point is created, which will be supplied through a gutter to the wheel blades.
- Run the water in a circle using a pump. An artificial hill is created, for example, from compacted earth or stones. A hose is placed inside through which water will be supplied upward.
Today in stores there are installations that can generate energy from the force of rotation of the wheel. A small wooden mill can provide electricity to operate its own pump and LED lighting.
Materials and tools
Necessary materials:
- wooden beams, slats, plywood;
- threaded rod;
- nails, self-tapping screws, bolts with nuts of different sizes;
- gutter pipe;
- moisture-resistant glue;
- protective impregnation, varnish or drying oil.
The amount of materials needed is determined by the size of the future building.
The mill wheel is in constant contact with water, so all wooden elements must be impregnated with a protective solution, and the use of unpainted metal elements must be kept to a minimum.
To create a water mill you will need a standard set of tools:
- saw, hacksaw or jigsaw;
- drill or screwdriver;
- hammer:
- roulette;
- level.
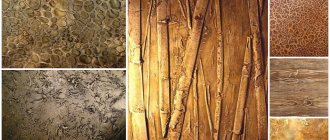
Types of stone chips
The variety of types, shapes and sizes of stone chips provide great scope for creating ideas for exterior design.
Types of crumbs:
- Gravel - rounded stones that are mined on the banks of mountain rivers. They can be homogeneous and consist of material of one rock, or mixed (stones of different rocks). The color of the chips is the same as the stone from which it was obtained. The size of the fractions is 5–70 mm.
- Granite or marble crushed stone — to obtain crushed stone from marble or granite, blocks of rock are processed in specialized workshops. As a result of processing, the edges of the stones are sharp and flat. Natural color is dark gray. Repainting is allowed.
- Pebbles - a natural material of round shape, which belongs to hard rocks. It is not subject to processing, since it is honed and polished under natural conditions. Pebbles are mined on sea coasts. The color palette can vary from white to beige and light gray.
- Sand - fine-grained crumbs, the largest particle of which is only 5 mm. Mainly used for filling and design. The color can be white or golden.
How it is made
Stone chips of a certain fraction and acrylic paint are used as raw materials for the manufacture of the material. If the initial raw material is stone chips not sorted into fractions, then the first technological stage will be separation into fractions by sifting on a vibrating screen (vibrating screen).
The necessary raw materials for the production of painted crushed stone are extracted from the quarries Source avistd.ruThe next stage is painting, for which a painting hopper is used, the principle of which is similar to a concrete mixer. The volume of paint loaded into it is about 20% of the volume of loaded crushed stone. After coloring, the crushed stone is moved to a drying chamber; after drying, the stone is packaged in bags weighing from 2 to 20 kg.
There is a risk of purchasing low-quality decorative material. These are mainly products of small enterprises, which, at the expense of quality, can save on:
- feedstock;
- the amount of paint placed in the hopper;
- drying chamber (drying is carried out simply in air on plastic film).
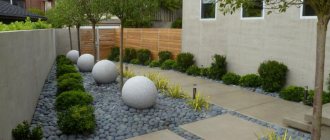
Methods and ideas for use in landscape design
There are many ways and ideas for using stone chips in landscape design. Most often, flower beds and ponds are decorated with natural materials. You can also decorate the garden in the form of a dry stream. Paths and paths made of small stones will look beautiful among the greenery and flowers.
Important! The stone chips should be laid out so that they completely cover the geotextile.
General rules for laying stone chips:
- Remove top layer of soil.
- Pour a thin layer of sand (this is necessary so that rain can easily seep into the ground).
- Lay a special fabric on the sand - geotextiles (this material allows moisture to pass through well and will not allow weeds to grow).
- Lay out a layer (about 5 cm) of crushed stones.
What follows is a detailed description of decor ideas and materials that are suitable for creating an original garden exterior.
Decor for flower beds and ponds
Marble chips are perfect for decorating flower beds. Crushed marble comes in many sizes and colors, so choosing the right material is not difficult.
Find out also about the use of a well in landscape design.
Having selected a material suitable in size and color, you can begin laying it. To do this, marble crushed stone must be laid out in the manner described above. Then you can form the pattern. Sand, as well as smaller marble stones, are suitable for drawing. It is advisable to choose a contrasting color for the stones. Sand can be sprinkled on the main pattern formed from small fractions. Plants can be sprinkled at the base with pieces of bark. This will add decorativeness and create a layer of mulch.
Marble installation needs to be replaced regularly. It can be used to decorate an existing pond or fountain on the site. To do this, you need to select small fractions, then lay them on the bottom in a layer of 10–15 cm.
Dry stream made of marble chips
If there is no pond in the garden, it can be created artificially. In this case, you can form a dry stream - an imitation of a natural reservoir. Decorative colored stone chips made of marble and pebbles are suitable for this. You need to lay out the stream on a flat surface. Construction should begin with light pebbles mixed with fine white marble crushed stone.
Important! Colored decorative chips, unlike natural ones, are not an environmentally friendly material, so it is not recommended to allow children and animals to come into contact with them.
Then you need to gradually add fractions of blue and cyan shades. They will shine in the sun and create the impression of a water surface. The stream can be made winding, meandering between bushes and flower beds. To enhance the effect, you can install a small curved bridge across such a “river”. The “mouth” and “source” can be hidden in vegetation.
Creating paths and paths
Paths and paths in the garden can be laid out from fractions of different sizes. For example, crushed gravel and granite are suitable. Large granite fragments can be laid as the main layer, and smaller, gravel fragments can be used to frame the path.
Here you can read about garden bridges in landscape design.
You can also decorate alleys made of stone chips by superimposing on them patterns from flat granite fractions of dark shades. Along such paths you can plant a hedge of ornamental shrubs.
Use as mulch for plants
- Plants in the garden can be covered with flat crushed stone made of granite or marble. Benefits of stone chip mulch:
- preventing weed formation;
- additional shelter from the cold;
- decorativeness.
To cover plants with crushed stone mulch, you will need a medium-length flat material. It is advisable to choose a natural color, since the paint, together with watering, will penetrate deep into the soil and, thus, have a toxic effect on the root system. Having prepared the material, you need to cover the circle around the trunk with a thin layer, no more than 5 cm.
Video: How to properly mulch plants with stones
Selecting a site, marking it
First you need to decide how the garden paths will be placed on your site. They can be straight, connecting one area in the yard to another, or circular. It is important to take into account the area of the garden or summer cottage and the nature of the soil. When you have decided on the location of the path, you need to mark it.
For this you will need:
- stakes, wooden or metal;
- cord, rope or fishing line;
- yardstick.
The stakes are driven in along the edges of the planned path, and a rope is stretched along the required perimeter.
If the soil is not too dense, it would be advisable to dig a shallow trench. To do this, you need to cut off the top layer of soil to a depth of 20-25 cm. The cut soil can be used as fertilizer to improve the soil in the beds.
Caring for stone chips in the garden
Crushed stone in the garden looks very beautiful and impressive. However, it is quite difficult to care for it. Small fragments of stone tend to scatter in different directions. They have to be re-installed from time to time. Patterns on flower beds are also short-lived.
Did you know? The Roman Emperor Claudius Caesar spent all his free time in the garden, bringing to life his own ideas of landscape design.
Wind and other weather conditions scatter sand and small stone particles throughout the flower garden. The drawing has to be re-formed. In autumn, collecting fallen leaves is also not very convenient, since the original shape of the paths is disrupted during harvesting. It also needs to be corrected.
To tidy up alleys and flower beds decorated with stone chips, you need to collect the spilled stones and sand and then put them in place. Once a year, it is advisable to completely remove the material from the area, wash it under a hose to remove dirt and dust, dry it and lay it out again.
Stone chips are one of the most affordable natural materials for decorating a garden exterior. There are many types and colors of decorative crushed stones. Having chosen the material to your taste, you can lay out paths and paths with it, create a dry stream, decorate flower beds and ponds. Despite the fact that caring for such decor is quite difficult, the result is worth the effort.
Do-it-yourself marble imitation - step-by-step instructions
Imitation of marble on the wall, ceiling, furniture and household items is performed using available classic tools: bristled and round paint brushes, squirrel brushes, sponges, palette knife, double brush.
The paintwork is applied to a perfectly flat, prepared surface. Wall preparation is carried out according to the following scheme:
- Mechanical cleaning with a spatula and a stiff brush. If necessary, chemical treatment with antibacterial compounds and degreasing are performed.
- The surface is leveled using cement plaster. If the unevenness is deep, you can hide them with sheets of drywall.
- Then several layers of putty are applied.
- Finally, the surface is primed. Now it is ready to apply paint.
You don't have to be a professional to create the marble effect yourself. Use step-by-step instructions.
Using a paint roller, apply a base coat to the entire surface.
It is important to let it dry thoroughly: the process takes at least 12 hours. The next step is to apply two additional colors. They are the ones who create an imitation of texture in the overall picture.
It is necessary to apply the paintwork randomly, using a bristled paint brush. The two colors should form a texture similar to the pattern of marble. Using a sponge, smooth lines are used to shade the pigments that have not yet dried. This is how soft transitions appear between shades. Marble veins are drawn with a thin brush. The work is performed on a dry surface. If the work does not require adjustment, a protective layer is applied. Transparent varnish is applied to the dried paint: this will give it the shine characteristic of real marble, and also protect it from fading and cracking.
San Marco paints contain high-quality coloring pigments and components that provide an excellent, lasting effect. When the work is done correctly, following all application rules, the surface resembles stone as closely as possible and is not even inferior to it in terms of abrasion and environmental friendliness.
Features of shading
Shading is one of the important stages of creating a marble effect. The texture of the drawing and its correspondence to the original will depend on it. Shading is done with a regular sponge or a crumpled plastic bag. The procedure is performed until the applied pigments have dried.
Experts call this method of partial mixing of applied pigments the trimming method. A tool is passed along the boundary of the joints of wet paint, pressing it to the surface with varying pressure and randomly. This achieves the effect of a soft transition of tones and smoothes the border.
Popular articles Pruning irises and peonies after flowering
Imitation of veins
The veins complete the whole picture and give the painted surface a complete resemblance to stone. They are painted with a mixture of dark paint and glaze (1:4) for light colors, and a light pigment for finishing a dark background. The veins are drawn with a thin brush. They are located chaotically in the form of intermittent stripes with varying thickness along the entire length.
Finally, it is necessary to apply heterogeneous thinner and shorter veins. You can perform the technique with the same brush or a regular pen. The lines should not be clear and rough; in some places they can be smeared with a sponge.
Color spectrum
Modern manufacturers offer marble plasters in numerous colors. About 10 years ago, the range was limited to natural marble shades, but now dyes are added to dry mixes. For example, it produces material in unusual and original colors that combine well with each other. They are often chosen by designers and builders to decorate building facades.
Attention! If the material is used for external work, the service life of the coating is 15 years even with constant exposure to the atmosphere.
Base finishing
Marble plaster for the plinth can be used for finishing purposes. The application process does not differ from the standard finishing work. You should first prepare the base, repair all the unevenness, cover it with a layer of primer, and wait until the walls are completely dry. After this, manual or mechanical distribution of the mixture is performed using special equipment.
Why do you need to finish the base?
Base marble plaster is necessary primarily to protect the base from excessive exposure to moisture. Since the basement floor is located below the planning level of the building, it is susceptible to moisture.
A durable coating will protect the walls from condensation, mold and various fungal colonies.
Ready mixes
To save money, many builders and building owners prefer to make marble plaster themselves. For this, a binder, a filler represented by marble chips, and pigments are used. Typically, acrylic putty is used for the bond, which is easily replaced with white cement M500.
Pre-mixed formulas, which are mixed with water before use or sold in liquid form, have many benefits. These include:
- optimal composition in which all elements are combined in suitable proportions;
- ease of use;
- there are no toxins or harmful components in the composition;
- the manufacturer offers a guarantee;
- availability of recommendations from the manufacturer, following which you get excellent results;
- sometimes mixtures are sold complete with tools that can be used to create a beautiful texture on the facade of a building.
The disadvantages of the finished material include high price and significant consumption. The cost of 15 kg of the finished mixture is approximately 1.5 thousand rubles.
Reviews on the use of marble plaster
People who have used Marble Crumb plaster speak only positively about this material. This is due to the high characteristics of the coating.
Oleg
I chose marble plaster to decorate a private house made of foam blocks. The work was done with my own hands without any difficulties. The result is a coating that has been serving without complaints for 10 years. It copes well with severe cold and frequent rain.
Maksim
The builders suggested this material before finishing the house. The marble plaster coating turned out to be perfectly smooth, beautiful and unusual. It does not collapse under atmospheric influences, and also does not require expensive periodic repairs.
What does “decorative crushed stone” mean?
Decorative colored crushed stone is a granular material that is obtained by crushing and processing rocks. It tolerates frost well, is durable and resistant to ultraviolet radiation.
There are three popular types:
- From gravel particles;
- From granite particles;
- Made of limestone.
On the market you can also find colored gravel obtained from construction waste; it is labeled as “recycled”. “Screening” is also used during construction work; these are small particles of crushed stone containing a little sand. This type is fragile and its price is low.
It tolerates frost well, is durable and resistant to ultraviolet radiation.
Adviсe
In order for marble plaster to adhere well and the finish to be durable and beautiful, you should follow several rules during the work.
- All work must be carried out in dry, but not hot weather. It is undesirable for the sun's rays to fall on a freshly treated surface.
- Lamps, if there are any on the walls, should not be turned on until the plaster is completely dry.
- The thickness of the plaster layer should not be more than twice the size of one filler crumb.
- Plaster should be applied to one wall continuously to avoid the appearance of unevenness.
- If it is cool outside, then the plaster should be given at least two days to dry completely.
- The drawing is best applied using patterns.
- If coarse marble plaster is used, it can also be applied to rough plaster. But the fine-grained one should be applied to clean putty or a sanded smooth surface.
Marble plaster is a universal method that allows you to hide imperfections in the walls of a building and give them a presentable look.
Prices for different types of plaster floats
Plaster grater