SHARE ON SOCIAL NETWORKS
FacebookTwitterOkGoogle+PinterestVk
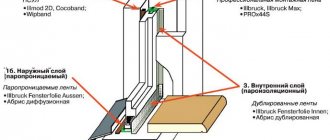
One of the important elements of a window opening, which improves its appearance by covering the installation joints, is the window sill. It can be made from different materials. However, the most popular is plastic, which is due to the widespread use of metal-plastic windows. Installation of a plastic window sill consists of several successive steps, the implementation of which will ensure the achievement of optimal performance.
The window sill is an important element of the window opening
Distinctive features of plastic window sills
Metal-plastic windows have long gained credibility. They are very popular among consumers due to the fact that they are characterized by high performance characteristics, are easy to install and have a long service life. After replacing the window, the slopes and window sill are immediately installed.
Thanks to the presence of stiffening ribs, the surface of the window sill is very durable
A metal-plastic window is a universal product that can be matched with different window sill options, which are selected in accordance with the stylistic goal. The most common option is plastic products. This design is best combined with the material of a modern window, creating a single composition with it.
The plastic window sill is characterized by distinctive advantages. The product is resistant to moisture, sunlight and temperature changes, and is not prone to rot, mold or corrosion. The surface does not deform and does not change its original shape and appearance. The material is completely safe for human health, is durable (due to the presence of stiffeners), reliable, and resistant to chemical influences. It has high thermal insulation properties, which is due to the presence of air chambers in the window sill structure.
The product is lightweight, which ensures easy installation of the PVC window sill, while it does not shrink during further use. The surface does not require painting or other treatment options to prevent possible rotting or corrosion. She is easy to care for. Plastic window sills are characterized by their low cost compared to other materials.
Despite its advantages, plastic window sills have their drawbacks. If used carelessly, dents or holes may appear on the surface of the product, which is a consequence of the fragility of the product. If there is a glossy coating, scratches may form on it, which will cause an unsightly appearance.
Plastic window sills are resistant to moisture, sunlight and temperature changes
Important! A plastic window sill can become deformed when exposed to high temperatures, so do not place a hot kettle or pan on the surface.
Where to put the printer at home - interior design solution. Hiding in plain sight
Today's:
- Pomegranate tree at home. Pomegranate varieties suitable for growing at home
- Where to put the printer at home - interior design solution. Hiding in plain sight
- Is it possible to place the printer near the battery? Is it harmful to sit next to a printer?
- How exactly does the printer get damaged?
- How does a printer affect human health?
- Harm from consumables
- Where to hide your computer. How to hide wires from a computer
- Where can I put the printer? Adding a printer to Windows
- Method 1: Installing drivers
- Method 2: Built-in Windows tool
- Method 3: Add network printers
- Is it possible to place the printer on a window? Expense
Which plastic window sill to choose: product types
Before installing a window sill on a plastic window, you need to select the type and size of the product. The most budget option is a surface covered with PVC film. However, such a window sill does not tolerate temperature changes and quickly absorbs dust and dirt, which leads to the loss of its original attractive appearance.
The CPL-coated laminate product is manufactured by pressing paper sheets impregnated with melamine resins. This window sill with a multi-layer base is characterized by resistance to temperature changes and chemical influences.
Most often, do-it-yourself installation of a PVC window sill with EPL coating, which has high strength and performance characteristics, is carried out. Products are produced by extruding plastic material through extrusion holes to obtain the required shape.
Window sill made of laminated paper with CPL coating is resistant even to chemical attack
The internal space is divided into several chambers with vertical and diagonal stiffening ribs, which ensures strength, rigidity and reliability of the structure, which does not bend or break. At the same time, the thermal conductivity of the product also increases.
The surface, thanks to the presence of an antistatic coating, does not absorb dust and dirt. This window sill is available in a wide range of colors, which allows you to choose a product that matches the specific interior of the room.
Texture, color and design of a plastic window sill
Depending on the type of coating, a plastic window sill can be matte, glossy or laminated. The first type of product can fit into any interior. The surface can be painted in a variety of colors. A matte window sill brings a feeling of coziness and warmth to the environment, but such a surface is prone to absorbing dust and dirt.
Important! If the matte surface is accidentally damaged, it can be restored using a special product.
Plastic window sill can be matte, laminated and glossy
A glossy product has a more attractive appearance. The surface has antistatic properties, so dirt and dust do not accumulate on it. The product is easier to care for. However, the surface is susceptible to mechanical stress; small visible scratches quickly form on it, which worsen its appearance. In addition, the glossy window sill cannot be restored.
Laminated window sills are covered with a special film, which gives the products texture, increased strength and durability. To obtain a white product, one layer of film is applied. The colored window sill has a two-layer coating that contains dye. The price for installing a plastic window sill of this type is the highest and starts from 1100 rubles. per linear m.
There is a separate type of product in the form of a wenge window sill, made from a mixture of PVC and wood flour. The unique production technology allows us to obtain a durable, scratch- and UV-resistant product. The price for installing a window sill of this type starts from 1,300 rubles. per linear m.
The plastic window sill can be made in white, colored or wood-look. The latter option finds its application in wooden houses. It can also be used in tandem with wooden windows. However, this design, unlike a wooden window sill, is characterized by resistance to moisture, no processing for further use, and a long service life. The “wood” imitation is achieved by using the appropriate laminated film.
The colored plastic window sill has a two-layer coating containing dye
Important! The use of such a coating in window sill manufacturing technology makes it possible to obtain a product that imitates natural stone in the form of marble or granite.
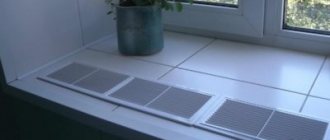
Plastic window sills are produced in lengths up to 6000 mm, widths of 100-600 mm in increments of 50 mm, and 600-1000 mm in increments of 100 mm, which directly affects the price of installing a window sill on a plastic window. The height of the product reaches 18-22 mm.
Components needed when installing window sills and slopes with your own hands
To install a window sill and slopes on a plastic window, it is not necessary to have certain skills and abilities. Even a novice master can handle this. To achieve a good result, an important step is the selection of the necessary components.
When installing a PVC window sill, you will need to purchase not only the slab of a certain type, but also connecting elements, as well as a double-sided end cap. The last element is represented by a strip with two spouts, used for decorative framing of the end sides of the window sill. The plug is divided in the middle, fixing one part to the right and the other to the left of the slab. To join the window sill at an angle and connect it along its entire length into one solid structure, connectors are used.
To install the window sill and slopes, you will need to purchase connecting and fastening elements
Slopes are used to frame the side elements of the window opening. They cover the mounting seams of the frame with the opening and give the window a complete, aesthetic appearance. The most common option is plastic slopes, which are characterized by strength, reliability, good thermal insulation properties, low maintenance and quick installation. The video “Installing slopes and window sills” will allow you to familiarize yourself in detail with the selection of elements and installation conditions.
To protect the window frame from the negative influence of the environment, it is necessary to install a drip lining on its outside. The structure can be made of aluminum, plastic or metal. The second option is the most widespread. Metal castings are the most inexpensive and short-lived, since they have a low level of resistance to the negative influence of atmospheric conditions.
Aluminum ebbs are more durable, have reliable protection from mechanical damage, and thanks to a special coating on the surface, they absorb the noise of raindrops.
How far should it protrude from the wall?
The window sill board should protrude 5-7 cm from the wall. The width of the protrusion is selected so that its edge is above the central part of the radiator. The larger protrusion blocks the heat from the battery, preventing the circulation of thermal air.
Can it be without a protrusion?
Installing a window sill without a protrusion is quite possible, based on the wishes of the customer or the specific layout of the room. But using a protruding window sill is much more rational for several reasons.
- Heat from the radiator should not flow directly to the window, otherwise there is a high probability of condensation occurring, which will lead to damage to the structure.
- The wall under the window sill is reliably protected from mechanical damage and accidental moisture.
Methods for installing a window sill on plastic windows
Before installing a plastic window sill, you should study possible methods of installing the product.
All installation options are very reliable, they differ only in the way the window sill is fixed under the window frame
The oldest option for installing a window sill on a plastic window is to fix the product using a special compound. Today, this method is used extremely rarely due to the emergence of more convenient and reliable methods.
The easiest way to install a PVC window sill with your own hands is to use self-tapping screws. First, holes are made in the window frame into which hardware must be screwed. For greater tightness, the joints should be treated with an acrylic-based compound. To achieve maximum rigidity and reliability of the structure during installation, special gaskets are placed under it, and the resulting gaps are filled with polyurethane foam.
The window sill can be installed using spring metal brackets. These fasteners are fixed to the stand profile using self-tapping screws. Then the PVC plate is installed in the groove that was formed between the bracket and the window frame.
There is an option for installing a plastic window sill yourself, which does not involve the use of fasteners in the form of brackets and screws. The plate is installed in place. Wooden wedges are driven under it until its surface is pressed as tightly as possible against the window frame. In this case, it is necessary to constantly check the level of the structure. The window sill should have a slight slope towards the room to prevent condensation from getting onto the frame.
After installing the window sill, the cracks must be sealed with silicone
All free space that has formed is filled with polyurethane foam. This type of installation is the longest, but it can be considered the most reliable.
Important! After filling the space under the window sill with polyurethane foam, it is necessary to install weighting on the slab in order to create the necessary resistance when the material hardens.
All window sill installation options have their pros and cons. They differ only in the way they fix the product under the window frame, and all other stages are identical.
Combination of ventilation with recirculation
Recirculation is called SW, when the air removed from the room is returned back through the influx with an admixture of fresh air. The disadvantage is that its use is limited by SNiP, and in regions with cold climates it does not work very effectively. Its action is limited to one room.
Recirculation allows you to save on energy consumption due to the fact that power is spent only on heating a small volume of air mass taken from the street
The recirculation system circuit can be converted into ordinary supply and exhaust ventilation by closing the recirculation valve and fully opening the supply and exhaust. If you do the opposite, the system begins to circulate air in a circle.
When the supply and exhaust valves are only partially opened, fresh outside air will begin to be mixed in. By adjusting the degree of opening, they optimize the flow of elements that ensure comfortable life.
There is a lot of free space under your wide window sill, but you don't know how to use this space? Then let the window sill become the base for the chest of drawers. Of course, this idea will only be useful to you if there is no battery under the window. However, you can make ventilation hatches there and store things that are not afraid of heat and dryness next to the battery. This is another great idea for a small film.
Girls, just imagine: bright sunlight, a mirror in an openwork frame, a suitcase with cosmetics, a comfortable ottoman, many, many cute little things. Oh, every girl’s dream is a personal dressing table for cosmetics, jewelry and perfume. Unfortunately, not all women's bedrooms have it: not because it is not needed, but because there is no space in the bedroom.
Maybe your window sill will become your boudoir? It seems to us that it will be very convenient and pleasant for him to take care of himself or get ready for a date.
How to install a window sill: preparatory stage
How to install a window sill correctly? First of all, you need to prepare the tools necessary to ensure maximum efficiency of work, and components that will make the installation process simple and convenient.
You can cut a plastic window sill with either a jigsaw or a grinder
To install the window sill you will need the PVC product itself, a corner, a building level, a marker with a tape measure, sealant for joints and seams, foam for filling the gaps between the slab and the wall, a jigsaw, a hammer drill, a screwdriver, screws, and self-tapping screws.
Many people are interested in the question of how to install a window sill if the window is already standing. First of all, the necessary measurements are taken. Carrying out this stage is extremely important, since the strength and appearance of the future structure will depend on the correctness of its implementation.
Related article:
Dimensions of plastic window sills: how to choose the right option
What parameters are considered standard? Pros and cons of using PVC material. What to look for when purchasing, how to take measurements.
The length of the window sill should be several centimeters greater than the distance between the side slopes. This is explained by the fact that the product is inserted 2-3 cm into the grooves made in the wall. The width of the product is selected taking into account its protrusion above the radiator, which is installed below. This value should not exceed 8 cm. Otherwise, hot air will not rise to the window from the radiator, which will cause condensation.
The distance between the window sill and the stove should also not be less than 10 cm. Otherwise, a closer location will cause air circulation problems, which will worsen the microclimate in the room.
The width of the window sill is selected taking into account the protrusion above the radiator
How to install a plastic window sill: taking measurements and preparing the window opening
Before installing a plastic window sill, the product is prepared according to the measurements taken. The required length and width are marked on the plate using a marker. Then, using a jigsaw, the PVC structure is cut. Work must be carried out in safety glasses and work gloves, since plastic is a very fragile material, so small particles can fly out when cutting it intensively.
The cutting process can also be carried out using a special hacksaw or grinder. In the first case, the process will be lengthy. Using a grinder, you can achieve perfectly smooth edges of the product.
Important! When making cuts, do not put excessive pressure on the slab, as this can lead to cracks and chips in the product.
Before you properly install a plastic window sill, you need to prepare a seat for it. Since the structure is mounted with some penetration into the side niches of the opening, it is necessary to make appropriate grooves for it on both sides in the wall. The process is performed using a chisel and hammer. The resulting openings are thoroughly cleaned of debris and primed.
Before installing a plastic window sill, it must be cut according to the measurements taken.
After this, you need to attach special spacers or wedges to the window frame, which are fixed for reliability using gypsum mortar. The installation elements must be positioned in such a way that the required inclination is ensured. Then you install the window sill on the seat with your own hands and check how smooth and tight it becomes. If necessary, the edges of the structure are trimmed.
Important! The window sill should have a slope towards the room of 1-2°.
The process of installing a window sill on a plastic window with your own hands
As mentioned earlier, there are several ways to fix the product when installing a plastic window sill. At this stage, the most popular and reliable option is being considered, which involves the use of wooden spacers and polyurethane foam.
How to install a window sill without a support profile? The product is mounted on a prepared seat. Wooden beacons are installed under the structure with a pitch of 80 cm. They ensure the horizontality of the structure, which is controlled by the building level.
If you install a window sill without a support profile, you will need to install wooden beacons
Under the slab at the front end there are wooden blocks, the distance between which should be about 50 cm. It is necessary to ensure that the load-bearing elements do not extend beyond the plane of the wall. The distance between the wooden blocks and the side walls should not exceed 10 cm. Before installing the window sill, the horizontal position of the window sill is checked again. If the value does not correspond to the previously obtained result, the pads are adjusted in thickness.
To pre-fix the window sill, the cavity between the slab and the concrete surface must be filled with polyurethane foam, a can of which is placed in warm water a few minutes before starting work. To prevent the binder from lifting the window sill during expansion, a weight is placed on the slab. Next, all free space is thoroughly filled with foam.
Important! Do not overload the structure to avoid deformation of the window sill.
In this position, the window sill must be left alone for 2-3 days. Excess foam should be removed with a utility knife. If possible cracks are found, they are filled with acrylic sealant. At the end of the installation process, to give the structure a complete look, special plugs are mounted on its ends with glue. After installing the window sill, you can begin installing the slopes.
The window sill should have a slight slope towards the room
Required Tools
To work you will need:
- roulette;
- hammer drill for forming a groove in the wall;
- jigsaw, metal hacksaw or angle grinder;
- rubber hammer;
- putty knife;
- foam gun;
- marker or special pencil;
- screwdriver or screwdriver;
- construction knife with replaceable blade;
- rags;
- level.
A level is one of the necessary tools.
Installing a plastic window sill on the balcony
Modern balconies and loggias are actively glazed through the use of metal-plastic double-glazed windows. This process is accompanied by the installation of a PVC window sill. The installation of a window sill on a balcony is mainly carried out at the time of glazing. However, this can be done later with your own hands. How to install a plastic window sill with your own hands so as not to regret the work done?
How to install a window sill on a balcony if the window is already there? To do this, you need to prepare metal brackets. They are needed if it is not possible to install the structure under an existing window. Metal brackets should be secured to the parapet using anchors. These elements will help strengthen the window sill, which will lead to an increase in payloads.
The distance between the metal brackets should be no more than 1 m. Using a building level, check the horizontalness of the fastenings. Before fixing the holders, to simplify the installation process, the thread is tensioned strictly horizontally.
After the brackets are completely fixed, the window sill is installed on the loggia or balcony. It is fixed at the bottom of the slab using self-tapping screws. After completing the installation process, the structure is treated with sealant. The procedure is performed to get rid of cracks that are formed as a result of uneven edges. You can learn more about the installation process by watching the video “Installing a plastic window sill.”
Polyurethane foam is not used to fill voids after installing the window sill on the balcony
Important! When installing a window sill on a balcony, unlike installing it in a window opening, polyurethane foam is not used to fill the voids.
What place in a room or office should a printer be given?
You might say that choosing the “optimal” location for a printer in a room or office is only for those people who are into Feng Shui or other similar eastern philosophies.
But experts do not agree with this formulation of the question, arguing that in fact choosing a place for a printer is not a tribute to some traditions and is far from prejudice. Rather, choosing the right location is the key to successful operation of equipment, high productivity of employees and peace of mind for your family members when it comes to living space.
Procedure for replacing a plastic window sill
Over time, a PVC window sill may become damaged or lose its original appearance as a result of abrasions and ingrained dirt. In this case, it is important to know how to change the window sill.
Before removing the plastic window sill, preparatory measures are carried out, which are determined by the type of slopes. They can be monolithic, that is, installed using plaster, or panel-based (made of PVC plates or sandwich panels). The window sill is mounted under the slopes, so before it is removed, they must be partially or completely dismantled.
When using plastic slopes, the profile used to frame the corner is removed. Then the finishing panel is carefully opened, for which the sealant seam is first opened. Next, the mounting foam is removed from the plane of the support rails, and the junction of the edge of the structure is cleaned. This is necessary for easy removal of the window sill.
Before removing the plastic window sill, partial dismantling of the slopes is performed
If the slopes are finished with plaster, to replace the window sill of a plastic window, two horizontal lines should be drawn along the edges of the opening with a distance of 25 mm from the top of the window sill. According to this marking, trimming is carried out using an angle grinder with a diamond wheel. The process is carried out with extreme care to eliminate the possibility of damage to the frame. Using an angle grinder, an undercut is made along the plane of the wall, the depth of which is equal to the width of the protrusion of the structure beyond the slope.
Helpful advice! The installation depth of the window sill usually reaches 30-40 mm, so to dismantle the slopes you will need a circle of 180 mm.
Since the slab, with the modern installation method, is not attached to the window frame or stand profile, but is fixed using polyurethane foam, simply tearing off the product will be quite problematic. Before removing the window sill, the structure must be cut into fragments using a jigsaw. If the slab is set on cement mortar, an angle grinder should be used to separate the structure. Next, each element is removed from the seat.
If the window sill was fixed to the delivery profile, then the ebb from the outside of the window is removed. It is necessary to unscrew several screws from the profile.
If the window sill was fixed with foam during installation, tearing it off will be quite problematic
Variants of shapes and sizes of tables by the window
Any shape will highlight the overall image of a children's room. Dimensions may vary depending on the type of window and the size of the room. Ask your child what kind of table he would like to put in his room. The long rectangular one looks stylish. Place it along the window. Entrust the organization of storing things to additional racks and shelves, make them yourself or buy them complete with furniture. Built-in wardrobes will help you maintain order; they will add the right touches to the interior of a child’s room, saving space.
If the room is small, a corner or rounded one will do. The advantage of the latter is the absence of sharp corners, guaranteeing additional safety for the child. This is also an original and creative way to create a unique room design. Children like unusual things.
If there are many children in the family, a large table under the window will help to properly design the space in the nursery, providing each with an individual place. Pay attention to the curtains for the window. Roman blinds or blinds are ideal; if necessary, they can partially cover the window from penetrating light. You can use light-transmitting tulle or abandon curtains altogether.
One of the stylistic ideas for decorating a table in a children's room could be to install a work area on the balcony or attic. The main thing is that there is a lot of space there, as well as warmth and light.
The photo on the left shows an option for installing a table by a window in the attic. The table is suitable for two children, the different colors of the walls behind the shelves emphasize the individuality of each child’s area, use the corners for storing things. The photo on the right shows a corner desk installed on the balcony. Drawers of non-standard shape emphasize the uniqueness, there are shelves for storing things and toys.
The article was published on Habré back in July 2014, but does not lose its relevance.
Posted here unchanged.
In general, there are a lot of people on Habré who are well versed in printers and their consumables. But there are probably more of those who perceive the printer as a device familiar to everyone (almost like an iron) that “works and is fine.” And if this approach is still acceptable for home use, then for the office, inattention to the printer can result in significant costs (and the wrong choice of printer threatens to turn into a black hole for finances). And for a home user, it would also be nice to save a couple of thousand rubles, right? As a result of mature reflection, we decided to publish a short reminder article for printer users (the article is “tailored” for working with laser printers, there are a couple of mentions about inkjet printers, and that’s all). The article contains several tips on choosing a printer, on choosing cartridges (for now we are only talking about laser printers), plus tips on the correct operation of printers and consumables for them. We also decided to develop an application - a nice reminder on working with the printer for “accountant Varvara Germanovna” and other employees. You can print out the reminder and hang it near your printing machine.
Choosing the right printer? Challenge accepted
1. Decide on your approximate print volume: up to 50 pages per month or 50,000 pages per day.
In the first case, you will need a simple inkjet printer (don’t forget about the danger of ink drying out) or the services of printing centers (which is more economically feasible given such a volume). In general, you can deliver it for 2,000 rubles. streamer and don’t worry about it anymore. The inkjet is also justified for the constant load of high-quality (photo printing) printing. But here it’s worth looking at the situation - do you need a “hot mess” with an inkjet and CISS (continuous ink supply system), or is it easier for you to constantly work with a photo/printing studio? If your printing needs exceed 100 pages per month, we recommend purchasing a modern basic laser printer for RUB 4,000. It’s clear with a home printer, but how can you estimate the volume of printing in the office? We recommend taking the average amount of paper ordered to the office as a basis. Then, you need to decide on the number of printers per company: either it will be one large productive device in the corridor, or several basic printers in offices. But we must not forget that by installing one large printer in an office, saving on additional printers results in, albeit small, daily costs for employees’ working time. You can decide on the type of printer(s) based on the classification of printing equipment according to the recommended load: personal, small, medium and large. Personal printers have a service life of up to 5,000 pages per month and are designed for home or office use with small print volumes. Most inkjet printers/MFPs (multifunction devices) and simple laser and LED printers/MFPs fall into this category. Small equipment is MFPs and printers that can print from 5,000 to 10,000 pages per month. This is the most common class of devices, it is used in small offices or in separate rooms. Mid-range printers print between 20,000 and 50,000 pages per month. Such devices can be placed one at a time in a large office; the feed trays allow you to make a significant supply of paper for intensive printing. Large office equipment is capable of printing over 50,000 pages per month without loss of performance. Such devices are close in performance to mini-printing houses and can be used to print small quantities of brochures. If the speed of printing documents is important in your office, you need to understand that the higher the class of the printer, the faster it prints.
Methods for restoration and repair of plastic window sills
With prolonged use, the slab loses its original appearance. The surface becomes very dirty, scratches and cracks may form on it, marks from hot objects, flower pots, stains from exposure to chemicals and sunlight.
First of all, the question arises of how to clean stains from a plastic window sill. To do this, you can use conventional detergents and cleaning products, but they do not always bring the desired result. In this case, it is not necessary to change the design to a new product. You can explore several ways to update a plastic window sill.
The PVC product is covered with a protective film, which turns yellow or peels off over time. To eliminate such a defect, you can use a special wax for laminate flooring or a solvent-based cleaner for plastic. The surface is coated with the selected composition and then wiped with a dry soft cloth.
An excellent way to update a plastic window sill is restoration using a PVC lining
To restore a window sill that has small cracks and scratches, you can use specialized mixtures with a plastic effect. They are sold in powder form. After drying, the material acquires the same properties as plastic. A thick putty mixture is prepared from powder and water, which is used to seal all visible defects.
Helpful advice! To achieve maximum effect, it is recommended to use a primer instead of water when preparing the finished composition.
The prepared solution is applied to visible damage. After this, you should wait 10-15 minutes and sand the sealed areas with sandpaper, and the surface can also be polished with a special product for plastic.
To repair deep scratches, it is better to use liquid plastic, which penetrates the pores of the material and sets quickly. To ensure that the restored surface has a uniform texture, it can be additionally covered with self-adhesive decorative film.
To eliminate minor defects, you can use a special wax for laminate flooring.
How to make a window sill from an old slab and give it an aesthetic appearance
A simple and affordable way to restore a plastic window sill is to cover the surface with laminated film. The material is presented in a wide range of colors, in a single color design, and it can also imitate a variety of textures.
The surface is pre-leveled using a putty mixture. The film of the required size is cut out with a margin of 3 cm at the edges. After removing the inner layer, the self-adhesive product is evenly distributed over the entire surface, eliminating the formation of blisters or waves.
Another option for solving the question of how to update a plastic window sill is to restore it using a PVC overlay, which can be used for slabs no more than 6 cm thick. This is a simple and economical way to quickly solve the problem of a swollen or cracked window sill. The lining is made of pure polyvinyl chloride, which is characterized by strength, moisture resistance, and resistance to ultraviolet rays.
Restoration begins with filling large cracks with glue, after which it is necessary to degrease the surface and spread it with an adhesive composition. An overlay of the required size is applied to the window sill and pressed with a weight. The surface must dry for 6 hours. The end edge is heated with a hair dryer and bent to the shape of the window sill.
Important! When using a glossy or laminated overlay, heat treatment is not used, as the product will lose its attractive appearance.
Installing a window sill under a plastic window is a simple task. However, to achieve a good result, it is important not only to choose the right product, but also to follow a certain algorithm for carrying out installation work, which will be the key to high-quality, durable and aesthetic window design.
Printer won't print [solution]
I think I won’t surprise anyone if I say that one of the most important office devices is a printer...
And quite often (especially when you need to print something urgently) the printer produces “pirouettes”: it seems to have sent the document to print, but it does not react at all. Or perhaps it just “buzzed” for 10-15 seconds. and then fell silent, as if nothing had happened...
The refrigerator itself can suffer significant damage, including complete damage.
When a heated object is placed in a refrigerating chamber, the vapors released turn into ice crystals, condensation begins to settle on the walls of the unit and a layer of ice quickly forms. Ice quickly covers the evaporator opening.
Kitchen sink
If you look at photographs of kitchens in foreign apartments and especially private houses, you will notice such a technique as placing a sink under the window. For Western countries, this is a fairly popular design solution, even if there is no need to expand the usable area. For Russia, such a location for placing a sink is unconventional, since, as a rule, a radiator is installed under the window.
But in recent years, and in our latitudes, installing a sink instead of a window sill has become a trend in kitchen design in private homes. In apartments this is more difficult: you will have to transfer communications. However, everything can be solved if competent specialists are involved in the work.
How to clean a coffee machine
Descaling products . If tap water has an increased hardness level, then it will not be possible to avoid lime deposits on the heating elements. Calcium and magnesium present in the water settle on the surface of the heating elements, slowing down the boiling process and gradually destroying the heaters themselves. This can be understood by the following signs:
- The coffee begins to flow from the cup in a thin stream, sometimes with pauses;
- The device operates louder and sometimes begins to hum or rattle;
- At the bottom of the cup you can see a whitish fine sediment;
- The cappuccino foam is not as fluffy and takes longer to whip up.
Leading manufacturers offer to combat this scourge with specially developed products - tablets, powders and liquids for decalcification, like 500ML-ECODECALK from Delonghi. They do not interfere with the technical and electronic systems of coffee machines, and the results are usually excellent. The table will help you compare funds:
Cappuccino maker cleaner. Even with regular flushing of the cappuccino maker system, the outlet tube may become clogged: for example, when using stale milk. Clogged tubes can be cleared with special liquid formulations or tablets that will remove remaining milk fat and other contaminants from the system. If cappuccino is your favorite and frequently brewed drink, it is better to perform these operations at least twice a week.
Coffee fat removers . Despite the fact that many models are equipped with a self-cleaning function, it is necessary to periodically clean the pipeline from oily coffee deposits. These can be powders or tablets, for example, PHILIPS CA6704/10. Typically, the manufacturer recommends using products from their brand - they are designed for the design features of the machine and provide the best results.
Coffee grinder cleaning products. Prolonged operation of grinding beans leads to the settling of coffee dust particles mixed with coffee oils on the grinders of the coffee grinder. This mixture gets clogged inside the mechanism, lengthening the time and reducing the grinding quality. Therefore, it is worthwhile from time to time to pour a special powder into an empty coffee grinder, which quickly eliminates oil deposits and sticky mixture in the inter-tooth space of the mechanism.
Library
The place on the windowsill is perfect for storing books. Here you immediately have daylight lighting and a sofa nearby. And if the window sill is wide, then you can lay a warm blanket on it and relax, enjoying your next novel.
The window opening and the space around it can and should be put to good use. Determine what is more important - decor or rational use of space, etc. act!
Tabletop
If there is not enough space in the kitchen, the work surface can be expanded by removing the window sill and placing a countertop instead. The result is a comfortable cooking area with maximum natural light and the opportunity to contemplate the scenery if there is a beautiful view from the window. A simpler option is not to remove the window sill, but to add a tabletop to it and finish the surface with the same material.
If space allows, you can place some small cabinet or shelves under the window sill-countertop. You can also send household appliances there: an oven or a dishwasher.
Choice
Before choosing shelves for your printer, you need to take another look at the interior. It is important to take into account the size of the room, design, and the presence of additional shelves for other items. It is possible that there is already a place where the equipment could fit.
It is also necessary to pay attention to the type and model of the printer. The size of the future space for storing it depends on its size.
If there is a window sill, such a place will be easy to equip as a future location for the printer.
If you want to hide your equipment, then it is best to choose various types of baskets and place them near your desktop. When space allows, the printer is hidden in a wooden box.
An interesting option would be a table on wheels . The printer is placed on it and moved around the room to the most suitable corner.
Bar counter
There is never any extra space in the kitchen, and in small apartments it is absolutely tiny. Because of this, there is almost no space left for the dining area and often you have to literally squeeze past the table, trying not to hit the furniture. You can free up space by making the window sill a bar counter. Width doesn’t matter: even a narrow surface will fit a couple of cups and plates. You just need to add high chairs that match the style of the kitchen interior - and the bar counter is ready. And with a sufficient width of the window sill, you will get an almost complete dining area.
Comments: 28
Marat Davletshin
Katerina, what’s not to like about the “table for Sasha” option in your ideas?))
- Like | 1
- Save
Katerina Dorofeeva
“A table for Sasha” was chosen for MCH 18 years old, taking into account the fact that there are additional wardrobes in the room. Now, in a new apartment, a table is required for a schoolchild who needs a lot of space in the center of the room (athlete). I really liked the idea with that table (thank you very much for reminding me, I myself had already forgotten that I saved it), but I need to insert additional cabinets somewhere for books, a printer, etc., at the same time, it didn’t “make it heavier” space. Although. if you add more drawers at the bottom.
- Like
- Save
Laptop overheats - what to do first?
If possible, it is advisable to immediately take the laptop for repair.
The technician will carry out diagnostics in the shortest possible time, determine the cause of the malfunction and explain it to you. Then he will repair or clean, and at the end he will give useful recommendations for further use and answer questions. According to the experience of our employees, the main reason why a laptop overheats is dust. Remember that cleaning should be done regularly, even if there are no visible signs of problems. Dust is destructive for any equipment; it prevents coolers from rotating during operation, clogs contacts on boards and prevents proper heat dissipation outside the case.
Don't forget to say "Thank you", "like" or repost to the author:
Storage system
Most often, window sills are used as a place to store various small items. It looks ugly and adds a touch of clutter to the interior, even if all other things are in their place. Why not develop the idea and equip a full-fledged storage space? Under a wide window sill you can stack several beautiful baskets with lids or a bedside table on wheels.
A more advanced option is to equip built-in shelves or a chest of drawers, made to order according to individual sizes.
The place of a desktop computer is on the table, oddly enough, for some this may be a revelation
First, let's take a look into the past. Hot 90s, black cash, gloomy faces, an accountant's heart attack, a director tied to a radiator and a smoking soldering iron... They are interested in what's under the table. And under the table is the system unit. Dirty and dusty, of indeterminate color with a broken disk drive. With traces of kicks - both from the accountant and the director. MS DOS and password as the price of life and death...
Pinch yourself, we are here now, in 2020. There are no more criminals cleaning offices straight from the train station. No more dirty system units on the floor. Or is there?
Okay, enough of the lyrics. Let's turn to the main argument, which is called by 99% of sexual computer keepers.
This is called "no room." Something from the series - my table is family and hereditary, it is strictly 50/50, work is not done on anything else and games are not played. So, it only fits a monitor, keyboard, mouse and a set lunch, so the system unit has a place only there, in the kick zone. The arguments are all at about the same level; I have a lot of experience communicating with “floor workers.”)
Some people say: so what if there is more dust? If the computer becomes clogged with dust, I will kill my wife. And others like it and add - I’m such a fat person that I can’t reach the USB port on the table. And still others are generally “philosophers”, they say this - why look at it, a computer should be an ugly black box, it should be disgusting to look at it. And the fourth ones add it nicely - and I like to put a cup of coffee on it so that it doesn’t get cold.)
The first wish is to give such people a link to the catalog of tables or shelving from the Ikea store. It's cheap, beautiful, practical, humane in relation to the PC. But I think this will not help, because it looks like a conscious choice to live in chaos - a floor PC, dusty carpets, brown lacquered furniture, yellow wallpaper, dim lighting, a screaming wife, crying children...
Ugh... it would be better back in the 90s, in general, the vest was not useful, the director paid in cash, the bald visitors took the system and handed it over at the station for a bottle. A few years later, the son of a station huckster took it to the Savelovsky Bazaar. And there they told him:
- Dust is evil.
- Storing on the floor is the death of your computer.
- You must love your Desktop Computer - and never make it a floor-standing computer.
Now, dear girls and boys, you know that only very stupid, bad and unscrupulous uncles and aunts keep their Desktop Computer on the floor.
For those who still don’t read well, look at the picture - this is how it should be (approximately):
Place for pets
Many animals love to look out the window, and cats are especially keen on contemplation. For fluffy purrs, you can create a cozy place on the windowsill by upholstering the surface with soft material. An easier option that does not require special work: just lay a bed or cover it with a mattress. In addition, part of the window sill can be allocated as an area for sharpening claws and covered with a special material. Or install a scratching post on the side of the window. And for dogs, you can make a comfortable place under the windowsill by arranging a mini-house with a bed.
Useful advice from Novate.ru: If the window sill is so narrow that it is uncomfortable for the cat to lie down, but there is no opportunity to remodel the window opening, then you can buy a special hanging lounger. It is securely attached to the window sill, expanding its area, and installation is not difficult. There are similar designs for balconies - the kit includes one large shelf-lounger and two small ones, installed as steps for lifting a cat. Please note that installation of such stands is only possible on glazed loggias and balconies, otherwise the animal may be harmed when trying to catch a flying bird.
And when the window sill is combined with a loggia, even better! Then there are your own bold ideas for kitchen design combined with a balcony or loggia.
Did you like the article? Then support us, click
: