The features of each element of the bathroom should create a unified interior of the room. This point is thought through at the stage of creating a design project.
If you need to install a heated towel rail in the bathroom, many questions arise: which heated towel rail is better, where and how to do it? These questions are especially relevant when decorating a small bathroom. Every centimeter is precious, but you don’t want to lose functionality.
Therefore, when organizing the bathroom space, it is important to take into account the main functions of heated towel rails, namely:
- Heating of the room;
- Drying wet towels;
- Protecting the room from mold and mildew;
- Additional hanger.
Let's talk about the features of placement and connection of these important bathroom elements.
Standards for placing heated towel rails
The existence of certain norms and SNiP requirements limit the methods and possibilities for installing heated towel rails.
Important conditions for placing heated towel rails:
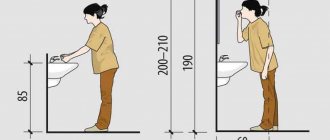
- The lower part must be at least 90 cm from the floor.
- During installation, it is necessary to maintain a distance of at least 60 cm from other plumbing fixtures.
- The installation spacing of heated towel rails is at least 90 cm.
- The heated towel rail can be installed above a horizontal loading washing machine so that the lid does not touch any parts of the heated towel rail.
Calculation of the convenient and functional placement of the heated towel rail must also be carried out taking into account the type of its connection. Let's consider the installation features of existing options: water, electric and combined heated towel rails.
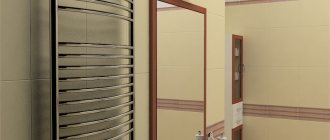
Plasterboard box
To hide the old heated towel rail, you can use moisture-resistant plasterboard. The manufacture of the box is carried out in the following sequence:
- level the wall near the coil using putty;
- prepare box templates and cut the material;
- fasten the frame parts with self-tapping screws;
- cover the front part with a single sheet, having previously made ventilation holes in it, or install a ready-made grille that will provide access to warm air;
- fix the profile to the wall using European screws or dowels;
- putty the heads of the screws and cover the edges of the box with plastic corners;
- paint the box.
The finished box should not fit tightly to the pipes; to do this, leave a gap of at least 3 cm wide.
A heated towel rail is a useful and convenient device that needs to be maintained in perfect condition.
iarriba
Features of installation of heated towel rails
The main parameter of a heated towel rail is its size. The heating capacity of the room and the number of towels placed on the product depend on it.
The size of the heated towel rail is selected based on the area of the bathroom. A large heated towel rail will not fit in a small room; a small one will not make sense in a spacious one. However, even an ideally selected heated towel rail size has placement features related to the type of connection.
Water heated towel rail
The functioning of a water heated towel rail depends on the central water supply or heating system. The height and type of connection of the heated towel rail must be calculated based on the location of the main communications.
Connecting a water heated towel rail can be:
- Lateral. Connection to the hot water riser on the left or right. When connected, it does not violate the integrity of the design, so it can be carried out after finishing work.
- Diagonal. Ensures good water circulation in the heated towel rail. This is especially true for systems with low pressure.
- Floor-standing. Relevant for spacious rooms where there is enough free space on the floor. Can use a collapsible connection system to the main pipe.
Electric heated towel rail
If you decide to buy an electric heated towel rail, pay attention to safety precautions when connecting it.
Installation of electric models does not require intrusion into the water supply system. But dependence on electricity imposes its own nuances. The location of the electric heated towel rail depends on the location of the waterproof socket.
Also, to prevent emergencies you will need:
- Installation of an automatic shutdown device;
- Careful grounding of contacts;
- Ensuring maximum ventilation of the room.
Most often, the bathroom layout does not include sockets. Then to install an electric heated towel rail you need:
1. Create additional wiring with protection from moisture and the necessary rubberized seals. It is important to remember that condensation accumulates on a cold wall, a drop of which can lead to a short circuit.
However, an electric heated towel rail is available upon request. There is absolutely no need to keep it on all the time. Then you can use the following installation item:
2. Route the power supply cable outside the bathroom, with or without decoration. Design involves cutting a tunnel for the cable in the wall or placing it in a special box.
In any case, the location of the outlet should not be closer than 70 cm from any pipes and other plumbing items.
The power supply cable fastening is most often located at the bottom of the device. The power button is also located there. If you decide to buy an electric heated towel rail with a thermostat, pay attention to its placement, which also imposes restrictions.
Combined heated towel rail
Placing combined heated towel rails is the most difficult of all existing types. Here it is necessary to take into account the location of both the pipeline and the outlet. It is also important to track the distance from the floor and from other elements in contact with water.
All existing requirements and compliance with installation features lead to the safety and comfort of using the bathroom. Combined heated towel rails cope with the assigned tasks perfectly. But when choosing such a heated towel rail, pay attention to the presence of shut-off valves to block the water circulating through the device.
Types of towel dryers
So, all wall-mounted bathroom heaters are divided into 3 types:
- Electric, operating from a 220 volt network. There are 2 types - with a heating cable inside or a liquid coolant and a heating element. Both options connect the same way.
- Water heated towel rails are connected to the hot water supply or heating system.
- In combined double-circuit devices, heat transfer is organized from 2 sources - electricity and the hot water supply network.
Note. The design of combined dryers is quite simple. The heater consists of 2 separate circuits - electric and water, which can operate simultaneously or alternately. Accordingly, the price of universal heated towel rails is 1.5–2 times higher.
The principle of operation of electrical appliances is as follows: the heating element or cable heats up to a given temperature, then the thermostat turns off the power. After the tubular body has cooled by 3–5 °C, heating automatically resumes. In heating element dryers filled with non-freezing liquid, air is discharged through the Mayevsky valve.
It’s easier with water dryers - they warm up to the temperature of the coolant flowing inside. The body is made of stainless or black painted steel, less often - of copper. Shape – in the form of a ladder, a coil, E-shaped, M-shaped. Since we are considering purely the installation of a heated towel rail, the shape and material do not play a big role, the only thing that matters is the connection method - side or bottom.
Location rules
Water devices for drying towels are installed near the hot water riser or heating pipe running between floors.
Shut-off valves cannot be installed on the coil; only a Mayevsky valve is allowed to bleed off excess air. The pressure in the water pipe is checked; the connection is not made using “American” pipes with a union nut and narrow fittings. Electric dryers are connected according to two schemes:
- with open wiring;
- with closed cables.
The second method is safer because the cable is enclosed in protective sheaths and in the wall. The open version is represented by a wire that extends over the wall from the outlet to the device.
Installation recommendations
The heater should be installed after finishing the finishing work - laying tiles, covering with plastic panels or other material. If an old coil is replaced with a new heated towel rail, first dismantling is carried out, repairs are made (if necessary), then installation and connection are made.
Large vertical appliances can be placed at a height of 15 cm from the floor, as shown in the drawing. It is better to lay supply pipelines hidden, at an angle
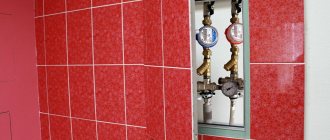
Comment. Hidden piping to the water heater is carried out before finishing begins (see photo above). The technology is standard: we use a grinder to cut grooves in the wall, the width is equal to the diameter of the pipeline plus polyethylene foam insulation. Then we lay the connections and install water sockets or simply bring the threads out.
Let's give some tips on how to properly place a heated towel rail in the bathroom and mount it on the wall:
- Try to place the water dryer closer to the riser if you plan to connect to the hot water system. When connecting to heating, the placement of the heater does not matter.
- There is a standard requirement for the installation of an electrical appliance - the minimum distance between the socket (wiring) and the edge of the bath (sink, shower) must be 60 cm.
- At what height should you hang a heated towel rail? There are no clear requirements here; the optimal distance from the floor lies within 900...1200 mm. Select the height based on ease of use. The exception is electric heaters, which are installed no lower than 60 cm from the floor covering.
- Always read the installation and operating instructions for the product. The manufacturer will definitely provide a drawing with dimensions and indicate all technological indents, if any are required.
It is advisable to mount wall-mounted rotating models closer to the corner of the bathroom
- It is allowed to install a dryer above a washing machine. If the latter is loaded from above, then the electric heater should not interfere with the free opening of the lid.
- To hang the coil on the wall, use standard decorative brackets and dowels. An exception is installation on drywall or a partition made of porous materials; special fasteners will be required to support the weight of the heated towel rail.
- When marking holes, try not to get into the seams between the tiles; it is better to step back 0.5–1 cm from the edge. Otherwise, the cladding may crack during the drilling process.
- An electric drying device must not be placed directly above the bathtub.
The pros and cons of hiding pipes in the bathroom
There are positive aspects to masking pipelines:
- the interior of the room is improved, communications become inconspicuous or not visible at all;
- with hidden installation, the space of the room is not taken away;
- camouflage with furniture creates a beautiful interior, places for convenient storage of various small items.
Negative points:
- Poor installation or materials lead to leaks and breakthroughs.
- Access to the pipes is limited, except for the option with roller blinds.
- In the event of an accident, the structure must be disassembled, in some cases without the possibility of restoration.
- Severe pipeline leaks during hidden installation are not immediately detected. You may have to make repairs not only for yourself, but also for your neighbors.
- Even moisture-resistant furniture in the bathroom lasts less than in dry rooms.
Despite the negative aspects of camouflage, you should not give it up. A competent approach to installation will ensure reliable operation of the system.
Connecting an electric heater
Installing an electric dryer is the simplest solution for apartments or private houses where recirculation of the hot water supply line is not provided. A heated towel rail with a power of up to 500 W can be installed at any allocated electricity limit. The installation is carried out independently, fortunately, you don’t have to lay pipes and cut into risers.
To connect the heater with a plug, you will need additional components:
Reference. PUE standards clearly require connecting sockets in bathrooms through a residual current device - RCD. If the line is already connected and powered through a differential circuit breaker with a leakage current of 30 mA, then a regular socket is installed. Its amperage is calculated using Ohm's law: divide the dryer's power in watts by 220 volts.
How to properly connect an electric heated towel rail in the bathroom:
- We draw a route on the wall from the distribution box to the point where the outlet is installed. An important point: placing the electrical box in the bathroom is prohibited, only in the adjacent room.
- We use a grinder to cut through the groove and the socket. We lay the cable and install the socket box.
- We connect the wires to the electrical network in the junction box. We remind you: the 3rd core of the yellow cable is grounding and must be connected.
- We close the furrow and install a socket. We hang the heated towel rail after laying the tiles.
If the walls of the bathroom are already tiled, conduct the wiring in a different way - from the next room. At the point where the socket is installed, drill through the partition and insert the cable laid in the wall of the adjacent room into the hole.
Some heater models are not equipped with a plug and are connected directly to the cable. There is no need to install a socket, but a 30 mA RCD is required. Step-by-step assembly of the heated towel rail with all fittings and installation of the heating element is shown in the video from:
Connecting a water heated towel rail
When installing a drying coil, 3 connection schemes are used:
- In apartment buildings - to the riser of the hot water supply system. There is a delicate moment here: in order to cut into a common pipe, you need to turn off the water to yourself and all your neighbors on the riser. You may need approval from your local Vodokanal.
- In a country cottage - to the hot water recirculation line coming from the indirect heating boiler.
- If there is no hot water storage tank or recirculation line, the heated towel rail is connected to the heating system. Minus: in summer the coil does not heat up.
How to ensure summer heating of a dryer connected to water heating. There are 2 options to solve the problem: buy a combination heater or leave the gas/electric boiler on. In the second case, you will have to leave 1-2 batteries in operation, otherwise the heat generator will “clock.” So it’s easier to switch to electricity or dry your clothes outside.
The water dryer is connected to the DHW riser by two connections, and a bypass is installed between them without any shut-off valves. The minimum center-to-center distance between inserts is 300 mm. It is not worth narrowing the diameter of the bypass line, but moving it to the side by 10...15 cm is quite acceptable. The minimum diameter of the connections is DN20 (internal), or better, according to the size of the riser.
If the heated towel rail is connected to the DHW recirculation pipe of a private house, then there is no need to install a jumper. Let all the water pumped back into the boiler by the circulation pump pass through the coil as shown in the diagram.
How to make the correct pipe connections and connect a heated towel rail with your own hands:
- Lay the liners in the furrows of the walls with a slope of 2...3 mm per 1 linear meter. The upper supply line slopes towards the dryer, the lower - towards the riser. As a result, the first insertion point will be above the coil, the second - below.
- Horizontal type heaters with side connections are connected simply - a threaded fitting is removed from the wall, an American or adapter coupling (supplied with the product) is screwed onto it. Shut-off ball valves are placed on the connections near the riser.
- A vertical ladder-type heated towel rail can be connected using a diagonal or bottom connection. If possible, implement the first option to minimize the risk of airing.
Video description
From the video you can learn how to connect a dryer at a great distance from the riser:
How to properly connect a heated towel rail to a hot water riser using fittings:
- The taps are installed between the pipes and the dryer. If there is already a thread on them, then it is worth correcting it with a die to ensure a tight connection.
- It is important to secure the fittings correctly here. They are prefabricated, so there is a seam on the body. It should be directed in the direction of the flow.
- Flax is used for compaction.
- The final fixation after manual tightening is carried out with a key ¼-½ full turn.
If you violate these simple rules, a leak will soon appear, a seam will rupture, or a nut will burst.
The last thing you need to do before launching the system is testing. To do this, turn on the riser for a short period of time. This will be enough to determine the tightness of the structure. If everything is in order, then you can put the heated towel rail into operation. Otherwise, eliminate the deficiencies and repeat the test again.
Leak detected during system testing Source www.tproekt.com
Finally about combined dryers
A double-circuit heated towel rail perfectly solves the problem of seasonality when connecting to home heating. During the cold season, the water circuit is heated; at the end of the heating season, you can turn on the second electric coil. The mounting of the device is quite ordinary - on brackets, the connection is made immediately to 2 networks - electrical and heating.
If it is necessary to change the old Soviet coil in an apartment, then the new one does not have to be installed in the same place and connected to the existing fittings. It is very advisable to replace the riser - it is probably “overgrown” with rust. Choose a suitable location for the heater, sketch out the connection diagram and install the heated towel rail according to the new requirements.
A comfortable environment in the bathroom can be created by many little things that are in perfect harmony with each other. One of these components is a heated towel rail. It allows you to maintain cleanliness and comfort in rooms with high humidity.
An incorrectly executed insert can reduce heat transfer and disrupt the hot water supply in the entire multi-storey building.
When installing a heated towel rail with your own hands, it is not recommended to use parts made of different metal alloys. In the future, this will lead to the appearance of electrolytic corrosion.
Next to the sink
A heated towel rail next to the sink is a functional solution for a small bathroom. Firstly, everyone uses the sink many times a day (especially in the current pandemic conditions). Therefore, dry towels should always be at hand. As a rule, even in small bathrooms there is a little space next to the sink - you can hang a compact vertical device there.
Water device installation process
The first step is to assemble it correctly. Next, it is important to follow the basic rules for installing a heated towel rail. Shut-off valves with detachable connections are installed on the supply line. In the future, they will ensure the smooth replacement of the old model with a more modern one.
Installation of a bypass using pipes and special tees. Here you will need three additional valves. Two of them are installed at the top and bottom of the heated towel rail and one on the pipeline itself to stop the water supply.
The final step will be to fill the device with water from the central water supply system. To do this, open all three taps.
Which pipe elements should not be masked?
The operation of the system is not immune to failures. To repair pipelines, inspection hatches are left to provide access to elements where problems may occur. These include places:
Metal pipes can be completely covered under tiles.
- with threaded connections, taps;
- with fittings that need to be tightened;
- corner type connections, tees, crosses, where there is a high probability of leakage;
- where counters and filters are installed.
Metal or plastic pipes without threaded or welded joints can be completely covered under plaster or tiles. Then the likelihood of a leak is reduced to zero, and you won’t have to break down the walls to fix the problem.
Installation of a combined model
Installing an electric heated towel rail requires special efforts. The main advantage of this installation is the continuous heating of the dryer at any time of the year. In addition, you can adjust the temperature here.
During the repair work, it is necessary to carry out additional wiring from the pipeline. This will save energy consumption in winter. At the end of the heating season, the electrical network is used.
The height of the heated towel rail from the floor should be from 65 to 100 cm. The higher the drying position for small items, the greater the heat transfer of the device.
As you can see, installing such a system requires special knowledge in the field of electricity. Photo installation instructions help to perform installation work correctly.
