The construction industry is developing along the path of simplifying and speeding up work, as well as improving the quality of building materials. Heavy and bulky buildings are being replaced by easily erected structures created from standardized elements.
This trend can also be seen in the field of construction related to facades. A lightweight and reliable frame with durable cladding – this is the look of the modern façade of residential, public and industrial buildings.
Curtain facades are divided into two types:
- Regular. There is no air gap between the facing material and the wall (or insulation). This method is rarely used due to unsatisfactory performance characteristics.
- Ventilated. Between the facing material and the wall (or insulation) there is a ventilation gap 40-100 mm wide through which air circulates.
Various materials are used for cladding: metal, wood or plastic siding, profiled sheets, composite cassettes, ceramic granite, natural stone.
Different materials serve different purposes, but for simple and reliable façade finishing, preference is given to attaching metal siding to a metal profile.
Installation
The frame for siding is a simple structure, so it is quite possible to make it yourself.
The following step-by-step instructions will help them with this: Sheathing a house with siding begins with the installation of a frame subsystem; it must be carried out on carefully prepared walls. To do this, the external surfaces should be cleaned of dust, plaster or paint residues. Then all cracks are sealed with cement mortar. If an additional heat insulator is installed, then the protrusions are removed from the walls, the deep depressions are plastered, the platbands are removed from the windows and the slopes are knocked down. There should be a clear and accessible surface around door and window openings. After the base of the walls is ready for work, you can install the sheathing itself. This must be done in a certain order: first you need to mount the frame profiles, then attach the sheathing to them. If you need to sheathe a wooden surface with siding, then it is treated with antiseptic agents that protect the wood from mold and mildew. Next, the surface is marked for mounting the frame. Lines are drawn along the base in the form of a lattice; they will later serve as a place for attaching hangers. Profiles and beams are prepared and painted to the required length. Installation work with the frame. Fastening the elements can be done in different ways, everything depends not only on the features of the wall, but also on the type of sheathing. The beams are usually fixed to a wooden surface without the use of fastening systems. According to the prepared markings, first of all, horizontal and vertical elements are filled, then jumpers. Fastening is done using screws and nails.
Installation should begin from the base area, which protrudes above the surface of the walls
For brick and concrete walls, it is best to choose sheathing made of metal profiles, which is fixed with brackets. Fastening is usually carried out on steel angles or hangers.
Installation is carried out strictly according to the markings, bending the suspension in the form of the letter “P”. The frame platform is fixed to the wall with dowels, and the profile with self-tapping screws.
The installation of frame profiles begins with fastening the starting strip; it is mounted along the entire perimeter of the building at a height of 50 mm from the ground. In this case, you need to leave a small gap of 10 mm between the ends of the plank and take into account the fixation of the outer corners, which are set vertically and fastened with dowels at a distance of 90 cm. An important point in the work will be the edging of the openings, the accuracy of the cladding will depend on it. Window openings are trimmed with a special profile, and doorways usually have a recess that forms a vestibule, so internal corners are simply installed for them, and the outside is finished with a plank. If the wall exceeds 32 cm, then it is usually covered with additional strips.
Stage 8: completion of the supporting frame
At the final stage, the finished structure is framed in areas of window and door openings . The sheathing frame is not connected to these elements, however, the installation of siding elements in this area will inevitably interact with both the supporting frame and the framing.
The finishing of the openings is carried out with the same corners and profiles.
The main problem is making joining sections, which may require cutting elements at an angle .
Further fixation is carried out using the same hardware. Return to content
Fourth step: Installation of platbands.
There are three systems for framing openings:
- Window or door flush with the wall.
In this case, you can use a J-bar
It is important to make the connections correctly at the corners
- Install waterproofing.
- Install two vertical J-straps or trim on either side.
- Fix the profile horizontally over the opening with a minimum of 6 cm beyond the frame. from each side.
- Connect the slats using the following method: cut a strip at the bottom of the horizontal profile and bend it down, make a 2cm cut on the side of the vertical slats. and cut at an angle of 45 degrees. top part.
- Fasten the top and side elements.
- Attach the bottom rail in the same way, but make the strip on the vertical elements. You need to make strips so that they cover the sheathing joint, protecting against moisture penetration inside.
- Openings with slopes no more than 20 cm.
Finishing should be done around window trims or platbands.
- Install finishing strips around the entire perimeter.
- Install the top and bottom profiles first, then the side ones.
- Make connections as described above.
- Openings with deep slopes.
They are usually finished with siding. A flexible ebb is installed on the inside.
- Attach inner and outer corner panels around the perimeter.
- Install siding between them.
Fifth step: Attaching the first panel.
The general rule of fixation is that the siding cannot be tightly nailed or pulled; gaps are required for temperature changes in size. It should be fixed in increments of 30-40 cm.
- Insert the first panel into the corner piece and the starter bar lock. There is a 6 mm gap between the panel and the bottom edge of the lock. (When installing in the cold season, leave 9 mm.).
- Attach the siding to the sheathing.
Extension can be done:
- The overlap is 2.5 cm; to do this, shorten the fastening strips and panel locks.
- H-profile - performed in the same way as joining corner strips. Leave a gap of 3 mm to the soffit; in relation to the starting strip, lower the profile by 6 mm. The same gap remains around any structures protruding from the wall.
Sixth step: Installation of siding.
- Install the remaining panels in the same way as the first.
- Check the level every 2-3 rows.
- When installing siding around openings, trim as necessary. At the bottom of the window, fix an additional finishing strip to level the surface of the trim.
- Fasten with “hooks”.
Seventh step: Cladding under the roof.
The finishing strip is attached under the roof structure:
- Measure the distance between the lock of the penultimate panel and the bottom line of the lock of the finishing strip, retreat 2 mm.
- On a separate panel, cut off the top locking module.
- Make hooks on top at a distance of 20 cm from each other. Bend the cuts to the outside.
- Insert the trimmed siding into the penultimate panel and snap the finish locks into place.
DIY home decoration
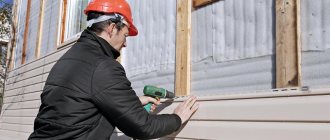
Professionals in the field of building cladding will complete the work much faster than the average person, but it is so interesting to try your hand at all areas of construction, especially if the house was built with your own hands.
Installation of siding begins with the preparatory stage, namely cleaning the walls from overhanging elements. Everything needs to be removed - drainpipes, trim, shutters. Then precise markings are made according to the building level and the building is sheathed using a thin beam. They are attached to a wooden house with self-tapping screws, to a brick or stone house using a hammer drill using dowels.
After this, the rest are attached - in the corners and for cashing doors and windows, you need to set the j option. In this case, it is necessary to leave a small distance to the lower and upper edges of the building, since the profiles can be cooled or heated and either shrink or expand due to temperature changes. If the latter happens and the product rests on a hard surface, then it may crack and burst, and this will lead to deformation of the entire cladding. It is better to fasten the profile to the wooden casing with press washers, since when using nails, a hammer can also damage the material. They need to be slightly loosened so that the gap allows the product to move easily when the temperature changes.
The correct installation of j profiles for doors and windows is as follows: first attach the vertical strips and only then the horizontal ones. At both ends, the upper material is bent and placed on the vertical ones.
All preparatory work has been completed and only now the installation of siding panels begins. First the bottom one, which will close the starting profile, and then the subsequent ones. They are inserted into the products and snap securely, and are also fixed with press washers. One of them is pushed into the oval slots of the panel in its center, which is also not screwed in, as in the case of fastening profiles.
The j type is mounted under the roof slopes, and the starting type is mounted on the eaves. Work continues, as with the cladding of the house itself. The panels can be overlapped, but it is better to use an H profile.
Types of lathing
Let's move on to installation and start with choosing the sheathing. The sheathing is made from:
- wooden beams;
- profiles for fastening drywall;
- metal U-shaped profiles for siding;
- plastic structures designed for the installation of vinyl and acrylic panels.
Before installing the sheathing, inspect the surface. If there are cracks, crevices and other defects on it, they need to be repaired. If the old cladding is crumbling (for example, paint or plaster), it must be removed. If there are strong differences and unevenness on the walls, they should be smoothed out. Otherwise, the geometry of the wall will be disrupted and the siding may crack or deform.
After eliminating the unevenness, you need to treat the walls with a protective coating. To protect the walls of a wooden house, use an antiseptic and a fire retardant: the first will cope with moisture and rot, the second will prevent fire. Treat concrete walls with a deep penetration primer. It will prevent the appearance of mold and mildew.
Wooden sheathing for siding (photo No. 5)
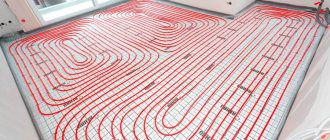
The sheathing is mounted perpendicular to the siding panels. In other words, if you want to lay the siding horizontally, then the sheathing frame must be made vertical. And vice versa. The step between wooden beams or metal profiles should be 30-50 cm.
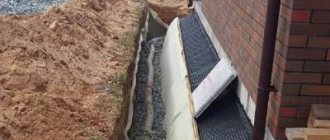
Hydro-wind insulation is laid under the sheathing. It protects the building from wind and moisture. Thanks to the presence of the lathing, a ventilation gap is formed between the walls of the house and the finishing panels. The gap prevents the appearance of condensation harmful to the walls and cladding. To keep the house warm, you can lay insulation between the sheathing. For this purpose, mineral wool and expanded polystyrene foam are used.
Let's take a closer look at each lathing option.
Wooden sheathing. It is made from beams 4 cm or 5 cm thick
When choosing beams, pay attention to the smoothness of the surface and the absence of cracks. Before installation, you need to dry the wood and cover it with solutions that protect the wood from rot and fire.
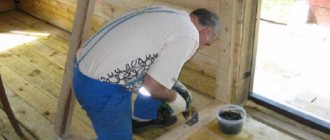
If you are faced with the question of how to attach siding to wood, then there are 2 options: with a screwdriver and self-tapping screws or with a hammer and nails.
Metal sheathing of walls and plinth (photo No. 6)
Profile for fastening drywall. If the goal is to save money, then profiles for interior work are used to install siding. Most often, sheets of plasterboard are attached to such structures. Manufacturers do not recommend using drywall profiles outdoors. Due to the thin zinc coating, corrosion occurs on them when exposed to moisture. They are intended for indoor use and are not suitable for attaching siding.
Metal U-shaped profile. To attach the siding, a durable metal profile 1 mm thick is also used. This design is more reliable than lathing with a plasterboard profile, but will be more expensive. If you use heavy cladding panels (for example, basement or metal siding), then you need to use street profiles.
Alta-Profile polymer façade fastening system. Polymer profiles are not subject to rust and rotting; they do not require additional processing or special storage conditions. If you choose vinyl siding to clad your building, you need to take into account that it expands in the hot summer and contracts in winter. Polymer profiles prevent deformation of cladding panels due to sudden temperature changes; they have the same coefficient of expansion as siding.
Plastic profiles are not subject to rust and rot (photo No. 7)
Why is a frame needed for finishing siding?
First, let's look at why siding needs sheathing. Some home owners believe that it is possible to finish the facade without a frame. And indeed, in very rare cases this is acceptable. But for most country houses and other buildings, sheathing for siding is required, and there are several reasons for this.
- Compensation for uneven walls. External walls, as a rule, are far from ideal, therefore it is undesirable to install siding without sheathing - the finish will warp over time, lose its original appearance and become unusable. At the same time, it is possible to make the walls as smooth as possible, but it is very difficult and expensive. Therefore, it is more expedient to equip a frame that will compensate for all the unevenness of the building.
Installation of siding on wood sheathing
- Accounting for shrinkage. This phenomenon is observed everywhere in houses built recently. And if you do not take this factor into account and place the siding directly on the walls, then when it shrinks, the finish will warp, break, warp and become unusable. A sheathing made of timber or a metal profile will prevent such problems.
Installation of wooden sheathing
- Insulation of the house. The lathing installed on the wall of the house allows you to lay mineral wool or expanded polystyrene boards under the siding. As a result, you get not only a beautiful façade finish, but also protection of your home from the cold, and its walls from dampness and gradual destruction.
- Ventilation of facade and insulation. The presence of an air gap between the sheathing and the insulation, represented by mineral wool (or polystyrene foam), prevents problems associated with the formation of condensation, dampness and mold.
- Uniform distribution of the load - the lathing has a positive effect on both the siding finish and the wall of the house itself.
Construction of a simple timber sheathing. All components of the system are marked and signed
Installation of sheathing
Preparing the walls of the house for installation of sheathing
Before making sheathing for siding (no matter - wood or metal), it is necessary to prepare the walls of the house itself. Preparation is carried out according to the following algorithm:
- We remove the trim from windows and doors, as well as all elements protruding beyond the plane of the wall.
- We clean the walls of the house from contamination, if possible, remove the remnants of the previous finishing, especially those that are peeling and falling off.
- If the outside of the house is lined with wooden clapboards, check how securely the boards are fastened. If there are loose cladding elements, we fix them with self-tapping screws.
- We treat the walls of the house with an antiseptic. This is done in order to prevent the development of mold fungi under the siding in case of possible moisture penetration under the sheathing.
Option for placing profiles
After preparing the walls, you need to mark them. The pitch of the sheathing under the siding depends on what kind of material we plan to use: the denser and heavier the siding panels, the smaller the pitch between the beams or sheathing profiles should be. As a rule, when installing vinyl siding, sheathing is used with a pitch of 40-60 mm.
Also at this stage we determine the direction of the sheathing: if the siding is attached horizontally, then the sheathing will be installed vertically under the siding, and vice versa.
Vertical lathing
The lathing for basement siding can also be either vertical (maximum step - 90 cm) or horizontal (step up to 45 cm). An exception is Dolomite basement siding - its panels can be mounted exclusively on vertical sheathing.
Installation of metal sheathing
The metal sheathing for fastening with siding is made from a U-shaped profile. The most commonly used profile is a section of 27x60 mm and a length of 3 m.
The profile is fixed to the base using hangers - perforated plates made of galvanized steel (pictured). Sometimes, instead of suspensions, special brackets are used - they are much more durable.
Profile hanger
The profile sheathing for siding is mounted according to the following scheme:
- We begin installing the profiles from both edges of the wall - they will serve as guides for leveling the plane.
- Using a hammer drill, we drill holes according to the markings on the wall. We insert plastic dowels into these holes, after which we fix the brackets for the profile, or metal hangers.
Installation diagram
- If you plan to insulate the facade, then before installing the main profiles it is necessary to install slabs of heat-insulating material. To do this, we cut holes in the slabs opposite the brackets and put the slabs on the fixed brackets.
- Using the same technology, a windproof membrane is placed under the sheathing.
- We attach profiles for the sheathing to the outer brackets. We stretch a cord between them - we will use it to align the remaining profiles.
- We continue to install the frame elements. To add rigidity, we connect the main profiles of the sheathing with perpendicular jumpers from scraps of the same profile.
- To attach the vertical sheathing, you may need a 28x27 mm profile. We will use it as a starting profile into which we will insert the ends of the main profile.
Metal sheathing
The installation of sheathing for siding must be completed by checking the resulting plane. For control, you can use a water or laser level.
Installation of timber sheathing
As we noted above, wooden sheathing for siding is somewhat cheaper: almost anyone can do it with their own hands, so you will also save on labor costs for craftsmen. The wood for sheathing must be thoroughly dried and treated with an antiseptic. In addition, it is better to choose even beams, since even a slight curvature of the tree complicates the work and makes it difficult to align the sheathing.
Assembling wooden sheathing
We install the sheathing under the siding as follows:
- We cut the beams for the sheathing in advance, so that the length of the beam matches the dimensions of the wall. If the length of one beam is not enough, you will have to join it, which is undesirable.
- We begin fastening the beams in the same way as when installing metal sheathing - by installing brackets. We apply the sheathing beams to the brackets, align them on a plane and fix them with self-tapping screws.
- If insulation of the space under the siding is not planned, then it is possible to attach the sheathing directly to the wall. When fastening in this way, the bars are drilled through with a hammer drill, and then attached directly to the wall through these holes. To level the sheathing, we use wooden or plastic mounting wedges.
Stage 3: Installing Insulation
A common technology is that the lathing is done in two levels . The first is intended for insulation, and the second directly serves as a kind of “substrate” for the siding. The heat insulator is also installed in a niche of the primary sheathing, which is usually made of wood.
After this, the finished structure can be covered with a metal sheet and the installation of the main sheathing can begin.
Sometimes thermal insulation is done in the same sheathing, which is the carrier for the siding lamellas. In this case, problems may arise in the layout of the material, since the installation of sheathing under siding with the presence of insulation panels requires space for its fixation. The fact is that according to the rules, the pitch of the lathing is no more than 40 centimeters , while the sheets of insulators can exceed 50 and 60 centimeters. There can be two ways out of this situation:
- Cut the material in half . For example, divide a 60-centimeter sheet into two parts and, accordingly, make a sheathing step of 30 cm. Increasing the step frequency will add reliability to the structure, but the disadvantage of such a solution will be losses in the thermal insulation function, since the number of joints will increase;
- Increasing the step size strictly according to the size of the insulating panels . This option, on the contrary, will maintain optimal insulating function, but will negatively affect the strength of the sheathing.
As you can see, the creation of a unified structure is not complete without sacrifices. However, if wooden sheathing is used for siding, then it is quite possible to allow a step of 60 cm , and if the cladding involves installing a metal structure on a brick house, then cut thermal insulation panels are more likely to fulfill their tasks.
Return to content
Pros and cons of wooden sheathing
Wooden sheathing is a traditional solution that has its pros and cons.
The advantages include:
- Availability of material.
- Ease of processing.
- Low weight of the material, which does not create unnecessary load on the wall.
- Possibility of making to order in any size.
- Wooden blocks do not require additional insulation, being themselves heat insulators.
- Convenient to attach siding panels.
Flaws:
- The bars do not have a perfectly straight surface; correction is required.
- There is a danger of warping or turning by a screw, which can change the geometry of the finished skin.
- Wood is flammable.
- There is a danger of mold, rot or insects; treatment with antiseptics is required.
- Wood reacts actively to changes in air humidity.
Despite all the shortcomings, there are many supporters of the traditional approach to the manufacture of sheathing. This is explained by the possibility of independently making planks from any available wood using a hand-held power saw.
Wooden sheathing
Advantages of the Alta-Profile siding fastening system
The Alta-Profile plastic sheathing was designed specifically for the company’s branded siding. This gives it a number of advantages:
- You do not need to select bars, profiles and fasteners to match the finishing parameters. I've already done it for you. An optimal system has been developed for each siding series. All you have to do is name the color you like and the parameters of your home to calculate the required number of elements.
- The material from which the sheathing is made is similar to siding. Therefore, even with sudden temperature changes, profiles and panels will expand and contract “in unison.” This means that the siding will not deform in any weather conditions.
- The Alta-Profile siding fastening system is very easy to install. This does not require professional tools or construction experience. After carefully studying the instructions, even a beginner can handle the job.
- The façade mounting system includes everything you need. You don't have to waste time and effort, for example, searching for studs of the required length and cross-section.
- The shape and size of the profiles correspond to the siding panels and additional Alta-Profile strips. You don't have to “adjust” them according to geometric parameters.
- Using the Alta-Profile facade fastening system, you can carry out exterior finishing with or without insulation.
- Alta-Profile lathing does not burn, does not emit harmful substances when heated, does not rot, does not rust, does not crack due to fluctuations in temperature and humidity, is moisture resistant and does not require special care.
Types of lathing for siding a house
The appearance of the cladding of the house depends on how well the sheathing is built. A frame installed in accordance with all the rules can hide any flaws and irregularities in the walls and gables of the building. The lathing is the base to which the finishing material sheets are attached.
When installing metal and vinyl slats, two types of frames are used:
- from wooden blocks;
- from a metal profile.
Types of lathing for siding a house
Any of them is suitable for installing facing material on wooden walls. A correctly installed frame allows you to lay any of the modern heat insulators on the walls. The lathing also provides the ventilation gap required to eliminate excess moisture.
In the photo there is insulation laid between the sheathing posts
Installation of the frame is not necessary if the walls of the wooden house are perfectly smooth. You can safely attach siding to such a surface without using a structure of additional supports.
Siding without sheathing can be easily installed on wood and chipboard surfaces, plywood, etc.
Adviсe
A few words about the color of the J-profile. As a rule, the element is produced in the same color variations as the siding itself, so choosing this element according to shades is usually possible without any problems. But in some cases, when decorating a house, a profile can be used in a different, contrasting color. Despite the fact that designers often use this technique and consider it one of the successful ways to decorate a building, you should still experiment with colors carefully
It is important to remember that such inserts do not always look harmonious
Pink siding trim
Vinyl siding trim
You also need to remember that dark elements will get very hot in the sun, so siding and profiles of such shades should not be used on the sunny side, even in small quantities. Due to exposure to sunlight, they can bend and lose their appearance (we are talking about plastic parts).
Covering the gable with siding. One of the options
Sometimes profiles on the roof gables may not be installed at all, motivating such a decision by the fact that this allows you to save certain funds, but the decorative elements are still not visible. But still, you should not neglect the use of the J-profile in this place: the fact is that during heavy rain, moisture will penetrate through the remaining cracks between the wall of the house and the siding, as a result, the cladding of the building will not be able to perform a protective function - the wood will still be redundant become moisturized and lose their qualities.
Lathing installation technology
This process is considered understandable and simple if you know exactly what sequential actions must be performed, as well as what nuances you will have to deal with, and how to do everything correctly.
As a rule, perfectly smooth walls are very rare, and attaching siding to the walls would be very inconvenient, so installing siding requires preliminary formation of a frame. At the discretion of the owner of the building, the sheathing can be metal or wood. Let's consider the manufacturing process of each of them separately.
Metal structure
The first step is to make vertical and horizontal markings on the wall. It is much more convenient to carry out the work if you have a laser level, but if you don’t have one, then you can get by with an ordinary water level and plumb line.
At the next stage, a metal sheathing is created, for the manufacture of which you will need:
- Guide UD profile.
- Rack CD profile.
- CD connector for CD profile (if necessary).
- ES-bracket (U-shaped profile).
According to the applied vertical markings, a U-shaped fastener is attached to the wall. The insulation is put directly on it, and everything is covered with a wind- and moisture-proof vapor-proof membrane.
Then, the starting profile is fixed strictly horizontally. You need to make sure that it is secured evenly. The starting profile is necessary not only as a base for the siding covering, it also protects the thermal insulation materials from moisture and other influences from below.
Wooden structure
To make the sheathing, a wooden beam of the thickness of the insulation is used, pre-treated with fire-bioprotection. It is attached to the surface of a wooden house in a horizontal position with self-tapping screws or long nails immediately above the base or in the lower part of the house installed on stilts. (The bars are attached to a stone or brick house with dowels). The next horizontal beam is attached in such a way that the seal fits tightly into it.
The space between the panels and the walls of the structure is filled with thermal insulation materials. Mineral wool or extruded polystyrene foam are excellent for this. If cotton wool is used, it is used exclusively in conjunction with waterproofing films, since if moisture gets on it, it will lose its positive properties. Laying should be done in such a way that the insulation boards fit tightly into the available space. After laying and securing the heat-insulating material, it is covered with a wind- and moisture-proof vapor-tight membrane. Installation of the film begins from the bottom in a horizontal position with the rough side inward. It is attached to the bars with a stapler
The next layer of film is laid overlapping the bottom one, by at least 10 cm, and is also fastened. Now it is important to make such a frame with identical cells, the distance between which will be optimal for the future installation of siding; usually it is made 40 cm. To do this, vertical posts are attached in the corners, a cord is pulled between them from above and below, along which all installed slats are aligned.
Panel fastening technology
Do-it-yourself installation of metal siding is considered a simple job if all the necessary preparatory processes have been completed.
There is a special guide, following which no mistakes will be made:
Fastening the first panel. It is best to start covering the facade with siding on the side of the house that is least noticeable, so that you can gain experience before working on the front side of the building. The first panel is inserted into the corner profile, as well as into special locks available on the starting strip. We must not forget about the gap. Next, the panel is fixed to the frame, for which special fasteners are used, designed for installing metal siding.
Extension of panels. The installation scheme for metal siding involves fastening the panels overlapping or using an H-profile. In the first case, the locks and frames for fastening on the panels are shortened.
Installation of the remaining panels. The operating technology is no different from installing the first panel and subsequent elements
It is important to install the covering perfectly evenly, therefore, after fixing each part, it is recommended to check the correctness and evenness of the cladding. Excess parts of panels are removed near the openings, so installing siding around windows usually takes a lot of time and requires significant effort.
To level the entire coating, it is advisable to install a finishing profile, which is located at the bottom of the opening. Fastening is carried out with special hooks using a punch.
At the last stages of the work, the installation of slopes and other small but important elements is carried out. A pediment is installed around the entire perimeter. The cornice is installed in such a way that the entire cladding looks complete and beautiful.
Thus, the step-by-step instructions contain all the sequential actions, the execution of which guarantees an ideal result for the cladding of any building. After careful study, it is possible for every person to improve and protect their home from various negative influences.
The choice of professionals - metal profile lathing
Despite the fact that professionals sometimes use a wooden frame, metal sheathing for siding is more in demand, as it has higher strength and performance characteristics. Its installation is in many ways similar to the installation of a wooden frame, but there are also significant differences.
Which profile is used?
When constructing a frame from a metal profile, two main types of profile will be required:
- UD profile, which will be attached around the perimeter of the structure, and will also frame window and door openings.
- CD profile on which the siding will be directly attached. These elements are inserted directly into the UD profile and provide rigidity to the structure.
The sheathing for metal profile siding is attached to the surface using ES brackets. This is quite convenient and allows you to compensate for unevenness.
Calculation of materials and components
To determine how much material and components are required for metal profile lathing, you will need to make preliminary calculations.
Next, depending on the size of the metal profile and the step of its fastening, it will be possible to determine the required amount of material.
Scheme
It is also important to determine the number of fasteners required. Here, brackets or special canopies can be used as the main elements
You will also need dowel nails and screws. It is better to purchase them with a reserve.
Marking the wall, installing hangers
Surface marking is carried out using a level and plumb line. If insulation is installed, the distance from the wall should be greater.
This must be taken into account when installing support elements. If the building is made of timber, then the hangers are fixed with self-tapping screws. If the base of the structure is concrete or brick, then you should use dowel-nails.
Installation of the guide profile
After fixing the suspensions, it is necessary to install guides that can be used to guide during further work.
Installation of guides
To ensure that the sheathing of a house made of metal profiles for siding is of high quality and level, after attaching each element, it is necessary to check its position with a level. Installation of the guide profile should begin around the perimeter. Based on these planks, all subsequent ones are attached. Next you will need to frame all openings with a profile.
How to properly install a frame at the corners of a house
To properly distribute the load, you should pay special attention to the corner elements. Leaving a gap of 10 cm from the corner will ensure a tight fit to the vertical profile
Corner elements
Corner parts should be installed with a distance of 6 mm from the cornice, as well as from the starting strip.
Installation of the stand profile and its alignment
The stand-up CD profile is fixed into the UD profile. How much is needed depends on the height of the building. It is intended to be used for every 60 cm of surface. It is on this that the starting bar is then fixed.
How to make sheathing for siding around windows and doors
Installing additional horizontal elements around the openings is not necessary, but experts recommend doing this, as this process will help improve the degree of rigidity of the structure.
Preparing the wall surface
Before starting the main construction work, the following surface preparation work should be carried out:
- All protruding objects should be removed from the surface of the walls: window and door frames, window sills, lighting fixtures, etc.
- cleaning walls from dirt, cement deposits, partial or old finishing.
- If there is any finishing, we check its reliability and fix weak structural elements.
- After completing the previous steps, treat the surface with an antiseptic against the formation of fungi and mold.
Profile with stiffening ribs
Having completed all the preparatory stages, we mark the surface on which the frame will be installed under the siding. We calculate the distance between the guides taking into account the weight of the facing material: the heavier the siding panels, the smaller the step between the guides.
The direction of the sheathing is set depending on the type of material fastening: for horizontal types of siding, the sheathing is installed vertically and vice versa.
Installation of internal corner strips
The corners are installed before installing the main panels, immediately after attaching the starting strip. The internal corner profile is attached with the lower edge at the level of the starting strip; the screw density is recommended to be 25-30 cm.
If the starting strip prevents you from positioning the profile in the right place, nail strips should be cut from the corner profile to a length equal to the width of the starting profile plus the temperature gap.
If it is necessary to extend the corner strip, cut off the nail strips from the top by 30 mm and overlap the top one over the bottom one for proper water drainage. The amount of overlap is no more than 25 mm to ensure that the temperature gap is maintained.
You can make a corner connection using a J-bar, which is cheaper than a corner connection. This can be done using one plank, when it fits tightly with its outer edge to a row of panels on one side, and the panels on the second side are installed into it.
The second option is to use two strips on each side of the corner, in which case there is a danger of water entering the gap between the strips, since absolute tightness of the connection cannot be achieved here, in addition, temperature gaps are necessary in any case.
Which siding to choose?
If timber or a solid log was used as a building material, then it is best to use vinyl siding to cover the erected log house.
Panels made of polyvinyl chloride reliably protect the building from adverse weather conditions.
They are light enough, so they do not create additional load on the foundation. Plastic panels are easy to install and clean. Such cladding will significantly extend the life of a wooden house and give it a unique appearance. Sheathing an old wooden house will give it a fresh look.
Wooden siding is ideal for covering a frame house. This type of cladding looks truly expensive and impressive. The sheathing is installed very quickly. In this case, the panels can be installed both vertically and horizontally.
Excellent breathability and the absence of toxic fumes are the main advantages of wooden siding. For cladding a frame house, experts recommend purchasing panels made from beech, spruce, pine or larch wood.
As for a brick building, when choosing a finishing material, you should take into account the purpose of the building. If this is an industrial building, then it is best to finish it with metal siding. It is better to cover a residential brick house with vinyl siding. It will allow you to successfully imitate other expensive materials.
To decorate houses made of foam blocks and aerated concrete, you can successfully use vinyl, metal, and basement siding. Simplicity of installation, as well as excellent performance characteristics, of the installed panels will help improve the facade of the house, it will look beautiful and stylish.
A high-quality frame for siding, where insulation is necessarily present, can significantly reduce heat loss and improve the waterproofing of the building.
Features of high-quality siding:
- Same panel thickness. This cladding will not deform and will serve the building owner for as long as possible.
- The presence of a uniform layer of paint. If the panel is unevenly painted, then most likely low-grade raw materials were used in the production process. Such panels cannot withstand mechanical loads, quickly lose their color and become deformed when temperatures fluctuate.
- Surface structure. There are no chips, stains or cracks on high-quality panels. They should not delaminate.
- Plastic. All cladding parts must demonstrate flexibility and strength.
- Availability of certificates. When purchasing material for cladding a house, feel free to ask for a quality certificate. The document must contain, certified by seal, expert conclusions that confirm the fire resistance and hygiene of the product.
Recommendations
Installation of metal and wooden frames is slightly different. At the metal sheathing, a UD guide profile is first attached along the perimeter of the building at the top and bottom and around the openings. Its main task is to secure the structure and give it rigidity. A CD profile is already attached perpendicularly to it in increments of 50-60 cm. The profile is secured to the wall with an ES bracket or bracket. At the same time, the brackets make it possible not to use stretched beacons. Metal can expand in hot weather, so it is recommended to leave a small gap between the joints of the profiles.
A wooden frame is much easier to install. It does not require horizontal jumpers, but starting strips under the siding and around openings must be present. The edge bars can be additionally reinforced with metal profiles, as can the corners. This will give the structure greater strength, without making it much more expensive. The construction of a wooden frame should not be done in rainy weather or high humidity. The wood will absorb excess moisture, and when it dries, the entire structure will warp.
Even with an accurate calculation of the material, it is better to play it safe and buy 10-15% more of it. Due to window and door openings, the material will have to be cut, and among the timber there may even be defects, especially if a large batch is purchased. The remaining material will always be useful in gardening and planting work. Many hardware stores accept back unused materials while maintaining their presentation.
If you are doing the construction of a frame with your own hands for the first time in your life, then it is better to choose a wooden structure. It is easier to install and cheaper, damaged materials will be easier to replace. If the main requirement is durability or the climate of the region is characterized by high humidity, then it is better not to save money and build a metal frame. It will last long enough and will fully pay for its cost.
To learn how to install siding profiles, see the following video.
Stage 1: material selection
The sheathing can be made of wood or metal - accordingly, a profiled beam or a steel profile is used. If you are counting on durability and high quality installation, then it is better to prefer metal. Its installation is simpler, and the finished design will be more functional.
It is more profitable to use wood in houses of the middle price category. This is a cheap solution that will also ensure the reliability of the siding installation. But to obtain such a result, the material must initially be checked for defects, and then subjected to antiseptic treatment.
Return to content
Constructions where a frame is simply necessary
There are situations when it is impossible to do without a frame for gypsum boards. These can be curly design details:
- arches and niches,
- built-in wardrobes,
- multi-tiered ceilings,
- bedside tables.
A special section consists of partitions between load-bearing walls, which also cannot do without appropriate foundations. And for not too smooth surfaces, a plasterboard wall frame is often used to hide existing flaws. Thus, the frame profile is used almost everywhere as an additional guarantee of strength and durability. Now let’s move on directly to the practical part of implementing our plan.
Frame profile assembly algorithm
- The first step will be the correct choice of material, both for the frame and for the cladding. So, for example, in the bathroom it is more advisable to use a metal profile (since the humidity there is very high) and a certain type of gypsum plasterboard - moisture resistant. In a living room, to level the walls, you can use standard plasterboard sheets and wooden slats to construct the sheathing. When the materials have been selected and purchased, you can proceed directly to assembling the frame for drywall.
- If you plan to finish both the walls and the ceiling, then work should begin from the ceiling. By the way, check in advance all communications that are carried out under the future structure. It is imperative to leave access to key components so that you don’t have to disassemble half the wall or ceiling if something happens. And the cable length reserve should be at least 10-15 cm, for example, from the mounted ceiling or walls.
- Next, we will mark the surfaces for the profiles. It must be done using a level and plumb line. You can mark with an ordinary stationery marker, but these marks will still be covered later with sheets. It’s worth starting from the lowest angle of the ceiling. If only the walls are sheathed, then markings should begin with the windows.
- Next step: how to attach a metal profile frame for drywall? Much in solving this problem depends on the material from which the sheathed surface is made. So on wooden walls (either made of sandwich or SIP panels) you can fix them with galvanized self-tapping screws of the appropriate length. But on concrete or slabs, in brick walls you will have to drill holes for special construction dowels. So you need to look at the situation and choose the most suitable fastener for the given case.
- It should be remembered that in order to make a frame, the profiles themselves, if necessary, must be cut with metal scissors: this way the galvanization, which prevents the profile from rusting, will be least damaged.
- When installing wall frames, it is advisable to carry out the work in order: first completely cover one wall, and then move on to the other.
- After marking the wall, the marks left by the marker are connected from the floor to the ceiling, and profile guides can be attached according to the resulting lines. Step – 60 centimeters. This is due to the fact that the width of gypsum boards is usually 120 cm, and each sheet when sheathing must be secured at least at three points. One of the profiles must be installed in the corner of the room.
- Rack profiles are inserted into the guides and secured to each other. Do not forget to check the quality of work with a level so that the structure does not become distorted. We finally fix it with self-tapping screws, and the profile frame is almost ready for further work.
By the way, the “checkered” frame is considered the most durable, which also uses crossbars that are secured with the help of special crabs.
As you can see, there are no particular difficulties in the question of how to properly assemble a frame for a gypsum board. You need to strictly follow the recommendations, and everything will definitely work out!
Author of the article
How to choose material for the frame
The main purpose of the frame is to provide reliable support for the siding panels. The most commonly used sheathing is wood or metal sheathing. When choosing a material, you should focus on the type of siding, the weight of the panels, and the amount of insulating material, because all this will place a significant load on the reinforcement. Therefore, the material for its installation must be durable, strong, and resistant to deformation.
The wooden sheathing is constructed using any available lumber for the subsequent installation of vinyl siding . Wooden beams, timber, boards are suitable. The main requirement is that the wood must be well dried in accordance with the technology and additionally coated with protective compounds to extend its service life.
Usually in construction, preference is given to a metal profile made of galvanized iron with stiffening ribs to improve practicality properties and to increase mechanical strength. The thickness of the metal should not be less than 0.4 mm.