Miscellaneous
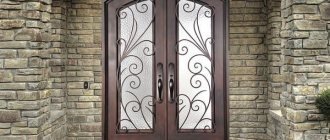
Door fittings and structures in general are a sensitive topic. There are many different models available. They are made in antique, modern styles, in the form of gold items. There are doors and fittings that are equipped with lighting. This solution allows you to decorate the interior and highlight the details. Let's look at how to connect the power supply to the fittings.
Manufacturing of frame panel doors
A frame panel door implies the presence of a wooden frame that has a contour around the perimeter of the door and several transverse elements connecting the long sides of the door in order to impart rigidity to the structure and the possibility of installing fittings. Usually one additional element is located at the level of the future door handle.
Initially, two identical panels are cut exactly to size from plywood (laminate, fiberboard, MDF) exactly to the size of the door. Then two long and three to four short pieces are cut from a block or board. When cutting out workpieces, you should strive to maintain the 90° angle of the transverse elements as accurately as possible, since they must fit tightly across the entire width of the workpiece to the vertical elements without forming gaps. This will affect the geometry of the door and its strength.
Similarly, holes are drilled on the inside of long workpieces, at the level of which the horizontal frame parts will be located. To be 100% sure that the holes will coincide, drilling of all holes is carried out according to a pre-made stencil: which can be made from an aluminum corner with a 40 mm shelf. or any thin sheet metal.
After installing the tenons on both sides into the short (transverse parts), they are laid out on a flat surface, the protruding tenons and ends of the parts are lubricated with glue and the long part is applied to them so that the tenons fit into the drilled holes. Using a mallet, the long part is hammered evenly along its entire length until the tenons are completely immersed in it. The second long part is glued in the same way. After this, it is necessary to use long clamps or a device for tightening the floor laminate to tighten the long parts together with the maximum possible force.
After the glue has dried, first the bottom panel of the sheathing is glued, then the filler is placed in the voids and also fixed with glue, and the assembly is completed by gluing the top sheet. Immediately after this, it is necessary to ensure that the panels being glued are pressed tightly by placing a weight on the door or pulling them with clamps through the placed transverse boards at the bottom and top.
When the glue has dried, the canvas is cleaned with sandpaper to remove any glue drips, the irregularities along the edges of the workpieces are sanded, if necessary, they are primed around the perimeter, wiping out any existing cracks and irregularities using a rubber spatula. After the primer has dried, it is treated again with fine sandpaper and wiped with a damp cloth to remove dust.
The canvas is ready for further finishing with the selected material or for painting.
How to connect?
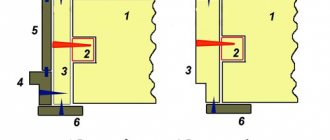
First of all, you need to understand how to supply light to electronic devices. It is necessary that opening the door does not disrupt their operation. This is achieved by connecting the door to the electrical network in the area of the door hinges. This area of the door leaf and door frame is in contact with each other.
DIY door lighting connections
Illuminated push handles are installed for metal entrance doors. Usually, they are already installed on the door. The door is sold together with the frame. The wire for connecting the LED goes to a loop inside the case and extends outside the box. All you need to consider when installing a door is how to connect the wire to the general electrical network. Since this is factory fittings, it has a special device for changing the voltage to the value required by the LED device.
How to connect the backlight in models that do not have wiring in the housing. When you try to do this yourself, you will encounter several problems, some of them serious.
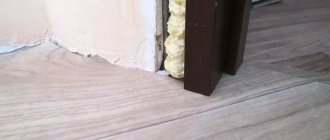
- First, how to run the wire. It will not be possible to make a hole in the loop area and push it through. Why? Because the door has stiffening ribs across the entire width of the door leaf. These are 2-3 vertical stiffeners. If you drill a hole at the loop and insert a wire, it is impossible to overcome the internal barrier. There is only one way out: run the wire along the contour of the door. This causes another problem. How to route the wire along the outer body of the door so that it does not get pressed when closing. Otherwise, the insulation will be damaged and there will be an electric shock. The doors have seals; you can run a wire under the seal.
- How to secure the wire in the loop area.
- How to change the electrical potential to a suitable one for an LED light bulb.
Hole for the wire in the door frame
The problems have been voiced and for the first of them a solution has already been found. All that remains is to decide on the course of action.
- First of all, we draw a wire from the door frame to the door leaf. We make a hole in the door structure for the wire. The wire runs along the outside of the box, will pass through it and attach to the canvas. The junction of the box and the canvas is a likely place for damage to the wiring. Hence, keep the amount of wire to a minimum. At this point it is placed in a protective housing. The body is not thick so that it does not interfere with closing the door.
- Next, remove the seal, starting from the top hinge and up to the locking mechanism along the upper side of the canvas. We lay the wire under the seal. It is attached to the canvas, secured with glue in places, and on top it is pressed with a sealant. If the seal is connected using a tongue-and-groove system to the canvas, then wiring the wire will be easier. There will be somewhere to hide it. If the sealant is glued, then glue the sealant to a lesser thickness or use a knife to remove the excess.
- After the wire is drawn, we make a hole in the handle area. Remove the lock to connect the wire.
- After all the parts are done, we check again whether the wire is pinched, especially in the loop area.
- To connect the LED to a 220V network, a special convector is used. Buy it at the store. You can see its connection in the instructions.
Voltage transformer
The lighting of the fittings looks beautiful and is convenient. But doing this work yourself is problematic. It is better if the fittings are manufactured and installed on the door by specialists during production.
Self-installation of the peephole
who is too lazy to read the short video at the bottom of the page
Hello, today we will look at a case where your front door, for some reason, does not have a peephole. And we will describe in detail the procedure for installing the peephole yourself.
If you decide to install a peephole in your front door with your own hands, you will need the following tools for your work:
First of all, before going to the store, buy a peephole.
We need to measure the thickness of the door. To do this, open the door and from the end, using a ruler or tape measure, measure the thickness of the door.
In our case, the door thickness was slightly less than 6 cm.
This size must be remembered or written down; it will be useful to us in the future.
A huge selection of door peepholes awaits you in the store. Door peepholes differ both in color and design. For example, the lens in the eye can be glass or plastic. And glass is not always the best choice. As a rule, eyes with a plastic lens have a wider viewing angle. But first of all, we are interested in what thickness of the door the peephole is intended for.
Types of windows
The type of imitation window opening is selected based on preferences and financial capabilities. A wide selection allows you to choose the most suitable option.
Photo wallpaper
This view allows you to select the best images: you can find yourself on an exotic beach, in a green forest, or looking outside the city from a tall building.
Photo wallpaper
To make the window more realistic, it is recommended to frame it (the frame can be made of any material). Many forms of image can be found.
Before mounting the image, you need to prepare the surface. A flat wall is the main thing during installation.
To make it even more realistic, a window frame with a window sill is glued onto the image; plexiglass is used instead of glass. Indoor flowers are placed on the windowsill and curtains are hung.
painting
Some masters use hand-drawn images. This pleasure is not cheap, but if you have the funds, this option will be good in small rooms.
painting
If you have artistic skills, you can draw a picture. There will be no problems finding an image that is similar in spirit.
Before carrying out work, you must perform the following steps:
- Level the surface with plaster mixture or putty.
- Clean the wall.
- Get rid of dust and dirt.
- Treat with primer mixture.
Acrylic paints will help make the image colorful. The frame is made of polyurethane baguettes. If you want to attach a real frame, it is recommended to wait until the paint has completely dried, after which you can begin installation.
Popular articles Lamp - without electricity. . .Mirror design
The mirror structure is made from a single piece of fabric, or using a tiled version. Let's consider both options:
- A one-piece mirror is framed with a wooden frame, and a decor is created from fabric curtains.
- Mirror tiles are a complex design. First, the window is assembled, then individual pieces of mirrors are mounted in it, and the structure is hung on the wall.
Ceiling option
Starry skies are a popular option. Additionally, the structure is equipped with blue lamps, which will help simulate night.
If the room has a suspended ceiling, then you can achieve the effect of a glass roof due to the double structure. Installation consists of several stages:
- Installation of a suspended structure (ceiling) with a niche.
- The inside is covered with an image of the starry sky.
- Install lamps.
- Cover the structure with a window frame.
Illuminated window
A false window using lighting is a decorative structure equipped with artificial light. A large structure can replace indoor light.
Backlit
Rooms deprived of natural light are the main places where it is recommended to use imitation windows. If you use stained glass instead of ordinary glass, then if the structure is properly assembled, you can mistake the false structure for the real one.
Materials for making canvas
Before starting work on making an interior door yourself, you need to prepare the material. In most cases, wood is used for this purpose. The frame of the door leaf, as well as the door frame, are made from it. In addition to wood, the following can be used:
- Styrofoam;
- Cardboard honeycombs;
- Glass;
- Fiberboard;
- MDF.
Polystyrene foam and cardboard honeycomb are used as a filler for the door leaf; it is not made of solid wood
These materials are lightweight, which is important for subsequent use. In addition, polystyrene foam can reduce noise levels by making the fabric more sound-absorbing.
The use of glass for the manufacture of interior doors is primarily due to the aesthetic side. Such inserts visually expand the room and also allow you to diversify the design of the room. Glass also has one more property. It perfectly transmits daylight. Therefore, with glazed interior panels, the corridors of the apartment will be much lighter, even if the door is closed.
Fiberboard or its more advanced version MDF is used as a cladding material. In the design of the canvas, these materials are responsible for the decorative finishing of the future product. At the same time, MDF is the finishing element, but fiberboard will have to be further processed to give it an attractive appearance.
In addition to the listed materials, sheets of laminated chipboard can be used as cladding. A wide selection of colors that imitate natural wood makes this type of finish very popular. It should be noted that the use of laminated chipboard will give the doors more rigidity in the diagonals.
PVA glue or confirmats can be used as fastening material. To coat the finished canvas you will need varnish. If you need to add color, the problem is solved thanks to stains and tinted varnishes.
Lighting accents
The dark time of day allows you to give the local area a special charm: light will highlight areas of the territory, and not particularly successful places will disappear in the darkness. Ponds, gazebos, benches, alpine slides and other garden elements are highlighted with light. Illuminated flower beds, bushes and trees look original: if the beam of light from a compact lamp is directed from the base of the tree up to the crown, you will get a charming play of shadows.
For decorative garden lighting, low-power spotlights, garlands, and portable garden lamps are used. The use of underwater lamps gives a stunning effect.
An important point: even if you often return home late, or like to go out into the garden, the fact remains that most often you will admire street lighting from the windows of your own home. Therefore, do not forget to check how your site will look from the inside.
Subscribing to our blog will help you learn a lot of useful information about light and lighting design, which can be successfully applied in the outdoor lighting of a private home and garden.
Classification of interior doors with glass inserts
Choosing the right door for a room is possible if you know all types of products and their parameters. In addition, you can ask the right questions in the store and evaluate the quality of the proposed model. Doors are classified according to the following criteria:
- manufacturing method;
- production material;
- type of coating.
Interior doors with glass are classified according to manufacturing method, material and type of coating
Types of interior doors by manufacturing method
According to the production method, the following types of doors are distinguished: panel and panel. Paneled structures are made either from solid wood or from combined raw materials. By design, they consist of a frame and thin panels inserted into the frame - panels. In the case of glazed doors, glass is inserted into the internal openings of the frame instead of some panels.
Such structures are embossed, and the door itself is very strong and reliable. However, the weight of the panel door is much greater than the mass of the panel model. For the manufacture of such interior structures, natural veneer or melamine is usually used. Also, various types of varnishes can be used as a coating.
The surface of panel doors is usually smooth, but there are models with a raised upper plane, which is created by finishing with baguette. The frame is often made of valuable wood.
Panel doors are the most common type of structure due to their reliability and low production price
The inside of panel doors can have a solid or small-hollow filling with slats made of natural wood or chipboard, MDF, NDF. The most durable, but at the same time heavy doors with solid filling are called reinforced. Products with fine-hollow filling are produced manually - and the quality of such doors is not the best. Doors with honeycomb filling are considered the optimal design in terms of price and quality.
Types of doors based on material of manufacture
For the production of doors, solid wood or wood substitutes with different coatings are used. In the first case, the product consists entirely of natural wood, often valuable species. These doors are very strong and durable. They look presentable, solid and respectable. The products provide excellent sound insulation, but, accordingly, this design is not cheap.
It is more practical to buy interior doors made from wood substitutes, which are covered with veneer of expensive wood species. They are cheaper than massive ones, weigh much less, and are also less susceptible to temperature changes and humidity. Only a professional can distinguish them from massive models by appearance. For the manufacture of such structures, chipboard, MDF and other wood-like materials are used. On top they can be covered with melamine or natural veneer.
Interior doors made from wood substitutes are cheaper and lighter than structures made from natural materials
Doors with honeycomb filling are made from cellulose and then impregnated with a special solution. The design consists of cells that are placed inside the canvas. These models weigh little, they are quite reliable and durable, and most importantly, they are inexpensive. The products are practically immune to temperature changes in the room.
Interior doors with glazing: their varieties by type of coating
Doors are usually covered with veneer or melamine. Very often, structures made from inexpensive types of wood or wood substitutes are finished with a thin layer of expensive wood - veneer. In terms of external characteristics, such products are difficult to distinguish from structures made from solid wood. They weigh less and cost less, but are less durable.
Thanks to veneer, interior doors retain the inherent wood grain
Melamine is decorative paper impregnated with resins. The thickness of the material is 0.1 mm. This surface looks beautiful and is quite resistant to mechanical stress. Melamine has a number of advantages:
- low price;
- a wide choice of patterns, colors and textures (matte, glossy, semi-glossy, with relief).
Often the pattern on the surface imitates natural wood. Canvases coated with melamine do not fade in the sun, they are difficult to scratch, and they are also less susceptible to moisture in the room than veneered ones.
Unlike doors with veneer, structures coated with melamine are less susceptible to moisture.
Types of interior doors
You should not overestimate your potential and take on the production of panel doors if you do not have access to professional carpentry equipment. It is impossible to achieve the required precision in manufacturing parts using hand or electric saws, jigsaws, drills and grinders.
It’s easier to make a panel interior door. The manufactured door leaf can be equally suitable for swing doors and various sliding doors. At the same time, you will not be tied to existing size standards in house construction at all and will be able to make doors to fit any doorway, and of any, most intricate shape. At least like a hobbit’s hole – round.
When you have decided on the concept of the future door, you need to take measurements of the doorway in which your masterpiece will be installed.
Be careful when choosing sensors
Motion sensor exterior lighting is very popular because it is practical (no need to look for a switch) and economical. But to make it really useful, instead of getting on your nerves, pay special attention to the sensor's detection area.
If the radius is too large, passing cars or pedestrians could unnecessarily trigger it, consuming electricity and frustrating you.
It is also important that the lamp does not light up too long after switching on, nor does it go out too quickly. It will be extremely awkward if you find yourself in the dark when you find the key and want to insert it into the lock.
Choosing a location for a fictitious window and design tips
When starting to create a false window structure, you need to select the type of structure, a suitable picture, and determine the location.
Living room or hall
This is the place where people most often gather: family, visiting guests. Because of this, there may be a feeling of lack of space, especially if the room is small.
Living room
The way out of this situation will be a false construction. The main thing is to choose the right image. How to do it?
- The picture should focus on distant objects.
- It is better if the image contains light colors - it will create the illusion of lighting.
- Try to make the picture contain fewer objects, animals, people - it will give the impression of fullness of the space.
Popular articles Bracelet with beaded hearts
Children's room
The best options for simulating children's room windows are:
- In the first place you can put on the facade a window into a fairy-tale kingdom, a forest.
- The depths of the sea are for dreamers.
- If a child dreams of becoming an astronaut, then install a skylight with a starry sky in the room. Children's Image should be selected according to the child's wishes.
Children's
Bedroom
A bedroom is a place to relax, which means the selection of images must be appropriate. The picture should contain calm tones. It is not recommended to use bright colors.
Pictures with sunsets and seascapes will greatly help to calm you down. You can install the window structure opposite the bed - at the feet, and look at the landscapes before going to bed.
If the false window opening is located on the ceiling, then images of the starry sky and tree branches in the evening are recommended.
Workplace
In this case, everything depends on the nature of the work performed in the room. If you are busy with office work, it is better to install a large window with a plastic frame. Using a view of a big city as a background creates the illusion of an office in a high-rise building.
If the owner is engaged in gardening: growing seedlings, replanting house plants, then it is better to place a small window with shutters on the front wall and a view of the garden.
Bathroom
An original solution would be to design an open room, devoid of walls, but with windows on all sides. These techniques are used in large villas by the sea.
Bathroom
On all sides you need to attach photo wallpaper with a view of the sea beach and frame it with a false window structure. In such a room you can immerse yourself in a bath and imagine yourself on the seashore of a southern resort.
Kitchen
It is recommended to equip the kitchen with large windows, but window structures should be located on one or two walls.
The right picture can visually increase the space.
Tall lanterns on poles
Such lamps can be installed around a platform with a gazebo, next to benches, in the center of a flower bed, along the railing of a bridge over a pond or inside a green tunnel. Most often, tall lanterns are chosen for large local areas or parks. This lighting creates a beautiful fantasy atmosphere. At dusk, Victorian or Gothic-style lanterns can look mystically frightening, but as night falls, their light transforms the surroundings into a romantic fairy tale.
Manufacturing procedure
The assembly of an interior door is carried out using different methods. But if the meaning of all operations is clear, then developing your own technology is not difficult.
Box
It’s quite simple with it - assemble a rectangular structure, and only then place it in the opening. But installation is recommended only after the fabric has been manufactured. This makes it easier to mark the places where the awnings and latch (lock) are attached. Doing this on a jamb already installed in the opening is much more difficult. In addition, it is necessary to select the grooves for the door. Therefore, after the box is knocked down, you still have to return to it.
Canvas
It all depends on the chosen design, and therefore where to start - with tying or cutting MDF boards - is decided based on the door drawing.
Frame making
The technology is simple - a rectangular shape is assembled according to the size of the sash. But there are options for filling it.
Stiffening ribs are installed in the form of vertical posts. This solution is advisable if the frame is planned to be sheathed with MDF or plywood - the strength of the coating will be ensured.
One horizontal jumper in the center. A good solution for insulating an interior door. For example, installed in a passage leading to a cold room (utility room). The canvas is filled with expanded polystyrene, and its slabs are foamed around the perimeter.
Leave one frame without additional elements (small-hollow design). How to fill it and whether to do it is decided depending on the specifics of the room. But this frame option is only suitable for interior doors that are covered with boards. Otherwise, there can be no talk of strength.
Fabrication
- Its dimensions are known; All that remains is to cut the MDF into 2 - 3 fragments, according to the drawn up drawing.
- The second stage is assembling the harness. That is, the frame is assembled using a ready-made canvas.
Door processing
- It is advisable to use the antiseptic again. Since material sampling and drilling were done, individual areas may be “exposed.” Secondary use of the anti-rot composition eliminates this disadvantage.
- Surface design. Options are marked: stain, varnish, veneer, film - depending on the design concept.
Preparation for installation
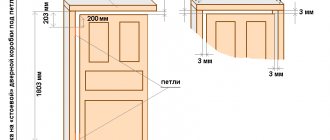
At this stage, latches, eyes, handles and hinges are installed on the canvas. The box is placed in the opening, aligned and securely fixed.
All that remains is to hang the door, align the second half of the canopy with the mounting holes and secure it with self-tapping screws (included in the kit).
“Finishing chord” - checking the correct operation of the canvas, tightness, absence of distortions; If deficiencies are identified, eliminate them. All further measures - insulation of the opening, installation of platbands, decorative design - are a slightly different topic.
Making an interior door at home is quite possible. Success largely depends on proper work planning, choosing the optimal design scheme and your own diligence. And quality is ensured by a good tool, the purchase of which is not worth regretting.
Disadvantages of Solar LED Lights
Despite all the advantages of these lighting devices, they have a number of disadvantages that need to be taken into account.
- Falls and impacts should be avoided;
- the solar battery and light cells must remain clean;
- batteries may fail in cold weather;
- a long absence of bright sun will not allow you to accumulate a sufficient charge, the glow will be dim;
- In the event of a breakdown, it is almost impossible to repair the lamp.
Taking into account such features, owners need to carefully choose the location of the lamp and think about the method of storage in winter, if the site is located in a region with severe cold.
Assembly of a frameless solid wood door
For such doors, lumber of the required thickness is selected and preferably even in texture, without a large number of knots and defects on the surface. If possible, calibrate by thickness (discrepancy no more than 1 mm). The base is a sheet of plywood or other material. On it, a sheet of lumber sawn along the length is laid out so that it evenly covers the entire surface of the sheet.
The sheet on which the layout was made is smeared over the entire area with wood glue and selected pieces of lumber are laid out on it tightly to each other, while their end sides adjacent to each other are smeared with glue. After all the workpieces have been completely laid out, they must be tightened with clamps or a tie for floor boards (laminate) and a load placed on top, or the boards placed across the door must be tightened with short clamps.
After the glue has dried, the door is processed with a plane along the long side - excess lumber is removed to the required width, then sanded with a grinder to completely equalize any possible differences in the thickness of the lumber blanks.
This results in a door that has a base on one side, and a solid wood surface on the other side, which can be kept in its natural form or covered with some decorative material.
Choose only properly protected products.
Outdoor lighting is susceptible to many weather conditions and contaminants, so good protection against dust and moisture particles is critical when choosing a material.
- Manufacturers of lighting equipment also mark the level of this type of protection with the IP (Ingress Protection) sign.
- This marking tells us how safe the product is from water and dust particles.
- The IP rating is usually expressed as a two-digit number, with the first number indicating protection against particulate matter (dust, dirt) and the second indicating how well the product is protected against water entering the housing.
The higher the IP value, the better the protection. Outdoor lighting experts recommend values between 65 and 67.
Using lighting in the interior
There are a lot of interiors and design solutions. The classic style is characterized by the use of details made from high-quality materials with elegant patterns. Classics are an indicator of aristocracy and wealth. In such stylistic directions, light is used to a large extent. These are sectional windows and chandeliers of invisible sizes. Therefore, illuminated door elements are not their path.
Additional light sources in the interior
The use of additional light sources, technologies characteristic of modern or high-tech style. These styles are performed in simple forms without unnecessary grace. Practicality and dark shades harmonize. Therefore, technology and stylistic trends go hand in hand.
Hallway lighting
Hi-tech translated from English means high technology. He is characterized by extraordinary solutions in interior design. Dynamic walls with a built-in TV monitor, which, when turned off, blends into the overall interior and goes unnoticed. Motion and light sensors installed in all rooms, remote control of curtains and blinds - all this is in her spirit.
But not only these styles use details with additional lighting in the interior. Any modern style is characterized by additional light sources. Light allows you to look at things differently, is able to highlight certain features, emphasize advantages and hide the flaws of the room with a contrasting arrangement of light sources.
Area in front of the garage
Outdoor lights should also be placed near the garage door and on the driveway. One or more lanterns will do the job perfectly: it all depends on the size of the access area.
Lamps with gas-discharge lamps on high supports have proven themselves to be excellent. They evenly illuminate the road surface and the surrounding area, do not require maintenance, and last for at least 6 years. It is convenient to control such lamps using a twilight relay: it will automatically turn on the lamps as soon as natural light becomes insufficiently bright.
Be sure to take into account the existing lighting of streets and neighboring areas. Your area may be illuminated by someone else's light source, and your lamp may disturb your neighbors. Think about how not to disturb the overall comfort.
Complex design and unusual materials
The first thing you should pay attention to is the height of the doorways. All the canvases in this apartment are made up to the ceiling, and their height is almost 3000 mm
To install such products, it is necessary to accurately calculate every detail. The ceiling doors are mounted in a hidden frame, which only has side posts. The canvases do not reach the top ceiling by literally 3 mm, while everything opens perfectly and has a gorgeous look.
Standard set of canvases:
- The canvas is moisture-resistant MDF, inside is solid wood, metal profile, sound insulation is mineral board, primer coating;
- The box is moisture-resistant MDF, there is a metal corner on both sides along the perimeter, the coating is primer, for subsequent finishing on site;
- Interior handle Forme model MILLY 133, matte chrome;
- Magnetic lock AGB (Italy);
- Transparent seal Hafele (Germany).
Popular articles Ultrasonic washing machine
Several hidden swing doors up to the ceiling are installed in a small corridor that leads from the kitchen area to the children's rooms. The two doors are integrated into the porcelain stoneware wall and have identical finishes. The drawing smoothly transitions from the wall to the canvas, as if continuing the texture. To achieve this effect, the designers had to work hard. The cutting of the material was calculated down to the millimeter and was carried out directly on site. To do this, sheets of porcelain stoneware about 3 meters high had to be delivered through the window.
Two more swing doors to the ceiling lead from the corridor to the children's rooms. To finish these canvases, plaster that imitates concrete was chosen. The canvases look elegant, stylish and noble. At the same time, on the side of the children's rooms they are painted in enamel the color of the walls. You can see what ceiling doors look like in our other properties in our portfolio.
Beautiful exclusive furniture to order
When a designer is working on the interior, it is difficult to find suitable furniture in the store. Most often, individual cabinet furniture is ordered to order. For this apartment we made: cabinets for children's rooms and hallways, cabinets and shelves for TV areas, furniture for the bathroom and laundry room, wooden wall panels with lighting and much more.
Also, according to the manufacturer’s special specifications, a decorative overlay was made for the front door. All products have a chic appearance and excellent quality. You will find a detailed description of all objects in our detailed video review.
Technology and features of installing lighting in a vehicle interior with your own hands
Interior lighting is not only a practical solution for illuminating a car at night, but also a modern type of tuning and decoration of a vehicle. Initially, you need to set the right tasks for yourself so that the result meets your expectations. The set of tools and the specifics of the work depend on exactly which areas of the interior you want to tune - these could be the car's sills, handles, dashboard, driver's foot lighting, and how the lighting should work - when you open the door, when you turn on the ignition, or on a special button. .
And also decide which lighting devices you want to use to illuminate the car interior. Most often, LEDs or neon glow elements are used for these purposes.
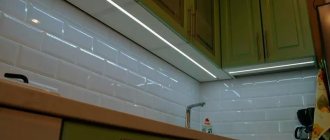
Car door illumination using LEDs
You can decorate the interior of a vehicle using LED strip. The tape is easier to install with your own hands, as it has a special self-adhesive coating and therefore does not require additional fasteners. It is also shock-resistant and can withstand different weather conditions well.
Purchasing special LED strips for car lighting can greatly facilitate the work of installing them, but their price category is much higher than LEDs per meter. It is necessary to improve and adapt the meter tape to the vehicle using a soldering iron.
To work, you will need to purchase heat-shrinkable pipe, LED strip and electrical wires. First, we try on the LED strip to the threshold of the car and cut off the required piece, it is better to take it with a small gap. To one end of the LED strip you need to solder two wires, minus and plus. For convenience, you can install female terminals on their ends. Separately, it is necessary to prepare four electrical wires with male terminals.
We insulate the soldering areas using heat-shrinkable tubing. The modules are ready to use. Next, you need to remove the trim from the doors and sills of the vehicle and install the developed blanks.
Two wires with male terminals on each door must be routed through the hinge, so they will stick out from it. We tighten the negative wires to the ends of the right and left doors, respectively. This will ensure that the threshold is illuminated exactly from the side where the car opens.
We connect the negative electrical wires to the diode modules, and connect the positive wires to any permanent positive in the vehicle. This could be a car's standard light source, a cigarette lighter, or a battery plus
It is important here not to confuse the polarity of the electrical wires. Checking the operation of the installed LEDs
If everything is done correctly, they will light up every time the car is opened. We put the casing in place and enjoy the result.
Similarly, you can illuminate the dashboard of a vehicle, the driver’s feet or door handles. And also the negative ends of the wires can be brought out to a separate button. In this case, the backlight will only work when you turn it on yourself.
Installing neon lighting in the car interior
Neon lighting fixtures have a diffused glow, which greatly attracts the attention of car enthusiasts. Although, on the other hand, if we compare LED and neon devices in terms of service life, the former are distinguished by a long period of operation
If you want neon lighting for the car interior, then the easiest way to work is with a neon cord. It is sold similarly to LED strips by the meter and is installed according to the same principle. For installation, it is necessary to remove the threshold covers and lay out neon cords of the required length along the outer edge. Ideally, when installing the casing in its place, it should be flush with the neon cable. Similarly to the previous method, we bring out the electrical wires to the ends of the doors and to the power supply.
Neon lamps are a more difficult lighting material to install, as they are prone to mechanical damage and are demanding in terms of operating conditions. To install neon lamps, you will need clamps, screws and aluminum corners. The aluminum corner is cut to the size of the neon light sources and attached in places above the dashboard using self-tapping screws. The same is done in the rear passenger seats. Neon light sources are attached to the installed corners with clamps. Wires are supplied to the door opening sensor and power supply to ensure that the lighting devices are turned on when the door is opened.
What should street lighting be like?
Lamps that are used outdoors must be protected from the weather as much as possible. The IP marking for such luminaires should be the highest. The first number, indicating dust protection, should be at least 4–6, the second (moisture protection) – 4–8. Lamps with IP67/68 can be submerged under water. They are commonly used to illuminate pools and fountains.
The device must withstand the influence of various weather conditions, including heavy winds and significant temperature changes, and high humidity. If you live near the sea or ocean, pay attention to the quality of the lamp's coating. Poor quality products over time begin to collect condensation under the glass, and the coating begins to peel off.
The next important indicator for a street lamp is its energy consumption and power. Today, solar-powered lamps are often used instead of the electrical network. It’s great if an automated system equipped with motion sensors or a twilight switch is used to illuminate the area. “Smart” lighting will provide the owner with complete comfort and significantly reduce energy costs.
Firstly , you don’t have to run around the area to turn on the lighting in the right places - the system will turn on the lights automatically when it gets dark. You will be able to regulate what exactly, how bright and in what order the activation will occur.
Secondly , the presence of motion sensors will reduce the total operating time of the lamps: if no one enters the area, then the lights will not light there.
Illuminated fittings
A simple use of lighting in door fittings is to illuminate the keyhole with an LED bulb. This feature is used in entrance doors. The push handles on the bar are equipped with an LED light source. It is installed on the bottom at the base of the handle. Activated by pressing the lever. This solution helps when there is little lighting in the entrance.
Illuminated door handles
Illuminated door handles are widely used for interior doors. These are push-on types or knobs that are made from a combination of metal or plastic with glass. Equipped with various LEDs: white, blue, red, green and any other light. There are models that have several different LEDs in the housing. They burn together or separately for a certain period of time. Such fittings are convenient at night, when turning on the light in the room is painful for the eyes. They will help you find the door in the dark and decorate the design of the room, shimmering in different shades.
Arched structures are characterized by the use of doorway lighting. Light bulbs are installed in the body of the arched structure. This type of lighting allows the light to shine only onto the opening, illuminating the path, while maintaining a calm night light in the rest of the house.
Doors with frosted glass stakes use LED strips along the contour of the glass. Light shades highlight the design of the door and the image printed on the glass. Tapes are installed along the side parts of the glass; they are not noticeable, and the light penetrating the glass along its edges emphasizes the structure. There is an illusion that the glass produces light.
Colorful glass lighting
Take advantage of the canopy
Many entrance doors are covered with a canopy, which also allows you to conveniently install a light housing, such as an outdoor chandelier.
Especially if you don't have enough space at your front door for one or two lights, overhead lights are a great choice.
Ceiling lights will provide ample illumination along the access path, but if your canopy is supported by columns, you can also use a couple of wall lights. They beautifully highlight the entrance elements with directional light.