Installing an interior door frame with your own hands is a rather complicated procedure that requires certain knowledge and skills. In hardware stores, door frames are most often sold assembled. But there are also products on sale in disassembled form, that is, a door set consisting of individual door elements is offered.
The main advantage of purchasing disassembled doors is that when assembled on site, they are easier to fit into the interior opening. But before you start installing the product yourself, it is recommended to study the diagram of its assembly and installation, as well as the recommendations of specialists.
Types of door frames
In order to correctly install the door frame in the wall opening, it is first recommended to study the design of the product.
The frame is a load-bearing element of the door structure, which takes on the load of the door leaf. It consists of one horizontal and two vertical strips connected to each other. The box is fastened directly to the walls of the entrance or interior opening.
The load-bearing element of the door forms a flat portal and also ensures reliable fastening of the door itself. On one side of the box frame there are hinges on which the canvas is hung, on the other side there is a hole for the locking mechanism and a strike plate is attached.
The position of the door primarily depends on the correct installation of the load-bearing component (frame). Therefore, this particular stage of work is a priority. Even a slight misalignment will cause the door to close poorly, get scuffed and wear out quickly. It is also important to pay special attention to the strength of the frame, taking into account the weight of the material from which the canvas is made.
Door frames offered on the market are classified according to different indicators. One of them is the technology of assembling the structure: straight, diagonal or tongue-and-groove. Installation of an interior door frame into a doorway is carried out only after preliminary assembly of the structure.
In the first case, the elements of the door frame are connected to each other perpendicularly. In the second, the edges of the planks are cut at 45 degrees. In both cases, screws are used to connect them. The most reliable way to connect a structure is a tenon into a groove, which is cut directly into the plank.
Boxes can also be divided into different types based on the material used. For their production, steel, wood, plastic and MDF panels are used. Today, metal structures are most often installed at the entrance to apartments and private houses. They are the most durable, reliable and durable. Wooden doors are installed in interior openings, and plastic doors are installed on balconies.
What is the fixation used for?
The reliability of the entire structure depends on fixation to the load-bearing wall , which is why it is important to know how to secure a metal entrance door. Types of fastenings:
- One-piece:
- “grip” fastening;
- reinforcing rod.
Anchors are used:
- Mechanical:
- wedge;
- mortgages;
- driving;
- spacer;
- frame;
- façade;
- hairpins;
- springs;
- ceiling;
- bolts with hook or ring.
- Chemical:
- For interior and exterior use;
- vibration-resistant;
- monolithic fastener;
- for thin-walled and loose bases;
- for long-term use.
- For foundation construction.
- Plastic.
- Height adjustable.
- Ground.
Preparatory activities
Before you begin installing the door frame yourself, you need to prepare all the necessary materials and tools. Depending on the type and configuration of the product, their list may differ slightly, but you should definitely have on hand:
- Pencil;
- Corner;
- Roulette;
- Plumb;
- Level;
- Wooden wedges;
- Spacers;
- Additional bars;
- Screwdriver and screwdriver;
- Hammer;
- Bulgarian;
- Self-tapping screws, screws, nails;
- Hacksaw (saw), jigsaw;
- Miter box;
- Chisel;
- Construction foam.
Before installing the box, it is necessary to prepare the surface of the wall of the doorway itself. The old door structure is being dismantled. After this, it is necessary to carefully seal all the cracks, remove irregularities, and adjust the size of the opening to fit the new box.
Significant protrusions are cut off using a grinder, recesses and cracks are sealed with plaster mixture. In order to carry out installation without any particular difficulties, it is recommended to select the parameters of the door structure after preparing the opening in the wall.
Categories
- 3D apartment projects
- Repair video
- Apartment design
- All about repairs
- Doors
- Window
- Ceiling
- Walls
- Plaster and putty
- Drywall
- Furniture
- Other about repairs
- Floor
- Leveling the floor
- Cement strainer
- Dry floor screed
- Semi-dry screed
- Self-leveling floor
- Flooring
- Warm floor
- Electric floor
- Water heated floor
- Floor coverings
- Tile
- Laminate
- Everything about plumbing
- Water pipes
- Bath, shower
- Faucets
- Toilet
- Heating
- Everything is electrical
- Wiring
- LED in everyday life
- Ventilation
- Construction materials
- Tools
- Materials
- Construction calculators
- Repair of a country house
- Miscellaneous articles
- Top review
- Question answer
- News
Connecting frame strips at an angle of 90 degrees
In this case, the top strip of the box is attached on top of the side strips. The length of the vertical frame elements should be 6 mm greater than the height of the door leaf with the threshold (two gaps at the top and bottom).
Most often, a threshold is not installed in interior openings. Therefore, in this case, the length of the vertical strip = the height of the canvas + the upper gap (3 mm) + the lower gap between the canvas and the floor base (1 cm).
The structure is assembled on a floor base. The top panel of the box is placed on top of the side elements and screwed to them with screws perpendicularly.
If it is necessary to reduce the passage in the wall, additional elements (building timber) are used, which are inserted between the box frame and the wall. The additional detail will then hide the casing. This installation technique can be used if the opening itself is even in height and its width is slightly larger than required.
Peculiarities
The door block serves as a remarkable interior detail. Additional accessories are added to it.
Pen
The handle is part of the necessary functionality. It emphasizes the finished look of the entrance block. It is selected in accordance with the appearance and material of the canvas.
Door handles are classified by type:
- Push - control the lock latch. They consist of two parts, fixed on both sides of the canvas. Push-type ones also include rotary rounded ones.
- Stationary (staples) - not functionally connected to the lock.
- On the bar - the most universal and common in modern door blocks.
The handles are secured to the door leaf with screws and self-tapping screws. To ensure secure fastening, screw the self-tapping screw into ⅔ of the door material.
How to correctly position a horseshoe over the canvas?
Decorative plastic and other horseshoes are fiction because they are not charged with energy. Inside the home, amulets are placed with their horns facing up, which symbolizes a full cup accumulating good luck. On the outside, the horseshoe is secured with its horns facing down, as a talisman against evil spirits.
In modern homes, such talismans are attached to decorative strips above a metal door or at the top of the door leaf.
The accessory is secured using self-tapping screws into pre-drilled holes or with special glue.
Mirror
A mirror is an important element of the hallway interior. At first, the idea of placing life-size mirrors on the front door was due to the lack of free space in the corridor. Now it has turned into an original design solution.
Advantages of a mirror panel on a door:
- Visually lightens the massive structure.
- Visually increases the space of a corridor or hallway.
- Reflects light, increasing the level of illumination.
- Brings an element of originality into the interior.
Disadvantages of mirrors on entrance doors:
- Weighting of the door panel, not designed for the strength limits of the awnings.
- The fragility of a large-area mirror plate.
- The quality of conventional mirror coating on glass is not designed for vibration loads.
- Increased level of contamination of the mirror surface.
When attaching mirrors to the front door, the following factors are taken into account:
- When hanging a life-size mirror of large thickness, it is necessary to replace the canopies with reinforced ones due to the significant weighting of the door leaf.
- Vibration loads on the mirror when opening and closing the door.
- Reserving space for fittings, etc. - 20 cm from the end of the door.
Special requirements for mirror fabric:
- the mirror is made of impact-resistant tempered glass;
- the thickness of the mirror is selected optimally to prevent an increase in the weight of the sash;
- a thin mirror sheet should not distort the reflection.
Methods for attaching a mirror plate to a door:
- Mechanical . Fastening is performed:
- brackets;
- staples;
- profiles;
- self-tapping screws with silicone inserts.
- Glue. Used when the mirror surface area is no more than ¼ sq. m. with help:
- double-sided tape;
- construction adhesive “Liquid nails”;
- glue for mirrors "Soudal";
- using a combined method (glue and double-sided tape).
When attaching a mirror to a metal door, use a gasket that compensates for vibration loads:
Mechanical fastening is carried out using self-tapping screws into pre-drilled holes.
Additions to the iron base
Additions are designed to bring the doorway to the required size when the thickness of the door block does not match the doorway.
Additional panels are produced by:
- Plain , finished with edge tape. Selected strictly according to size.
- Telescopic , having tongue-and-groove connections. The width is adjustable.
What to attach the extensions to depends on the size of the mismatch of the door block. Additional strips are fixed:
- On foam - the simplest method with fastening with polyurethane foam after installation and wedging.
- For nails - with preliminary drilling of holes, securing the finishing nails in them with the points outward. Extras are driven into them.
- Self-tapping screws are the best way to attach to a metal door.
- With expansion - if there is a large expansion of the doorway. It involves installing an additional block before installing the door block itself.
When installing the entrance block, serious installation measures are carried out. Anchor connections eliminate the need for welding. They make it easier to dismantle the door frame without disturbing the integrity of the structure to replace or correct the geometry of the door section. Fastening the fittings is facilitated by the presence of modern hardware.
The most important step in installing a door is attaching the door frame to the wall - the video below will confirm this. Weak fasteners, non-compliance with the level and other installation errors can lead to the fact that the leaf will not fit into the frame or the door will open randomly. In the worst case, the entire structure will simply fall.
We invite you to explore several installation methods and choose the one that seems most optimal to you in your situation.
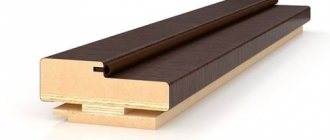
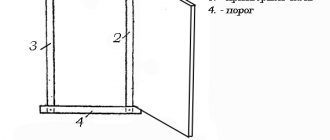
Connecting planks at an angle of 45 degrees
As in the previous case, before installing the door frame intended for an interior door, the structure is assembled on a flat floor base. The elements of the box frame are laid out on a plane, preliminary measurements are taken, and calculations are made. The structure is assembled from two vertical profiles, a lintel, a rebate and a hinge post.
The height of the vertical slats of the frame is equal to the height of the door leaf + the thickness of the lintel + 2 gaps between the slats and the wall (3 mm each) + the thickness of the threshold (if any).
The length of the threshold with a jumper is calculated in the same way. It is equal to the width of the door leaf + the thickness of the vertical frame slats + 2 gaps between the frame and the entrance wall (3 mm each).
After performing the necessary calculations, markings are applied to the beam and the excess part is cut off. Next, a section for the vestibule is marked on the profile, which is also removed.
Blanks prepared from timber are placed around the perimeter of the door leaf. Pieces of cardboard 3 mm thick are placed between them to obtain the required technical gap.
Next, markings are made for the placement of loops on which the canvas will be hung directly. To do this, you need to retreat 20 cm from the top and bottom of the vertical strip of the frame and draw a line. Loops are placed along these lines, their second edges are marked, and self-tapping screws are screwed through the holes to mark the attachment points.
Next, the loops are removed and, according to the applied markings, using a chisel, material is selected from the plank to a depth equal to the thickness of the loops. After this, they are inserted into the resulting recess and twisted.
After this, all the elements of the box are folded together while maintaining the gaps. Their perpendicularity to each other is adjusted, after which the connection is made using screws. It is recommended to make holes for them in advance. In this case, the screws are screwed in at an angle of 45 degrees.
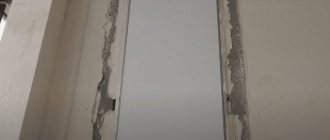
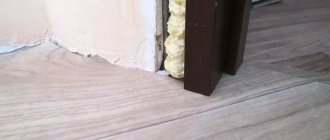
Why jambs bend: all the reasons
You know that door frames are made of wood. And, as you know, wood perfectly absorbs moisture. Of course, the outside of the jambs is varnished. And this, in theory, should protect the material from water. But the fact is that the varnish perfectly allows moisture to pass through.
The result is the following diagram. By absorbing moisture, the tree increases in size. And when it gives it away, its size decreases. The process is natural - but unpleasant.
Installation of jambs
Since wood has a non-uniform structure, it both increases and decreases non-uniformly. As a result, the jambs bend.
This is the main, only and main cause of the problem. How to solve it? Yes Easy! The jambs should be properly secured. Then they will remain in their place in any case, even when exposed to external factors.
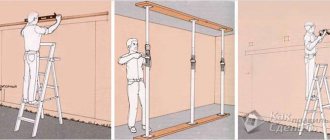
Planting a box on construction foam
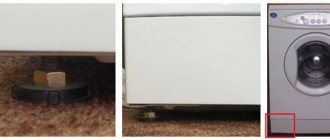
Door assemblies (frame, door leaf suspended on hinges and spacers between these elements to maintain the required gap) are installed in a previously prepared opening. The structure is adjusted vertically and horizontally using a building level and plumb line. After this, to secure it, wooden stakes are inserted between the box and the wall of the opening.
It is recommended to approach this stage responsibly in order to avoid door misalignment in the future. The gaps between the door frame and the wall are filled with special construction foam. It is recommended to do this carefully in small portions and thin layers until the free space is completely filled.
Next, you need to wait until the foam is completely dry, and then trim off any excess foam. Then the cracks are closed with decorative trim. The door structure will only be supported by polyurethane foam.
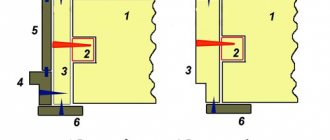
Option No. 1 Installing the door with anchors and screws
Installation of a door block involves fastening its elements using self-tapping screws that pass through special holes for installation. Typically 4 anchors or screws are used on each vertical side. It is also allowed to attach racks with 3 fasteners on each side. In this case, it is necessary to evaluate the degree of filling of the remaining gaps between the anchors. The smaller the distance between them, the less likely it is that the stand will not deform when blown with foam.
This option is considered the most reliable, as it involves a strong connection to the doorway of all parts of the door frame. At maximum density with the opening, the door block will be stable, durable and invulnerable. Even over time, it does not deform or become beveled, which is an excellent condition for the long-term operation of the door.
Along with impeccable practical and operational advantages, there is one drawback. It consists of violating the integrity of the door elements and thereby leaving marks from the screws. The visible parts of the fastening elements, even if they are the same color as the racks, sometimes look unaesthetic. The solution is to use decorative plugs, although they also do not blend perfectly with the overall background of the door frame.
Fastening the door structure
To secure the door leaf to steel hangers, metal fastening elements are used, designed to connect frames under plasterboard slabs. At least 4 such fasteners are needed.
Do-it-yourself installation of an interior door frame in a wall opening step by step:
The fully finished door leaf (already with fittings) is hung on hangers fixed in the frame. Cardboard spacers are inserted into the gaps between the canvas and the box frame. After this, the hangers are screwed onto the outside of the door frame.
Next, the door block is inserted into the wall opening and secured with wedges. The structure is leveled and the places where the suspension is attached are marked. In these areas, the material is selected, that is, a recess is made for the plates. After this, the door is leveled again and the plates are fixed to the wall.
The recesses with inserted hangers must be plastered, and the resulting voids must be filled with construction foam.
If a through installation option using anchors is used, holes for such fastenings are made in advance on the side of the box profiles. To do this, marking is done first. 2 anchors are fixed on each side.
At the point where the fastening is located, first drill a hole with a diameter of 14 mm (for the plug) with an electric drill, then a hole with a diameter of 10 mm (for the anchor). Next, the door frame is installed in the opening, fixed, and holes are drilled for anchors in the concrete wall of the opening. The installed anchors are covered with platbands.
This method of fastening is quite durable and, accordingly, more reliable.
How to securely fasten a jamb? Tips for everyone
Experts offer a number of tips:
- first step: insert the frame into the opening. It must be made of metal. And then foam it;
- Mechanical fastening of the jamb must be done at five points. If you neglect at least one of them, then the door will subsequently become difficult to close. Or other, not the best consequences will arise;
- if the door is double-leaf, then it should be secured at six points;
- if flexible plates are inserted into the opening, they should grip the wall.
The door catches the frame: how to fix the problem?
If, after installation, the door leaf rubs against the frame, the door closes with difficulty or does not close tightly, it is necessary to find out the reason.
Led the box
In such a situation, the first thing to check is the correct installation and reliability of the door hinges. If they are not the reason, it means that the box was deformed as a result of swelling of the construction foam due to significant temperature changes.
To eliminate the resulting defect, the door frame must be drilled through and connected to the concrete wall using long screws or anchors. The holes are then decorated with plugs.
Tools and materials
In addition to purchasing an interior door with frame and trim, you will need the following:
- a hand saw with a miter box for cutting at a precise angle;
- screwdriver or drill with attachments;
- for concrete walls you need a hammer drill;
- chisel;
- construction level;
- square, protractor, ruler;
- fasteners: screws and dowels;
- small nails;
- hammer;
- polyurethane foam;
- door fittings (handles, latches, hinges).
Installation methods
There are several ways to secure a door frame in a wall opening. Each of them uses its own type of fastener. And each option provides a certain level of strength and reliability of the structure.
The choice of method depends on both the wall material and the weight of the door leaf.
Foam mounting
Fastening the door frame to foam is recommended only for lightweight MDF panels and for infrequently used doors, since the reliability of fixation is not too high.
The algorithm for performing the work is simple:
- The building level determines its correct position relative to the vertical. Moreover, the level must be applied to two adjacent faces: internal and lateral;
- Spacers 3 mm thick are inserted between the frame and the closed door on top and on the sides;
Advice. In order not to stain the canvas with foam or damage it, you can use spacers made of wooden slats or special adjustable devices instead.
- Small areas between the wall and the frame are foamed with polyurethane foam;
- When they dry, the entire perimeter is filled with it. This cannot be done right away, since as the foam expands it will put pressure on the box. When foaming the perimeter, you should not fill it completely; initially, half the volume is enough to leave room for expansion.
Advice. To install doors, buy professional foam for a gun, and not in a can with a tube. Its price is higher, but it is dosed better, hardens quickly and does not have such a large expansion coefficient.
Suspension mounting
Like the previous one, this method is hidden, allowing you not to violate the integrity of the box and hide the fasteners. For this purpose, direct hangers are used for mounting drywall.
Advice. It is better to purchase suspensions from Knauf - they are stiffer and more reliable than analogs from other brands.
- We screw the hangers to the box, at least two on each side;
- We insert the box into the opening and level it, securing it with wedges;
- We bend the wings of the suspension to the walls (or to the slope, if it is wide) and mark their position;
- At the marked place we make a sample so that the plate is flush with the wall;
Advice. If the walls are not yet plastered or you will use a telescopic platband with a groove, you don’t have to do any sampling.
- We screw the hanger to the wall and foam the gap between it and the box.
Through installation with screws or anchors
This is the most common method applied to heavy doors installed in both wooden and brick or concrete openings. It consists of drilling through holes in the vertical posts of the box and fixing them in the opening with hardware suitable for the wall material.
The door frame is fastened according to GOST at four points on each side.
- Attachment points are marked on the racks;
- According to the marks, first, blind holes are drilled with a depth of 1 cm and a diameter equal to the diameter of the decorative plug;
- Next, through holes are drilled for screws (in wooden walls), dowels or anchors (in concrete and brick);
- After installing the box in place and fixing it with wedges, marks are made on the walls of the opening through the resulting holes, the box is removed and in these places holes are drilled into the concrete for anchors;
- The box is returned to its place and fixed; plugs are installed in the fastening points on the front side, matching them by color.
The fastening is as reliable as possible, and the door can be used immediately after installation is completed, without using foam.
Concealed installation with self-tapping screws or anchors
You can hide the fasteners under the hinges on one side and under the decorative plate of the lock on the other.
To do this, you need to remove the door hardware yourself and carry out installation as described above. But three fastening points are not enough, so you need to hang the canvas again or install spacers between the frame posts and fill the gaps with foam.
Installation on a special mounting system
Currently, a universal installation kit has been developed for quick and high-quality installation of doors. This fastening for the door frame allows you to easily adjust it in space without using wedges, and then firmly fix it in the desired position.
For reference. Adjustment is possible at any stage of installation, as well as during the operation of the door.
To install the box, you need to screw brackets with holes and grooves to it from the outside, hammer dowels into the opening and screw the mounting bolts into them. The box is hung on them by placing brackets on the bolt heads.
Note. The kit can only be used if the gap between the wall and the frame is at least 10 mm thick.
When purchasing such fasteners, pay attention to the load it is designed for. For example, the MKS 6 Economy kit is designed for installing doors weighing up to 20 kg. And the ISS 5-3D Titan can withstand canvases weighing up to 100 kg.
Additional equipment
In addition to the standard configuration, there are a lot of additional options on how to improve the functional qualities of the product. These additions include:
- hidden threshold. A unique development of a door threshold that is mounted in the door leaf and is activated only when the door is closed, completely protecting you from drafts. Relevant for children's rooms, when babies like to crawl or play on the floor;
- hidden hinges with a closer. A handy feature when you like your doors closed, or for rooms where it makes sense to close the door behind you;
- lock mechanism with hidden handle. If you really decide to make invisible doors as invisible as possible. Not very familiar in everyday use, but definitely an interesting design solution;
- concealed mounting stopper. A real find when you need to prevent the door handle from hitting a nearby wall;
- electric deadbolt lock. Obviously not for home use, but for offices, hotel-type premises - a convenient addition to the standard package;
- mounting grid. Be sure to use it when finishing installation gaps. Without it, there will be trouble - the finish will crack at the joints of the wall and the door frame. It is supplied as an additional set, only because the installers do not do the finishing work, this is done by your craftsmen. Check with them if they have this mesh or if it is better for you to order it along with the doors.
For clarity, study and decide for yourself one or another additional function.
Additional equipment options for installing hidden doors