When renovating a bathroom, it becomes necessary to move old or install new plumbing fixtures. In these cases, installation of water sockets for faucets in bathrooms is required. These fittings make it easier to place or replace faucets. You can connect the device yourself.
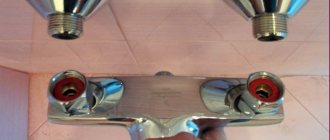
A water outlet is a specially designed fitting.
The need to use water sockets
No more than 4 such fittings are installed in one room. Water outlets in the water supply system are useful because they:
- facilitate the installation of plumbing fixtures and appliances;
- allow you to quickly replace a failed mixer;
- They supply water to several points, which simplifies the operation of the devices.
Water outlets make the process of installing plumbing easier.
Water outlets in the bathroom are installed in accordance with the requirements of SNiP. Otherwise, the likelihood of accidents increases.
Place for socket in accordance with regulations
It is better to install sockets and change wiring during a major renovation of the bathroom. This will make it hidden from view. Of course, GOST allows open wiring, but its appearance will not be particularly aesthetic. Gosstandart classifies electrical appliances for the bathroom by zone:
Bathroom zones
- In the zero zone (sink, shower and bathtub), installation of equipment with a voltage of no more than 12 V is allowed.
- In the first zone, the installation of a boiler is allowed, but 220 V sockets are prohibited.
- The second zone is located 60 cm from the first. Here it is allowed to install sockets of the 4th class of moisture protection.
- In the third zone you can install sockets, provided they are connected to an RCD. Any electrical appliances can be installed.
Types of distribution devices
Water outlets are divided:
- to single, used to connect 1 water line;
- solid double, used to connect 2 pipes;
- double, united by a common bar.
Fittings are made from non-ferrous and ferrous metals, plastics, and alloys. Wall varieties are classified as follows:
- crimping;
- threaded;
- crimping;
- self-anchoring.
Each type has its own positive and negative qualities.
Crimping type
The device is secured using a collet, which is a sleeve that is used to secure cylindrical elements. The part is installed between the outer and inner parts, which ensures tightness. The positive qualities of crimp water sockets include:
- acceptable price;
- increased service life;
- ease of installation;
- wide range of shapes and sizes;
- tightness;
- Possibility of dismantling and reuse.
The crimp type is secured using a collet.
Threaded sockets
The device is connected to the pipe using a thread. This connection is hermetically sealed, does not depend on operating temperatures, and holds in any conditions. High-quality thread is considered an important design element. The strength of the device is also determined by the material.
Threaded fittings are good:
- long service life;
- ease of installation and maintenance without the use of special tools;
- reliable operation, increased tightness;
- resistance to mechanical stress.
Water inlets with crimping
The devices are connected to the water supply system by soldering using a special device. The positive qualities of a crimp fitting include:
- minimum number of elements;
- small sizes;
- resistance to mechanical stress;
- compatibility with any type of plumbing fixtures;
- long service life;
- reliability and tightness;
- comfortable height;
- acceptable price.
Water inlets with crimping are resistant to mechanical stress.
The disadvantages are the impossibility of reuse and the need to use special equipment during installation.
Self-locking devices
The recently introduced self-locking fittings are dismountable, universal, and easy to install. Such water sockets can be dismantled and reused.
What power do electrical appliances have in the kitchen?
Knowing the power of kitchen appliances allows you to calculate the number of sockets.
Table: power of household appliances in the kitchen
| Device type | Power, W) |
| Refrigerator (energy saving class A) | 90-160 |
| Freezer | 10-120 |
| Microwave | · without grill – 800-900; · with grill — 2400 |
| Food processor | 450-800 |
| Double boiler | 850-950 |
| Air fryer | 1300 |
| Toaster | 850-950 |
| Hob | 6600-7000 |
| Separate oven | 3000-3500 |
| Electric stove with glass-ceramic coating | 6000-8000 |
| Electric kettle | 1800-2000 |
| Washing machine | 2000-2200 |
| Dishwasher | 2000-2500 |
| Hood | 240-300 |
Standards and regulations for installation
The rules by which appliances should be installed will be different for the bathroom and toilet, for washbasins and shower stalls, heated towel rails and washing machines.
For the bathroom
According to building codes, sockets for faucets and other appliances are installed as follows:
- the device should be located at a distance of more than 30 cm from the washbasin;
- the installation height of the faucet above the bathtub is at least 20 cm;
- The recommended distance from the fitting to the floor is more than 80 cm.
In the bathroom, sockets are installed according to regulations.
Compliance with these rules will not allow moisture to negatively affect the water outlet.
For washbasin and sinks
In this case, the distance from the floor to the device is 85 cm. When installing the equipment, other rules are observed:
- If the sink is mounted on a cabinet, the distance from the floor should be 65 cm. A gap of 8 cm is left between the hot and cold water taps.
- When using large cabinets, the distance from the floor to the fitting is reduced to 62 cm. Water inlets are placed in increments of 10 cm.
It is important to follow the order of connecting fittings to DHW and cold water systems. If the connection is incorrect, the water supply is disrupted.
For shower cabin
This device is not used like just a bathtub. Therefore, the installation rules are also different. The fitting is placed at a distance of at least 70 cm from the cabin. The shower net must be at a height of 2 m. The distance between the floor and the water outlet must exceed 50 cm.
The shower fitting is used differently than in the bathroom.
For washing machine
To ensure that the devices operate normally, the following rules must be observed:
- The washing machine tube must be able to reach the fitting freely. It should not be allowed to sag or become tense.
- The water supply tap must be left freely accessible. This helps to quickly shut it down when accidents occur.
- The socket must be firmly fixed. If the elements included in the kit are not enough for this, additional fixation methods are used.
- The fitting must be placed at a distance of at least 78 cm from the floor. Each machine has its own requirements, the indicated value is the minimum.
For heated towel rail
This water socket is placed at a distance of 1 m from the floor.
For toilet
If the plumbing is floor-mounted, then the recommended distance is 17 cm. At a height of 22 cm, the fitting is installed in the case of installing a wall-hung toilet.
For a toilet, the distance is 17 cm.
For drywall
When using a wall-mounted mixer, the thread of the water socket is recessed into the cladding by 5 mm. The fittings should protrude from the sheet by the same 5 mm. These values are suitable for standard tiles. If the wall is not tiled, the edges of the fitting are pressed into the drywall. When using a ball valve, the sockets are placed flush with the tiles. The thread should protrude 1 cm from the sheet. Soldering of water sockets is carried out before sheathing the frame.
Other plumbing
Of course, the devices described above are not the only ones, so standards have been developed for some other equipment.
Let's look at each of them:
- The installation of a socket for a floor-standing toilet must comply with the standard distance from the floor covering of seventeen centimeters.
- For a wall-hung toilet, twenty-two centimeters.
- Kitchen sinks - sixty centimeters.
- Heated towel rails require a distance of one meter.
- Hygienic showers - zero point seven meters.
In general, you can find recommendations for any technique that uses water mass. This is necessary in order not to violate the integrity of the entire hydraulic system, as well as not to damage its individual elements.
Also, compliance with these standards will give you confidence that the devices will function correctly, reliably and safely.
How to choose a water socket
When purchasing a device, pay attention to:
- on the material of manufacture;
- fitting installation method;
- connection method to a plumbing fixture;
- manufacturing company.
Manufacturing materials
The following materials are used for the production of water sockets:
- Brass is a durable, chemically inert alloy. Devices made from this material are resistant to increased temperature and pressure, and also have an affordable price.
- Steel is a more expensive metal. Its performance properties are similar to those of the previous material. Steel water sockets are not recommended for use in systems operating under pressures exceeding 20 bar.
- Cast iron is a durable material. Such fittings can be installed on high pressure pipelines. However, the fragility of cast iron complicates installation work. Water inlets made of this material are installed only in a hidden way. This eliminates the impact of negative factors.
- Plastic is a material inert to chemical influences. Plastic fittings can withstand high temperatures and medium pressure. They are used in combination with PVC, metal-plastic and polypropylene pipes.
- Bronze, copper and other non-ferrous metals. The water inlets made from them are extremely durable and can be used in difficult conditions. It is advisable to install on water lines made of the same material.
Brass, steel and cast iron are used to produce water sockets.
Socket fittings
When choosing a model, take into account that the devices are:
- single (designed for connecting heating taps, connecting to 1 line of hot water supply or hot water supply);
- double (used for simultaneous connection of a mixer and a washing machine, washbasin);
- with one connection and 2 outlets (designed to connect 1 device to 2 pipes, for example a faucet in a bathroom or kitchen).
The last type of equipment is equipped with a bar, which can be solid or composite.
Connection methods
Water outlets for sinks and bathtubs are supplied with the following types of fastenings:
- threaded (the devices are screwed in, pre-sealing the connection with tow, FUM tape);
- crimping system (such an element, fixed with a nut, increases the tightness of the structure);
- press (fastening is carried out using special equipment; it is resistant to increased pressure and reliable).
Water inlets are supplied with threads.
Equipment Manufacturers
An important selection criterion is the reputation of the manufacturer. The following manufacturers are considered the best:
- Valtec (Italian-Russian company). The company produces inexpensive fittings, compatible with the water supply systems of our country, with good build quality.
- UNI-FITT (Italian company). Manufactures plumbing fixtures from durable materials. The company controls the quality of products at all stages. The components are reliable and durable.
- Rehau (Germany). The German brand is popular in our country. The devices produced by the company are durable, reliable, and resistant to negative factors. The company produces water sockets from plastic.
What types of sockets are used in the kitchen?
Ease of use, functionality, and safe operation of kitchen equipment is ensured by a variety of models of electrical outlets. They have varying degrees of protection from moisture and are available in plastic, carbolite, ceramic, and rubber cases. By design, there are three types.
Invoices
For overhead sockets, you do not need to groove the kitchen wall to recess the socket box; if necessary, they can be easily installed and dismantled. Used when installing cable systems in an open way. They are convenient to use when new appliances appear in a renovated kitchen that require the installation of an additional electrical point.
Overheads are used for open cable networks
Hidden
A built-in or hidden socket in the kitchen is one of the best options for small household appliances. It does not interfere with the desktop or spoil the interior. For installation, you can choose any convenient place, for example, placed in the countertop of a kitchen unit or under it, as well as in the wall of a cabinet - this is a retractable option.
Swivel is convenient to mount on the tabletop
Hidden sockets in the kitchen have several advantages:
- safe as they are protected from moisture;
- save usable space;
- have special connectors for connecting a TV, smartphone or tablet;
- They are easy to install yourself.
Structurally hidden electrical points are retractable, horizontal, vertical, double, single.
The vertical block is pulled out by pressing the cover
The disadvantages of built-in sockets in the kitchen are the gradual loosening of the unit with constant use, the inconvenience of connecting the side plug, which can lead to kinking of the power cord. They are installed on surface and hidden cable networks.
Corner models
The corner socket in the kitchen fits well into the unoccupied space at the junction of the wall with the kitchen wall cabinet or table surface. They can be single or have several rosette groups. The installation method is similar to overhead models. Elegant design will suit any style of kitchen interior.
Corner ones save work space
Flaws:
- high price;
- not all models are suitable for installation in kitchens of old houses;
- inconvenience of using more than two sockets at the same time; plugs with side wires interfere with each other, and the cord breaks;
- inability to connect lighting fixtures.
The advantages include reliable protection from moisture, additional functionality, and compliance with both Russian and European standards.
Additional built-in options
Modern models of sockets in the kitchen are equipped with additional functions. The lighting makes it easy to find your way in a dark kitchen. To protect the safety of small children, manufacturers install curtains inside the device to block the entrance holes for the plug. Powerful sockets for wet rooms are equipped with a cover that protects the contacts from water and a protective shutdown device for electrical appliances.
An electrical socket with an RCD is installed for the boiler of a washing machine and dishwasher
Using a timer, you can program the operating time of the device followed by automatic shutdown. The switch is convenient because there is no need to pull out the plug; the equipment is de-energized by pressing a button.
A built-in wattmeter in the outlet makes it possible to monitor how much electricity a connected household appliance consumes. The indicator is equipped with a backlight that changes color depending on the amount of electricity consumed. This option makes it possible to use equipment more rationally and save money. An electrical outlet with a USB connector is convenient when you need to turn on the device and charge the gadget at the same time.
The timer allows you to program the operating time of the device
Preparation for installation
Installation begins with determining the location, then marking the surfaces and preparing the pipeline. After this, they begin to connect the equipment. At the end, be sure to check the correctness of the work.
Determining the location
When choosing a location, take into account the building codes that must be observed when installing a particular device. In addition, the fitting must remain freely accessible. This facilitates further maintenance, and in the event of an accident, repair of the device.
When choosing the installation location, building codes are taken into account.
Markings for water sockets
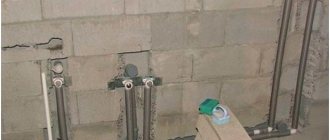
Polypropylene lines in grooves are laid with some reserve. Subsequently, they are cut taking into account the horizontal markings. After connection, the pipes are discharged into niches. At this stage, the surfaces are marked according to the drawing drawn up in advance. When installing the mixer, a distance of 15 cm is left between the axes running through the centers of the water outlets. When installing a faucet for a sink with hidden communications, this value may increase.
After completing the vertical marking, the pipes are placed along it. At the next stage, horizontal lines are drawn at the level specified in the project. The water lines are also marked, leaving an allowance of 1.5 cm for installing a water outlet. At the last stage, the polypropylene elements are cut with special scissors.
Pipeline preparation
After marking and cutting the polypropylene lines, fitting is carried out. You need to make sure that all threaded components are in place. Deviation of no more than 5 mm is allowed. If one section is shorter than the other, the pipe can be extended. To do this, use an element of the appropriate diameter, a plastic coupling of the required cross-section.
When welded correctly, the strength of the joint is comparable to that of a solid section.
Placement of water outlet
The device is fixed to the wall in the following ways:
- Using self-tapping screws. This method is considered the most reliable. Before placing the fitting, holes are made for fasteners. Dowels are inserted into each hole, after which a water socket is installed and screws are screwed in.
- Using cement-sand mortar. The method is suitable only for hidden installation of communications. The solution provides strong fixation.
- Using polyurethane foam. The method is also intended for hidden installation of pipelines.
Water outlets are secured using self-tapping screws.
To connect a faucet or other plumbing fixture, sockets and outlets must be at equal heights. To check the correct installation, use a building level.
Fastening fittings
The method of connecting the device to the water supply line is selected taking into account the material of the pipes. When working with polypropylene products, soldering is used with a special device. The work is carried out as follows:
- The unit is equipped with a Teflon nozzle. Heat it to +250°C. A coupling is inserted into the second nozzle. The elements are held for 3-5 seconds. This time cannot be increased, since polypropylene loses its properties when liquefied.
- The heated parts are removed from the apparatus and combined with each other. In the first seconds, changes in the position of the elements are allowed. During this time, the water socket is leveled.
- Leave the structure for a few minutes. The cooled material forms a strong, hermetically sealed joint. The system cannot be used until the plastic has completely hardened. Failure to comply with this rule leads to the occurrence of cracks, and accordingly, the service life is reduced.
Mixer bar
This element is used to firmly fix a plumbing fixture. The bar is made of stainless steel. Compared to a plastic product, it is more durable. The part itself is equipped with a coupling connector. The mixer hose is connected to it. The other side of the plank is attached to the water supply.
Checking connections
After fixing the fitting on the wall, the threaded connections are provided with plugs, then the water supply begins. After 10-15 minutes, check the connections for leaks. Particular attention is paid to soldered areas.
Final finishing
If there are no leaks, then proceed to calibrate the water outlets. The following features are taken into account:
- The position of the devices is selected taking into account the facing material. The plane of the water outlet must coincide with that of the final finish.
- If it is necessary to recess the fitting, the depth of the part should not exceed 5 mm.
- The coupling with the pipe is fixed in the plane of the wall if painting or plastering of the surface is planned in the future. If the room will be tiled, take into account the thickness of the tile and adhesive. The total figure is 11-14 mm. If there are defects on the wall that need to be hidden by increasing the thickness of the adhesive layer, water sockets are placed along the plane of the lined wall.
After calibration, they begin sealing the grooves with pipes with cement-sand mortar or a special mixture. Wait until the composition hardens, level the surface with plaster, cover the walls with tiles, plastic panels or other material.
Which outlet to use for appliances in the kitchen
For low-power kitchen appliances up to 3.5 kW, use a simple single-phase 16-amp socket. The installation is carried out above the countertop in the kitchen work area to connect a kettle, mixer, coffee maker, as well as a refrigerator and microwave. For the kitchen stove, three-phase power sockets are used, designed for a current of 32 A and a voltage of 380 V.
Power ones are designed for powerful household appliances
Design Features
For the installation of modern water supply systems, metal-plastic pipes and fittings are often used. This material is non-corrosive, durable and easy to install and maintain. For such systems, connecting elements appropriate for their intended purpose are selected: tees, press connections, etc. Polypropylene, polyvinyl chloride and other pipes are no less popular; fittings for them are also available in a wide range.
Different types of pipes are used for water supply; fittings for them are plastic or metal
As for the water socket, it acts as a fastening of the outlets of the water supply system to the wall and connecting them to the taps. A special feature of this element is that its design includes a fastening strip and an adapter fitting (socket). The fastening bar is usually made of steel due to its higher strength compared to similar samples made of metal-plastic or plastic. On this part itself there is a connector in the form of a coupling. On one side there is a thread for connecting a water supply hose or mixer, and on the other side it is connected to the water supply system.
Work options
You should start installing an outlet in the bathroom after the walls in the room have been finished with tiles or decorative plastic panels. To have an idea of the installation process, you can consider three possible options:
- Installation of overhead socket;
- Built-in installation;
- Use of a protective enclosure (standard electrical panel).
The socket body usually indicates the maximum current load that it can withstand. The passport of the washing machine and its nameplate reflect similar data. If a contact block designed for a lower current is used, then there is a very high probability of its overheating and partial melting. The socket for the washing machine must withstand a load of 16 A.
The socket packaging contains technical specifications
Before installation begins, preparatory work must be done in the room. An electrical power cable must be laid in advance at the installation site and an installation section must be routed out. The free end is stripped of insulation to the required length, and each core is covered with solder. Subsequently, the tinned areas will be fixed in the contact block of the socket.
Sufficient length of wire must be used. By not installing junction boxes or using connecting terminals for splicing, the labor intensity of the work will be significantly reduced. For all three installation options, the rules for performing electrical wiring, connecting an RCD and choosing an installation location are the same. Differences will only appear when mounting the installation products.
We purchase a suitable wire
When choosing a cable for laying power lines to household appliances, you should focus on standards and recommendations. Thus, for washing machines, copper wires and a hidden installation method are used. This will allow you to safely operate the machine without fear of fire or accidental tripping of the RCD. The cross-section of the wires used to power washing equipment depends on the power of the installed machine. As a rule, 2.5 mm is enough, but it is better to take it with a reserve to avoid network overload.
If the apartment has aluminum wiring with a core cross-section of 1.5 mm, then it is better to think about replacing it with a safer one. At a minimum, it is worth laying a new branch for the washing machine. Otherwise, the cable will heat up and melt the insulation, which can lead to fire.
