To make cabinet doors, like any other element, you only need a frame, free space and the author’s imagination.
An old grandmother’s closet or prefabricated structures purchased in a store will be suitable as a base.
Communities › Do It Yourself › Blog › The simplest DIY furniture door.
Hello friends. Many people like to frequently change the interior of their home. I offer you a relatively inexpensive way to change the facade of any furniture. This method of producing doors will also be useful to you in the production of any cabinets, mezzanines, etc. and so on. For example, almost all the furniture in my house is made by hand. The only thing you need to do is take the dimensions and order the material from an organization that produces custom-made furniture. Transportation and assembly, I think, is not the same and difficult task, for which you sometimes have to overpay two or even three times. I hope it will be useful to someone. Moreover, it looks no worse than factory furniture. Colors and sizes, you choose everything YOURSELF. For me this is a very big plus. Enjoy watching.
Tags: DIY furniture door
Comments 27
My friend, 99% of those sitting here have such furniture. What are you talking about?
What is this argument about 99%? As our teachers said at school - “if everyone is bent off the roof, you too will jump”? I am for changing Soviet thinking and striving for better. And it’s not necessarily more expensive; Ikea also has quite affordable wooden furniture. And you can do it yourself without any problems. I made a cabinet like this from furniture panels, and the paneled doors are for sale... Four years ago it cost me, I think 8 thousand, and this is a normal product, not shitty furniture made from toxic glue and sawdust!
Normal wooden furniture cannot be afforded by the common man. And it’s not so easy to do it yourself for a person who doesn’t care about it. And I didn’t understand at all about Soviet thinking. What, in the Soviet Union they made such furniture as they do now? Look at some grandma’s house, there’s a hundred pounds worth of some kind of heavy-duty wooden chest of drawers. And the varnished walls were already closer to the collapse of the USSR and there was no choice. What does the scoop have to do with it? Should I write something against it? I don't understand.
and at first I thought: you sawed, trimmed and glued yourself...
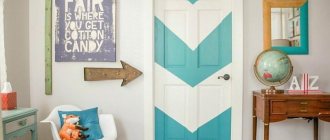
A good option to update the facade
The door weighed 2 kg, became 3 kg))
There is no way to upload the video, unfortunately, so I apologize if my question was answered there, what did you use to cover the casing?
What do you mean?
Normal topic. I think that regular trim made from sawdust in film can also be used, you just need to cut it carefully. If I can’t think of anything else, I’ll decorate the mezzanine like this.
Well, assembling such a façade at home is also problematic. A frame profile made of MDF is produced by AGT; it can be assembled in two ways or using plastic butterflies, but this requires a special router, and it is not cheap. Or using a pneumatic stapler on pins is also a rather specific thing and not everyone uses it on their farm. I’m telling you as a former furniture maker. So the only option left is to order a ready-made facade. And as far as I know, the cost is also not cheap. Although now most furniture makers work for the sake of work. Almost no gain. I did it a little differently. I bought all the materials myself and went to familiar furniture makers, sawed, cut, assembled myself. In this case, you can save money, but not too much.
I also thought it was a framer) but no) it’s an imitation of a framer, you can clearly see it in the photo. the profile is simply glued to an ordinary chipboard part
Then yes. Cheap and cheerful. At least change the frame every year when you get tired.
I also thought it was a framer) but no) it’s an imitation of a framer, you can clearly see it in the photo. the profile is simply glued to an ordinary chipboard part
This photo just didn't load for me. Fucking Chinese phone industry.))))
Well, assembling such a façade at home is also problematic. A frame profile made of MDF is produced by AGT; it can be assembled in two ways or using plastic butterflies, but this requires a special router, and it is not cheap. Or using a pneumatic stapler on pins is also a rather specific thing and not everyone uses it on their farm. I’m telling you as a former furniture maker. So the only option left is to order a ready-made facade. And as far as I know, the cost is also not cheap. Although now most furniture makers work for the sake of work. Almost no gain. I did it a little differently. I bought all the materials myself and went to familiar furniture makers, sawed, cut, assembled myself. In this case, you can save money, but not too much.
Yes, you don’t need any special milling machine. At one time they assembled stray stuff from plywood and a swallow cutter into a regular router. Its cost price was zero + a milling cutter and it did the job no worse. The difference in speed, of course, is not worth comparing
We also started with homemade ones. But we got away from it. It took a lot of time. And we have mass production. Moreover, when they start to customize it faster, it starts to affect the quality. When we started, almost all the machines were homemade. We even had a homemade formatter. It’s impossible to count how many fingers were cut off on him. I currently don’t have enough of two of them.))) Although in this case everything turned out to be much simpler. I glued the imitation frame and that's it. It seems like the look is different.
I agree with you (sorry if it’s YOU) The quality is greatly affected if you rush The formatter was also homemade)))
Those were the times! Romance!
Well, assembling such a façade at home is also problematic. A frame profile made of MDF is produced by AGT; it can be assembled in two ways or using plastic butterflies, but this requires a special router, and it is not cheap. Or using a pneumatic stapler on pins is also a rather specific thing and not everyone uses it on their farm. I’m telling you as a former furniture maker. So the only option left is to order a ready-made facade. And as far as I know, the cost is also not cheap. Although now most furniture makers work for the sake of work. Almost no gain. I did it a little differently. I bought all the materials myself and went to familiar furniture makers, sawed, cut, assembled myself. In this case, you can save money, but not too much.
A simple solution accessible to everyone
To get the job done quickly, we choose one of the least labor-intensive options for making hinged cabinet doors:
Homemade paneled doors are hung on semi-concealed overhead hinges. There is no need to cut the grooves with a milling cutter; the sashes can be made to the required size; upon completion of the work, the product is coated with furniture varnish.
Rice. 1. Plywood doors with a semi-secret hinge
Homemade swinging plywood doors have trim around the edges. Each sash should protrude about a centimeter beyond the front frame. No groove cutting is required; fastening to the back of the door and the end of the front frame is easy.
Hanging ready-made doors selected in a store on semi-concealed hinges or manufacturing doors in production according to drawings makes it possible to get the job done without turning the apartment into a carpentry shop.
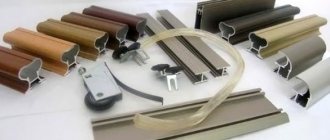
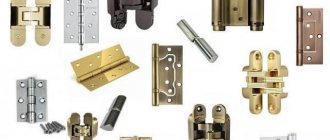
Rice. 2. Door hardware samples
For accessories, if there are no self-closing hinges, you can use: A – universal lock; B – roller; C – lock, locked with a key; D – door brass bolt; E – magnetic latch. The last element is most often used on glass doors.
Finishing plywood doors
Work should begin by taking the dimensions of the doorway and selecting the number of doors to be installed. With a width of more than 60 cm, one sash is not enough. If you decide to install one panel, the height and width remain unchanged. When double doors are made, the width of the opening is divided in half and about 1.3 cm is subtracted from it on each side.
Rice. 3. Making a cabinet: taking measurements
To frame the sashes, profiles with bevels of 45° are measured and cut. These pieces are secured to the panel with 1 1/2-inch finishing nails. Varnish coating is carried out.
On the back side of the doors there are 2 semi-secret overhead hinges. We recommend fixing them at a distance of 5 cm from the edge of the panel (top and bottom). If the door height is more than 75 cm, you should use 1 more hinge in the center. To check the correctness of the taken dimensions, it will be convenient to temporarily stick adhesive marking tape on the front frame, above 1.3 cm from the doorway.
The door is placed on the opening, the top edge is aligned with the marking tape. The location of the hinges must be marked on the front frame with pieces of the same tape.
Basic holes are drilled into which the door is secured with screws. The loops should be in the marked place. The marking tape is removed after installing the door. Lastly, door handles and other door hardware elements are attached.
Rice. 4. Making a cabinet: placing the sash on the opening and installing it
If a folding door is made, then semi-secret hinges are attached to the front frame at the bottom, and holders and latches are installed on the sides to prevent spontaneous tilting of the sash.
Rice. 5. Making a cabinet: attaching door hardware
Making at home
Accuracy is the key to obtaining a high-quality and beautiful product, so each stage of production must be as prepared as possible. The selected material for the door is installed on a flat surface of a workbench or regular table and secured.
Marking
After carefully measuring the cabinet, it is necessary to apply markings to the material sheet. To do this, you need to draw several dots or dotted lines along which the cut will follow. If you are not sure that the cut will be smooth, you should connect the dots to obtain a smooth, uniform line.
Cutting parts and processing
A circular saw with a well-sharpened blade is used to cut out the part or parts of the required size.
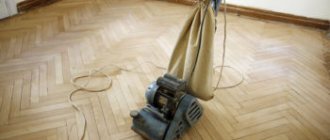
The nicks and irregularities formed at the cut site are eliminated using a grinding machine or ordinary construction sandpaper.
Using the grainy surface of the sandpaper, you can create a beautiful 45 degree cut to make the doors look more elegant.
Advice . After processing work, the cabinet door must be attached to the frame to determine whether the dimensions match and how smooth the door is.
If the work is carried out efficiently, you can begin decorative design; for this, the wooden surface is covered with stain or paint , preferably in two layers. The door is left to dry in a dry, well-ventilated area for one to two days. After this, it is better to varnish the door in order to preserve the coating as much as possible for a long time. The more layers of varnish are applied, the more glossy the effect appears.
Accessories and decoration
At the final stage of manufacturing, hinges and handles are screwed to the door. It is better to screw the latter exactly in the middle so that the shock absorption of the door reaches the maximum effect.
For doors in a classic design, you can purchase a molding primed for painting or a ready-made frame in a golden or silver shade. If the material chosen for the door is strong enough, you can insert a mirror into the frame.
Assembly of sliding doors
You can install not only swing doors, but also sliding doors with your own hands. They save space and give furniture a more stylish, modern look. Sliding doors are an integral element of the design of both built-in and cabinet wardrobes. According to the constructive solution there are:
In the first case, the main load is supported by the upper guide, in the second – by the lower one. With the proper dexterity and skills, a home craftsman can install any doors in a closet with his own hands. However, if you want to make a suspended structure, you will need:
Over time, under heavy weight, the upper part of the face frame will begin to sag. There are more reliable suspension systems that provide a smooth ride. We are talking about designs with a distributed load across 8 wheels (not 2, as usual) and installation of bearings in the rollers. But this system:
An advantage of the suspension system is its low demands on the door leaf. A door made from any rough material, screwed with larger self-tapping screws, will roll properly.
Installation of frame and door profiles
To make the cabinet door fastening as secure as possible, prepare connectors for the pins. We align the door façade so that no problems arise during use. To avoid damage to the profiles, use supports when creating holes. Tables and chairs are suitable for this. When they are ready, sand them with sanding paper. It is important to leave a step of 5 centimeters. We do the same for the screws to ensure reliable fixation.
Next, we select a place to install the guide. It is optimal to move it 1-2 centimeters deep so that the door is not too far inside and does not stick out from the outside. This fact does not interfere with use, but the aesthetics of the furniture are spoiled. Don't forget about the stoppers in the bottom grooves to secure the doors tightly without creating gaps.
Choosing a rail structure
It is easier to assemble a rail system with your own hands, although it is more capricious in operation. When deciding on a design, pay attention to its quality. It will be impossible to fix it, to do anything worthwhile, if, having decided to save money, you purchase dubious parts.
Door systems of the “Commander” type have proven themselves in operation. However, do not rely only on the model name: some unfortunate manufacturers manage to replace aluminum guides with tin ones or in some other way ruin a good idea.
The main advantages of using a high-quality rail system:
Rice. 6. Possible options for making your own wardrobe facades with rail doors
When installing this system, no screw connections are used; the door frames are fastened with latches. For DIY assembly, this is the most acceptable option.
An example of calculating the overall dimensions of sliding doors
Let's calculate the dimensions of sliding doors:
Rice. 7. Wardrobe layout
Calculating the width of the doors will give a size of 1556 mm: from the total span of the opening (1572 mm) covered by the doors, it is necessary to subtract the thickness of the right wall (16 mm). Any sliding structures overlap each other, so we add 50 mm to the calculated figure (25 mm for each panel), we get 1606 mm. The extra 50 mm is guaranteed to ensure the absence of gaps when opening, but you can make a tolerance of 25 mm, at a minimum. We divide the resulting width (1606 mm) by the number of planes (2) and derive the width of one sash - 803 mm.
Advantages
Sliding doors to the kitchen have many advantages:
- Space saving. Installing these systems allows you to get additional free space, whereas the open wing of swing doors requires space. Sliding structures maneuver freely along the wall or are hidden in it. This allows even the smallest apartment to look comfortable and roomy.
- Zoning of space. It becomes possible to divide a large room into several smaller ones that perform different functions. For example, separate the dining room area from the kitchen. Sliding partitions are relevant for studio apartments, when there is no desire to reduce the area of the space, but periodically there is a need to isolate any of the zones.
- Safety and reliability of the design. The absence of a threshold and the free sliding of doors ensures comfortable movement for children and the elderly.
- The number of sashes in a sliding structure can vary from one to several. This allows you not only to transform the interior, but also to simplify control over the width of the doorway.
- Depending on the interior design, you can choose different materials and finishes for the partitions, and order the design according to individual sizes.
Sash design
The wardrobe door leaf consists of profiles:
The lower profile has deeper sidewalls
Upper profile for sliding door leaf
The handle can stand on both sides
These profiles are placed between parts of the door leaf, but you can do without them - if the door is solid and not composite
All this together looks like in the photo. The door material you choose is inserted into this frame, into the grooves. It can be glass, mirror, chipboard and other materials.
Sash design without filling
Separating profiles are optional. They are needed if you assemble the sashes from different materials or you simply like them this way better. The maximum thickness of the filling material is 10 mm, the minimum is 4 mm. Thinner ones - glass, plastic, mirror - are inserted through a sealing gasket.
In order for the sash to be able to move, rollers are installed on it - at the top and bottom. The lower rollers bear the entire weight of the door, and the upper rollers stabilize the vertical position of the leaf, preventing it from deviating.
Rollers for wardrobe doors
The rollers are attached to the side profiles using special fasteners.
Materials
The range of materials for the manufacture of door panels is varied:
- Tree. If financial capabilities allow, you can give preference to wooden door consoles. This is a good investment, because varnished wood looks simply perfect, especially between the living room and the kitchen. The door leaf can be either solid or in combination with other materials (paper, plastic, glass, mirror).
- A significant advantage of wood is its environmental friendliness and pliability, thanks to which it can be included in various interior styles. The only drawback is the massiveness of the finished products, so it is better to use door consoles in spacious kitchens. Wood often goes in tandem with glass inserts; such door options are popular and fit into any design idea.
- Glass. Designs made from glass sheets will ideally fit into the decor of a room in the style of hi-tech, minimalism or classic interior. The choice of these doors should be based on the strength and reliability of the material: how the glass reacts to sudden changes in temperature and whether it is afraid of impacts. If there are small children or animals in the house, you should use only impact-resistant fabric. The value of these doors lies in their ability to transmit light; they do not create a completely isolated space.
By choosing models of a certain dullness and color, you can achieve the required transparency of the structure. Then through the closed door it will not be visible what is happening in the adjacent room, but at the same time a certain amount of light will penetrate.
- MDF/Fibreboard is a high-quality budget material for kitchen consoles. Such doors are appropriate if it is not possible to install natural wooden panels or if the kitchen is too small and cannot withstand such door finishing. Visually, they are almost indistinguishable from their natural “colleagues”. Doors made of MDF and veneer are lightweight, do not require maintenance, and are resistant to temperature changes. A wide range of colors allows you to choose door leaves to suit any interior style.
- Plastic. Often used in conjunction with folding structures and sliding doors. The material is an economical option, but has a presentable appearance. This is the optimal solution for the kitchen space: plastic doors do not require special care; all you need to do is walk over them with a soapy cloth. If the kitchen is adjacent to the living room, such decoration of the doorway will look somewhat ridiculous and cheap.
Guides for sliding doors
As you understand, the sash is not everything. Guides are needed along which these very doors will move. There are two of them - upper and lower. In appearance they differ significantly.
Top guide for wardrobe door
The bottom guide is made of metal
When installing the door, first insert it tightly into the upper guide, lift the sash all the way and place the lower rollers in the corresponding slot. The entire structure is shown in the following photo.
Size calculation
When assembling a sliding wardrobe door yourself, there are two options. The first is to measure the opening, think about how many doors you want to have and contact a door manufacturing company with this information. Just make sure they sell the parts without paying for assembly. The manager himself will count all the necessary materials for you, give you the dimensions and announce the amount. It's simple. But you will have to purchase everything from this office, i.e. choose from what is available.
The second way is to calculate everything yourself and look for the necessary components from different companies. It’s more complicated and more expensive, but there’s a wider choice. For those who do not like simple paths, we will describe the calculation of the components.
Doors
Calculate the width of the doors so that when closed, only one handle is visible, but it should not cover the door leaf itself. For a sliding door with two leaves, you calculate it like this: measure the width of the opening, add the width of the profile and divide in half. This will be the width of the sash.
For example, the opening is 1600 mm, the width of the handle profile is 26 mm. We get 1600 mm + 23 mm / 2 = 811.5 mm. Please note that the width of the handle profile is taken arbitrarily. It can be different in shape and, naturally, in width. When making calculations, substitute the width of your chosen structure.
Photo
If you have already mastered making doors and want new feats, we suggest looking at other options: