Hello readers of my blog! Today we will talk about which self-leveling floor to choose for an apartment. It would seem that the matter is not tricky, but when you are faced with this problem, you have to think about how to do it correctly, what preparation to do, what materials to choose. Thus, I decided that this article would be useful to someone, and I am devoting my efforts to this subject. In it I will answer a number of questions that will arise immediately before choosing which self-leveling floor to choose for an apartment, and some even after that. This topic is quite broad, because before work, thorough preparation is necessary, but how to do this? And this is a separate topic. You can learn about all this in great detail in the article below.
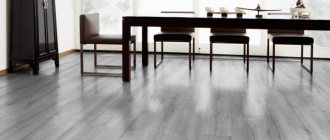
Leveling the floor in the apartment
If you have started a major renovation, be it an apartment in a new building or in an old house, and you want to end up with a flat floor that will be pleasant to walk on, then practically the first thing you have to start with is leveling it.
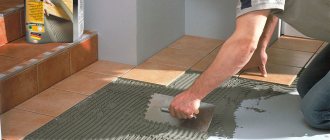
The easiest and fastest way to level the floor is to use a self-leveling mixture.
Experts from Sika, a Swiss manufacturer of building materials, conducted a survey among their clients and identified the most common mistakes when carrying out floor pouring work.
Mistake 1: Choosing the wrong material
The survey showed that 16% of respondents inattentively read the description of the characteristics of levelers, as a result of which they buy completely different floor mixtures that are needed for this particular repair. There are no universal materials suitable for all types of premises, which is why each manufacturer has a whole line of floor levelers.
Floor mixtures differ in the method of application, layer thickness, quality of the resulting surface, curing and drying time, and interaction with the topcoat.
In this case, it is better to choose cement-based mixtures rather than gypsum-based ones, since they are more versatile. Parquet layers also adhere to the same position, since laying parquet with glue on a gypsum base is strictly not recommended.
So, before buying a self-leveling mixture, you need to decide what will be on this floor - parquet, parquet boards, tiles or laminate.
How much material will be needed, calculation of consumption
As a rule, if a ready-made mixture is purchased in a retail chain, the manufacturer’s annotation provides information about the rules for choosing the amount of building material, at a level of 1 mm and a prepared base.
The master can independently make such a calculation for 1 m2 of floor using the formula:
P = S * H * P
Where:
S—floor area;
H—layer thickness;
P is the density of the bulk mixture.
The first 2 indicators are measured with a tape measure, and the density is taken according to the passport data for a specific composition.
Additional Information! To level a floor of 15 m2 with a layer of 1 mm you will need: 24 kg or 1 bag of 25 kg. To fill 15 m2 and 5 mm thick, 120 kg is required, 5 bags of 25 kg each.
Mistake 2: preparing the base for a self-leveling floor
Almost a quarter of the buyers surveyed incorrectly answered the question about preparing the foundation, and this can lead to dire consequences!
Dust, grease stains, putty and paint residues lead to poor adhesion between the base and the floor, which reduces its strength and in the future can lead to cracks and destruction of the base.
In addition to stains, it is also necessary to remove flaking areas of the base and cement laitance, as well as repair and putty cracks and crevices. Don't forget to vacuum everything thoroughly!
Error 3: unprimed surface
26% of respondents did not even think about using a primer.
The result in this case, as a rule, is the same - a fragile, peeling floor with cracks, which they then try to hide behind the finishing coating.
The fact is that an unprimed base quickly absorbs moisture, violating the required water-cement proportion.
Particular attention should be paid to the loose base - treat it with a primer at least twice.
Mistake 4: Preparing the self-leveling mixture alone
62% of respondents thought that they could cope with leveling the floor on their own, but anyone who has tried to do it alone at least once knows that nothing good will come of it.
To fill a room, you will need more than one batch, and while you are preparing the second batch, the first one will already begin to set and lose its plasticity, which will not allow you to fill a flat floor.
Time is a key factor in performing a quality pour when working with self-leveling mixtures.
And remember that when preparing the solution, we gradually pour the mixture into water (in no case vice versa), while a second person carries out the kneading.
Mistake 5: Not thinking about the finish
46% of respondents planned to pour screed of the same height throughout the apartment.
And this is correct if you are going to install only tiles or parquet in all rooms. But for different finishing coatings (parquet, laminate, linoleum, cork, ceramic tiles) bases of different heights are needed. Therefore, you first need to decide where, what type and thickness of the finishing coating you will lay.
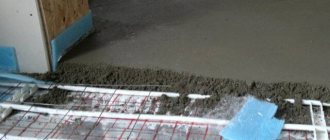
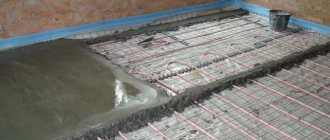
If you have already made this mistake, and the height difference is small, then you can raise the level of the base: for tiles using glue; for parquet, laminate, linoleum and cork using a thin-layer self-leveling, quick-drying cement floor. Also, do not forget to take into account the thickness of the “warm floor”.
It can also be embedded in tile adhesive or filled with self-leveling cement screed
What does self-leveling mean?
Why is it needed?
The floor, as you know, must be smooth and durable. A few decades ago, this was ensured by the use of cement-sand screed.
But progress does not stand still, and science has given us such a miracle as a self-leveling self-leveling floor. With its help, you can quickly and efficiently level the surface, and put it into operation in a short time.
The question of which is better: self-leveling floor or screed is somewhat incorrect. Because if you look at it in detail, self-leveling flooring is one of the types of screed. Only it is produced on a different basis and filled using slightly different technologies.
Why such a coating is necessary can be answered in a nutshell, for ideal, quick leveling of the floor. Moreover, this technology allows even an untrained person to do this work with his own hands, if he has detailed instructions.
Types of coating
For different types of premises, different self-leveling floors are used, in particular, it is customary to distinguish.
- Self-leveling coating based on cement.
- Self-leveling coating based on gypsum.
- Self-leveling coating made from synthetic polymers.
The first 2 types are more used for residential premises, as an ideal intermediate layer for laying the finishing coating. The third type is more often used for filling large industrial premises. It has also found its application in the arrangement of decorative, designer floors.
Self-leveling floor scheme
Mixtures used for flooring
Self-leveling mixtures are usually used exclusively at the final stages to create a perfectly flat floor. They are used when the height difference is no more than 40 mm. Theoretically, it is possible, by pouring layers, to even out large differences, but the price of such mixtures is quite high and such a screed will be very expensive.
Therefore, we advise you that if your floor has too large differences in plane and horizon, first fill the beacons using a reinforcing mesh with a regular cement-sand mixture, and then, when it dries, this is up to 1 month, level special solutions.
A self-leveling cement floor is a mixture of the main component, which is cement with the addition of polymer-based modifiers.
A distinctive feature of this mixture is that it is not afraid of high humidity and can be used in damp rooms.
- The coating also has a high compressive or bending strength.
- The coating, due to the presence of cement, adheres perfectly to concrete.
- Has a high degree of wear resistance.
Gypsum self-leveling flooring is a similar mixture, but uses gypsum as a base.
This coating is no longer as durable as cement.
- It cannot be used in damp areas.
- Its flexural and compressive strength is much lower.
- The coating, although quite strong, is fragile.
- It is not recommended to lay ceramic tiles on it.
- Among the advantages are the short drying time and the price is more affordable.
Scheme of decorative self-leveling coating.
Mistake 6: forgetting about a technology break
Every second person believed that the technological break allotted for drying the screed is not completely necessary (in some cases it takes up to several weeks), and the topcoat can be laid in just a week.
In practice, the best solution would be to adhere to the deadlines stated by the manufacturer.
Otherwise, this may lead to deformation of the wood and laminate. If you cannot wait long, then it is better to purchase a modified mixture with a rapid increase in strength at the stage of purchasing materials.
Error 7: leaving drafts and not protecting the screed from direct sunlight
Once the floor is finished pouring, you can relax and wait quietly. This position was voiced by 36% of buyers.
But this is a mistaken opinion. Even before starting work, you must make sure that there are no drafts in the room, that the windows are closed, and that direct sunlight does not fall on the floor surface. Otherwise, this will lead to premature drying of the mixture and the appearance of shrinkage cracks, as well as peeling of the screed from the base.
Incorrect use of heat guns leads to the same result - they should be aimed at the ceiling, and not at the floor surface. It is very important not to overheat the room. A temperature of +25°C is sufficient.
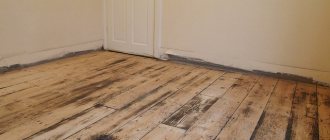
Right on the sore spot, I recently did some repairs, well, not me, but the repairmen, if you can call them that. In general, the floor, although it is laid with laminate, is just like after a “bombing”, or like our roads, everything creaks and sags.
And this is an interesting thing with rubber crumbs, and it can be used on playgrounds. We need to take it into account.
I know people who have laid laminate and even linoleum on warm water floors. It's clear what this could lead to. And I know people who laid laminate flooring in the gym, and the first dumbbell that fell made a hole in the floor.
The best floor screed
In a new room or one requiring major renovation, as a rule, you have to decide the issue of arranging floors and choosing a screed.
A screed is an intermediate layer between the base of the floor and the floor covering; it compensates for unevenness, provides heat and sound insulation, and masks utility lines.
The screed is made from various building mixtures, carefully leveling and smoothing them. It is important that there are no voids or cracks in the screed; the service life of the floor depends on this.
Expert advice
Typically, one bag of mixture is designed for one batch, but everything will depend on the quality of the floor surface and the presence of curved areas on it.
Taking into account water, when mixing from one bag, 20 liters of solution are obtained; it is not recommended to do more at one time. Since the solution is liquid, there are no joints when pouring it; one room is filled at a time, by carrying out several pours. To remove air efficiently, the roller with needles should be several millimeters above the pouring level.
To prevent the mixture from spilling outside the room, you need to install dampers; it is better to do this right away than to install them in a hurry.
How to choose a floor screed
Floor screed can be dry, semi-dry or wet, depending on the percentage of water in the building mixture used.
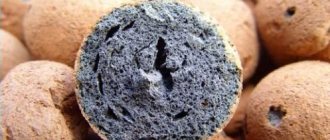
To install the screed, you will need to clean the base, seal the cracks in it, and lay waterproofing. In the case of wet and semi-dry screed, in order to lighten the load on the floor slab, a layer of expanded clay is often poured before pouring.
To obtain a horizontal surface, “beacons” are used - special guides along which the required level of the working mixture is determined and leveled, removing excess and smoothing it.
To better understand which type of floor screed to choose, let's look at their main characteristics.
Wet floor screed
Wet screed is the pouring of a prepared base with a cement mixture, most often a cement-sand mortar (sand concrete).
Sand concrete is the most versatile material; it is used in large-scale capital construction.
Can be used to create a finishing surface in technical rooms. Suitable for rooms with high humidity. High grade strength M150.
Shrinkage takes 28–30 days, and there is a possibility of cracking. It is necessary to control the moisture content of the screed during shrinkage. It is quite difficult and time-consuming to prepare the solution yourself, as is leveling the surface.
Heavy weight, high floor load. It is necessary to use self-leveling mixtures (self-leveling floor) after laying the screed. The need for floor insulation.
For wet screed, you can use polystyrene concrete.
It provides reliable thermal insulation with minimal load on the floors, does not require reinforcement, and dries quickly. Its main disadvantage is the need to additionally strengthen the surface of the screed (for example, with a self-leveling floor) and the inability to use it as a finishing coating.
The mixture for wet screed can be made in production or directly on construction using a concrete mixer. It is necessary to take into account that each room has only one day for arranging the screed. In this case, there will be no seams and, as a result, no cracks.
Gypsum or cement.
Good day!
Please tell me about the next question.
New building in a monolithic house. I myself (already decided) will level the existing cement screed (the screed is normal) under the plywood (then I will decide on laminate or parquet boards). Area 50 m2. Differences in floor level are at least 5 mm (about 30% of the total area), maximum 33 mm (about 30% of the total area). I will level it using self-leveling (already decided). I choose the self-leveling one.
In connection with this question.
To begin with, I want to decide on the type of self-leveling, cement-based or gypsum-based. What + and – do these and those have? And also, in the bathroom should you use self-leveling only based on cement, or can you use gypsum based and then a good coating waterproofing?
PS: Internet is only at home, so I apologize in advance if it takes me a long time to answer questions.
they don’t make gypsum floors – nonsense
Not nonsense! Take any Khrushchev. The floor is only made of plaster. Pros: a) lower thermal conductivity compared to cement b) better soundproofing compared to cement c) gypsum floors do not shrink Well, in general, here it is” >
By the way, there are also disadvantages
The link is dead. I would be grateful if you take a look.
ALNI wrote: The link is “dead”. I would be grateful if you take a look.
” > Error in address =)
The KNAUFFliseystrich FE80 mixture is used for the production of seamless floors with and without a separating layer, “floating” and heated. Used as a leveling layer for subsequent coating. The nominal thickness of the self-leveling floor is at least 2.5 cm. Designed for enclosed spaces.
I warn you right away. The floor turns out very good if you use only branded mixtures. Hack work will lead to big troubles. Since the gypsum used is not simple and, at the same time, is modified with various kinds of additives.
I repaired Khrushchev and not only my own, but nowhere did I see gypsum screeds, unlike plaster walls
Modern cement-based levelers also have very low shrinkage. Fliseystrich FE80 is used for the manufacture of seamless floors with and without a separating layer. What is its compressive strength? We have gypsum levelers (20 MPa). In general, most manufacturers do not have them in their assortment, i.e. Cement based only. Why is not clear, because in principle, the strength of gypsum can be more than 20 MPa (only the W/C will have to be reduced and the solution will accordingly spread worse), and moisture resistance - there are water-repellent impregnations or additives
Obviously depends on geography. In Lugansk, all Khrushchev buildings are exclusively plaster.
Modern cement-based levelers also have very low shrinkage
I surfed the Internet today and got the impression that all cement-based self-leveling (it says “self-leveling”) are intended to be applied in a layer up to 20 mm thick (maximum 30 mm, one or two grades). There are a lot of self-levelling gypsum for application in layers up to 50 mm or more.
I was also very surprised at the time, but it turns out that such compositions exist. And gypsum can have sufficient strength, but it is unlikely that this technology was used in Khrushchev buildings - these are modern compounds.
What does unlikely mean? Should I pick out a piece of the floor and send it for examination? I repeat. I have never seen a Khrushchev building with cement floors. Only plaster!
And I won’t agree to a cement one!
Dry floor screed
This screed consists of a lightweight bulk material (expanded clay, perlite, vermiculite), on top of which sheets of plasterboard, chipboard or plywood are placed on metal profiles in one or two layers. The joints of the sheets are glued.
Simple, fast and clean installation, accessible to DIYers. The mixture is immediately ready for use. Does not require expensive professional equipment.
Provides high sound insulation. Does not require drying or shrinkage. Due to the absence of water in the working mixture, it can be easily installed in the cold season, as it is not subject to freezing.
Professional builders often say that, in addition to moisture, the main enemy of dry screed is amateurs.
If the backfill is poorly compacted, it shrinks and the top sheets stick to the profiles. This leads to deformation of the floor. The sheets must be supported over their entire area so that the load is evenly distributed.
The profiles themselves must be level, otherwise the floor will have differences in height. Although professionals can redo dry screed in one day, this is an additional cost. Therefore, if you decide to make a dry screed, immediately discard the idea of saving on calling a construction team.
Semi-dry floor screed
Combines the advantages of wet and dry screed. The working material is a wet crumbly cement-sand mixture with plasticizers and additives.
To mix it and supply it to the room, mobile mortar pumps (pneumatic blowers) are used. The finished surface is processed with a trowelling and grinding machine. To prevent the semi-dry screed from cracking, immediately after grouting the surface, so-called shrinkage joints are cut to a depth of 1/3 of the thickness of the screed.
They should be smooth and have no branches. Before laying the topcoat, they are sealed with sealant. If the mechanical load on the screed is increased, the seams can be reinforced with metal corners.
You can walk on such a screed within 12 hours after installation.
In industrial premises, as a final finish, semi-dry screed can be impregnated with special strengthening solutions or filled with the so-called self-leveling floor [7].
It sets quickly, gives slight shrinkage, and is not prone to cracking. Instead of reinforcing mesh, fiber fiber is used, which is already part of the mixture.
Universal, suitable for use in residential and industrial construction. Does not create a large load on the floors. Has high grade strength.
The turnkey cost is low, just like a wet screed.
List of manufacturers
The question of which brand of self-leveling floor is better is significant. Indeed, this parameter can have a decisive impact on the installation result. For this reason, we decided to clarify.
Vetonit
The brand specializes in the production of dry formulations that have excellent quality characteristics. Varieties are individual and differ in the time it takes to harden.
Knauf
The brand produces floors based on gypsum in combination with quartz sand. This is a good brand that is liked by both professionals and amateurs. Its self-leveling floor products are suitable for use in rooms with moderate humidity characteristics. Plus, the composition combines well with other solutions.
Volma
Company from the Russian Federation. Specializes in the production of self-leveling floors from the budget segment of products.
Moment (Ceresit)
The brand's self-leveling floor is used as a starting surface. Some types have the ability to harden quickly. This allows you to reduce operating time to a minimum.
Classification of self-leveling floors for home
One-component floors. Such polymer floors for apartments are a single-color coating, used in most cases as the basis for laying a layer of decorative material - it can be stone, parquet board or linoleum.
The one-component self-leveling floor is quite thin and dries quickly without bumps, seams or cracks.
Sometimes such breakwaters can play the role of a separate covering.
Two-component floors. More interesting polymer floors in the apartment, which contain not only a layer on which decorative elements are laid, but also a layer with a pattern - at a certain angle it acquires the properties of a three-dimensional image. These floors are expensive, but they look very beautiful and stylish.
If the floor surface during construction has large protrusions and differences in height, thicker layers of polymer flooring can be used to level the base - for this, a certain amount of quartz sand is added to the liquid components of the floor. This intervention increases the drying time of the floor to 5 – 7 days.
Advantages and disadvantages
The advantages of using this technology are its following features:
- simple procedure for preparing and using the solution . Before starting work, you just need to mix the composition with the required amount of water;
- fast drying time of the solution. They are usually indicated in the instructions supplied with the material;
- a large selection of different types of compositions. The building materials market offers products from both domestic and foreign manufacturers;
- the liquid solution fills all the unevenness and differences, forming a smooth surface;
- using the mixture requires minimal preparation. Such a screed does not require reinforcement.
Flaws:
- a thin-layer screed 5-20 mm thick forms an insufficiently strong floor;
- Screed made from a self-leveling mixture has low sound and heat insulation characteristics.
What is the composition of polymer self-leveling floors?
The above classification of polymer floors is not the only one. They can also be divided according to materials:
- Polyurethane. Such floors have good impact resistance.
Visually, the composition of this floor resembles thick oil paint. As a rule, polyurethane self-leveling flooring is installed in corridors, halls and other rooms where there is increased load and intense friction of the coating.
- Epoxy. Organic two-component flooring, which is excellent for rooms with high levels of humidity - often such decorative flooring in the apartment is installed in the bathroom and kitchen.
Such floors are the most common of all polymer coatings and are characterized by low cost.
- Methyl methacrylate. A solution that is better than others for rooms without heating in winter.
- Epoxy-urethane. Due to their high strength and wear resistance, they are well suited for crowded places.
The material for a self-leveling floor should be selected not by cost, but primarily by the type of task being performed. Obviously, for crowded places it is better to choose polyurethane and epoxy-urethane floors, which can withstand prolonged loads well. For specific conditions of use, you should choose your own material.
Also, the polymer floor in the house may differ in surface properties. It can be smooth or rough. What else should you know about self-leveling floors before making your final decision before purchasing them?
What are the advantages of liquid polymer floors?
It is obvious that the high demand and popularity that characterize self-leveling floors at home did not come out of nowhere.
It should be noted that polymer floors for the home are made using seamless technology - this greatly facilitates the process of machine cleaning. In addition, the absence of seams prevents dust from getting into them, and thereby causing allergies and other troubles. This is another significant advantage in the treasury of advantages of self-leveling flooring.
Product cost
When carrying out such a procedure as screeding a floor with a self-leveling mixture, the price of the composition plays a significant role.
It would be a good idea to familiarize yourself with the cost of some types of products in advance, which will help you at least roughly navigate the volume of upcoming costs.
Below are prices for packaged goods, where the bag weight is usually 25 kg.
- cement mixture CERESIT CN80 – 240 rubles;
- cement mixture VOLMA Nevelir Express - 280 rubles;
- cement self-leveling floor UnisGorizont – 264 rubles;
- gypsum leveler Ecopol (weight 30 kg) – 370 rubles;
- gypsum mixture DELUXE Litopol UN – 310 rub.
Independent installation of a self-leveling floor in an apartment
Of course, it is better to entrust such a matter as installing self-leveling polymer floors in an apartment to professionals.
They know exactly how to apply all the layers so that the end result is durable and attractive. However, the installation of polymer floors can be done on your own.
Container for preparing the solution. Its volume can be approximately calculated as follows - for one square meter of area of the space being poured, 2 liters of the mixture are needed.
Thus, for a room of 40 square meters. meters, it is enough to prepare a container with a volume of about 80 liters.
Electric drill with mixer attachment. You can stir the solution with your hands, however, this will not only increase the time spent, but also negatively affect the quality of the floor solution.
A large spatula is necessary for thoroughly leveling the solution.
A needle roller or other device suitable for removing bubbles from the floor surface.
Also, before you make self-leveling floors in the house with your own hands, you need to prepare clothes for yourself.
You should find protective gloves and a face mask, as well as special shoes - paint shoes. It is necessary for walking on the treated surface without disturbing the layer. When all the tools and materials for the mixture are ready, we begin.
Quality of produced materials
Despite all the commonality of dry mixtures, each manufacturer uses its own recipe, that is, its own ratio of added modifiers. This determines their different behavior.
You can form a preliminary opinion about the quality based on the consumption of the composition in its finished form, which is indicated by the manufacturer on the packaging.
In the case of a high-quality mixture, on average, at most 1.6 kg/m2 should be consumed per 1 mm layer. The strength and speed of complete hardening depends on the declared volume of water required to prepare the solution, and the less it is, the better the quality.
Surface preparation
If the floor has not yet been disassembled, it must be dismantled and completely cleared of construction debris. Use the solution to remove greasy stains - if you ignore this step, the polymer coating will not adhere well.
After cleaning, you need to carefully inspect the floor for changes. If there are any, they will need to be sealed. When this stage is completed, the floor must be cleaned again, now using a powerful vacuum cleaner.
After preparing the floor, its surface must be thoroughly primed. Primer treatment will significantly increase the adhesion of the floor to the future polymer floor, as well as prevent peeling of the finished coating.
Calculation of the number of components for concrete
To calculate the required number of components, it is necessary to calculate the total volume of the mixture. To do this: multiply the average height of the screed by the length and width of the room.
If the floor width is 3 m, length is 4 m, the lower point of the screed is 3 cm, the upper point is 4 cm, the average height of the screed is (3+4) / 2 = 3.5 cm, the required volume is 0.035 m * 3 m (width) * 4 m (length) = 0.42 m3.
Marking the floor for screed
To prepare a mortar with a cement to sand ratio of 1:3, you need to take 0.105 m3 of cement and 0.315 sand. 1 m3 of cement has a mass of approximately 1500 kg, then its required amount is 0.105 * 1500 = 157.5 kg. 1m3 of sand is 1400 kg, then its required amount is 0.315*1400=441 kg.
Pouring the polymer layer
The self-leveling floor in the house begins with the preparation of a special solution.
The solution must be transferred to a container prepared in advance, and then diluted with water in the proportion indicated on the instructions for the floor. Next, connect a drill (or a construction mixer) and the mixture is thoroughly stirred until the solution is homogeneous.
After this, the resulting mixture must be carefully poured onto the floor surface - the self-leveling floor for the apartment begins to be installed from the far corner of the room towards the exit, just like when painting coatings.
The next step after applying the solution is leveling with a spatula and removing air bubbles. To do this, you need to carefully roll the self-leveling floor of the apartment, trying not to create an imbalance in the thickness of the polymer coating.
How to prepare homemade leveling mixture
The composition of homemade is almost identical to the composition of dry ready-made mixtures:
- cement brand: M500, D0 or D20, PC 500 D0 or D20 (a certain guarantor of cement quality will be the full details of the manufacturer indicated on the packaging) – 1 part,
- washed (clean) sand of at least class I, grain size, up to 5 mm - 3 parts.
First, mix the ingredients in dry form, after which, gradually stirring, add water until the consistency of thick and viscous sour cream is obtained. When compiling, special attention is required to ideal cleanliness, sifting of sand, and the amount of water introduced - its excessive amount significantly reduces the quality of the screed.
Of course, a self-prepared option is relatively inexpensive, but the risk of getting a low-quality screed is quite high.
Completion of self-leveling floor
The applied polymer floor solution must dry completely, which will take several hours. But that’s not all - after the layer has dried, you need to apply “Level” to it.
This liquid solution allows you to completely smooth out all the unevenness and make the flooring perfectly smooth. The thickness of the coating should be from 1 to 4 mm. As in the case of a polymer solution, “Nivelir” must be carefully rolled out with a roller to remove bubbles.
After the leveling layer has dried, the matte self-leveling floor in the apartment is almost ready. You can leave it as is, or use the coating as a base for laying parquet, stone or tiles. Even a “bare” polymer floor will look very attractive and can withstand any impact!
It is quite difficult to answer the question “which gender is better”?
After all, floor coverings differ from each other, at least in appearance. If we take the decorative factor out of the equation, we can compare the price, service life, advantages and disadvantages of each material. Let's try to find the best floor covering in this way.
Which coating should you prefer if there is so much choice?
Floor coverings can be divided into three large groups: wooden (parquet, boards, solid boards, cork), elastic (carpets, linoleums, rubber coatings), ceramic and stone. Which floors are better - decide for yourself!
Well, now it's time to finish the article. All the material I wanted to share has been reviewed. I hope it will be useful to you, and you will use it if necessary, which self-leveling floor to choose for an apartment. Improve your own practical skills and gain new knowledge, as they say: “It’s never too late to learn!” That's all, thank you for your attention, successful and easy repair!
Leveling the floor using special mixtures
Screed for the perfect floor
In Russia, screeds were traditionally made from dry concrete mixtures. But since a mixture of concrete and sand in any proportion is not a very durable material, this rather outdated method of leveling floors has been replaced by the European fashion for self-leveling floors, in the manufacture of which special self-leveling mixtures are used.
expanded polystyrene is often placed under these mixtures for additional noise and heat insulation . This floor dries much faster than a regular screed (in a few days).
Any finishing coating can be laid on self-leveling floors: tiles, laminate carpet, etc. In addition, the self-leveling floor layer has a very small thickness, which is especially convenient in apartments with low ceilings.
All floor levelers can be divided into two large groups: the first is intended for initial, rough leveling, creating the main thickness of the screed. The second is for the final, finishing layer, creating a smooth surface. Levelers for initial leveling have a large fraction of components, due to which the possibility of applying the mixture in a sufficiently thick layer is achieved. (but it is almost impossible to create a perfectly smooth surface). The leveling agent for finishing leveling, on the contrary, has a fine fraction; it can only be applied in a thin layer, but the surface is perfectly smooth.
Laying the screed
In this section we will cover only general recommendations for installing floor screeds. Read the manufacturer's instructions for specific values, mixing proportions, set setting and drying times. So, first we list the tools that will be needed for this work:
- 1. Deep container (bucket) 2. Brush 3. Wide steel spatula 4. Drill 5. Mixer attachment 6. Tape measure 7. Hydraulic level
Before starting work, make sure that all window and door openings are tightly closed. During work, the temperature of the base floor and the air in the room should be within +10oC - +25oC. During the work and for 1 day after its completion, avoid drafts and air drafts on the floor surface (in this case, the relative humidity of the base should be < 95%).
Peeling and weak concrete, cement adhesive, oil, carpet adhesive, as well as water-soluble leveling mixtures must be removed before installing the screed.
It is necessary to prepare the foundation. Such treatment improves the adhesion of the leveling mixture to the base, prevents the formation of air bubbles and too rapid absorption of water from the leveling mixture into the base.
Primers also improve the spreadability of the leveling mixture. Dry and highly absorbent substrates (monolithic concrete floors) should preferably be treated twice.
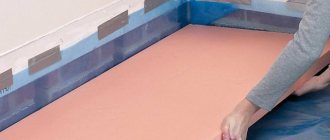
When laying the screed, do not forget that any floor leveler is sealed with water. Therefore, in order to prevent liquid from leaking through small cracks that are invisible to the eye, you should apply waterproofing (do not forget to maintain the time required for each layer of applied material to dry, this time is indicated in the instructions for use of the building materials you purchased).
When the base is completely ready, a level is placed around the perimeter of the room. This is done like this: an arbitrary mark (mark) is placed at a certain height from the floor and measurements begin from there.
It is better to carry out this procedure in pairs: one puts the flask at risk, and the other moves further along the wall with the second flask and leans it against the wall.
Having ensured that the water in the flasks coincides with the mark on the wall, place a second mark where the second flask is located. And so on around the entire perimeter of the room. Please note: 4 marks in the corners may not be enough; it is better to put intermediate marks in the described way.
Then take a long lath or plaster cord and draw a line connecting all the marks. The result is an absolutely even line around the perimeter of the entire room.
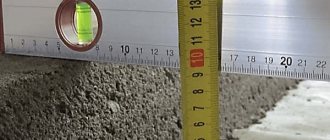
The next step is to use a tape measure to measure the distance from the resulting line to the base and find the highest mark. The most painstaking stage is placing the beacons. The quality of this work determines how smooth the floors will be. To do this, you can use plaster beacons (a beacon is a special profile that has a certain height). Beacons are mounted on the base, parallel to each other, at the same level. The distance between them should be no more than the width of the tool used for leveling.
Check the leveler manufacturer's instructions for the maximum thickness of the solution (if the thickness of your future screed is too large, the leveler will need to be applied in several layers).
Only after installing the beacons can you begin to prepare and mix the leveler: to do this, take a container with clean water, gradually add the dry mixture to it, stirring constantly. It is best to mix using a powerful drill at low speeds (with a mixer attachment) until a homogeneous mass is obtained without lumps or clots.
The finished mixture is suitable for use within 30 - 50 minutes from the moment of mixing with water. The temperature of the leveling mixture must not be lower than +10oC.
When mixing the leveling agent, strictly follow the proportions established by the manufacturer of the dry mixture and do not allow an overdose of water, because introducing an excess amount of water can cause foaming of the solution, reduce its mechanical strength and lead to delamination of the material.
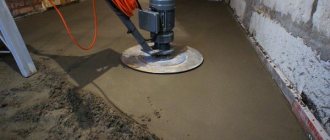
The finished mixture is laid out on the base, gradually filling the space up to the beacons. Distribute the solution evenly over the entire leveling surface. To remove air bubbles, the surface of the freshly laid mortar can be rolled with a needle roller.
If the pouring area exceeds 20 m2, then it is necessary to make expansion joints, dividing the area into technological sections. The thickness of the expansion joint can range from 5 to 13 mm, depending on the material used. When the level of the leveler reaches the level of the beacons, simply place a spatula on two adjacent beacons and finally level the solution.
Laying the finishing mortar
If you want to get a perfectly smooth floor after rough screeding, you should use a finishing floor leveler. To use the finishing leveler, the same temperature and humidity conditions must be maintained as when working with the subfloor described above: the base must be cleaned of dust, dirt, grease deposits, and weak areas of the base must be removed.
Finishing floor levelers are diluted to a liquid state, because of this the likelihood of leakage to the lower floors is higher than when using levelers for the initial leveling. Therefore, if you are leveling the original concrete floor, waterproof it.
Due to the fact that the finished solution is liquid, it spreads perfectly over the surface under the force of gravity, accumulating in places of the smallest heights and depressions. Considering that in most cases such levelers are not applied thicker than a few millimeters, measure the level of the base around the perimeter with special care, otherwise the solution will simply drain into one corner (there are self-leveling levelers with an application thickness of up to 30 mm). Beacons do not need to be used when using this leveler; the solution will spread on its own, creating a horizontal surface.
That's probably all, at first glance, simple recommendations for installing screeds and laying finishing self-leveling floors. But despite its apparent simplicity, this process requires special professionalism and accuracy of specialists and the quality of the materials used.
For this reason, if you want the floors in your home to be perfectly smooth, durable and beautiful, you should not chase “a long ruble” by turning to dubious companies for help and purchasing unknown materials. After all, the floors in the house are not built on one or the other for two years: and the maximum service life and quality are guaranteed only by specialists who know their business.
Author: remontus.com