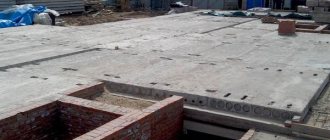
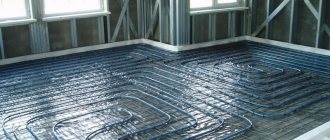
How high-quality, beautiful and smooth the parquet or tiles in your home will be directly depends on the correct execution of the rough base under these coverings. There are several varieties of it, but one of the most commonly used is rough floor screed in a private house made of concrete or a cement-sand mixture. Therefore, given the popularity of this coating, we will consider here the features of its subtypes and design features.
Rough floor screed in a private house
Floor screed care:
For a high-quality result of floor screed using semi-dry technology, there are some recommendations for caring for the finished base at the time of strength gain; this process is also called “ripening the screed”
The period of time required for the semi-dry screed to fully mature can be from 20 to 28 days
such a spread in time depends on the temperature and humidity conditions in the room, but it is still recommended to wait all 28 days and only after this time carry out work on flooring or applying a finishing coating to the base.
It is important to provide it with the necessary humidity during the “ripening period” of the screed.
, since when forming a semi-dry screed, a minimum amount of water is used sufficient for initial strength, but for the chemical processes of cement stone formation to take place completely, a little more moisture is required and it is important that it be uniform if the screed is moistened in one part of the room, but not in the other half this will most likely lead to cracking.
* According to SNiP 3.04.01-87, a screed made of cement-sand mortar must be provided with the necessary moisture during the first 7 - 10 days.
A semi-dry screed gains 90% strength within the first two weeks ; you need to provide it with the necessary humidity so that the solution does not dry out, but hardens; if you speed up this process, the screed will become covered with cracks and will crumble easily.
As it was written earlier, a minimum amount of water is used in the solution for a semi-dry screed and to retain this moisture, polyethylene is initially laid on the base to ensure that it is retained in the solution, and it does not go into, for example, concrete floor slabs.
Cost comparison
The prices presented for comparison today are not constant, since manufacturers of concrete and mixtures often focus on the exchange rate, but they give a general idea of which material is more profitable and cheaper.
You can make the concrete mixture yourself, or you can purchase it ready-made at a concrete plant. The cost of 1 m3 of the finished mixture is 2500-3500 rubles. The costs include the cost of renting a mixer and transportation depending on the distance.
Preparation of cement-sand mixture from ready-made dry mixtures:
- Gypsum mixture "Ekopol". Mixture consumption (with a thickness of 10 mm) 13 kg per 1 m2. The cost of a bag weighing 30 kg is 385.5 rubles. Consumption for cooking 1 m3: 13x100=1300 kg. It will take 1300/30=43.33 (44) bags. Cost 44x385.5= 16,940 rubles.
- Floor screed "Almi" 25kg. Mixture consumption is 1.5-2.0 kg for a layer of 1 mm. The cost of the bag is 115 rubles. Consumption per 1 m3: 2.0x1000=2000 kg, 2000/25=80 bags. Cost 80x115= 9,200.00 rub.
At first glance, ready-mixed concrete is cheaper than others, but the cost can be increased if additional construction equipment has to be used to lift the concrete mixture in a multi-story building.
Recommendations for caring for semi-dry screed:
After completing the work, the screed needs to be covered with polyethylene film 80 - 100 microns thick; a thinner film will also work, but it will be difficult to lay it since it is very light.
not to create drafts in the room during , otherwise this will create premature evaporation of moisture from the screed.
It is recommended to lift the film after 3-4 days and evenly moisten the top layer of the screed , for example, using a watering can. Do not pour water so that puddles form! The main thing is to moisturize, not flood! After the screed is moistened, you should cover it back with film, it is advisable that the film at the joints should be laid with an overlap of 30 - 40 cm.
During the period of work and maturation of the screed at the site, the temperature in the premises should be from +5 degrees Celsius, otherwise the screed assembly process will be stopped and it will be loose.
* If the screed was carried out using underfloor heating systems, they should not be turned on for 28 days , after this time, ventilation should first be arranged in the rooms where the screed was made to remove residual moisture, after which you can systematically increase the temperature of the heated floor system.
When continuing finishing work in rooms where semi-dry screed is applied, the following rules should be observed:
- The next day, do not load the screed with more than 100 kg, free walking is possible;
- The screed can be loaded with more than 100 kg after five days at the earliest;
- You should not throw heavy objects onto a semi-dry screed during the ripening period;
- There is no need to store various types of moisture-absorbing building materials indoors for the first 28 days - dry mixes, gypsum board, wood and similar materials;
- In the first 10 days, you should not install scaffolding, stepladders, or tours on the screed, which can pinpoint the screed during the period of strength gain.
So, we can summarize the recommendations for caring for floor screed:
- Immediately cover the entire surface of the screed with polyethylene;
- After 3-4 days, moisten and cover with film;
- If the heating is turned on in the room, humidify again after 4 days;
- For the first 10 days, do not load the screed more than 100 kg;
- For the first 28 days, do not turn on the floor heating system.
- After the semi-dry screed has hardened and gained strength, it is recommended to apply a layer of strengthening primer to prevent dusting of the screed.
Good afternoon We made a semi-dry screed and covered it with film. Is it possible to leave the film for the entire curing period or remove it after a week? How long can you not ventilate? Electricians are also planning to work in a week, is it possible to stand on a stepladder if you put a 5 eps down. Thank you!
Answers: Administrator “Screed Floor”
Hello. It is better to leave the film for 2-3 weeks; a week after installing the screed, it is advisable to moisten it a little additionally, and also leave it under the film. After a week, electricians can move freely. It is not advisable to ventilate the room for the first week. The screed gains strength in the first 28 days, the curing processes and the formation of cement stone occur only with the required moisture content of the screed.
Please tell me! 19.05 made a semi-dry screed. After a day, we easily moistened it and covered it with film (the windows are closed) After 4 days, we removed the film, moistened it and covered it again (the windows are closed) There is no one at the site (we are not loading it) How many days after moistening (on the 4th day) should we keep the screed under the film? When should you start ventilating (from what day should you not be afraid of drafts)? And is it necessary to further moisten it after removing the film?
Answers: Administrator “Screed Floor”
Hello. It is better not to remove the film for the first 2 weeks; it is advisable to moisten the screed on the 7th day after completing the work; it is not advisable to ventilate it in the first week; the screed gains strength within 28 days.
On Saturday we made a semi-dry screed. On Sunday I watered it and covered it with film. When can you open windows?
Answers: Administrator “Screed Floor”
Hello. If the screed is under film, you can already ventilate the room, but you need to make sure that the screed is moistened during the week.
Checking the humidity level
A popular way to check whether the screed has dried is to take a paper napkin, place it on the surface, and press it with a hard object of the same shape (for example, a tile). If after 24 hours the product remains dry, then you can begin laying the flooring.
Special devices for measuring humidity:
- Carbide hygrometer , a similar sophisticated laboratory equipment. Gives extreme accuracy, indicators in cm%, analyzes within the thickness of the material. But these are not very practical devices; they are mainly available only to companies that are constantly engaged in such work. The devices violate the integrity of the mixture (you have to stick probes in), they are expensive. Buying them for rare, single use is not particularly advisable.
- Electronic moisture meters . Indicators are not in CM, but in %. As a rule, it is precisely such devices that are used to analyze screeds in everyday life, since they are simple in themselves and in use, not too expensive, and do not violate the integrity of the object. They analyze only the surface, the accuracy is somewhat less, but for the vast majority of work in private construction they are more than suitable.
- Conductometric devices are not used because they cannot measure humidity below 5%.
For a finished screed, instrument readings should not exceed CM 2% and CM 1.8% if there is a heated floor. But these are indicators in CM% for carbide hygrometers and similar complex laboratory equipment, which are used less frequently due to their complexity and high cost.
We are still considering this measurement scale, since such indicators are indicated in GOSTs and other standards, and we need to convert them into the values shown by ordinary household, more common moisture meters.
Humidity standards in “CM%” are indicated in official standards , and these are units of complex laboratory methods that are not used in real conditions due to cost. More often, the dielcometric method and household moisture meters with other units of measurement are used.
Therefore, we make a translation: 2SM% corresponds to 3.4%, and we correlate the remaining norms in the same proportion. That is, the maximum for the readiness of a semi-dry screed according to a household moisture meter, which should not be exceeded, is 3.4%, and in the standards of some CIS countries this figure is 4%.
Compliance with the norms for the humidity of the solution is important, first of all, for the subsequent floor covering, since if the value is violated, it will absorb moisture, deform, the glue will not harden, adhesion will decrease, and mold and mildew will appear. In this regard, stone materials are more stable, therefore the moisture level in the base under them is higher.
Caring for semi-dry floor screed after pouring
When choosing a semi-dry screed, we must not forget that the processes of cement hydration in it occur slowly. You will have to carefully monitor the maturation of the solution, otherwise it will simply crack due to the small amount of water. And if you give more liquid than required, islands of rapid expansion of the solution will appear on the floor. And it will resemble not a smooth surface, but the back of a camel.
What to do if it doesn't harden?
For example, the layer thickness is 8 cm, measurements were carried out with a dielcometric apparatus, that is, only the surface was analyzed, indicators of 3.3-3.4% were obtained, which corresponds to SM 2%. At first glance, everything is fine, but inside the thickness of the solution the figure may be equal to 5.7...6.3%, which is unacceptable.
If abnormal humidity persists on the surface, and especially in the thickness of the screed, you can wait longer and dry the material individually, but this will not always help, since, as a rule, this phenomenon is caused by the humidity of the climate or soil.
It is more expedient to make a vapor barrier with epoxy special primers (TDE GPIEP-2K, Uzin PE 480) in at least 2 layers. These products block any residual moisture and prevent the appearance of fungus.
SNiPs and GOSTs
The need to strictly follow the technology is spelled out along with recommendations to adhere to the rules of care in numerous documents and construction manuals. It regulates the need to care for semi-dry screed during its ripening period and create conditions for it:
- Maintaining a constant temperature.
- Without creating drafts.
- Protecting the surface with film. It is desirable that the film be of the required width, this will prevent evaporation at the joints.
The technological map strongly recommends moistening, that is, watering the surface at least in the first 5 days after laying the semi-dry floor screed.
Semi-dry floor screed after pouring
The strength of concrete here depends on care no less than on following the installation instructions. There are only two main conditions:
Installation of PVC windows- Covering the drain hole with your own hands
- How to lay flexible tiles on the roof?
- Do not allow the solution to dry too quickly . With humidity maintained and a constant temperature at 20 degrees, concrete reaches 70% of the required strength in the first week. The rest will arrive and be added in about a month.
- Do not allow the temperature to drop until the fill freezes . Therefore, they try not to do semi-dry floor screeding in winter.
To maintain the humidity level, there is little plastic film on top. The floor will need to be watered several times a day. Not throwing buckets of water, but sprinkling lightly for the sake of moisturizing. And cover again. After a week the splashing stops. Then the filling dries naturally. Intervention to speed up drying will lead to cracking and the need for repair.
Drying time
12 hours after laying and grouting the floor, the semi-dry screed holds the weight of an adult. You can walk around, remove the film and cover it back, water it with a spray bottle. But be careful. It’s not worth running on the surface or moving heavy objects yet. For loads over 100 kg, you must wait 5 days.
How long does it take for different types of floor screed to dry - table:
| Screed type | Drying time for every 10 mm for a total thickness of up to 40 mm | Drying time for every 10 mm over 40 mm |
| Plaster | 42 hours | 90 hours |
| Semi-dry | 3 days | 4 days |
| Sand concrete | 7 days | 14 days |
| Cement | 7 days | 14 days |
| Expanded clay concrete | To gain 70% strength 28 days | |
| Concrete on the street | ||
If a semi-dry screed is installed over a heated floor, it cannot be turned on for at least 30 days. Finishing work on the walls and ceiling of the room can be resumed after 10 days. It is already permissible to install ladders and scaffolding, and the screed ceases to be afraid of heavy and sharp tools falling from a height.
Expansion joints
The pouring technology requires leaving gaps at the border with walls and architectural elements such as columns. Expansion joints are designed to compensate for possible expansion of concrete. They are:
- Insulating , running along the perimeter following the damper tape, delimiting the horizontal screed from the verticals of walls and other structures.
- Shrinkable . They are cut according to the finished screed after grouting the floor. The distance is determined by the thickness of the layer and should be 30 times greater.
- Structural . They help if the filling is not done on the entire floor, but in separate pieces over a long period of time.
If expansion joints are made correctly, there should be no cracks on the surface after pouring the floor when it dries.
Expansion joints
In addition to installing the damper tape around the perimeter of the room in places where the subfloor subsequently abuts the walls and architectural structures, an expansion joint is made with a semi-dry screed. It is necessary to compensate for the expansion of the solution under the influence of changes in temperature conditions. This is especially necessary when installing screeds over heated floors.
These gaps have their own classification:
- Insulating. That is, to differentiate itself from other existing structures. In this way, tension that could be transmitted to each other is relieved. Even a semi-dry screed should not put pressure on the wall, for which a damper tape is used. Seams are made around each of the elements (columns, recesses, walls).
- Shrinkage. The depth of such joints is usually 20-30 mm (the concrete layer should be about 100 mm). After finishing the surface grouting work, they are cut evenly over the entire area of the room. All distances between them must comply with SNiP. This number is approximately equal to 30 times the thickness of the solution layer. The configuration is only rectangular. The floor map must also take into account all other existing gaps. Diagonally can be done in a small rectangular room.
Example of a construction seam - Structural. They are performed when constructing screeds in several stages, when there are separate sections. A very simple option - upon completion of work on a certain area, the edges are made in the shape of a ridge. The next stage and pouring the solution will cling to this area and become engaged. In certain circumstances, special compensation strips are used.
Find out how to properly care for semi-dry floor screed
The semi-dry floor screed gains all its properties within 21-27 days. It all depends on the room, its humidity and temperature.
Therefore, like any cement-sand screed, it must be provided with sufficient moisture after it has been poured. According to SNiP 3.04.01-87, semi-dry screed must be moistened for 3-5 days.
How to properly lay a vapor barrier on the ceiling?- Is it possible to glue wallpaper on whitewashed walls?
- Imitation of a brick wall made of gypsum plaster
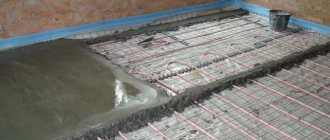
Floor pie in the shower using insulation. Floating floor
Floating floor with insulation (or bedding) in the shower stall/room.
- floor slab
- thermal insulation / bedding (20-100mm)
- reinforced mesh (2.5-4mm)
- damper tape (5-10mm)
- finishing floor screed (60-80mm)
- elastic waterproofing with overlap on walls (1-2mm)
- elastic tile adhesive (1-5mm)
- finished floor covering (ceramic tiles / mosaic) (2-12mm)
Caring for semi-dry floor screed
As the screed dries, the cement gains its strength within 21-25 days, from the very minute the mixture was made. For all the same chemical processes occurring at the moment of screed formation, water is needed, since the solution must harden and not dry out. It is possible to dry the floor screed only after the required strength has been achieved, otherwise the screed may crack.
To prevent early drying out, it is necessary to take care of the floor screed, this means that within 3-5 days, from the very moment when the screed was filled, it will need to be spilled with water, but not too much. A simple plastic bottle, preferably 2 liters or more, is suitable for this. Make 5-10 holes in the bottle cap and that’s it. Take water and wet it. A small watering can is best suited for these purposes.
For a good result, the screed is covered with plastic film by the workers who make the screed; it can not be removed for about 1 week. After this period, the screed needs to dry naturally, for as long as possible, so the film can be removed and thrown away.
When the semi-dry floor screed dries, it is forbidden to dry it quickly using various types of equipment, as there is a possibility that it may crack and cracks may form. It is also not advisable to create drafts for 10-16 days, as this causes rapid evaporation of moisture in the cement mortar. In other words, the windows in the room must either be closed, or if there are no windows, they must be sealed with plastic film.
In order for the screed to dry more or less evenly and naturally, certain conditions must be met, namely, the temperature in the room should not be lower than +5 degrees, and there should also be no large drafts.
And while the screed is drying, you need to follow the following tips for its operation:
— pedestrian loads (up to 120 kg) are possible within one day after completion of work
— loads over 120 kg are possible after 5 days
During the operation of the screed it is prohibited:
- drop sharp and heavy objects, so to speak, sharp loads
- How to strengthen floor beams in a wooden house?
Sand and stone foundation
Strengthening floor slabs with metal beams
- when the screed is installed on a heated floor, you cannot turn on the system for up to 1 month from the date of installation of the screed
— you cannot install tours, stepladders, scaffolding within 15 days from the date of installation
Poor quality maintenance of the floor screed means the presence of drafts at the site. Most people, when they feel moisture in a room, very often open the doors and windows, wanting to ventilate and dry them as quickly as possible, so this is the main mistake. Since, for uniform drying, the screed requires gradual acceptance of moisture, and not its weathering by drafts. Also, the room requires a normal temperature range of 15 to 22 degrees, since at elevated temperatures the water from the screed also quickly evaporates, which will accordingly lead to its destruction.
And lastly, you need to understand that a semi-dry screed is still sand and cement, which means early loads can deform it. This is especially true for impatient owners or workers who are trying to make room for themselves as quickly as possible. If you still need such urgency, then the best option is to lay penoplex or 2 cm (if the loads are not significant), or 3 cm, or even 5 cm (if the loads are significant), this way you save your time on the screed Nothing will happen. But still, if possible, then the screed should be allowed to dry for at least 25 days and only then begin any work with it.
I hope this article helped you figure out what not to do and how best to care for the screed so that nothing happens to it.
Method 3: reinforcement with polymer mesh
This is one of the simplest methods of reinforcement. It is mainly used not for special strengthening of the screed structure, but to prevent cracking of concrete or cement mortar during complete drying and minor deformations. Often the mesh is placed directly on the base, especially if it is a film located on a bulk cushion or layer of thermal insulation, to prevent cracks from forming on the underside of the screed.
Polymer meshes are most widely used in the process of reinforcing self-leveling floors. This is due to the ease of its distribution and the technology features of the self-leveling floors themselves. When forming them, the main desire is to reduce the volume of solution consumed and the thickness of the resulting layer, and reinforcement options using rolled wire, much less reinforcement, are not suitable for this.
An incorrectly selected screed thickness can lead to very disastrous consequences, such as:
- failure of the floor covering
- cracking of too thin layer of screed
- the layer is too thick, when installing heated floors it will take a long time to warm up
On many construction forums you can find reviews about the mountain - craftsmen whose work guarantees you the dismantling of new floors and financial losses. Therefore, it is better to do all the work yourself, following all the recommendations.
Semi-dry floor screed. maintenance of cement screed.
Proper care of cement floor screed.
The semi-dry floor screed, like any concrete, contains cement as a binding element. In fact, this is a classic cement mortar, into which, in order to increase strength and reduce cracking, the minimum amount of water required solely to ensure the hydration reaction of the cement is initially dosed. In general, it can be argued that the process of formation of cement stone involves two equal components: the binder - cement and the binder - water. To properly understand the importance of the relationship between these two components, they can be called a “binder system”.
For reference: the water-cement ratio (W/C) when preparing a semi-dry mortar in the mixing tank of the air blower is 0.3, i.e. For one batch of a bunker (0.2 cubic meters), 15 liters of water are poured and one 50 kg bag of cement is filled. The rest is sand. This proportion is optimal. The equipment and technology itself prevent changes in the proportions of ingredients. In theory, you can, of course, instead of a whole bag of cement, pour 50 kg into a mixing tank 2/3 of it, but believe me, in practice this is quite labor-intensive and impractical. Much the same thing happens with water: if you pour too much, it’s inconvenient to work; if you fill in too little, it’s very inconvenient to work. It is advisable to not add enough sand to the bunker if it is necessary to increase the grade strength of the cement mortar.
So, the “binder system” implies the mandatory presence of both components in the required proportions for the normal maturation of cement stone.
Another important factor in the formation and hardening of cement stone is temperature. The lower the ambient air temperature, the slower the chemical reaction of cement hydration occurs. If the ambient temperature is negative, this will lead to freezing of water in the cement mortar, as a result of which one of the components of the “binding system” will be eliminated (turn into ice crystals) and the process of formation of cement stone will be suspended. After thawing, the water will become liquid again and the hydration process will resume, but the second component of the “binding system” - cement by this time may significantly lose its qualities. As a result, the cement screed will not gain brand strength. It is also possible to remove one of the components from cement stone - water - by excessively rapid drying, which will also negatively affect the brand strength of the cement stone.
To summarize, it can be argued that for the normal process of maturation of cement stone from the correct cement mortar, only two conditions need to be provided:
- Prevent freshly laid cement mortar from freezing.
- Do not allow the cement mortar to dry out too quickly , at least during the first 7 to 10 days. During this time, the cement mortar at a temperature t = +20 C 0 will already gain 70% of the design strength. The rest of the strength will be gained within a month. In this case, to continue the hydration reaction, the remaining moisture contained in the solution itself, as well as moisture from the environment, will be consumed.
It is clear that in order not to freeze the freshly laid solution, it is necessary that the temperature in the room where the work is carried out is positive.
To ensure the second condition, it is advisable to cover the screed with plastic wrap the next day and keep the screed under the film for 7 days. If the doors and windows in the room are closed, there are no drafts and extreme dryness, this need not be done. It is enough just to pour the screed from a watering can or spray water over the screed with a broom once a day during the first four to five days after installation.
After installing the screed at your site, specialists always give recommendations on the optimal care of the screed, taking into account the requirements for floors and conditions at the site.
Screed warranty 2 years!
Call and order!
8 free multichannel.
+7
We accept orders daily from 9.00 to 20.00.
The surveyor's visit is free.
Speeding up the process
Some try to find the maximum number of ways so as not to think about how long it takes for the concrete floor screed to dry, but to do everything very quickly. It's not always rational. It is impossible to direct warm air currents to the screed due to the fact that it will not dry equally around the entire perimeter. There will be no uniformity at all. In the future, there will be areas that will be empty or, as experts call them, “bays.” Even ventilation is not the best option. The temperature outside the window can differ significantly from that in the room. The maximum that can be done in such a situation is to turn on the guns and point them towards the ceiling. This will raise the temperature throughout the room.
The main thing in one case or another is not to overdo it. If you leave the guns in this position for a long time, the screed may completely lose water and dry out to the limit. The strength of the cement stone in this case will remain at a minimum value. This all suggests that it is best to leave the finished version of the screed until it dries completely under the natural conditions of the room. Here a little more time will be spent, but the result will only be positive and no changes to the surface will occur during operation.
Careful handling of the screed after installation work
It is not enough to simply arrange a semi-dry screed indoors. After all work is completed, there is a certain time during which the subfloor base should be maintained. It must gain strength and hardness in order to be able to lay the flooring. The strength of the semi-dry screed will also depend on the quality of all stages of installation. There are some subtleties and nuances in courtship that everyone should familiarize themselves with who has decided to renovate their own apartment.
Peculiarities
When you need a semi-dry floor screed, it is important to remember its main feature - a small amount of water in the finished solution. The process of cement hydration does not occur so quickly, so it is worth monitoring the “ripening” very carefully. If this is not done, the semi-dry screed will develop cracks, which will have to be repaired in the future.
A large amount of water, in excess of the norm, will lead to the reverse process. In specific places, rapid expansion of the cement mortar will begin, which will lead to various types of surface destruction. Many people also say that a semi-dry screed is bubbling. If this happens, then it is best to immediately remove this area to a solid base and refill it, but using a metal mesh. This will be more reliable in this case.
Temperature also makes its own adjustments. They must be maintained at a certain level, especially in the first days of hardening of the screed. Drafts and winds should not be allowed, but it is better to immediately cover the entire surface with polyethylene film.
When laying semi-dry screeds, special attention is paid to the process itself. The same applies to careful care of the finished version. Here, a technological map for semi-dry screed will help answer numerous questions, including how much to water the screed in the apartment.
The map is compiled on the basis of numerous building codes and regulations, namely:
- SNiP 2.03.13-88 “Floors”.
- MDS 31-6.2000, which sets out recommendations for high-quality floor installation.
- Numerous GOSTs.
Among all the points, there are also points where maintenance is simply necessary for a semi-dry floor screed. In addition to polymer film, plastic sheets can be used. Moreover, they all must overlap each other in those places where they connect to each other. But the best thing is to purchase a whole film for the entire area of the room.
Regarding humidity, the technological map for constructing a semi-dry screed gives an answer as to whether the screed needs to be watered after pouring. If the room temperature is high and the humidity is low, then during the first 3-5 days it is simply necessary to prevent cracking of the surface.
The technological map for a semi-dry screed device states that after drying, shrinkage cracks are allowed to occur. But you can easily get rid of them if you repair a semi-dry screed.
Maturing conditions
The strength of a semi-dry floor screed will depend only on how well the installation work is carried out and how well it is maintained. The process of normal maturation of the screed can only be carried out if two important conditions are met:
- Do not allow the solution from the dry mixture to dry out immediately. This especially applies to the first week after installation. If during this time the temperature is kept within 20 degrees, then the cement will gain about 70% of the required strength. Everything else will be gained over time, approximately within one month. It is also worth paying attention to the fact that even after laying the floor covering, the solution will draw out the remaining moisture from itself, as well as from the environment. The hydration reaction does not end so quickly.
- The freshly laid solution should not freeze. During work, it is better to choose a period with positive temperatures. This will help not only to prepare the solution itself for the semi-dry screed and to install the subfloor.
If there are drafts in the room and slight temperature changes, it would be a good idea to cover the semi-dry screed with plastic wrap. It will provide the necessary level of humidity and sufficient ventilation.
Humidity level
Humidity in the room is of great importance. Everything here must adhere to regulatory requirements, namely building codes and regulations 3.04.01-87. In the first 8-10 days after laying the screed, these indicators should remain at the appropriate level. In the following days, up to day 25, the cement will be able to gain maximum strength of 90%.
Moistening the semi-dry floor screed after installation should only be done if necessary. After all, the screed itself is able to collect the required amount of moisture from the prepared solution. It is worth paying attention to the fact that the finished screed can dry only when the required density of the semi-dry screed has been achieved.
When the moisture is not enough for the strength of the cement mortar, and the screed remains unmoistened, it will begin to crack and crumble. Additional efforts will have to be made to restore it and make surface repairs.
But not everyone knows how to water the screed after pouring. This should be done in the first 3-5 days after installation. Do not generously fill the surface with water, but only sprinkle it lightly. You can also use plastic film to cover the screed for uniform drying. But even in this case, you should pay attention to his readiness.
After one week, the screed should dry naturally. To achieve maximum results, you should not rush anywhere, but let the “rough” floor sit for as long as possible. However, artificial drying is not recommended under any circumstances. After it, cracks often appear, and drying does not occur entirely evenly.
All types of work using the technology must be carried out at minimum ambient temperatures of at least five degrees. The same applies to the initial stage of maturation of the finished solution on the floor surface. In order to perform semi-dry screeds at the proper level, you should adhere to certain operating recommendations:
- Any walking loads with a maximum weight of up to 100 kg are permissible only 12-18 hours after pouring and grouting the mortar.
- If there is a need for heavier loads, over 100 kg, then you will have to wait at least five days.
In these cases, you can experiment and leave ahead of schedule. But no one is immune from the negative consequences that can lead to redoing the “rough” floor.
There are several tips that should be followed during the operation of a semi-dry screed. No heavy objects should fall onto the surface, especially if they are sharp. When installing a heated floor under a screed, it should not be in working condition for 30 days after pouring out the solution.
Each of these points can only harm the freshly laid screed and damage it.
Drying time
After 12-18 hours, the screed is ready to support an adult. But this does not mean that you can run on the surface, place various objects on it, etc. Only movement and then only if necessary. Depending on the type of floor covering, you need to wait a certain time until the finished solution dries completely. This takes at least 4-6 days. But in any case, control should be ensured constantly in order to obtain the desired result.
Some people wonder whether it is necessary to reinforce a semi-dry floor screed. For this purpose, in the modern world there is a sufficient amount of materials, among which fiber fiber is very popular. It does not have any effect on the drying time. But the end result is a reliable design for any type of floor covering.
Expansion joints
In addition to installing the damper tape around the perimeter of the room in places where the subfloor subsequently abuts the walls and architectural structures, an expansion joint is made with a semi-dry screed. It is necessary to compensate for the expansion of the solution under the influence of changes in temperature conditions. This is especially necessary when installing screeds over heated floors.
Repair
As has been said above about the maintenance required for a semi-dry screed, situations may still arise when a semi-dry screed cracks. In this case, it is very important to take all measures in time to restore the structure.
Beacons and profiles that were not attached to the surface of the ceiling can be removed after 18-24 hours. The same applies to screwed-in screws. But instead of them, only recesses and pits remain. They are sealed with a ready-made solution, after which a grater is used to rub the surface. Next, all that remains is to moisten the semi-dry floor screed, for which a spray bottle is used.
It is important to check if there are any gaps in the floor. This is done 3-4 days after pouring the base. There will be no gaps if the semi-dry screed technology has been followed. Minor deviations are allowed, it will not be critical. When gaps are obvious and noticeable, special mixtures are used to smooth them out.
But this cannot be done until the strength of the poured solution has reached its maximum. Brand strength is achieved only 4 weeks after installation of the subfloor. Only in this case can you try to use artificial drying before laying the floor covering. It can't hurt if everything is done in moderation.
Main advantages
If we consider the main advantages of creating a floor on the ground, we can identify the following.
- Simplicity of all work. Overall, creating a floor cake with the right approach only takes a few hours.
- High strength and resistance to deformation will ensure a long service life of the floor finish.
- This base has good thermal, hydro and sound insulation properties. Such a floor will not freeze critically even in cold weather, which will keep the house warm and cozy.
- One of the factors is economy. Arranging a rough screed is not as expensive as it might seem at first glance.
Subfloor on concrete floor
Thanks to all these advantages, many future home owners choose a concrete subfloor as a base, rather than one created from any other materials.
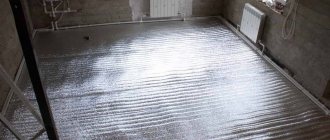
Final leveling of the concrete floor
Spraying the screed with water
Within 3-4 days, the screed needs to be “spilled” with water. This does not mean that the screed needs to be filled with water from buckets. But caring for the screed requires generous wetting with a wet roller. This will also protect the screed from cracks.
Important! After each wetting, the screed must be covered with polyethylene. One day after the end of wetting, the polyethylene can be removed. If you are making a screed in the heat, then the period of wetting the screed needs to be increased; the screed needs to be wetted 2 times a day.
Actions after final drying
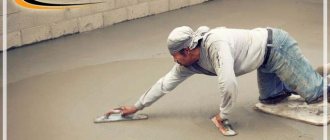
After the final hardening of the solution, it is polished with special graters and machines.
Immediately after filling , the holes and recesses from the beacons and screws are sealed with a ready-made solution , and then the maintenance is standard: wetting, grinding. When cracks appear, gaps, after the screed has matured, special mixtures are used to smooth them out, but we especially pay attention - only after final hardening.
You can turn on the heated floor, as well as use artificial drying, only after reaching the maximum hardening period - after 4 weeks.
Preparing the base
The first step is to determine the zero point using a level, taking into account the relief and surface level. Thanks to this, you can correctly estimate the amount of work with the soil. The ground on which the floor is planned to be laid must be thoroughly compacted to reduce the risk of soil subsidence and cracking of the floor itself.
After this, a cushion of sifted river sand is poured onto the recessed base:
- The first layer should be 25% thicker than necessary;
- The layer is moistened and compacted, due to which the thickness should become in accordance with calculations;
- Compacting can be done using a vibrating machine or a roller.
A layer of expanded clay or gravel is poured on top of the sand, due to which it is possible to compact the sand layer and create a solid foundation for subsequent filling.