When renovating an apartment or building a house from scratch, it is important to think through all the nuances so that the final result is not only beautiful, but also of high quality. A lot of attention needs to be paid to the preparatory work, including the production of floor screeds. It is necessary to ensure that the foundation under your feet is strong and reliable, as well as for arranging the finished floor. And its long service life can be ensured only by properly manufacturing it. What is the minimum thickness of a floor screed? After all, making it is not a cheap pleasure, and a small consumption of materials would allow us to achieve a certain degree of savings.
Minimum thickness of floor screed
Screed in theory
Screed is an important and even basic element of almost any room. It must be made in any case, since without it it is impossible to properly lay the finished floor covering. The screed also performs additional functions of heat and waterproofing and will provide a good level of noise insulation if done correctly. But its main function is precisely to level the rough base and correctly distribute the load on the floors .
Functions of floor screed
In order to level the base, that is, to implement the first function of the screed, in certain situations it is possible to make a very thin layer. So, sometimes it is enough to make a screed about 5 mm thick. But in order to achieve the correct distribution of the load on the base, which will depend primarily on the thickness of the layer, sometimes it is necessary to pour a much thicker layer.
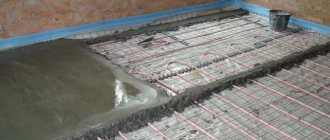
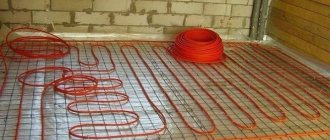
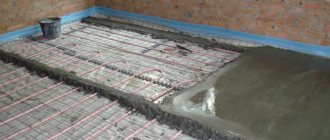
Installation of screed on top of a heated floor
On a note! The screed layer must easily withstand a compressive load of 15 MPa. Moreover, the slope of the base should be minimal and be no more than 0.2%.
Thus, the screed must be strong, reliable, have no cracks, and be even. The better this construction element is made, the greater the chance of getting floors that will last without complaints for many years.
Main characteristics of floor screed technologies
Basic terms
The rules use terminology according to which the floor is divided into tiers, components that have specific names:
- External covering
- the outer layer of the floor surface that absorbs the load during operation. - The intermediate layer
is a floor element that provides elasticity and is located under the top layer. - The waterproofing contour
is a layer that impedes the access of groundwater, wastewater, and liquids through the floor surface. - Screed
is a leveling layer that serves as the basis for installing the floor, which ensures the flatness of the base, distributes loads, and covers various communications. - The bedding
is the bottom layer that evenly distributes the forces from the floor and the weight of the screed onto the surface of the base.
All work related to leveling the floor with cement mortars, even if done with your own hands, must meet certain requirements
What affects the layer thickness?
The thickness of the concrete screed layer depends on the influence of many factors. Let's consider the main ones:
- the condition of the base, that is, the floors . This is one of the main factors influencing the final thickness of the screed layer. So, the greater the difference in height of the rough foundation, the thicker the screed will be. Otherwise, it will simply not be possible to achieve smooth floors. Plus, the base may be covered with cracks, have some protrusions - all this will affect the final thickness. That is, for example, if the base has very minor flaws, then the thickness of the concrete layer in the screed, according to SNiP, can be only 4 cm. If the height differences are too great, then you should prepare for the fact that the consumption of materials will increase - get rid of it with a minimum layer will not work;
The thickness of the screed depends on the degree of damage to the base
Important! A screed that is too thin can quickly collapse, even if it is poured correctly. Therefore, when pouring a layer of minimum thickness, you will have to use reinforcing elements as an addition. If they are not used, the minimum layer should be at least 4 cm.
Plastic reinforcing mesh for screed
- type of solution used . Some materials allow you to achieve a strong, but very thin base. So the mixture used to fill the screed will also affect its thickness. The minimum consumption will be indicated on the packaging. This point applies to all modern mixtures. Using conventional time-tested compounds or making a dry screed, you should expect that its minimum thickness in some cases can reach 8-15 cm. Sometimes you can use a trick - use expanded clay as a bedding, which will allow you to achieve the desired level, but at the same time reduce screed mass and concrete mix consumption;
Pouring screed over expanded clay bedding
- the presence of insulating layers for various purposes also affects the thickness of the screed layer. For example, the screed can be poured directly onto the floors if their condition allows this. And in this case, sometimes 2 cm of mixture is enough. But if there are layers, the screed will have to be made thicker. Even if only waterproofing is used.
Screed pouring process
It is important to remember that a layer that is too thick is not the best option. Excessiveness in this case can cause a decrease in the space between the ceiling and the floor, the material will take a long time to dry, and if a heated floor system is used, much more energy will be required to warm the base than with an optimal or minimum layer. Also, do not forget about the increase in the mass of the floors and the load on the floors. In some cases, making a heavy, thick screed is completely prohibited.
Screed for heated floors
By the way, if you plan to install a heated floor, this also needs to be taken into account when creating a screed. It should completely cover all heat sources. For example, if the diameter of underfloor heating pipes is 2.5 cm, then the thickness of the screed should vary between 5-7 cm. Experts note that sometimes 4 cm of thickness is enough. A screed that is too thick is not an option, since a lot of thermal energy will be spent on heating the concrete itself.
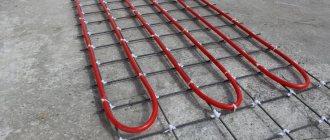
Diameter of pipes for water heated floors
SNiP 2.03.13-88. Floors. Downloadable file (click the link to open the PDF in a new window).
SNiP 2.03.13-88
Video - Screed thickness in the presence of heated floors
Documents establishing standards
Technical documentation helps determine which class of solution is needed in specific circumstances. It describes all the requirements for concrete walls according to the conditions in which they will be located.
Information can be found in special certificates SNiP and GOST, which relate to concrete mixtures.
Here is the most basic documentation providing regulatory references about the required thickness of concrete walls:
| Regulatory document | Content |
| GOST 7473-2010 | Specifications for concrete mixtures |
| GOST 31108-2016 | Construction cements |
| GOST 8267-93 | Crushed stone and gravel for construction work |
| GOST 8736-2014 | Sand for construction work |
| GOST 23732-2011 | Water for creating a concrete mixture |
| GOST 10060-2012 | Methods for determining frost resistance for concrete |
| GOST 10180-2012 | Methods for determining strength for concrete |
| GOST 10181-2014 | Test methods for concrete mixtures |
| GOST 18105-2010 | Rules for monitoring and assessing the strength of concrete |
| GOST 24211-2008 | Additives for concrete |
| GOST 27006-86 | Rules for selecting concrete composition |
| GOST R 52085-2003 | Technical conditions for formwork |
| SNiP 2.01.07-85 | About loads and impacts |
| SNiP 2.02.01-83 | Building foundations |
| SNiP 02/23/2003 | Thermal protection of structures |
| SNiP 3.09.01-85 | Reinforced concrete structures |
| SNiP 01/23/99 | Construction climatology |
What type of screed is there?
It was mentioned above that the thickness of the screed is also influenced by what it can be made of. Let's get acquainted with the main types of screeds.
Table. Types of screeds.
| Type | Description | Minimum thickness |
| Cement-sand | Classic. This screed has been used in construction for decades and does not lose its relevance due to its reliability. However, it is quite heavy and cannot be used in all buildings. It is made independently from cement, sand and water. | 4-5 cm or less. In the latter case, it is important to use additional reinforcement. When installed on concrete slabs, its thickness is at least 5 cm. If there is no reinforcement, it is at least 7 cm. |
| Self-leveling composition | In this case, the screed is made from special compounds that can spread independently over the floor with a little help. You can achieve the thinnest screed layer. Often used as a finishing coat on screeds before laying the final floor. Here the screed turns out to be very level relative to the horizon. | From a few millimeters to 2 cm. |
| Ready-made building mixtures | Ready-made mixtures are very convenient to use, but are not cheap. Often this option costs much more money than creating a conventional concrete one. But bases made from ready-made mixtures dry faster, and the layer usually requires a much smaller thickness. | In this case, all recommendations for layer thickness should be looked at on the packaging - they are given by the manufacturer; the indicators for different mixtures may differ. |
| Dry screed | In this case, the screed is made of expanded clay, special slabs and a number of other elements. It is lightweight and easy to install; it does not need to be dried and can sometimes be used immediately after installation. | The thickness can be approximately 10-15 cm. And the minimum is 3.5 cm, provided that the thickness of the slabs forming the surface is 2 cm. |
Dry floor screed
In some cases, the thickness of a concrete screed can reach 15 cm. This is a monolithic heavy thick floor, inside of which reinforcement or reinforcing mesh is necessarily used to further strengthen the floors. In ordinary city apartments, this option is not used due to the fact that a significant load is created on the interfloor floors. But in a private house, this screed can itself become both a foundation and a floor at the same time.
How to reinforce a floor screed
The minimum thickness of the screed layer will also increase if bedding is used. It can be crushed stone or expanded clay, poured onto the ground or a rough foundation, and a concrete mixture is poured on top or a dry screed is laid on top. The thickness of the concrete layer cannot be less than 10 cm in this case.
What is a dry floor screed?
Choosing a solution
When deciding on a coating device, make an economically sound, technically competent decision, taking into account the points specified in the standards:
- service life and structural strength;
- rational use of materials taking into account characteristics;
- the possibility of mechanizing work, reducing labor costs;
- the influence of negative aspects, the ability to violate the integrity of the flooring;
- hygiene and fire resistance.
When designing floors, standards require taking into account the degree of mechanical impact indicated in the table, as well as the level of influence of liquid on the surface. With abundant moisture, the rules require the floor to be constructed with a slope of 0.5 to 2%, which is ensured by pouring a layer of varying cross-section.
Is it possible to make the screed thinner?
In fact, it is not worth deviating from the minimum screed thickness recommended by experts to a lesser extent, even in order to save money. This will be unjustified, since a thin layer will be unreliable, and everything will have to be redone over time anyway. Of course, no one forbids saving on materials, but too thin a layer can:
- cause rapid cracking of the screed;
- serve an extremely short period of time;
- be damaged when a heavy object falls on the floor;
- cause improper heat distribution when installing floor heating.
On a note! Sometimes you can still get out of the situation - make a thin tie. But a reduction in thickness is allowed only if some kind of plasticizer is added to the mixture - for example, lime, detergent, PVA, etc. There are also a number of professional products that can be bought in stores.
Plasticizers for cement screed
Application of ready-made fixing parts
For quick and accurate installation of reinforcement inside the formwork, building material manufacturers produce inexpensive plastic clamps. You can see several types of such products. But, in fact, there are only two of them - vertical posts (supports, “chairs”) and round ones (“stars”). All other models are derived from these two types.
Vertical posts are used to install a reinforcing mesh or spatial structure in a position raised above the support. Their height and support recess may vary depending on the diameter of the reinforcement and the design height of the installation.
Round “stars” are put on using a special latch-lock on the upper horizontal rows and vertical ones. The calculated radius prevents the rods from getting closer to the formwork and ensures the required thickness of the protective layer. Available in various outer and inner diameters.
The use of plastic clamps for mounting steel reinforcement allows you to:
- ensure high accuracy of the thickness of the protective layer;
- reduce work completion time while ensuring high quality structures;
- reduce the cost of manufacturing reinforced concrete elements of buildings and structures.
The determining factor for use is the simple design of the clamps and their low cost.
Screed installation: general rules
Knowing all aspects of the design and installation of the screed, you can begin to work. However, it is worth remembering a few rules that must be followed during this process. And they are relevant for absolutely any type of screed.
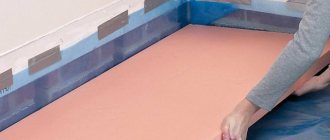
- You should always do waterproofing . Otherwise, your neighbors may be flooded while pouring the cement screed. And in the future, the possibility of pipe leaks cannot be ruled out. In this case, the neighbor's renovation will again be saved by the waterproofing layer. Also, in some cases, it allows you to get rid of adhesion, which is not always necessary when pouring screed.
- Installation of damper tape must be mandatory . The bottom line is that the screed changes its physical parameters during the drying process and can either crack itself or damage the walls. And the damper tape will in any case soften the pressure of the poured base on the walls of the room. It is better to install the damper tape before laying the waterproofing layer.
Damper tape when installing heated floors
Calculator for calculating the amount of ingredients of a mortar for floor screed
Go to calculations
The importance of correct sizing
The dimensions of concrete walls are a very important operational parameter. Knowledge of the required thickness and height will help you build a concrete structure that will meet all operational standards and become reliable for many years. For calculations, GOST and SNiP standards are used.
The tables of regulatory documents provide optimal data that allows you to calculate with extreme accuracy how much concrete will be needed to erect a structure. Moreover, there is a full guarantee that the building will be durable.
After all, many factors influence the reliability of a design. From the prevailing weather conditions to the landscape. Therefore, when creating a concrete solution, it is determined in advance which components will participate in it and what exact quantity of each ingredient is needed.
To make calculations take into account:
- purpose of the structure;
- terms of Use;
- load level.
Correct calculation also has practical significance and allows you to control the project from the financial side . After all, erecting walls with excess thickness is extremely impractical. There will be an obvious overexpenditure of resources.
Instructions for creating a screed
Let's look at how a screed is created in an apartment. This is a rather troublesome and dirty process, but in general anyone can cope with the task.
Step 1. First of all, it is important to clear the floors of debris and inspect them for damage. It is best to seal them with cement mortar if there are cracks and eliminate them as much as possible.
The base must be properly prepared
Step 2. Then you need to apply a primer coat. You need to apply the primer, thoroughly covering the entire base, without missing a single centimeter. You can use a regular paint brush or roller. After the primer has been applied, it should be dried thoroughly - it is better to leave the floors alone for a day. It is important to stick damper tape along the walls of the room.
Applying primer
Step 3. Next, you should begin installing the beacons. However, it is important to first determine the highest installation point. This can be done using a laser construction level. This small device, when turned on, casts a thin beam of light onto the wall, which will help determine at what level the top edge of the screed should be located. It is important to focus on the line, since the base may have a certain slope, which should disappear completely as a result of installing the screed.
A laser level is used for work
Step 4. Installation of beacons must be carried out starting from the highest point. The first beacon should be located at a certain distance from the wall, and between adjacent horizontal lines there should be a distance not exceeding the length of the rule.
Installation of the first beacon
Step 5. Small piles of cement can be used as supports for the lighthouse. It is on them, laid in an even row horizontally at the required height, that a metal profile is installed, which is laid on top of their highest points. The lighthouse must be positioned along the line marked by the building level.
Beacon installation process
You need to navigate along the line marked by the building level
Step 6 . All beacons must be installed at the same level relative to each other. The goal of all this is to get a perfectly even and neat screed.
Beacons are installed at the same level
Step 7. Next, you can start pouring the screed, but before that you should prepare the cement mixture. You just need to mix cement and sand in a ratio of 1:4. You can add plasticizer and fiber. You will also need water. To prepare the cement mixture, it is convenient to use a small concrete mixer.
Preparation of the solution
Step 8. Then you can lay out the finished mixture on the subfloor between the beacons.
The mixture is laid out between the beacons
Step 9. When part of the mixture has been laid, it needs to be smoothed using a rule that should rest on the installed beacons. This way you will be able to achieve a level base. If necessary, the mixture should be added to those places where there is not enough of it, and the surface should be leveled again using the rule.
The mixture is smoothed out using the rule
Step 10 . Similarly, it is worth making the entire screed and leaving it to dry for 28 days. By the way, the beacons do not need to be removed. You can also spray the screed with water during the first days to prevent it from cracking while drying. This is especially true in dry, hot weather.
Further arrangement of the screed
Attention! You can walk on the screed after a couple of days, but be very careful. Under no circumstances should floors be used for their intended purpose until they are completely dry.
Prices for reinforcing mesh for screeds
reinforcing mesh for screed
Video - Semi-dry screed by hand
Additional calculations
To determine the strength of walls, it is often necessary to know their exact height and sometimes length. All necessary parameters can be found in the tabular data of SNiP II-22-81. But if you need to calculate the height of the floor, then it is determined by the formula:
H = L /(p×w), where:
- L is the effective length between two rigid horizontal supports.
- P is the stiffness coefficient of the junction of walls and floors.
- W – perpendicular direction coefficient.
The exact values under certain conditions are found in the SNiP tables.
But to understand the calculations, you can consider a simple example. The length of the wall section between the two supports is 2.8 m. Since the nodes in the example are rigid, the first coefficient will be equal to 0.8. Under normal conditions, the value of the second is equal to one.
Multiplying the coefficients and dividing the length of the wall section by the result obtained, we get 3.5. It turns out that in this case it is possible to build a wall to a height of three and a half meters.
Drying and surface treatment
After pouring concrete, you need to wait until the surface dries and sets. This occurs, depending on the temperature and humidity, in approximately 24-48 hours. After this time, you should remove the inserts that were installed to form thermal joints and clean the surface with a wide spatula from remaining deposits and irregularities.
The setting of concrete does not mean that this material has achieved the calculated physical characteristics. The complete hardening time for concrete grade M200 can reach 28 days, but it is believed that concrete structures can begin to be used within one and a half to two weeks.
As a preventative measure, it is recommended to cover the concrete area and paths with plastic film to reduce the rate of water evaporation.
At this time, it is necessary to take measures to ensure that the concrete does not dry out prematurely, and that the water necessary to complete the chemical process of cement hydration remains in it.
In too hot sunny weather, the site needs to be watered periodically. After two weeks, you can remove the film and finally start using the new elements of landscaping your yard
Concreting the site and paths
Pouring concrete itself is a fairly simple, but labor-intensive and very responsible process. The appearance of the entire concrete structure and overall quality depend on its precise implementation. Work must be carried out at an outside temperature of 5°C to 25°C.
In order to concrete the yard, you can order the delivery of ready-made concrete, which will significantly reduce the amount of work performed. Or, in order to save money, prepare the concrete mixture yourself.
If the size of the site is not very large, then the mixture can be prepared independently. To do this you will need:
- concrete mixer;
- shovel;
- buckets and a wheelbarrow for moving sand, crushed stone and ready-mixed concrete.
Concreting process.
Repair in case of damage
During the operation of reinforced concrete elements, cracks, chips and other defects may appear on their surface, violating the integrity of the protective layer. The reasons for such formations can be:
- loads on structures exceeding the design value;
- ill-conceived use of special construction equipment;
- construction of additional floors without changing the foundation design;
- pressure of heaving and moving soils.
Violation of construction rules and technologies almost always leads to damage. Restoring the integrity of the protection is possible, but will require additional costs.
The full range of repair work should include:
- strengthening the concrete structure;
- installation of additional transverse elements;
- sealing all existing cracks;
- restoration of chipped and crumbled areas.
The work is carried out using concrete mixtures and high grade cement mortar. For strengthening, formwork is installed and reinforced concrete is added with preliminary driving of steel anchors into the old structure.
Restoration should not be performed more than 2-3 times. In these cases, it is not the repair of individual elements that is required, but the complete restoration of the building.
Waterproofing
The waterproofing device is necessary in order to prevent the penetration of moisture from the soil into the concrete, as well as to prevent the premature loss of liquid into the soil from the concrete mixture after it is poured. In addition, in the future, the waterproofing layer will prevent grass from growing through the concrete layer.
After this stage of work is completed, reinforcement begins. It needs to be done so that the concrete structure becomes stronger and more durable.
Scope of work
In order to fill the yard with concrete, you will need to perform the following steps sequentially:
- excavation;
- installation of a drainage system;
- installation of formwork;
- waterproofing;
- reinforcement;
- installation of beacons;
- pouring concrete;
- processing during concrete hardening.
Each step is important and cannot be skipped. Since it is possible to fill the yard with concrete only if the work technology is fully followed, which will ensure a high-quality, durable and beautiful coating.
The main stages of concreting a path or yard.
These works have some specific nuances, since they directly depend on the topography of your site and the type of soil. If the soil in the yard is not fertile and you still have to import black soil, then all excavation work comes down to marking the yard with your own hands, leveling the surface and adding a thin layer of crushed stone.
It is necessary to remove the layer of earth so that the surface of the concrete is at the same level as the surface of the earth, i.e. by 20-25 cm.
And if the base is clay, then you don’t have to add crushed stone. It is best to remove a good fertile layer and transfer it to flower beds and beds, where it will be completely useful.
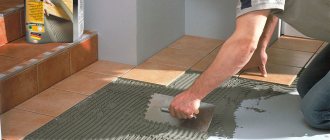
Installing a floor with a self-leveling mixture
Self-leveling mixtures are used for height differences of no more than 3 cm.
Self-leveling mixtures are sold in bags, are easily diluted with water and mixed without forming lumps. If the height difference is less than 3 cm, you can perform quick and easy installation yourself. This floor will dry within a week.
According to the instructions on the package, dilute the mixture, mixing all ingredients well. Pour onto the prepared surface from the far corner, level with a needle roller towards the entrance. Make sure that there are no air bubbles left.