Almost all city dwellers have a dacha outside the city, where they go for a weekend getaway with family or friends. To make the time spent on it as comfortable as possible, it is necessary to build all important buildings on the site, such as a bathroom and an outdoor shower. It is best to make a heated shower so that taking water procedures even on cool summer evenings will be pleasant.
Features of an outdoor shower for a heated cottage
The need for a shower in a country house with heated water arises mainly due to the lack of a full bathroom in a country estate. There are a number of other reasons why owners of summer cottages install such a structure with a warm water supply:
- the shower room is located outside the house - it does not have a heating system, thick walls and a roof;
- the need for water procedures not only in summer, but also in spring and autumn;
- There is no centralized water supply with hot water supply, so the container is located above the pressure cabin, and the heaters are directly in the shower room, and not in the house.
Another important point is the lack of a central sewerage system. For this reason, you have to equip a drain or septic tank when installing a heated garden summer shower for your dacha.
It is these features that distinguish a heated shower in a country house from a conventional bathroom and from an ordinary summer shower. Depending on the number of people in the country, the frequency of the need for water procedures, the availability of electricity, a septic tank, and the climatic conditions of the region, they choose which heated shower to install.
Sheathing
You can cover the frame with any material:
- Oilcloth or film. Not durable, but fast and cheap. Enough for the season. You can even use an old banner (advertising agencies give them away for almost nothing).
- Impregnated fabrics. The option is very easy and inexpensive. You can use the material that is used for awnings and tents. Budget shower covering - fabric and film
- Lumber. Lining, imitation timber, block house, etc. One point: do not buy a raw lining or block house if you need to install it right away. After a year, it will dry out significantly, causing cracks to appear. Sometimes the shrinkage is so significant that the boards jump out of the grooves. Have natural ventilation. Although, if you make it according to the principle of a wicker fence (as in the photo), you can use a regular board. The walls of this summer shower are made according to the principle of a wicker fence
- Slate. They can install asbestos and polymer. Although everyone knows that asbestos is harmful, they still make cladding out of it.
- Profiled sheet. If there are scraps left after making a fence from corrugated sheets, you can adapt them. Shower in the country from corrugated sheets
- Polycarbonate. If the translucency of this material does not bother you, you can use it. Only the cuts will need to be sealed, otherwise dust/moisture will get into the cells and algae will settle. Polycarbonate, of course, will no longer be transparent, but will take on a grayish-green tint, which you are unlikely to like.
You can use any other fence that comes to your mind and will perform its functions. For example, at one summer cottage they wove the shower paneling. Like a wattle fence.
You can weave a shower panel
Types of warm showers for a summer residence
There are many ways to create a shower in a suburban area. You can get by with a simple device, but there are also serious, solid structures with utility networks and wiring. The principle of a heated shower is the same - a flow of warm water comes from a container that is located above the person’s head. This design can be mobile or stationary according to the wishes and capabilities of the summer resident.
Portable shower for a summer cottage with heating
Mobile devices for showering in the country are adapted for easy installation and are as easy to use as possible. The main difference that affects the cost of a portable shower is the principle of heating the water.
Mobile shower with naturally heated water
Naturally heated shower - the container is filled with water, which is heated by the rays of the sun. Using the trigger mechanism, the water supply is turned on and you can use a portable shower anywhere in the garden. Portable shower devices are not connected to water supply systems and electricity. All you need to take a shower is a sunny area to naturally heat the liquid. There are different models based on the principle of water supply:
- Portable shower of the “Camp Shower” type. As a rule, a soft tank filled with water is attached to any structure made of metal, plastic or wood above a person's head using a hanger or rope. In order to take a shower, you just need to turn on the water supply with a simple movement of your hand. Standard models usually come with a 20-liter black tank, which, due to its color, heats up faster in the sun.
- Pocket device of the “Toptun” type. This is a lightweight, compact foot module that consists of a rubber mat with two diaphragms, tubes and a mount. One tube is lowered into any container (bucket, basin) with water heated in the sun or fire. By alternately pressing your feet on the mat (stomping), the liquid flows through another tube into the shower head.
Mobile shower with forced water heating
Such devices are convenient to use in cool or cloudy weather, when it is not possible to heat water naturally.
A mobile heated shower for a summer cottage is connected to the network, the water heating module is placed in a container of water. As a rule, in 10-15 minutes standard water heaters with a power of 1.9-2 kW heat water to a temperature of 45-50 degrees. Usually the heater is easy to fix in a bucket or barrel with a hook.
By turning on the pump, water flows through the hose. Many models of heated mobile showers have a temperature regulator and a convenient shower head with a pressure lock.
Advice! If the electricity is often cut off at your dacha, then you should take care of purchasing an adapter for a heated shower that can work from a car cigarette lighter.
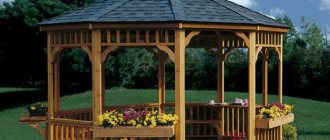
Stationary garden shower for a summer cottage with heating
Typically, the stationary design of a heated summer shower in a dacha consists of a water tank and a cabin, the size of which depends on the size and number of people visiting the dacha.
On the roof of the shower house there is a tank - a metal or plastic container. The water in the tank is heated by sunlight or electricity using a heating element built inside. A pipe is built into the bottom of the water tank, to which a shower head and tap are attached. When the valve is opened, water flows downwards under its own weight, providing good pressure. Through holes in the floor of the shower, the used water goes into the septic tank or into the ground if the flow rate is small. Modern models of heated shower cabins are presented in different variations in design, material, size, sections, and price.
The most popular models are plastic heated showers for summer cottages.
As you can see in the photo, the designs are quite simple, so making a heated shower in the country with your own hands will not be difficult.
Preparatory stage: project drawings, dimensions
Any summer shower needs to be thought through and developed before construction. Doing this kind of work is easier than it might seem. The height of the structure must be at least 2.5 m so that a person is not cramped during the shower procedure.
Approximate drawing of the future design
It is also necessary to provide free space inside the cabin, sufficient to allow you to bend over while bathing without bumping into the walls with your elbows. The minimum dimensions of the room are 1 x 1 m. At the same time, you should think about where to store towels and personal items so that they do not get wet. For a “locker room” an area of 0.5 m² is sufficient. In reality, the most comfortable design will be 1.4 x 1.9 m.
Advice: the small area of the constructed shower will subsequently cause its destruction. To ensure the stability of the structure, it is recommended to place the cabin on a pile foundation.
Determining the location of the building
To ensure rapid drainage of water, it is better to place the building on a slightly elevated area. A flat part of the site is quite suitable for this purpose. The main thing is that it is not in a strong depression.
The best option for placing a summer shower is an open area well lit by the sun, which is located at a short distance from other buildings
By choosing a sunny area for the construction of a shower, you will ensure that the tank can warm up well naturally. This solution will reduce costs by combining forced heating of water in cloudy weather and natural heating of the water container from the sun on fine days.
When choosing a location, take into account the moment that electricity is supplied to the future building. It will be needed to power the heating element, which will serve as a heating element.
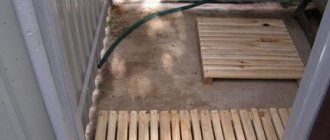
Wooden shower on a slope: We make a frame 1.75x1.25 m from six thick beams, install it on a slope under which used water will flow. We bury the lower ends of the supports in the ground and concrete them, treat the wood with impregnation, nail the boards across the supports, and lengthwise on the door. If you take boards 3 m long, then one product is just enough to cover both sides. We place two or three thick boards on top to secure a barrel of water. From shallow lining we knock together a flooring so that your feet do not slip while washing. The distance between the boards is 1 cm, this is necessary for free flow of water. For contrast, we paint it in a darker color. We decorate the upper part, which will serve as windows and let in sunlight, with a lattice. To do this, we cut small slats and fasten them diagonally. We fix the grille with self-tapping screws. The floor mat can be extended if the area around the booth is uneven. You will get comfortable bridges. We paint them in any color we like, here it’s darker. To make it possible to sit down during or after a shower, we make a small bench from the remaining boards. We treat it with protective impregnation and install it in the “dressing room” - near the doors. After the final finishing - painting or varnishing - we finish the arrangement of the shower: we install a tap, a shower head, we bring soap accessories, you can hang a curtain. To ensure the water supply, we fix a barrel on the roof. To prevent it from rolling off, we prepare a stand from a metal profile. Heating of water will be carried out naturally - by the sun's rays Step 1 - frame made of timber Step 2 - facing the frame with boards Step 3 - flooring Step 4 - grate as decoration Step 5 - walkways for convenient access Step 6 - furniture for the shower - bench Step 7 – arrangement of the interior space Step 8 – barrel on the roof
It is not recommended to place the outdoor shower too far from the house. Not everyone likes to make long runs along the street after water procedures, preferring to immediately find themselves in a warm indoor room.
Drain pit equipment
From a biochemical point of view, draining wastewater from the shower and street toilet into a common pit is a gross mistake. It is necessary to build a separate pit under the cabin. To equip a summer shower, which is supposed to be used only from time to time, a drainage hole with a capacity of no more than two cubes is sufficient.
When calculating the required volume of a structure, adhere to the rule that its capacity should be 2.5 times greater than the contents of the water tank
The drain should not be located under the shower building itself or even near its walls, but two to three meters from the building.
What is a warm shower for a heated cottage made from?
When building a shower room in a country house, practical and simple materials are chosen, so building a heated shower can be quite a budget-friendly endeavor. The walls of the structure can be made of different materials.
Brick is solid masonry that will last a long time (you can use bricks left over from building a house). Wood is a completely environmentally friendly basis. High-quality ventilation is necessary to preserve the material and its treatment with a fire retardant due to the proximity of the heating device. Polycarbonate is a lightweight and durable material that does not deform from natural precipitation. It is easy to cut and install.
Sheet plastic is another moisture-resistant resource. You need to choose durable, non-toxic varieties that do not emit harmful substances when heated. Some use corrugated sheeting - a durable material that does not corrode. Its advantages are ease of installation and design.
Sheet materials are used to form the side walls of the shower; the frame is made of profiles, metal pipes or wood blocks. Regardless of the wall cladding, the top layer on which the tank filled with water will stand must be strong and firmly supported by the vertical bases of the frame. Lightweight shower options in the country are left on stilts, while heavy massive structures require a poured foundation.
The size of the tank is selected based on the number of visitors who will use the heated shower in the country house. The volume recommended for a family of 3-4 people is 100 liters.
For heated shower tanks, plastic or steel tanks are used. From steel tanks choose:
- metal;
- made of galvanized steel;
- made of stainless steel.
Recently, steel tanks have faded into the background due to their heaviness, which implies a more solid frame. Containers for country showers made of plastic have become increasingly popular due to their lightness, quick heating and the ability to withstand temperature changes from +60 to -60 degrees.
There are tanks that are already equipped with a heating element with the function of adjusting and maintaining the required temperature.
Recommendations for choosing a tank
You can buy a ready-made water tank by choosing one of the models you like, or you can make the tank yourself from scrap materials, for example, from a 200-liter barrel.
The tanks on the market, depending on the shape, come in several types: square and rectangular, flat and oval
Ready-made tanks can be made of plastic, metal or galvanized steel. On sale there are containers of simple design, the design of which has a bevel and holes for installing heating elements, and models that are already equipped with heating elements.
When choosing a tank, you should be guided by two criteria:
- the material from which it is made;
- capacity of the tank.
A 100 liter tank is enough for a family of two. And for water procedures to be carried out by three or four family members, it is better to install the 200 liter option.
Do you want to make a heated tank yourself? There is nothing complicated about this. Buy any suitable container. You purchase heating elements separately on the construction market.
A 1-2 kW heating element equipped with a temperature controller is suitable as a heating element, for installation of which you will need two nuts and a ½ inch bend.
On sale you can find heating elements with remote power regulators, in which the adjustment varies from 0.5 to 2 kW. Their only drawback is that they are not able to maintain the set temperature.
To install the heating element in the center of the tank, maintaining 15 cm from the bottom, make a hole. At the bottom of the container, closer to the edge or in the center of the bottom, another hole is made for arranging a drain. The outer part of the heating element is hidden in an electrical box.
To drill a hole for a heating element with a nut, you will need a drill D 40 mm, for an overflow of ½ inch - a drill D 20-21 mm.
How to build a warm shower in the country with your own hands
Construction of a heated shower in a country house with your own hands begins with choosing a location. The optimal location would be a sunny hill at the edge of the site or along the fence. They clear the land 2 by 1.5 m - this space will be quite enough for a shower with a locker room. To make it easier to perceive the future booth and calculate the required material, it is worth sketching out a drawing on paper.
When developing a project, you need to take into account the free space inside the shower stall - it should be enough so that you can freely bend over and move your arms while bathing. The minimum dimensions included in the drawing are 1 by 1 m. They also think about a place for a locker room where dry towels and clothes hang. For comfortable storage of personal belongings, leave 0.5 square meters. m. The optimal design is 1.5 by 2 m with a height of 2.2 m.
Used water should flow freely and not accumulate on the floor to avoid dampening the entire structure. To do this, form a concrete base with a slope. Dig out the top layer of soil 20-25 cm, cover it with gravel and fill it with solution. A comfortable covering for the feet is formed on top.
If the booth will be used by more than 2-3 people, then make a drainage hole. To do this, dig a small ditch and lay a drain pipe into it, which goes directly into the pit. The pit into which the water will flow is made 1.5-2 m deep at a distance of 2-3 m from the cabin itself to avoid subsidence of the structure. The drainage pit is made sealed (tires, plastic tank) to isolate soapy water from fertile soil. The top of the drainage ditch is covered with boards or metal sheets for safety. In order for the water to flow directly into the pit, a solid tray is placed on the floor of the shower stall, and an adapter into the drain pipe is attached to the drain hole.
After forming the base of the shower and the drainage area, they begin to build the frame. They make the bottom trim around the perimeter with a 100 by 100 mm beam, fastening it with anchors.
Vertical posts are attached to the base with steel corners and long self-tapping screws with additional fixation with diagonal boards.
The top trim is formed from the same timber, fastened with nails or self-tapping screws.
Important! All wooden components are treated with fire protection and coated with a water-repellent preparation.
Boards are stuffed along the top frame or moisture-resistant plywood with a hole for the pipe is placed. The upper part of the frame must be reinforced with strong sheets due to the heavy load of the water container. Install the tank on the cabin.
They fix it, install the outlet and install a faucet with a shower head.
To fill the shower tank for a heated cottage with water, install a pump.
If the tank is no more than 100 liters, then you can choose a low power device. In order to avoid overfilling the container, install a valve that shuts off the flow when filling.
The walls are covered with the selected material: polycarbonate, siding or boards.
To delimit the space between the dressing room and the shower stall, hang a waterproof bath curtain or install a polycarbonate partition. The outer door should close tightly to keep cold air out, but to avoid deformation from moisture in the future, it is better to leave a gap. This distance is covered with a seal that is attached around the perimeter of the doorway. After covering the walls and installing the tank, they move on to the interior arrangement of the shower in the country. Shelves for hygiene items and hooks for clothes are attached to the walls, and a rug is placed on the floor.
Shower design options
The comfort and ease of use of the structure depends on how well the summer shower is designed. The task of a thrifty owner is to build an economical, easily constructed and at the same time maximally functional shower, equipped with heating.
The easiest option to implement is an open shower.
An open summer shower is a framed, collapsible block or a modular container, one of the walls of which is adjacent to the main building
When choosing this arrangement option, the tank is installed on the load-bearing wall of the building, positioning it in such a way that the sun's rays hit it at a right angle.
Do you prefer closed designs that are convenient to use both in the warm season and in the cold months? Build a stationary summer shower with a simple heating system. It can be a frame structure or a permanent structure.
The main advantage of this solution is that in warm times the water in the tank is heated by the sun's rays, and in cold months by means of a heating element
Traditionally, when building a shower with enough space for an adult to bathe, they focus on the following parameters:
- height – 2-3 m;
- width – 1.5 m;
- length – 1.9-2 m.
These dimensions are convenient when building a structure from wooden boards. Taking into account the thickness of the walls in its finished form, the area of the structure is approximately 2 * 1.5 m, of which an area of 1 sq. m will be allocated for the shower stall. m, and for the locker room - 60*40 cm.
When using boards of standard sizes, the material is consumed with virtually no residue.
In addition to wooden planks, the most commonly used building materials for the construction of cabins are:
- polycarbonate sheets;
- moisture-resistant plywood;
- sheet metal;
- flat slate;
- lining;
- brick.
When choosing a facing material, it is important to focus on the exterior of the site so that the building harmoniously complements the already created architectural ensemble.
How to insulate a shower at the dacha
To make taking a shower in a heated dacha comfortable in any weather, the walls and roof are insulated to prevent cold from entering from the street. To do this, choose mineral wool or polystyrene foam. Sheathing a heated shower in a dacha with thermal insulation material is no different from the procedure for insulating other rooms - the material is fixed to the frame and walls with suitable fasteners (if the thickness of the material allows, with a construction stapler to wooden parts). When insulation occurs from the outside of the shower, the fixation is performed in the usual way. If the material is placed inside the booth, then care must be taken to protect it from water splashes. It is best to cover the insulation with thick cellophane film and foil on top of it.
Comment! It is important to insulate not only the shower walls, but also the ceiling. Warm air will instantly evaporate if the ceiling is not insulated.
Maintenance and care
A huge advantage of our plastic shower cabins is their simplicity and ease of maintenance. If the basic rules of use are followed, no major maintenance or repairs will be required. Our structures retain their original properties at temperatures from -50 to +50 degrees ; they don’t even have to be hidden for the winter.
During all the time of our work, we have never been contacted with complaints about serious breakdowns and defects. If you handle the structure with care, it will last for decades and will not make you doubt the highest quality of its workmanship. Outdoor showers work properly even on construction sites, where dozens of workers use them, and not always 100% accurately.
The maximum that may be required is the cleaning of minor contaminants. To do this, you can use standard cleaning products, ordinary sponges and rags. At the same time, the color of the structure will not lose its brightness and saturation and will continue to delight you with its aesthetics and attractiveness.
Heating water for a shower in the country
Heating water in the tank can be done in two ways:
- Naturally, the tank along with the water is heated by the heat of the sun. To do this, install a flat black tank. On sunny days, the water usually warms up to a comfortable temperature by lunchtime.
- By forced method - the water in the container is heated using a heating element. This electrically heated garden shower allows you to bathe in warm water in any weather conditions.
Many modern shower tanks are already equipped with heating elements, which significantly simplifies, but also increases the cost of providing warm water. Anyone can install such a structure on their own if you use the heating system for a shower in the country.
A heating element with a power of 2 kW or more is installed in the lower part of the tank, fixing it with rubber gaskets in a pre-drilled hole. A thermometer is installed on the container, which indicates when the heating device can be turned off, or an automatic thermostat. A prerequisite for self-assembly of a tank with a heating element is the installation of a device that shows the water level. This is an important point, because the heating elements react to the lack of water and fail.
Warning! To avoid short circuits, the wire from the network to the shower stall is laid in one piece.
Heating schemes
During the construction of a country shower, you need to decide on a water heating system. To comfortably refresh yourself on hot days after working in the country, the water must be warm, otherwise you may catch a cold. Today, there are several types of installation of structures, each of which has a specific heating scheme.
- Portable shower. It is a simple version of the structure in which water is poured into a special bag equipped with a watering can. The bag is hung on a rack and filled with preheated water. You can also place the container and wait until its contents warm up on their own in the sun. The main advantage of such a system is its efficiency, it does not require additional equipment, the water is heated without the cost of electricity, but the volume of the bag, which is 20 liters, will not allow the whole family to take a full bath.
- Solar heated shower. Thanks to special equipment, you can profitably use solar energy, which will generate heat and make swimming practically free. To do this, you can install a structure made of any building material on your summer cottage and place a tank under its roof, having previously painted it black or covered it with a dark film. In addition, it is recommended to additionally place reflectors in the form of sheet or roll materials made of foil with the tank; old mirrors may also be suitable for these purposes. As a result of this installation, the tank will heat up under the influence of both direct and reflected rays of the sun; the only drawback of this system is considered to be uneven heating of the water, since warm water will be at the top of the tank. But to eliminate this problem, it is enough to attach a float inside the tank, as a result of which heated water will flow into the outlet hose.
- Titanium. In the event that it is necessary to heat the water forcibly, without using solar energy, country showers are built with a coal or wood titanium system. In such structures, the water will always be warm, regardless of weather conditions. To increase the heating efficiency, an expander is additionally installed in the tank or barrel; it evenly distributes the flow of cold and hot liquid, so warm water goes directly into the container, and cold water goes down into the heat exchanger. But it is worth paying attention to the fact that such equipment belongs to the category of fire hazards, as it is equipped with an open flame. Therefore, if you do not have experience in installing titanium, then it is better to entrust the construction of a shower to specialists.
In addition, it is necessary to purchase a high-quality boiler from well-established manufacturers that meets all standards and safety regulations. Additionally, in the summer shower you will need to finish the walls, ceiling and flooring with thermal insulation and asbestos. This will protect the structure from possible fire. If the titanium is planned to be placed externally, then you should also worry about enclosing its space, especially in areas where children can play.
- Electrically heated shower. It is considered the most popular and convenient design option in which water is heated using an electric heater. The only drawback of such a system is considered to be the high energy consumption and the load on the network. Therefore, for this type of heating, you need to first think through the optimization of the electrical network and install powerful wiring that would meet all the requirements for safe operation. In addition, all switches, sockets and cables will have to be grounded and protected from moisture.
- Solar panels. The most modern type of heating water in a country shower is a system using vacuum collectors that are powered by solar energy. Of course, such an installation is considered expensive, but its effectiveness, practicality and safety will pay off over time. To install such a system, panels that consist of vacuum tubes are attached to the roof of the structure; they accumulate energy and heat water. At the same time, the panels do not require additional power sources; they are powered by the sun, converting ultraviolet radiation into thermal energy.
You can install such a system yourself, without having any special skills or experience; the most important thing is to correctly place the panels and calculate their production load.
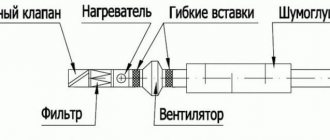
How to auto-fill a tank
The most advanced ones do automatic filling. Then the water supply is opened/closed by a float system similar to the one in the tank. Only in case of breakdown should provision be made for draining excess water. And, preferably, when leaving the dacha, turn off the supply tap. Otherwise, you can turn your and your neighbor’s dacha into a swamp.
Water tank design with automatic level control
An approximate diagram of the implementation of auto-filling the tank is shown in the figure above. Please note: the water intake into the shower occurs close to the surface: this is where the warmest water is usually located. Only this pipe is placed at the opposite end from the cold water inlet, otherwise the water will still be cold.
There are two pipes going into the sewer system: one is an overflow pipe (mustard colored). With its help, the tank will not overfill if the float mechanism breaks down. The second drain into the sewer for complete drainage (brown). It is useful when preserving the system - draining it for the winter, which is why a tap is installed on it.
Useful tips
Installing a heated summer shower at your dacha with your own hands is a completely feasible process for any summer resident. There are several clever tips that will make organizing your work easier and save you from problems during operation in the future.
- To enhance heating by the sun's rays, a polycarbonate roof is placed over the tank or a film is stretched to give a greenhouse effect and retain the heat of the water.
- The volume of the drainage pit must be at least 2.5 times larger than the water tank.
- The farther the septic tank is from the shower stall, the less the risk of an unpleasant stagnant odor.
- When forming windows in a summer shower room, cracks and joints are sealed to prevent drafts.
- If there is not enough space on the site, the minimum size of the booth can be 1 by 1 m. Hooks for clothes and towels can be placed on the outside of the structure to prevent moisture from getting on the fabric.
Little tricks
A few little secrets and the drainage hole will serve for many years.
In order to extend the cleaning period of the structure, you can apply some nuances. For example, divide the plum. In this case, you will get a main drainage hole and another smaller one. What will it give? Liquid without solid particles will be drained into one structure, for example, a smaller one. This approach will make it possible to quickly absorb water into the ground, and mucus will not form on its walls.
The second option is to use biologically based products . The advantage of this product is bacteria that are able to process waste. The result is that water seeps into the ground faster and easier.
We must not forget about drainage and septic tanks. Their location should be close to the drainage pit, since if water gets on them it will lead to the appearance of:
- unpleasant odor;
- soil destruction;
- may lead to destruction of the foundation.
To avoid problems with runoff, it is better to place the structure on a hill .
Recent Entries
Chainsaw or electric saw - what to choose for the garden? 4 mistakes when growing tomatoes in pots that almost all housewives make Secrets of growing seedlings from the Japanese, who are very sensitive to the soil
Before you start building a shower with your own hands, you should familiarize yourself with heating options. In conventional buildings, as a rule, tubular electric heaters are used. There is only one disadvantage of such heaters - it is necessary to constantly monitor the heating process. When the water in the shower reaches a certain temperature, the electric heater must be turned off.
Installation of the barrel
A tank with an electric heater and thermostat can be installed on top of the cabin.
Such products are sold today in a wide range. But this option has significant disadvantages:
- A significant part of the heat is spent on “street heating”.
- All household members, regardless of preferences, will have to wash with water at the same temperature or wait until the water reaches a comfortable temperature after the previous user.
A more practical option is to attach an inexpensive boiler to the wall outside the shower, protecting it with a canopy. An ordinary barrel is placed on top, from which water is supplied through a tee to the mixer and to the boiler. The outlet from the boiler is connected to the second pipe of the mixer.
Before you start building a shower room in a country house, you need to study a lot of nuances, because when dealing with water, you need to be able to prevent possible leaks and damage to the foundation in advance. Do-it-yourself shower in a private house - recommendations on the order of construction work.
You will find tips on making a shower tray with your own hands in this article.
Preparing the base
At the site of construction of the cabin, it is necessary to select all the fertile soil, reaching the underlying layer of soil - sandy loam or loam.
Next, a cushion is built in the resulting recess, consisting of a 15-centimeter layer of gravel and a layer of sand of the same thickness.
Next comes laying the foundation.