Articles
All photos from the article
Before laying the flooring, it is often necessary to carry out preparatory measures to create a reliable foundation. This article will discuss how to level wooden floors immediately before finishing work. The methods mentioned below can be used for almost any type of facing material.
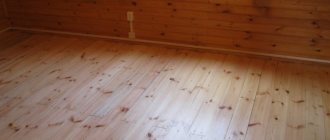
The photo shows a flooring made of boards that requires leveling.
Application of wood boards
This option is used mainly if it is necessary to level a wooden floor under a laminate. As a result, it is possible to create a completely reliable base without significant differences in height, thanks to which the panel locks have a high-quality connection. However, the method may well be used in combination with other flooring materials (read also the article “How to make a handrail for a staircase from wood with your own hands - the main nuances of the work”).
Product varieties
When leveling a wooden floor with your own hands under a laminate or any other coating using this technology, different types of products can be used during the work.
They differ in quality characteristics, so their prices can vary significantly.
The use of wood-based panels is demonstrated.
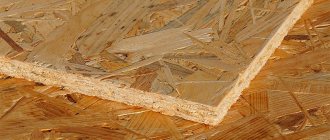
- Oriented strand board has recently become the most popular material for preparing substrates. It has high strength properties, but without compliance with environmental standards, there may be a high amount of formaldehyde and other toxic resins.
- Particle board is a composite material supplied in sheet form. The product is inferior in strength to its previous analogue, but has a lower cost. During installation, special attention must be paid to fastening.
- Fiberboard is made from wood chips. During production, water repellents such as rosin or paraffin are necessarily added to the bulk. Depending on the brand of the product, strength indicators may differ significantly.
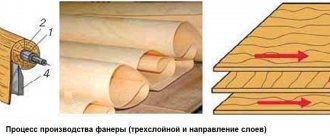
- Plywood is a wood-laminated board produced by gluing veneers prepared in a certain way. Typically, products contain at least three layers. In this case, the wood fibers are located perpendicular to the other two layers.
Addition! The listed materials, as well as some other analogues, may well be used if a wooden floor is being leveled under linoleum, laminate or carpet.
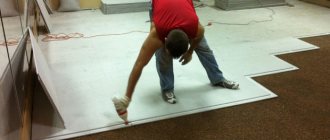
Laying sheets on top of flooring
With this option, no special difficulties arise, since the elements are simply fixed to the plank base using self-tapping screws. Fastening is carried out in increments of no more than 15-20 cm. If the distortions are too large, the material can be laid directly on the logs, which are aligned in the same plane.
The sheets are laid on top of the flooring.
The distance between the crossbars depends on the thickness of the slabs used and their strength qualities. Typically the pitch ranges from 15 to 30 cm.
Option with adjustable floors
Plywood can be laid not only on flooring or joists, but also on special fasteners. To do this, 16 holes are drilled in the sheets, located at the same distance from each other. In this case, you should not deviate more than 50 mm from the extreme part.
Using the prepared sheet as a template, you need to make holes in the wooden base for fasteners. When fixing the material, the protruding ends of the parts are carefully removed. When leveling a wooden floor with plywood without joists, an additional layer is usually laid on top with offset seams.
This is how plywood is fastened without installing lags.
Tools required to perform the work
To prepare the wooden base and pour the mixture you will need:
- An ordinary nail puller, wooden wedges and a chisel for dismantling skirting boards.
- A scraper or a hand scraper.
- Sander.
- Coarse sandpaper or emery paper.
- Industrial or household vacuum cleaner.
- Roller or medium size brush for applying primer.
- A flat brush or short-haired paint roller to evenly distribute the polymer coating.
- Needle roller for removing air from a polymer coating.
- Squeegee and metal spatula.
- A construction mixer or drill with an attachment for mixing the polymer floor solution.
Tools necessary for performing work on preparing the surface and pouring self-leveling wood floors
Don’t forget about such mandatory items as safety glasses, work clothing, gloves and respirators. In order to be able to move, if necessary, on a freshly applied layer of self-leveling floor without fear, you need to acquire shoes equipped with soles with spikes.
Pouring liquid mixtures
When constructing bases for floor coverings, this option is also very often used. However, leveling mixtures for wooden floors are used much less frequently than in the case of concrete. This method is most relevant if you need to lay ceramic tiles on top.
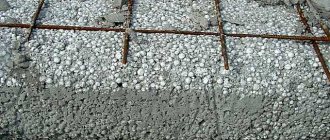
Creating a cement-sand screed
If desired, you can use a cement-sand mortar to form a base for finishing materials. Since the flooring made of boards acts as the supporting part, the thickness of the layer should not exceed 3 cm.
Although the final figure will depend on the cross-section of the wooden elements.
Proportions for the preparation of cement-sand mortars of different brands.
- It is mandatory to carry out preparatory work, which consists of sealing large cracks and replacing boards that are in poor condition.
- Waterproofing made of polyethylene film is laid on the lower plane. An overlap of at least 15 cm is made at the joints. The joints are carefully taped with waterproof tape.
- A mixture is prepared for leveling a wooden floor from cement and sand in a ratio of 1 to 3. Before mixing, the aggregate must be sifted so that stones and excess particles do not fall into the finished solution.
- After preparation, the composition is distributed over the base. Metal beacons act as guiding elements. They are installed immediately before pouring. Leveling is carried out by rule.
Note! A leveler for a wooden floor, such as a cement-sand composition, allows you to get rid of even strong differences. However, the wooden flooring must be strong enough.
Self-leveling floor
In this case, the wooden floor is leveled with a self-leveling mixture. Unlike a traditional solution, it is the most liquid, so it easily spreads over the surface, forming a thin layer. It will not be possible to eliminate serious differences with its help.
Prepared base for pouring.
Before the main work, defects in the flooring should be eliminated, after which it is recommended to lay self-adhesive waterproofing on the surface. If a wooden floor is leveled using special mixtures designed for complex bases, then if you have a flooring made of tongue-and-groove boards or wood boards, you can dispense with the waterproofing layer.
However, in this case, the lower part of the room will have to be treated with a primer to improve the quality of adhesion. It is still necessary to tape the joint around the perimeter with waterproofing tape.
If self-leveling mixtures are used for a wooden floor, then the choice should be made in favor of polymer compounds. They have good adhesion to almost any type of surface and belong to the category of elastic solutions.
The composition is poured without a waterproofing device.
When working with self-leveling floors, it is advisable to use a polymer or metal mesh with a fine mesh for reinforcement. In this case, the strength characteristics of the layer will be noticeably higher.
For precision, the mixture for leveling a wooden floor is best poured directly along the beacons. During installation, a needle roller must be used to remove excess air from the liquid composition.
Conclusion
In the video presented you will find additional information on this topic. Also, based on the above text, we can conclude that the cost of creating self-leveling floors on a wooden surface will be somewhat less than when organizing preliminary screeding or leveling large differences. Therefore, if the coating is in satisfactory condition, then pouring is done directly over it.
It is worth noting that there are special brands of mixtures for self-leveling surfaces that were developed for application to wood. They have a high level of adhesion to this material and have great ductility, retaining all the necessary properties. However, not all manufacturers produce them, citing the fact that they have universal components for such work.
Dry screed device
A layer of expanded clay, on top of which plasterboard sheets are laid, allows you to do without wet processes. Such a base can be prepared for various types of floor coverings.
Brief instructions for constructing such a screed are presented below.
According to this scheme, a dry screed is made.
- Polyethylene film is spread on the wooden flooring. When connecting the fragments, an overlap of 10-15 cm is made and carefully taped along the entire joint with masking tape. Waterproofing should also be applied to the wall.
- Guide profiles are installed in increments of no more than 1.2-1.5 m. This distance depends on the length of the main tool - the rule. The beacons should be located parallel to each other.
- Between the exposed profiles, filler made of expanded clay or any other material is poured. Using the rule, the base layer is aligned.
- Sheets of plasterboard are laid on top of the embankment. The connection is made using self-tapping screws and adhesive. These two methods are usually used in combination with each other.
Attention! It is necessary to lay plasterboard slabs from the front door, then you will not have to step on the expanded clay filling. The folds on the outer sheets must be cut off.
Waterproofing requirements
Waterproofing is required to protect wood from harmful effects. You can choose film, roofing felt and other means that are intended for this purpose. Both rolled types of waterproofing materials and coating types are suitable. In any case, it will be necessary to install a waterproofing layer with a position of 10 centimeters on the wall; the walls will be covered with special construction tape.
Waterproofing is required to protect wood from harmful effects.
How to cope with changes
Floors are measured using a level or rule. To do this, place the level on the floor, and use a tape measure to measure those places where there is space between the level and the floor. If such a “hole” exceeds 2 mm, then the problem needs to be fixed. You can deal with differences on an already laid floor like this:
Often, old parquet boards are used as a base for a smooth surface. In this case, the floors also need leveling, and this can be done in the following ways:
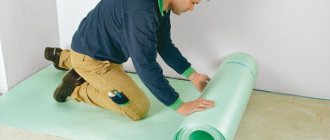
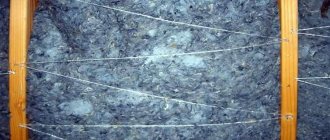
As a soundproofing material, foamed polyethylene can be laid on the parquet floor, and covered with plywood or screed on top.
Source
Laminate and uneven base: looking for compromises
The installation of laminate flooring itself is a simple and fairly quick process. The most important thing is the procedure for preparing the rough foundation. If you have removed old parquet or other covering and discovered unevenness that is visible to the eye, you should not ignore it.
Parquet board is an absolutely natural material that can cope with such problems.
With laminate, everything is different: it is an artificial product made of fiberglass board. And he does not “forgive” an uneven foundation. There are various options for laying laminate flooring on uneven floors.
Why can't you lay laminate flooring on uneven floors?
The maximum differences that are permissible when laying laminate flooring should be no more than 2 mm per meter. There are many instructions on how to properly lay laminate flooring, and such points are discussed there. If you ignore this condition, then soon expect the following problems:
Briefly about the main thing
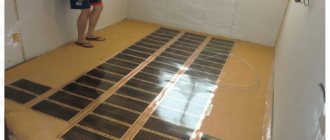
Self-leveling flooring allows you to protect and perfectly level floors made of various lumber: boards, timber, plywood, OSB boards. There are several types of mixtures on the market; the appropriate option is selected based on operating conditions.
Self-leveling floor is a complex coating. To compensate for the difference in temperature expansion of wood and fill, reinforcing mesh and damper tape are used. To protect the wooden base from moisture, waterproofing is installed. The mixture is prepared and poured in accordance with the instructions on the package; It is important to observe temperature and time conditions.
Question
Write in the comments what you think - should you close the windows from sunlight so as not to disturb the drying process of the fill?
When to fix problems locally
Changes can appear either immediately after installation or after several years. There are two types of differences in height - when individual boards rise above the surface and when there is an empty cavity under the board. Before fixing problems, you need to evaluate the surface based on the following factors:
If one of these points does not comply, the coating will have to be changed, and local elimination of differences will become impossible. This is especially true for parquet damaged by mold.
How to equalize level differences on an installed parquet floor
Of all the flooring options, parquet is rightfully considered the most beautiful, durable and expensive. Its installation is done carefully, piecemeal, which makes the work expensive. Parquet floors do not require special preparation - it is enough that they are smooth and dry. This is considered a fallacy - without determining the levelness of the floor to the required extent, you can lay parquet and discover a height difference. You should not plan to remove the boards - you can level the parquet floor without extreme measures.
Laying laminate flooring on an uneven floor - three ways to compensate for base defects
Laminate is a rather demanding coating that requires a smooth and durable base. Height changes, holes, bumps, and cracks found on the subfloor significantly reduce its service life. They cause unplanned additional loads on the locking connections of the planks. Even one hole on the base will create a “failure”, upon which you will bend the slats, testing the strength of the locking joints. Sooner or later this will lead to the appearance of visible cracks, loosening, and possibly breakage of the locks. Thus, the service life of the floor covering will be reduced, and the appearance from the very first day will leave much to be desired.
So what to do? There are two options: either use traditional methods of leveling the base, or use alternative methods that neutralize the negative consequences of unevenness. Let's consider all these methods.