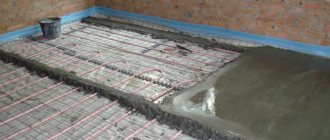
We pour the screed onto the heated floor
“The doctor hides his mistakes in the cemetery, the cook in the sauce, and the builder in the foundation.” (French proverb)
Good day, dear reader!
Many residents of private houses use a warm water floor as their main or additional heating. Even the bathhouse is no exception, for example, here. It has a lot of advantages, the main ones:
— balanced, that is, optimal temperature distribution across the height of the room;
— tactile comfort (this is when it’s pleasant to walk barefoot, but you can also sit and even lie down);
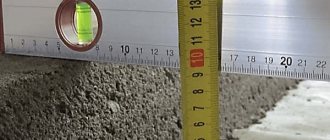
And here is one of the important questions for you - what is the thickness of the screed for a warm water floor. Let's talk exactly about this. Go…
Installation process
The entire installation of a water heated floor in a private house consists of several basic processes.
By doing each one correctly, craftsmen are rewarded with warm water floors in a private home that work reliably for up to 50 years. All work consists of:
- design;
- insulation;
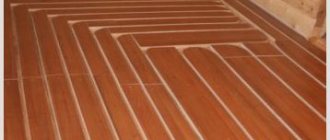
- pipe laying;
- finished floor screeds.
Each part has its pitfalls. You need to get to know them better.
Creating a Project
When installing a water heated floor with your own hands, you should correctly calculate the boiler power. If there is a lack of power, the water will not warm up enough, which will affect the quality of heating. Power is usually taken 15-20% more of the total power consumption.
Each water pipeline is made as a single pipe. To calculate the length, you must first draw all the contours on paper. Their laying diagram and the place of attachment of the collector are indicated.
A correctly drawn up diagram will help with the installation and calculation of equipment and components
Insulation of water heating
In order for the heat to warm the house, and not the ground or ceilings in the neighboring apartment, various insulation is used for underfloor heating, which is laid on a prepared, level base. Differences in height cannot be higher than 5 mm. The system will heat incorrectly and not for long.
Insulation for water heated floors comes from various materials. Application must be justified by location, ambient temperature and type of substrate.
The most popular insulation materials are:
Expanded polystyrene. It is used when insulating the first floors on the ground or in a cold basement. This insulation for underfloor heating has a high density. Available in various thicknesses. The more thermal insulation is needed, the thicker the slabs are used.
Expanded polystyrene is a dense and heat-resistant material. Mineral wool is used in conjunction with wooden coverings.
Profile thermal insulation is the most modern insulation for warm water floors. It is extruded polystyrene foam with a laminated coating and grooves or bosses that help subsequent pipe laying. The only disadvantage of the heat insulator is its price.
Thermal insulation for water heated floors is available in the form of slabs. Their installation usually does not take much effort or time. All seams or joints must be taped with foil tape to prevent moisture from getting into them and reduce heat loss.
Each component of the underfloor heating pie is important
A waterproofing layer is placed on top of the insulation to protect it from moisture or aggressive environments (concrete, cement). It is also recommended to cover the insulation with a foil layer for better reflection and distribution of heat. In practice, this only works for wooden floors. When pouring concrete, it's just a waste of money. When using profile plates, all these steps are omitted.
Pipe laying
Might be interesting
For installation of water heating, copper, metal-plastic and polypropylene pipes with a diameter of 15-20 mm are used. The diameter of the pipe depends on the size of the room and the weather in the region.
For installation, two schemes for laying water heating pipes are used:
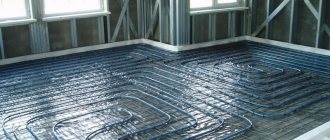
- Snake diagram. This is when the pipe is laid out in a uniform snake over the entire surface of the room. With this layout, hot water is first obtained, then it gradually cools, and the cooled water is returned to the return line. Recommended for use in sanitary areas (bath, toilet), corridors and small rooms where the length of the circuit is small.
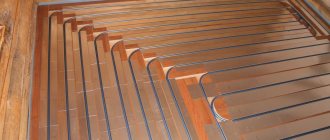
- Snail diagram. For large rooms, it is recommended to lay out the pipes in a spiral, starting from the middle. The result is an alternation of pipes of different temperatures. Heat is distributed evenly. The hottest pipe is located along the outer wall to compensate for the outside cold.
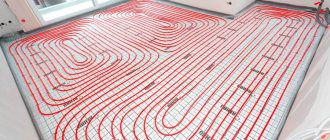
Heated water floors in the form of a pipeline laying diagram
Each circuit is laid using a single pipe. All bends are made smooth. The distance between the underfloor heating pipes is 7-20 cm. The distance from the wall is 5-7 cm.
Thermal insulation of the base
Before installing the heating system, it is necessary to insulate the base. The thermal insulation layer will protect the water circuit from heat loss going into the basement or foundation of the house. The following is used as insulation:
- Styrofoam;
- extruded polystyrene foam;
- foil-coated backing.
The listed materials are characterized by high strength to mechanical load, resistance to moisture and temperature changes. The thickness of the insulation is 30-50 mm, it is laid on a layer of waterproofing polyethylene film. The canvas is laid overlapping on a clean, dry base; it will protect the insulation from getting wet. Thermal insulation boards are laid end to end, the joints are coated with glue or blown in with foam, the excess of which is cut off.
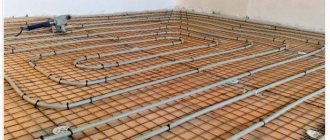
Penofol or a similar sheet of reflective insulation is placed on top. A layer of aluminum foil is directed upward, this will reflect the bulk of the heat back towards the room. The joints of the foil insulation are taped with special tape. Penofol will protect the insulation from the aggressive effects of concrete. A metal reinforcing mesh is laid over the thermal insulation. This element evenly distributes the high load from the water circuit system and the concrete structure.
Brief description of the “pie” and the tasks assigned to the screed
Screed for heated floors
Why do you need a screed:
Firstly, to protect water pipes from damage;
Secondly, for uniform heat transfer on the floor surface;
Thirdly, for heat and sound insulation from the lower levels of floors.
First, let’s list all the “classic pie ingredients.”
So - materials for a warm water floor
Down up:
- On the base of the floor there is a concrete screed;
- Waterproofing (if necessary based on the proximity of groundwater);
- Insulation. It is needed to prevent (reduce) heat loss into the ground, unheated subfloor or ceiling of the neighbor below. Usually this is expanded polystyrene with a density of 40 kg/m³ and higher or a basalt slab of special “floor” grades. Insulation thickness – requires calculation based on a number of conditions;
- Thick polyethylene film, two layers;
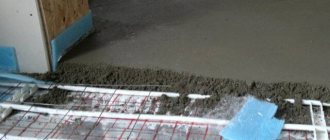
- A water pipe laid on a reinforcing mesh and secured to it with clamps. In those places of pipes where expansion joints pass, corrugation is put on;
- Concrete screed, for example, is an excellent and affordable option;
- Substrate. Its material depends on what the finishing coating will be (under tiles, laminate, parquet, etc.);
- Finish coating.
This is a "classic pie". Depending on the specific situation, the “filling” and technology change.
What does the thickness of the screed depend on: On the design features of the room and the customer’s intentions, of which the main ones are:
- a) characteristics of the floor (soil, floor slab, etc.);
- b) finishing (floor) coating materials;
- c) expected surface loads;
- d) coolant temperature and required air temperature in the room.
general information
In the process of making semi-dry screeds, dry ready-made mixtures have become more often used, which make the work easier and more convenient. A mesh made of steel material or fiberglass is selected as a reinforcing substance. To reduce the load on the floor and improve the strength characteristics, purchase fiberglass.
The concrete mixture dries much faster due to the small amount of water. The average period is 5-6 days. These figures are approximately 5 times faster than pouring a “wet” screed.
The semi-dry version of the subfloor installation can be done both on concrete floor slabs and on a wooden base. The room where the installation is carried out, as well as the subsequent floor covering, will not play a role. The main thing is that the technology is followed at all stages.
It is worth noting that the thickness of the semi-dry screed is determined very carefully. The height of the finished cake is influenced by certain factors.
On the ground
The filling technology will be the same regardless of the type of land and where exactly the groundwater is located. To work, you will need concrete grade M300 (or higher) and reinforcing mesh.
Before pouring the screed, the earthen flooring is leveled and compacted. Medium-fraction crushed stone or gravel can be used as the first layer of backfill. A second layer of sand is laid on top.
Each layer of bedding is compacted using a vibrating plate or manually.
Then the base for the rough screed is covered with waterproofing. These can be specialized materials or thick polyethylene film.
A subfloor 5-10 centimeters thick can be poured onto the finished base.
Pouring technology
Preparing for work
Before you start pouring it yourself, you need to prepare the room. Please note that the air temperature in the apartment during work should range from + 5 to + 25 degrees Celsius. Naturally, the base must be cleaned of debris and dust. Otherwise, the solution may lie unevenly and have poor adhesion to the surface. Try to eliminate all gaps in the base. If necessary, perform a rough curl of the base.
The solution should be poured only after all the contours of the heated floor have been laid and its performance has been checked.
During preparation, it is necessary to take into account the possibility of expansion of the concrete mixture under the influence of temperature changes. To avoid cracking of the solution after drying, it is necessary to arrange expansion joints. To do this, you can use a special damper tape or rigid insulation, the thickness of which is at least 1 cm. Such an expansion joint should be made to the entire depth of the screed.
The photo shows the installation of damper tape in front of the screed. Expansion joints are also installed in the passages between rooms
Pouring a heated floor should only be done after careful preparation of the base. Before using the composition, do not forget to check the system for operability and absence of defects.
What is needed to arrange a screed?
For work you will need the following materials:
- Cement mortar or dry mixture.
- Reinforcing mesh or reinforcing compound.
- Waterproofing.
- Insulation.
- Fastening elements.
- Container for stirring the solution.
- Construction mixer or drill with a special attachment.
- Spatula for leveling the mixture.
- Tiles or other finishing material for finishing the surface.
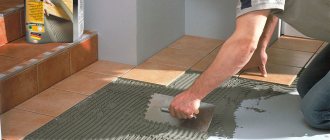
The reinforcing mesh should not have too small cells. Tiles under warm floors are used most often. Naturally, it is also necessary to choose this material correctly. You can lay it with your own hands, following the work technology.
Filling Features
A warm screed is installed in several stages:
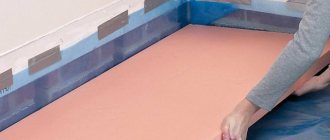
- Laying a waterproofing film, the thickness of which is usually 250 microns. The canvases are laid with an overlap (20 cm) on each other, as well as with an allowance for the wall. Secure all joints with reinforcing tape.
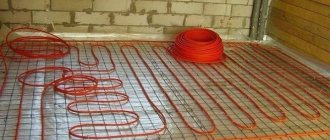
- Installation of insulation. This is also done with your own hands. It is better to use a special material with an aluminum reflector that will direct the heat upward.
- Attaching the damper tape. It is fixed at the edges and also divides a large area into parts.
- Laying the mounting grid. It is on it that the heated floor elements are mounted.
- Installation of level beacons. They will allow you to pour the solution correctly and evenly.
- Preparing and pouring the mixture. The composition must be diluted as indicated in the instructions on the package. Otherwise, it may turn out too liquid or too thick.
- If necessary, the layer can be reinforced with reinforcing mesh. It prevents damage to the screed after drying. A mesh is required if the layer is thick.
- After a day, the dried composition will need to be covered with polyethylene and left for 7 days.
If you are pouring a water heated floor, then there should be pressure in the pipes at this moment.
Within a couple of weeks after pouring the mortar, you will be able to lay the tiles.
Useful tips
In order for the dimensions to bring the desired result, it is necessary to correctly perform the screed and know the consumption of the central heating system per 1 m2. After all, flaws in such work can lead to significant heat loss, leakage and other troubles.
Here are a few simple rules that you can follow to create the ideal top layer of water heating in a building:
- The screed should be applied at a temperature of 15 degrees Celsius. This indicator is considered optimal, at which cement exhibits all its best properties;
- Before pouring concrete, it is necessary to turn on the pressure in the heating pipes. It should not be more than 5 atmospheres. But it will be possible to use such a heating system no earlier than after 3.5 weeks, because it is during this time that the concrete hardens completely;
- to avoid heat loss, it is necessary to place a heat-reflecting coating under the pipeline;
- The cement you use should be purchased shortly before the work is carried out, because old material often loses its properties.
With the correct choice of concrete screed thickness and scrupulous adherence to the above rules, equipping any building with a water insulation system will be successful. You will quickly experience all the benefits of this type of heating!
Water heated floor screed:
The underfloor heating system connected to heating pipes is a structure made of metal-plastic pipes, laid and fixed on a metal reinforcing mesh and filled with concrete mixture, no less than 30 mm above the top edge of the pipes. This thickness of the screed reliably protects the pipes from mechanical damage and allows you to lay any finishing material on it, including porcelain stoneware, laminate, parquet, linoleum and other materials, except floorboards. To lay a floorboard covering, a warm floor is installed using a different technology.
Excessively thick screed and flooring made of slab stone, porcelain stoneware, mosaic tiles have a high heat capacity, heat spreads evenly throughout the floor, retains and releases heat for a longer time. But the main disadvantage of a thick screed is that it takes more time to warm up and costs more fuel. How then to install a warm floor under tiles and a thick screed, you ask? You will find the answer to this question in the article - heating cable for heated floors under tiles, in which we examined step by step the entire process of installing a heated floor system under tiles with a thick layer of screed.
A screed that is too thin is economical in terms of consumption of materials, it heats up faster, but it can overheat, and the heating will occur in stripes according to the configuration of the laid pipes, and the temperature difference will most likely lead to cracking of the screed itself and the floor covering. To avoid this in the future, you can initially arrange a semi-dry screed with a minimal amount of liquid. Once we already discussed the pros and cons of this type of screed - dry and semi-dry floor screed - the pros and cons of both types, I advise you to read.
Therefore, when calculating the thickness of the screed, it is necessary to take into account the diameter of the pipes, the pitch of their installation, the temperature of the heating water, the type and material of the finishing coating. This can best be done by specialists based on their own experience and knowledge, but still, for residential premises, the thickness of the screed cannot be higher than 100 mm, as this takes away important centimeters from the ceiling height. In this case, the height of the screed above the pipes ranges from 20 to 50 millimeters.
Manufacturers' recommendations
HENCO
German manufacturer. It is worth paying attention to the demands of such pedantic Germans. Preferring a clear calculation and specific numbers, we recommend a screed thickness of 45 mm. This coincides with the majority opinion. Detailed recommendations here.
German manufacturer. The recommended thickness of the screed is 45 mm above the heating pipe, but not less than 65 mm from the thermal insulation material. Using especially durable materials when pouring the screed, the thickness can be reduced to 25 mm. You can read more on the manufacturer's website.
REHAU
Builders' favorite material. The manufacturer has developed its own standards for quality and work performance. According to the regulations 45 mm. – this is the thickness of the minimum screed. Do not neglect the maximum figure - in residential premises it is 61 mm, for industrial floors 92 mm.
Features of installing a rod infrared floor
This type of heated floor consists of rods that are connected to each other by flexible wires. When current is passed through the rods, they generate heat. This type of heating can self-regulate the temperature, so it can be used without a thermostat.
Installation sequence of the rod infrared floor:
- creating a laying scheme;
- preparation of the base;
- laying thermal insulation;
- preparing the location for the sensor;
- laying out the strips and connecting the cable according to the drawn up diagram;
- fixing the strips to the base using mounting tape;
- installation of a thermostat;
- connecting the sensor and cable to the thermostat;
- connecting the thermostat to the network;
- system testing;
- pouring screed;
- laying tiles.
For such a floor, the best finishing coating is ceramic tiles; it is laid in a screed, the thickness of which should be more than 2-3 centimeters.
Acceptable dimensions for different types of screed
Based on the thickness of the screed, rough coatings are conventionally divided into:
- Thin - from 2 to 7 cm.
- Thick – from 7 to 15 cm.
Layers less than 2 centimeters are usually made from self-leveling compounds and are not classified as screeds, but as self-leveling floors. And a thickness of more than 15 centimeters is more of a concrete floor with reinforcement.
Design features of screeds for heated floors
Features of arranging a thin floor screed
Thin screeds are used in rooms where there will not be strong point loads when using the floor. Usually these are kitchens, living rooms, bedrooms and other living rooms. Here a layer of 20–50 mm will be sufficient. For corridors and bathrooms, 50–70 mm are already recommended.
Such screeds are poured and leveled literally in one day. Then you still have to wait several days for the concrete to set. But the work itself of preparing the base and mixing the solution, as well as pouring the mixture, is carried out as quickly as possible.
Consumption of sand concrete per m2 of area
Features of arranging a thick screed
Thick screeds are used in areas with higher mechanical loads on the floor covering. Often they are poured not so much to level the floor, but to provide a reliable foundation for this or that equipment. And in fact, it is always a concrete mixture reinforced with steel rods. Gypsum solutions are of little use here.
Thick-layer floor screeds are installed in:
- utility rooms;
- in-house boiler rooms;
- garages;
- baths, etc.
In this case, the time required for pouring the concrete solution and the wait until the floor is ready will increase. A thick layer of concrete takes longer to gain hardness than a thin layer. At the same time, you still have to spend time carefully strengthening the concrete layer with reinforcement. Without it, such a screed will certainly crack when it hardens and will quickly become unusable.
How to calculate the amount of material for different types of screed
Nuances and secrets when styling
Craftsmen can share their experience gained over years of work and pouring screeds under water-heated floors. The following recommendations will help novice professionals or home owners:
- The presence of cracks or chips on the dried surface prohibits laying out the next layer. It is necessary to repair any defects that have arisen. This is done by pouring additional mixture.
- Waterproofing is always required in the bathroom and kitchen. The finishing layer is laid on top of the waterproofing layer.
- When using the dry variety, it is better to additionally use thermal insulation. It is also installed in a private home, which provides additional comfort for the family.
- The screed should dry under protection from sunlight. Therefore, you should hang thick curtains on the windows; it is better to use blinds.
- The surface must be clean and dry before pouring the mixture. This will prevent cracks from forming.
- It is recommended to coat the surface with a primer. It forms a film, therefore providing a water-repellent effect and making the mixture adhere to the surface more firmly.
Compliance with the presented nuances will help you avoid mistakes when working independently. It is recommended to take technology into account and use expert advice.
Limit layers
There is a maximum height of the screed above the water-heated floor, above which there is no longer any need or usefulness. A large amount of time will be spent pouring, but the efficiency of the underfloor heating system will suffer to a large extent. After all, the entire resulting “pie” will have to be heated constantly.
The greatest thickness can reach 150 mm. Much will depend on the purpose of the room where the work is being carried out. Moreover, in this case, the device is mainly made of a monolithic structure. The height of the screed for a water-heated floor also serves as a foundation. Greater thickness should be provided for certain types of premises, such as garages, parking areas, etc.
It comes to the maximum thickness of the fill in a situation where the soil at the base is very problematic. After all, warm water floors are most often installed in private buildings. Otherwise, the entire structure will be destroyed. A lot of money will be spent, but there will be no results. In the process of preparing the solution, only high-quality materials should be used, since the entire structure is created for a long time. It’s better to spend money once than to spend money later on labor-intensive repairs.
To somewhat reduce costs in this case, it is best to knock down the protrusions on the base as much as possible, and additionally arrange backfill for leveling. But this must be done before installing a warm water floor. In the future, it will be much easier to carry out all stages of installing a water heated floor.
If the pipeline circuit is located in a thick screed, operational problems may arise due to prolonged heating of the subfloor. A lot of resources will be spent on this. There will be no benefit from using the system. This suggests that you must first properly arrange the subfloor in order to lay the pipes without consequences for their integrity.
Optimal screed thickness
How thick the floor screed should be, its type, and the required mixture composition depend on the following factors:
- the presence of unevenness and differences in height of the base base;
- what exactly the mixture is poured onto (on the floor slab, on the insulation layer or on the pipes - in the case of a heated floor);
- what kind of coating the surface is being prepared for;
- characteristics of the room (floor load, humidity, temperature, etc.).
Basic base
The more significant the unevenness and height difference, the thicker the layer of mortar is needed. For minor defects, the minimum thickness of the floor screed will be 20 mm. If you have to deal with large differences (more than 60 mm), then there is no need to talk about the minimum thickness. In this case, it makes sense to make a solution from a mixture of coarse sand, cement and water; its height will vary from 100 to 150 mm.
Advice! If you want to save on concrete mix, use expanded clay or crushed stone as a partial leveling.
If you think that you can determine the unevenness of the floor “by eye,” then do not be fooled: your eyesight may let you down. It is better to use a special level for this.
Classification
There are 3 types of screed depending on its thickness.
The first type is a thin subfloor. To fill it, self-leveling mixtures are used, which allow you to create a layer of up to 20 mm. In this case there is no need to use reinforcement.
The second type is a screed up to 70 mm high. In this case, reinforcement from metal mesh or reinforcement bars is necessary.
The third type is a layer of maximum thickness up to 150 mm, which is a monolith with internal reinforcement.
Composition of the screed mixture
For unevenness and height differences of less than 20 mm, it is better to use self-leveling mixtures, with which you can achieve an even and thin layer. After drying, you can immediately lay the floor covering on it. Self-leveling mixtures spread over the floor independently, without human intervention. They include:
- gypsum or cement;
- fine sand;
- plasticizers that improve quality indicators;
- glue;
- pigments.
Attention! The minimum and maximum thickness of the screed of a certain composition are indicated on the packaging by the manufacturer. Self-leveling floor is a type of self-leveling mixture that is applied to a concrete base or cement-sand fill.
This composition is used as a topcoat or as a thin layer of screed from 2 to 20 mm
Self-leveling floor is a type of self-leveling mixture that is applied to a concrete base or cement-sand fill. This composition is used as a finishing coating or as a thin layer of screed from 2 to 20 mm.
Advice! For a self-leveling floor, the recommended thickness is no more than 20-30 mm: otherwise, it may crack over time.
Concrete remains an indispensable material for rough pouring due to its relative cheapness. SNiP recommends the following mixture composition:
- sifted sand;
- cement;
- gravel or crushed stone (fraction size from 5 to 15 mm);
- water.
Today, very often, instead of crushed stone, lighter fillers are used, which also have thermal insulation properties. The most common of them are expanded clay and expanded polystyrene (pellets). The first is used only as a component for pouring the subfloor, and the second is used for finishing. The height of laying the mortar is in the range from 30 to 50 mm and is used in cases where there is a need to remove irregularities whose size is more than 20 mm.
For significant differences (more than 60 mm), sand concrete is used, which contains coarse sand instead of ordinary sand. The height of such a layer ranges from 100 to 150 mm.
In order to speed up the process of repairing the floor and in the presence of significant damage to the base, a dry screed is very often produced, which includes materials that do not require drying for a long time. It includes a layer of backfill material, for example, expanded clay, and on top of it there is sheet material (chipboard, plywood, GVLV). If necessary, hydro-, heat- and noise insulation is carried out. The thickness of such a “pie” can be 35-60 mm.
Maximum
Covering with a thick layer of fill makes the pipes well protected. This layer retains heat for a long time and distributes heat well. But at the same time, its device is more expensive, and its operation may require unjustified energy costs
It is important not to overdo it and make a layer of moderate height
For ordinary apartments and houses above a heated floor, a maximum height of the protective layer of screed covering the pipe is allowed to be 60 mm. This thickness is justified if a regular, not very strong mixture of cement and sand is used. This will make the surface sufficiently durable and maintain the possibility of acceptable heat transfer.
Attention A thick floor has high thermal inertia and heating it up requires a long time and possibly an increased temperature of the coolant.
The influence of screed height on system operation
Before starting installation, it is worth figuring out what thickness of the screed is considered optimal. This indicator depends on:
- heat capacity of the floor;
- uniform heating;
- lifetime.
The thin layer heats up quickly, starting to warm the room, but soon the high temperature causes the concrete coating to begin to crack. This is especially noticeable in the locations of pipes. Heating above normal levels deteriorates the finishing floor covering. Extra centimeters above the water circuit will require more energy to heat. There will also be difficulties in adjusting the system. The advantage of a volumetric screed is significant heat transfer, which lasts for a long time at a comfortable temperature in the room.
In addition to the accumulation and distribution of heat, the screed performs a protective function in relation to hot water pipes. Insufficient circuit coverage will result in high loads and shorten its service life. Protecting the water system is especially important if you plan to install heavy furniture in the room.
The minimum thickness of the screed should exceed 6.5 cm; it is recommended for tiles that are not afraid of overheating. The optimal pipe filling size is 10 cm. This parameter is provided for underfloor heating systems in residential premises. For industrial buildings or warehouses, the maximum concrete thickness can reach 20 cm.
The size of the layer depends on the diameter of the pipes; if you calculate from the surface of the contour, then the figure without taking into account the thermal insulation cake will be 2-5 cm. The installation technology allows for the exclusion of the metal mesh from the cake under the contour and its replacement with fiber in the solution. In this case, the thickness of the screed above the water heated floor pipes increases, the minimum mark is 4.5 cm. Compliance with the recommended values will ensure uniform heating and safe use of the heated floor.
Under the pipes
Before laying water heating pipes, be sure to perform a rough pour. It is important that it is made with high quality and can last a long time, since replacing it will require destroying all subsequent layers. There is a significant load on the rough screed. It needs to withstand not only physical stress, but also possible significant temperature changes (for example, when the system is suddenly turned on or off). A poorly executed screed at this stage leads to destruction of the main screed, heat loss and pipe breakage. To eliminate the problems in the latter case, you will need to completely dismantle the floor covering, which will require significant material and time costs.
The mixture for rough pouring is made independently from sand, cement and plasticizer or purchased. The recommended amount of plasticizer is 1 liter per 100 kg of cement. Sometimes, in the absence of a plasticizer, it is replaced with the same amount of PVA glue. According to experts, the thickness of the screed for warm water floors
optimal within 2.5-3 cm.
What should it be: requirements
According to building codes and regulations (SNiP), the minimum thickness of the floor screed is 20 mm. In everyday life, such a minimum is rarely installed. It increases significantly if you need to hide equipment located on the subfloor. Thus, the thickness of the screed when installing a warm water floor should be determined taking into account the basic parameters of the pipes.
It is well known that the layer of mortar above the heating system should not exceed 40 mm. With a greater thickness, the installation of a heated floor is ineffective, since the bulk of the heat received simply will not reach the consumer. The internal layers of the screed will heat up, and the floor covering will receive virtually no thermal energy. The simplest calculations show that the thickness of the screed for a pipe diameter of 25 mm should be in the range of 50-70 mm. A standard screed consists of several components or layers.
The order of installation from bottom to top is as follows:
- waterproofing;
- thermal insulation;
- fittings;
- warm floor;
- screed
Different heated floor designs require different screed layers.
In some cases, the subfloor is first leveled with a thin screed; sometimes the solution is laid directly on the insulation. Its thickness should not be less than 2 cm. The layer is given 1 month to dry, and only after it has completely dried can you begin installing the heated floor, subsequently covering the installed communications with another screed.
An electric heated floor requires a low screed, especially if film heating was chosen. Infrared film is ideal for installation under laminate, carpet and linoleum.
If you plan to cover the floor with tiles, you should use a heating cable. In this case, you will need a less thick screed than when creating a water floor.
Determining the minimum
Other layers are also needed while filling:
After this, the floor is poured and covered with the selected type of coating.
Minimum fill thickness
not regulated by building codes.
It is proposed to make the thickness at least 2 cm, and when using reinforced mesh, at least 4 cm, if pipes of standard diameter are used.
Even the minimum height screed copes well with its functions. Minimum – not acceptable in places with heavy load. Its use is not recommended in rooms where the load is increased (corridors, garage, technical rooms).
Consequently, with proper arrangement, you can save money and minimize the height of the ceilings.
Optimal floor thickness with water heating
are considered 7-10 cm. In this case, the most acceptable screed under pipes is considered 4.5-7 cm, and above pipes about 2.5-3 cm. If reinforced mesh is used, then a total height of 6-7 cm is sufficient.
Filling the floor contour with mortar
In principle, the screed is poured over a warm floor, like any other. If problems arise, it is when installing beacons, since the base underneath them “plays”, and without a certain skill it is quite difficult to bring them to the same level. The distance between them should be such that the rule by which the alignment will be carried out protrudes beyond the boundaries of the parallel beacons by 25 cm. If the tool is 2 m long, the step between the beacons should be 1.5 m.
Screed thickness for heated water floors
Table. We explain all the installation details.
Steps, photo Description Step 1 - drilling holes for dowels You start by drilling holes for fasteners along pre-designated lines. If, as in this case, you have foam plastic under the pipes as insulation, take dowel-nails measuring 8*120 mm. That is, their length should be selected in such a way that, having passed through all the layers, the fastener can enter the rough base. Step 2 - Installing Dowels Before inserting the dowel into the hole, you need to put a washer on it. It will not allow the dowel head to fall into the foam. Step 3 – driving nails into the dowels. Using light blows of a hammer, hammer in the dowels, but not completely. The height to which they should be hammered still needs to be determined. Step 4 - determining the level of driving the dowels. The easiest way to do this is using a laser level. Make a horizontal mark on the walls, and then transfer the mark to any available tool: a chisel, a screwdriver, or, as in this case, a hammer
If you put masking tape on it, you can mark it with a pencil, and then use the tool as a template. Step 5 - determining the mark of the top of the beacon installed on the dowel. Now you need to determine the mark of the top of the beacon when installing it on the dowel. Note! It would seem, why do this if the profile size is already known? This is due to the configuration of its cross-section. As you can see, the head of the screw falls into the recess, and the height of the beacon is no longer 10, but 8 mm. Step 6 - Determining the difference between the finished height of the screed and the height of the beacon Move the previously made floor mark to these 8 mm below, and drive the dowels along it. Step 7 – final driving of the dowel Hit the nail until the mark on the template matches the laser line. Step 8 – installing the beacon on the dowels Next, place the beacon on the dowels and check the mark again. Step 9 - laying out the mortar under the lighthouse Having made sure that the marks match, you can lay out the mortar along the row of dowels, removing its excess so that the heads of the screws are visible. Step 10 - installing the beacon profile on the solution Install the profiles by adding the solution so that the beacons are recessed in it. Step 11 - removing excess mortar Remove excess mortar with a trowel. Step 12 - pouring the screed After the solution on the beacons has hardened, you can begin pouring the main screed
First, fill the space between the beacons with a trowel. Step 13 - leveling with the rule And then, installing the rule (with the wide side) on two parallel beacons, remove the excess mortar, achieving a perfectly flat surface. Note! The next day, when the screed has hardened, it is necessary to thoroughly clean it of deposits. If the finishing coating is rolled (linoleum, carpet), the surface will have to be wetted and ground. As an option, you can make a thin layer (1-2 mm) of self-leveling floor.
Prices for self-leveling floors "Starateli"
Self-leveling floors "Starateli"
As you can see, it is not enough just to know what the thickness of the heated floor screed should be - you also need to try to ensure that it is uniform over the entire area of the room. We hope that our instructions helped you understand this issue and make the heated floor perfectly flat.
Types of screeds
- Wet. It is made on the basis of cement mortar.
- Semi-dry.
- Dry heated floor. This option has become used very often, as it eliminates the appearance of dirt and problems with the contacts of the electric version of the heated floor. In addition, this option allows you to lay tiles or other finishing material the very next day. Naturally, such a screed must be properly arranged.
These options have their advantages and disadvantages.
However, you need to choose a screed taking into account the characteristics of the room, the design of the heated floor, as well as the time allotted for repairs. Which one is best suited in your case is up to you to decide. Date: September 25, 2021