Attaching the tank to the toilet is a simple process, but it is important to carefully follow the installation instructions. The installation procedure differs depending on the type of waste container. Compact models are the easiest to install; even a beginner in construction work can do it.
Before starting installation, you need to prepare equipment and tools, then prepare the location. If necessary, you must first remove the old tank and clean the surface.
Web page not found on InspectApedia.com
.
What to do if a link to a web page on InspectApedia.com results in a 404 page error
It's as simple as... well, choosing from 1, 2 or 3
- Use the InspectAPedia search box in the top right corner of our web page, find the text or information you're looking for, and then view the links our custom Google search engine returns
- Email us directly asking for help finding the information you've been looking for - just use the CONTACT US on any of our web pages, including this one, and we'll respond as soon as possible.
- Use your web browser's BACK button or arrow (usually in the top left corner of your browser screen next to the box showing the URL of the page you're on) to go back to the previous article you were viewing.
If you'd like, you can also send us an email with that name or webpage URL and tell us what didn't work and what information you need. If you really want to help us, use your browser's BACK button, then copy the URL of the webpage you were trying to load and use our CONTACT US (located at both the top and bottom of the page) to send us that information by email so we can resolve the issue. - Thank you.
We apologize for this SNAFU and promise to do our best to quickly respond to you and correct the error.
— Editor, InspectApedia.com
or enter your search terms in the InspectApedia search box just below.
We also provide a MASTER INDEX on this topic, or you can try the top or bottom SEARCH bar as a quick way to find the information you need.
Green links show where you are. © Copyright 2017 InspectApedia.com, All rights reserved.
The publisher of InspectApedia.com is Daniel Friedman.
How to attach a toilet to taffeta?
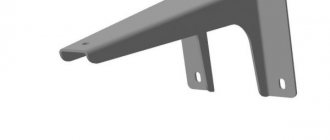
This method is most often used for installing compacts on a wooden floor. Taffeta - a lining made of high-strength wood with a thickness of 28 to 32 millimeters - is cut to the size of the support post of the plumbing fixture.
When installing plumbing fixtures on a wooden substrate, it is necessary to cover it with drying oil or waterproof varnish, in this way protecting it from the high humidity natural to the bathroom and potential rotting
Anchors are attached to the part from below or ordinary nails are driven in in a checkerboard pattern so that they protrude 2.5-3 centimeters from the base. The recess previously made in the floor is filled with cement mortar. Taffeta is placed on top with anchors down. As a result, it should become flush with the general surface of the floor.
After 12-15 hours, when the solution dries and hardens, the toilet is screwed to the resulting wooden base with screws. Rubber or silicone gaskets are certainly placed under the heads so that the structure holds more securely and does not lose stability during operation.
In order to easily carry out all the necessary repair work if necessary and easily unscrew the screws, it is recommended to pre-lubricate them with graphite or grease
According to plumbers, a wooden part can easily be replaced by a rubber one. It is cut out of high-density material (average thickness 5-15 mm). To prevent the edges of the rubber from sticking out, it is cut out slightly smaller than the size of the base base of the toilet sole.
The photo gallery will introduce you to the stages of work on installing a toilet on taffeta:
Image gallery
Photo from
Step 1: Removing the old toilet
Step 2: Attaching the Wooden Backing to the Base
Step 3: Attaching the toilet to the taffeta
Step 4: Connecting the toilet to the sewer
Prevention of the problem
If the bolts rust and cause a lot of inconvenience when unscrewing, you should put an end to this problem. Professionals advise:
- Be sure to coat all fastening points of parts with special silicone grease before tightening them. Thanks to this, metal fasteners are protected from corrosion for a long time.
- It is advisable to carry out preventive inspections of car parts or plumbing from time to time. You should not start the process if you notice slight rust on one of the fasteners. It is always easier to replace fasteners and parts at the initial stage of corrosion than to fight rust when it has completely corroded the metal.
- Fasteners should be tightened in accordance with the tightening degree of similar threaded connections.
If, having previously selected the necessary tools, you use one or several of the methods listed, then the rusted bolt will definitely give in. But it is better not to reach extreme situations and carry out periodic technical inspections.
If the bolt head breaks off
In this case, you need to be patient and choose the appropriate course of action.
Three ways:
- Drill a hole 3 cm smaller than the diameter of the bolt and screw a tap with a left-hand thread into it until the broken part begins to unscrew.
- If part of the bolt protrudes, then you can make a cut on it using a grinder under a slotted screwdriver and begin unscrewing it.
- A hole is made in the base into which the extractor is screwed counterclockwise. Then the damaged element is removed with a key.
Preparatory activities before installation
Regardless of how you decide to fix the toilet to the floor of the bathroom, work always begins by assembling the cistern. The process directly depends on the compact model and is usually described in detail in the instructions included with the equipment.
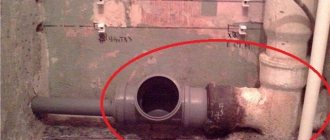
At the second stage, water supply and drainage units are prepared. If the connection is made to an old cast-iron riser, it must first be cleaned and dried well so that later there are no problems with the tightness of the corrugation.
Having completed these two steps, proceed to the third and ensure the availability of all connecting elements, materials and suitable tools for carrying out the necessary installation and plumbing activities.
Preparation
First we need to prepare the work area. To do this, remove all rugs and shelves from the bathroom. Make sure there are no fragile parts nearby. We will also need working tools, namely:
- pliers;
- hammer;
- chisel;
- hacksaw for metal;
- wrench;
- stationery knife.
Additionally, you will need a basin, rubber gloves, safety glasses and rags.
Before dismantling the toilet with your own hands, you need to turn off the water in the riser. Next, all the liquid from the tank is drained into a basin.
Methods for attaching toilets to the floor
There are several different ways to attach a toilet to the floor.
The most popular include:
- fit on the installation kit (dowels);
- use of various adhesives;
- installation on cement mortar;
- taffeta fixation;
- side mount.
The choice, first of all, depends on the quality of the floor in the toilet or bathroom and on the material of its finishing coating, since the same method of fastening is not relevant for all surfaces. Features and nuances of different installation options depend on the design and type of discharge into the sewer.
Toilet bowls of almost all modifications come with a standard installation kit (dowel-screw). It is suitable for mounting equipment, but requires the compact to be placed on an absolutely flat surface that does not have errors or slopes.
Plumbing fixtures attached to the floor in this way have good structural stability and do not wobble even during intensive use. However, the method is not suitable for all models and is usually applied to toilets of small size and light weight.
Fastening the toilet to the tile with cement is considered one of the most durable options for connecting the base of the equipment to the floor. Experts reproach this method only by the impossibility of quickly dismantling the product in case of urgent need.
That is why only those compacts that are intended to be used for a long time without replacement are “planted” with cement.
If a “warm floor” system is installed under the tiles in the bathroom, it is not possible to drill the tiles or use bolts and dowels. In such cases, it is worth using sealant, cement or epoxy resin to secure the toilet. All these materials will ensure a reliable position of the compact and will not damage the equipment laid under the finishing coating
The hidden fastening method is not much different from the open one, it only requires more effort and labor costs. But all this completely pays for itself, because externally the structure looks more attractive, neat and aesthetically pleasing, and the connecting elements are hidden from view and do not spoil the interior design.
Sequence of actions when dismantling the drain tank
The device is dismantled in a certain sequence. Let's look at modern models.
The first step is to disconnect the tank from the toilet. Note that the button head connection may vary in shape and thread (internal, external).
Operating procedure:
- close the water supply tap (it is located on the hard water pipe);
- disconnect the flexible line from the tank;
- by pressing the button we empty the tank and hold the element in this position;
- unscrew the head of the release key (we act carefully, counterclockwise) and remove the container lid;
- use a rag or sponge to remove any remaining liquid inside the device;
- using a screwdriver from the inside and a wrench (or using pliers) from the outside, unscrew the nuts;
- carefully lift the drive to separate it from the shelf. Here you may have to apply some force - in some cases the cuff sticks.
Attention! Standard fastening on a special protruding shelf consists of bolts or studs with a diameter of up to 7 mm. Bolts can be plastic or metal (bronze, brass, steel), with double-sided threads. As a rule, fastening is done through 2 holes (3 is less commonly used).
The single configuration was discussed above. Removing the cover, equipped with two buttons, has several features:
- when the container is empty, press the key that lowers the minimum volume (see photo);
- the lower part of the inner wall of the button contains a groove; use a screwdriver to press the lock through this opening (we act carefully);
- sequentially remove the large key from the cover, then the small one;
- remove the screw under the buttons holding the structure in place.
Reference! There are modifications where you first unscrew the decorative part (nickel-plated washer) and turn the lid 90º, perpendicular to the tank. Then press out the fixing brackets (inside the head).
We move the device to the place of further work.
The next step is to remove the drain fittings. The component is manufactured in various designs, but in all cases the dismantling scheme does not change:
- remove the seal from the nut securing the valve;
- unscrew the nut;
- We take out the drainage system from the container.
Reference! We disassemble the filling mechanism (which ensures that the tank is filled with water) in an identical manner. Fasteners can have different shapes (pentagonal, round); here it is important to choose the right tool.
Outdated models have differences in the disassembly process:
- to remove the upper part, remove the handle on the drain valve lever and unscrew the nut;
- to remove the drain valve, unscrew the screws securing it to the bottom of the tank;
- Usually the overflow tube has a separate fixation (plastic nut), we will use a wrench.
Reference! In some copies, the upper part is not fixed to the body and can be easily removed.
Installing a toilet on cement
Installing a sanitary module on cement is a more outdated method of fastening, which is now chosen much less frequently. In its main points, it resembles the above-described option for installing on glue, but instead of modern mixtures and sealants, it uses a self-prepared cement mortar.
A toilet attached to the floor with cement looks less aesthetically pleasing. If you suddenly need to replace it, you will have to break not only the mounting area, but also the coating adjacent to it
To make the bathroom look more attractive in the future, make a small depression in the place designated for installation, thoroughly clean it of debris and dust, fill it to the brim with the prepared solution, and place the toilet on top, after wetting the edges of the base with water.
Excess cement is carefully removed with a spatula and the structure is left to harden for a day. After the time has passed, it is connected to the drain and water is supplied to fill the tank.
Warming up
You should try to achieve the desired result by heating the capricious fasteners. Everything will do here - a gas torch, a soldering iron, a pocket lighter. You can even use rags soaked in gasoline or other flammable liquid, but this should be done carefully, following safety rules. Without waiting for the old nut or rusty bolt head to cool down, you need to try to unscrew them. The best choice for these purposes is not an open-end wrench, but a box or socket wrench. If you don’t succeed the first time, you can try combining techniques - tapping well, loosening, using a lever.
“Spray it with Vedashka” - this is how any garage will respond to a complaint about a problematic bolt or capricious nut. And they will be absolutely right. A better remedy has not yet been invented. Its exact recipe remains a mystery, but it is known for certain that the liquid consists of 50% white spirit. To unscrew soured fasteners, you first need to open access to the threads by treating the area around the bolt or nut with a wire brush, and then generously fill the fasteners with “magic” liquid, spraying it from a spray can. After 15-20 minutes you can try to unscrew it. This remedy is really effective and almost always helps.
Remove the cover
A broken toilet tank is a common plumbing problem. But constant noise from the toilet is not the key.
The Compact series toilets are equipped with flush cisterns with double buttons, which are filled with tap water to carry out.
Some useful tips: how to remove the lid from the toilet tank?
Often, users of plumbing fixtures have problems with their normal functioning.
In these cases, urgent repair of failed parts or their replacement is required. This is especially true when there is a threat of flooding of neighbors, and it is not possible to turn off the water a long time
In order to troubleshoot the problem, you need to know how to properly remove the toilet tank lid.
How to remove the old-style cistern lid - with a lever
In their external configuration, the drain tanks are approximately the same, but they differ in the water drainage system:
- With a release lever that must be pulled. Mostly found on older models.
- With rectangular key.
- With a button.
- With double button.
Opening the lid is not difficult at all and the whole process does not take much time:
- First , turn off the water supply to the compartment. It is best to perform this step before you empty the container.
- Pull the lever and drain all the water, then, without pushing it back down, unscrew the top plastic ball.
- Carefully lift the cover without breaking the protruding rod and move it to the side.
Afterwards, the necessary repairs or replacement of internal parts are made.
Photo 1. The toilet flush lever, which is attached to the rod, allows the liquid to be drained.
Assembly occurs in reverse order . Tanks with a rectangular plastic rod open in a similar way.
How to open a tank with a key
- Using a flathead screwdriver, carefully pry the rectangular button from the near side, pulling it up. Remove the key from the reservoir cap and set it aside.
- Inside there is a small rod from the button with a ring screwed onto it that prevents the lid from lifting. Carefully unscrew it counterclockwise. To avoid losing the part, place it next to the removed key.
- Now nothing interferes with removing the top part of the barrel. Lift the lid and set it aside until repairs are completed. Assembly occurs in reverse order.
With button
The process is actually even easier than for designs with keys, because... does not require a lot of disassembly and understanding of how to more easily get to the details.
- Here you will also need a screwdriver and any flat object. Turn off the water and drain the remaining water from the barrel by pressing the button and not releasing it.
- This will cause a small hole to appear at the base of the metal end. Use a screwdriver to pick it up and slide it counterclockwise around the button. After this, the part can be easily unscrewed by hand.
- Unscrew the ring It won't be needed yet.
- Lift 90º if possible ; it should be positioned so that it is convenient for you to reach with your hand and unfasten the double-sided clothespin that holds the barrel. Pull one edge to the right and the other to the left. After this, the upper part of the tank can be easily removed.
With double button
- Press one of the buttons all the way, find a small slot on the inside of the second, by prying it with a screwdriver you can easily remove it from the tank.
- in the place where the button was located. It needs to be unscrewed.
- Similarly with the previous option, lift and turn the lid, not forgetting to remove the clothespin.
- Remove the cover. After repair work, install all parts in reverse order.
Useful video
Watch a video showing the process of removing the cap to fix a leak.
Everything is easy and simple
Analysis of even the most complex- looking configurations of toilet flush tanks is actually quite simple and takes only a couple of minutes. The process does not require special skills and anyone can remove the toilet cistern lid by following the instructions and assembly diagram from the plumbing fixture data sheet.
The most common mistakes at work
When carrying out plumbing work, it is necessary to observe clarity and sequence of actions. This will ensure that the bathroom is free of leaks, unpleasant odors and other negative aspects in the future.
When attaching a compact toilet to the floor, it is very important to carefully level the surface on which the plumbing fixture is placed.
To level the surface, it is best to use a building level. This tool will allow you to take all the necessary measurements with maximum accuracy and without unnecessary effort.
Ignoring this point happens quite often and leads to a violation of the integrity of the system, the appearance of leaks and subsequent equipment failure.
Another important point is the 100% tightness of all butt joints and the rigid installation of fasteners. It is especially important to pay attention to the area where the corrugation is connected to the toilet outlet.
In the future, sewage liquid may be released through a poorly processed edge, which will cause the appearance of sharp, unpleasant odors in the bathroom.
When connecting a toilet to an old cast-iron riser, in order to avoid leaks and the appearance of an unpleasant odor, the inlet of the pipe is very carefully washed, cleaned to metal and dried. Apply sealant to an absolutely clean surface, insert the corrugation tightly and gently press down so that it clearly takes its place.
To guarantee, you can apply sealant not only to the inner surface of the pipe, but also to make an additional outer layer, thinner on top and thicker at the bottom. Neither liquids nor odors will penetrate through such a barrier.
When attaching the toilet to the floor with dowels, you need to act carefully and without haste. If you overdo it and screw the plumbing fixtures too tightly, they may crack during use.
Very weak fasteners are also not an option, since the compact will begin to wobble and water will ooze from under the base. It is advisable to maintain the “golden mean” here and create an optimally reliable, stable mount.
Careful attention to the process and taking into account all the above points will help you attach the toilet to the floor accurately and clearly, avoiding the need to redo everything or make adjustments to the work in the future.
Chisel
Here we are not talking about simply cutting off a rusty nut or the head of a tight bolt. With a chisel and one sharp blow of a hammer, you can tear stubborn fasteners out of the tenacious embrace of rust. To do this, you need to point the chisel closer to the edge of the bolt or nut at an angle in the direction opposite to the thread, and then strike sharply and firmly with a hammer. Using this technology, experienced craftsmen masterfully remove any, sometimes even the most hopeless, nut or bolt with one blow. Of course, you still need to grow to such professionalism, but the method works.
Required materials and tools
Before starting installation work on attaching the flush tank to the toilet, you need to prepare the tools, as well as the necessary equipment.
The required materials depend on the type of structure; they should be selected according to the following characteristics:
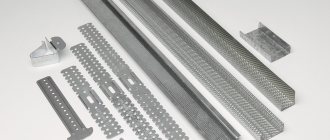
- method of fastening the toilet tank - it can be a monolithic structure together with the toilet, hung on the wall or mounted in a hidden niche;
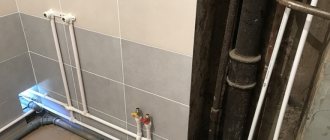
- method of supplying water supply to the tank - it can be done from the bottom or from the sides. The first option is used when lining pipes is required; the disadvantage is the complexity of installation. The second option is the most common;
- a type of reinforcement structure - the presence of a lever or drain button.
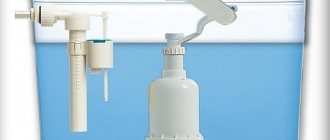
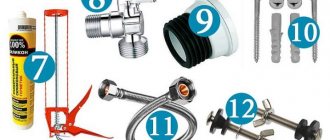
For installation you will need the following materials:
- a shut-off valve is installed on the pipeline; it allows you to shut off the flow of water into the tank from the water supply;
- rubber, copper and steel liner, which is mounted to the inlet pipe;
- drain fittings that collect and drain liquid;
- silicone sealant or sealant in the form of a tape, which are used for additional sealing;
- a special product that prevents corrosion damage to metal structural elements (for example, fastening bolts).
In most cases, the tank is attached to the toilet using nuts and bolts; all necessary fasteners are included in the plumbing kit.
To carry out the work you will need the following tools:
- drill, drill bits for ceramic tiles and metal;
- hammer for dowels;
- pencil/marker for marking;
- building level;
- wrench;
- core (used to prevent drill slipping);
- rubber spatula to remove residual sealant).
To attach the tank to the compact toilet, you will need an open-end wrench (can be replaced with pliers or an adjustable wrench) and a socket type. To connect the bypass pipe, you will also need an adjustable wrench with a diameter suitable for the cross-section of the corresponding coupling.