Today, drywall is one of the most popular materials. Practicality and versatility allow it to be used everywhere in interior decoration. Often, partitions are made with its help. In this case, installing a plasterboard profile is easy, but many are faced with the problem of not being able to use the ceiling. This happens in cases where suspended ceilings have only been installed in the room, and you don’t want to spoil them.
There's no need to get upset. There is an alternative - to do without mounting to the ceiling. Installation will take longer as it is more difficult to complete. First of all, you will need a powerful and reliable frame. It is firmly fixed to the floor and then covered with sheets of plasterboard. In this case, the design is aesthetically pleasing and meets the required conditions.
Selecting profiles and thickness of plasterboard sheets
Types of profiles for plasterboard sheets
Drywall is used in conjunction with profiles. They are represented in an impressive number. Each type has its own functional purpose. In accordance with this, the desired option is chosen in order to achieve the reliability and durability of the partition.
The design will require a guide profile. It is distinguished by a sheller-shaped cross-section. It is used as a base for fixing the rack profile. The standard width of the shelves is 40 mm, and the width of the backrest can vary from 50 to 100 mm.
You will also need a rack profile. Its distinctive features are the presence of bends on the shelves and a width of 50 mm. There is also a ceiling option, but it is not needed, since there is no attachment to the ceiling.
If you plan to create corners that require aesthetic design, purchase a special corner profile. With its help, it will be possible to protect soft corners that are created using sheets of drywall.
Arched profiles will help you create elegant curved structures. They are represented by shelves and a back, which are integrally connected to each other. However, there are divisions that help to bend them and achieve sophisticated rounded shapes. The last possible profile option, which is distinguished by functional purpose, is a beacon profile. It is used to level the wall as a stop.
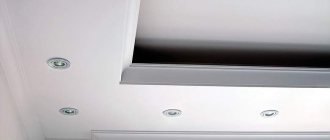
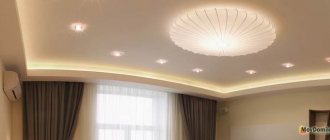
Plasterboard partition with internal lighting
Varieties
- How to determine the type of drywall - regular, moisture-resistant or fire-resistant?
By leaf color. Regular gypsum board is always white or light gray, moisture-resistant - sea green, fire-resistant - red or pink.
From top to bottom: regular, fire-resistant and moisture-resistant drywall.
- What shape are the edges of the sheet? Which edges are more convenient to install?
Domestic GOST 6266-97, which regulates the production of gypsum boards, provides for five types of edges:
| Edge type | Symbol in sheet marking |
| Straight | PC |
| Rounded | ZK |
| Semicircular on the front side | PLC |
| Thinned on the front side | UK |
| Semicircular and thinned on the front side | PLUK |
The most convenient for installation (and, accordingly, the most in demand) are PLUK edges. Why? There are two reasons:
- Rounding allows you to fill the maximum volume of the seam between adjacent sheets with putty. The more densely the seam is filled, the less likely it is for cracks to appear in it;
- The smaller thickness of the edge of the sheet makes it possible to stick a tape of reinforcing material (fiberglass mesh or fiberglass) along the seam and cover it with putty, leaving the surface perfectly flat.
Plasterboard sheet with PLUK type edges.
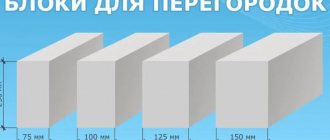
- What are the sizes of gypsum board sheets??
The above-mentioned GOST provides the following size options:
- Length - from 2000 to 4000 mm in increments of 50 mm;
- Width - 600 or 1200 mm;
- Thickness - from 6.5 (arched plasterboard) to 24 mm (wall gypsum plasterboard, allowing the installation of durable partitions with sheathing in one layer).
Most often, sheets of size 2500x1200 mm are found on sale - wall (12.5 mm) and ceiling (9.5 mm). Sheets 3 meters long are used for covering walls in rooms with high ceilings, and sheets 600 mm wide are convenient because they can be mounted on the ceiling by one person.
The ratio of sheet size and weight.
Profile thickness and drywall type
Attention!
Choose the correct profile thickness. It depends on the thickness of the metal used as the material.
For light partitions, a profile with a thickness of 0.4 mm is suitable. But its use to create a partition that is attached to the floor is considered irrational. Any serious loads will ruin the resulting structure. Profiles with a thickness of 0.45 mm are stronger, but for the described option it is better to choose a thickness of 0.55 mm. It guarantees excellent resistance to stress and wear. If desired, even shelves can be mounted in such a partition.
Additionally, take care of the selection of the drywall sheets themselves. Many people prefer the universal option. It comes in gray with blue markings. If the partition is installed in the kitchen or bathroom, choose a moisture-resistant or fire-resistant option. A plasterboard sheet that is resistant to both moisture and elevated temperatures is optimal. Its price is high, but its characteristics fully justify it.
General Tips
When laying laminate on a plasterboard wall, do not forget the basic installation points:
- The end joints of adjacent lamellas must be offset by a distance of at least 20 cm. This is not necessary for a wall, again due to the lack of load, but this type of installation is better.
- You need to calculate the laying in such a way that the outer boards of the rows do not need to be cut shorter than 30-40 cm. For the same reason.
- The absence of gaps between the rows is achieved by perfect alignment of the lamellas in the row. It is important.
Correct marking of the space for the partition
The frame is the basis of the partition. He admits that there will be about 25 cm between the partition and the ceiling. A larger distance is not recommended, since in this case reliability will be lost, and it is unlikely to add aesthetics to the room.
Marking
Frame installation begins with markings. A chop cord and level will help with this. Initially, the required height of the partition is selected from sheets of material. It is preferable to do this along the bottom corner of the room, measuring from the ceiling. This will eliminate visual unevenness, even if there is a gap between the ceiling and the structure.
After this, marks are left on the wall to which the frame is attached. They are performed using a chokeline - the chop cord is pulled back and abruptly released. The result is a reference line on the wall. It is recommended to verify its correctness using a building level.
If you wish, you can start marking from the floor, this will eliminate the need for measurements. The resulting line is then accurately transferred to the surface of the selected wall or walls. Additionally, you can use a plumb line. It is this line that becomes the control line for placing the guide profile.
It is not difficult to determine the boundaries of the resulting structure. To do this, the thickness of the selected sheets of drywall, putty and the planned finish is added to the marked parameters. If you are planning an arch or doorway, take this into account during the marking process.
Grinding
- How to sand a partition after the putty has dried?
I use an oscillating sander with 80 and 120 grit (for the first and second pass, respectively) for sanding. Sanding is performed in bright light directed at an oblique angle to the wall surface: this way the slightest irregularities will be highlighted with shadows. After sanding, the partition is carefully swept and primed with penetrating primer.
A disc sander will make sanding even faster.
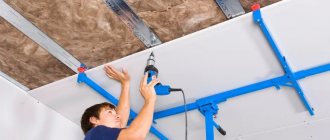
Creating a wireframe
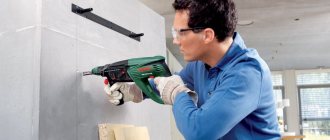
The next stage is installation of the frame. It involves attaching a guide profile to the floor. choose the one that has the greatest load-bearing capacity to eliminate possible difficulties in subsequent operation. Dowels are used to secure the profile. They are placed at a distance of 50-80 cm from each other. The specific distance depends on the dimensions of the structure.
Frame base for partition
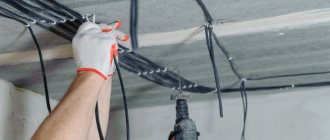
Next, fix the rack profile, starting from the edges of the guide and in the place where the doorway will be located, if it is planned. The fixation should be of the highest quality, so do not skimp on fittings. This will prevent movement or deformation of the finished structure. The rack profile is mounted along the length of the entire frame. The distance is fixed - 60 cm. Metal screws are used for fastening.
At this point, the installation of the frame is considered complete. It is recommended to ensure its strength and, if there are minor flaws, provide additional reinforcement. Rigidity is enhanced by installing cross bars made of profiles. The frame itself must be double-sided. This will ensure the rigidity of the partition itself. If you wish, pay attention to the video, which will allow you to understand the principle of operation. In the video you will get acquainted with the features of installing profiles and their fastening.
Stages of work on laying laminate on a plasterboard wall
Since we do not use the laying method on bars, we do not consider laying methods using a construction stapler, small nails, or clamps. We are interested in the method of laying laminate flooring on a wall using glue.
For these purposes, polyurethane adhesive sealant is used. The quality of the glue must be good. Without practice, we determine the quality of glue by its brand.
For example, we lay the laminate vertically.
Preparation
The plasterboard wall must be cleaned of dust and primed. The laminate needs to be sorted and sorted by pattern.
In this case, I don’t think it’s important to glue the seams between the sheets. It is important to use sound-absorbing tape between the metal frame profile and the base wall. It is also important to recess the heads of the screws by 2-3 mm into the sheet of drywall.
Start of installation
As when laying on the floor, the locking part of the outer slats needs to be cut off. This can be done with a construction knife, but it is better to use a jigsaw. If the laminate is laid in a corner, then leave a damping gap of 5 mm between the corner and the first row.
We lay the first row in separate planks, without assembling them in a row in advance. We apply glue to the back side of each plank in zigzags, trying to increase the area of contact of the glue with the wall. There is no need to spread the glue.
We continue installation
There are two ways to continue laying the laminate on the wall.
Method 1. We assemble a full row of laminate flooring. We glue the planks from the front part with good masking tape. We turn the row strips over and apply glue to the back side of the row. Then we glue the full row onto the wall, not forgetting to lock the lock with the first row.
This method is not bad, but it is not at all suitable for horizontal laying of long walls. Therefore there is a second way.
Method 2. We do not assemble the laminate in rows in advance, but assemble it directly on the wall. To do this, you need to cut off the end lock of each plank with a wallpaper knife (as in the photo).
The absence of mechanical load on the wall makes it (the lock) unnecessary and this method of installation is quite acceptable.
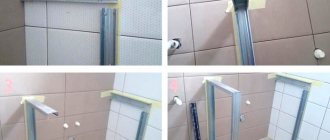
Covering the partition with plasterboard
The next stage of work is the installation of drywall on the created frame. The material has a beveled edge that hides the seams at the joints. However, it is recommended to remove it from the first row of sheets. The edge is cut with a knife to a width of approximately 50 mm.
Covering the partition with plasterboard
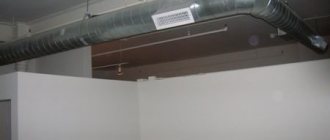
Drywall is attached to the frame using self-tapping screws in increments of 200-250 mm. It is recommended to recess the screws by approximately 1 mm. This will cover one side of the frame. embedded parts are mounted inside. These include lamps or supports for shelves, laying pipes and electrical wiring, if required, laying sound and heat insulating material. However, this is not always required for the partition.
Then perform similar actions on the other side of the structure. At this point, the frame covering is considered complete. Now we begin finishing, which will add elegance and aesthetics to the interior.
About the material
- What is good about the material we are interested in? Does it have significant disadvantages?
We have to decide whether to choose it or look for alternatives.
pros
- Drywall has fairly high vapor and air permeability. This means that the atmosphere in the room will be renewed even with the windows closed, albeit quite slowly. It will always be easy to breathe in a finished room;
Let me clarify: of course, this is only possible if the outer walls throughout the entire volume have at least the same vapor and air permeability.
- Thanks to the large sheet sizes (typically 2500x1200 mm), finishing walls and installing partitions will be quite fast;
Due to the size of the sheet, finishing with plasterboard will not take much time.
- The surface of gypsum plasterboard has high adhesion to any cement mortar (in particular, tile adhesives), which greatly simplifies the finishing of walls with tiles;
- Drywall is easy to cut, and the cuts can be straight or curly. In addition, thin arched and ceiling plasterboard bends easily; Thicker wall sheets can be mounted on curved surfaces by first cutting them from the back. The fractures are given a rounded surface using gypsum putty.
All these properties of the material make it possible to create structures of arbitrary shape from it, without limiting your creativity at all;
- Any surface defects (seams, broken corners, chips and potholes) can be easily eliminated with gypsum putty. For the same reason, sheets do not need excessively precise sizing: a wide seam can always be sealed;
Puttying will eliminate any defects in the seams and surface.
- The sheet is strong enough to withstand moderate mechanical loads. Where they are higher than the average value (for example, in a small room with significant traffic), gypsum plasterboard is simply attached in two layers;
- GKLV (moisture-resistant plasterboard) can be used in damp rooms, and GKLO (fire-resistant material) can serve as a barrier to the spread of flames in fire-hazardous rooms.
Minuses
Alas, they also exist:
- Our material is afraid of water. Yes, yes, even waterproof: its gypsum core, although it has low hygroscopicity, after a while still gets wet and becomes soft;
- Gypsum has limited mechanical strength, which is significantly inferior to cement plaster, plywood or OSB. A wall finished with gypsum plasterboard can be penetrated through by an accidental impact. In principle, we are not talking about any kind of protection of the premises from intruders;
A gypsum board sheet can be pierced through with a blow of moderate force.
- Fluctuations in humidity and temperature over time often lead to cracks in the seams.
However: the last problem is successfully solved by reinforcing the seams. I will talk about it in one of the following articles.
Finishing and useful recommendations
Finishing is also easy to do yourself. Initially, irregularities and seams are sealed. The joints are glued with a mounting mesh, and then leveled using starting putty. Rub and level the putty with an abrasive mesh or sandpaper.
After this, finishing begins. Choose any material at your discretion. Drywall is universal, so it can be easily combined with any options. Among the traditional ones are wallpaper or paint. If desired, you can leave the drywall itself. If the work is done well, it looks attractive. This option is suitable for high-tech or minimalist design.
Living room with plasterboard partition
The partition is a useful element of the interior. With its help, they zone the space, achieving individuality and originality of the interior. Creation is a feasible task for everyone, so you can save on calling specialists.
Finishing work
The final stage is finishing work. The following materials are needed: perforated corners for leveling the corners, serpyanka mesh (to seal drywall seams), two types of putty, starting and finishing. You will need: spatulas (large and small rubber), containers for diluting and applying putty. Finishing stages:
- Starting putty is applied to the corners of the structure, and a perforated corner (metal, plastic) is attached to it. The remaining putty is removed with a spatula.
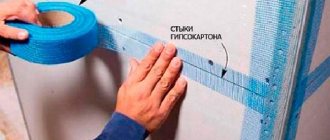
- The seams of the joints of the gypsum board sheets are sealed with sickle tape, then they are puttied.
- Clean the putty with a grouting mesh.
- The walls are primed, allowing the composition to absorb and dry.
- Putty is putty in 2 layers, and before applying each subsequent layer the partition is primed and sanded.
- The last stage of preparation for finishing will be a layer of finishing putty.
The partition is ready for finishing, according to the design concept. This could be painting drywall, wallpapering and other types of finishing. The shelves will look more impressive if they are highlighted according to the principle of contrast. If you have certain repair skills, then try making a partition with shelves with your own hands.
Stages of legalization of redevelopment
If the idea arises of making changes to the configuration of the residential premises, the preparation of design documentation will be required. For its development, they turn to architectural organizations specializing in creating projects or to BTI. The customer expresses the essence of his thoughts, and the performer transfers it to paper, taking into account the requirements of GOSTs and SNiPs.
Next, the necessary documents are collected and the created project is agreed upon with the Housing Inspectorate. She decides whether to give permission for redevelopment, erection of partitions, or consider it impossible and refuse.
Redevelopment work begins only after a positive response from the Housing Inspectorate. All manipulations are carried out strictly according to the project, since the slightest deviation entails rework.
Upon completion of the transformation process, changes are made to the documentation. To confirm the correspondence between the project and the work, a commission is invited to the premises. If the documents are identical to reality, a work completion certificate is drawn up. With this act, the owner goes to the technical inventory bureau, where he receives a new registration certificate for the housing. Changes are also made to the cadastral passport and a new certificate of ownership is issued.
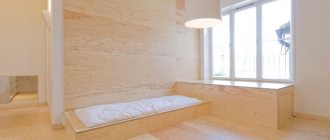
Modern interior element - niche
One of the ideas for creative room design is a niche - a recess in the wall of various shapes. This technique is sometimes resorted to in order to hide the roughness of the layout and unevenness of the coating.
But, more often, this is a pre-planned space, as an alternative to a bulky furniture cabinet, a relic of the past.
This move is especially relevant in small apartments. A well-designed and well-thought-out niche in the wall in the living room can turn the wildest ideas into reality.
Thanks to the harmonious play of light, shape and color, it makes the space dynamic and correct, visually adjusting the room, adding variety and zest.
A photo of a niche in the living room for any aspiring designer can be the first work for a portfolio.
Why do we need niches in the wall?
The niche has not only a decorative function. Allows you to solve many problems. Moreover, it can be created not only indoors, but also outside. Thus, niches for a watering tap can be arranged in the outer wall. Inside the room, a recess is also useful and solves the following problems:
- Refusal of large-sized furniture and inconvenient storage systems. The excess space will not be occupied;
- Creating a beautiful and functional area that combines decorative and useful functions;
- The ability to hide wiring and wires, making the interior neat and tidy;
- By excluding some furniture items from the interior of the room, you can save money.
Organizing a niche is not only practical, but also financially beneficial. Various decorative and practical items are placed inside the structure, including books, photographs, vases, etc.
Organizing a niche is not only practical, but also financially beneficial.
Interior subtleties: accent wall in the living room
What is an accent wall in the main room of the house, and why install it in the living room? An accent wall is a section of the wall that is highlighted in a special way using all possible design techniques. The main requirement when decorating an accent wall is that it must completely coincide with the overall style of the interior.
So, what is an accent wall for?
If you want to decorate such a wall, then you need to prepare for solving a difficult task. The process must be approached competently and thoughtfully. If you don't take the matter seriously, you won't be able to avoid mistakes. Why waste money, time and nerves.
In order not to make any mistakes, experienced designers recommend adhering to the following principles when designing an accent wall:
- The area of the accent wall should be less than the total area.
- An accent wall does not have to be a single element.
- You can highlight a wall using either bright colors or an unusual texture.
- The psychology of colors should be taken into account.
- You need to choose the right location for the accent wall.
- An accent wall can highlight the functional area of the living room.
- The wall should create balance in the room, so you need to be very careful about its design.
Here are some tips for choosing a location:
- If possible, it is better to place the wall opposite the entrance to the room.
- It must be positioned so that there is a separation of functional zones.
- An accent wall can be located where you watch TV, but in this case you should avoid too bright colors.
A wide variety of materials can be used to create an accent wall.
Today the following are widely used:
- Tree;
- Dye;
- Brick;
- Tile;
- Stone;
- Wallpaper;
- Glass panels;
- Plaster.
Many people believe that it is enough to cover the wall in a bright color, and all the emphasis is done - this is not so. A mini color composition must be created.
Designers suggest remembering a number of rules:
Documents for registration of redevelopment
In order for the work carried out to renovate a residential premises to be considered legal, you will need to collect a package of documents to obtain permission to carry out redevelopment work. You must provide the Housing Inspectorate with:
- Statement from the owner, drawn up according to the state model.
- A sketch of a room after “renovation or a project drawn up by a construction organization with a development license.
- Papers confirming ownership of residential property.
- Consent of all family members registered on square meters.
- Consent of neighbors if the new layout is very different from the old one and may affect the condition of the surrounding apartments.
- BTI technical passport.
The absence of one of these documents is grounds for refusal to issue permits.
Functional niche in the living room
If possible, it is worth making functional niches. They will completely replace many headsets. For example, you can build a niche for a TV in the living room.
The TV is aesthetically placed in a niche, while being fixed on the back wall. This allows you to hide all the wires for connecting the device
In addition, the plasma panel itself will draw less attention to itself.
The niche can also be used to place various other equipment, for example, a speaker system. You can install beautiful shelves made of wood or glass in the design, which will provide a pleasant appearance.
If necessary, sockets can be installed in the niches to connect various equipment. Floor niches can be made closed and used for storing equipment and things that are not used often and should not be in plain sight. For example, in such niches you can store a vacuum cleaner, iron and other household appliances.
Flaws:
- The space requires the creation of artificial lighting.
- Air exchange in the recess is reduced.
- Cleaning is complicated.
Functional and spacious shelves Source roomester.ru
The planes of the niche are used as a stand for equipment. The designs reduce the usable area, so they are only relevant for large rooms.
Recesses are well suited for the kitchen. They serve as stands for dishes, spices and cans of bulk products. A good idea would be to place narrow niches in the hallway wall or along the stairs. It is advisable to make several asymmetrical decorative elements and provide them with lighting.
A living flower on a niche shelf is an excellent solutionSource strojka-gid.ru
Modern bedroomSource strojka-gid.ru