- Houses of the I-209A series and their advantages
- Features of apartments in houses of the I-209A series
- Permitted redevelopment options in houses of the I-209A series
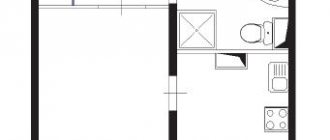
- Redevelopment project for a 1-room apartment in building I-209A
- Redevelopment project for a 2-room apartment in building I-209A
- Redevelopment project for a 3-room apartment of series I-209A
- Prohibited work when remodeling apartments
- The procedure for approving the redevelopment of an apartment
We continue the series of articles on how to remodel Moscow houses. Today we will talk about redevelopment in houses I-209A: what options are possible in one-room, two-room and three-room apartments and how they can be coordinated.
House series I-209A glazing
Balconies in houses of the I-209A series can be glazed with casement and sliding windows.
Sliding windows are the optimal solution for an uninsulated balcony; windows made from PVC profiles provide maximum thermal insulation. The most popular products are Rehau (Rehau Blitz 60 profile) and KBE (KBE Expert 70 profile). Among manufacturers of sliding windows, products from Provedal and Krauss (aluminum profile) and Sliders (plastic window profile) are very popular. Please remember: windows made of aluminum profiles can freeze at low temperatures. Windows made from plastic profiles do not have this disadvantage.
The prices shown on this page are approximate. They are based on the standard sizes of balconies in houses of the 1-MG-600 series. The exact cost can only be found out after you have selected the optimal type of glazing and the craftsmen have measured your balcony.
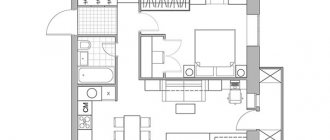
Layout of a three-room apartment
Before redevelopment
redevelopment 1
redevelopment 2
redevelopment 3
redevelopment 4
redevelopment 5
Options for redevelopment of a three-room apartment in a house of series I-209-A
Description
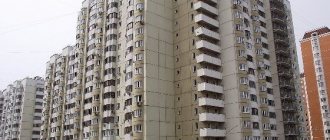
The I-209A series of houses are tower-type block buildings. The main period of their construction was in the 70-80s of the last century. This MNIITEP project became a logical continuation and development of the “twelve-story buildings” II-18. There are similarities in design solutions and apartment layouts, but as the number of apartments has increased, balconies (loggias) have appeared in each of them. The bulk of the houses in the series were built in Moscow and the region, less often in other regions of the Russian Federation.
It is worth noting that after increasing the number of floors in block buildings (up to 14 floors in the I-209A series), the designers made calculations that showed the need to use the panel-block construction principle in taller buildings. In I-209A houses, as in previous modifications of block buildings, the thermal insulation of external walls still remains poor and, as a result, the energy efficiency of the apartments is low. Currently, many of the houses in the series are included in the capital’s redevelopment plan; they are being overhauled with partial or complete replacement of utility networks and communications, as well as insulation of external wall panels and arrangement of a “ventilated facade.”
Series I209A
| House type | Panel |
| Planning solution | Block house tower. The house has 1, 2, 3 room apartments. |
| Ceiling height | 2.64 meters |
| Technical buildings | Technical underground and technical floor for placing utilities |
| Elevators | Two passenger and cargo carrying capacity of 400 kg. |
| Building construction |
|
| Heating | central, water |
| Ventilation | natural exhaust through ventilation units in the kitchen and bathroom |
| Water supply | cold and hot water from the city network |
| Garbage removal | garbage chute with loading valves on the interfloor landing |
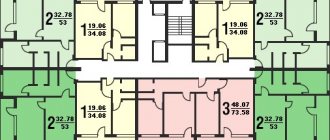
Typical layout of apartments in a house of the I209A series
Apartment areas
| 34,8 | 19,4 | 9,6 |
| 38,3–45,5 | 24–29,7 | 6,2–9,6 |
| 64,4 | 42,4 | 9,5 |
Which walls are load-bearing and which are not in house I209A?
You can find out by carefully studying the plans below.
Usually non-load-bearing ones are located between the corridor and the living room.
Construction of a furnace portal with your own hands
For a sauna stove with a fuel duct leading into the next room, you will need to make an opening in the wall. It is done at the construction stage of the bathhouse, but it can also be built in an already erected wall. Making a portal for a stove into a bathhouse consists of the following steps.
- An opening is being constructed in the interior wall.
- It must be filled with refractory bricks to the size of the fuel channel.
- Finally, decorate it with finishing materials.
The size of the portal for a sauna stove depends on the power and dimensions of the heating device. You decide for yourself what the area of brickwork around the combustion channel will be. The height of the bath portal may be greater than its width. But there are horizontal options.
Glass wool should not be used for insulation. Although it also belongs to mineral wool, it does not tolerate too high temperatures (it does not lose its properties up to 350 degrees). And near a hot furnace, glass wool will melt.
Basalt wool must be made without binding components, since when heated they release harmful substances, and at a temperature of 500–600 degrees they turn into sand and fall out, the material loses its properties. As a result, the wall heats up and the wood darkens or even begins to smolder. Therefore, special high-temperature insulators are used to insulate the furnace: their melting point must be at least 800–1000 degrees.
Be careful: you cannot directly connect brickwork to an unprotected combustible wall. A small distance is also left between them, which is also sealed with refractory. All portal joints are subsequently masked using decor. Above the stove, bricks are laid on a metal corner. If you move the top row a little forward, you will get a neat mantelpiece.
Mortar for laying bricks
How to prepare it
What to pay attention to
The solution is made of sand and clay. Proportion 1:2 (take two parts clay for one part sand). The clay should be of normal fat content. Water must be added in an amount of 1⁄4 parts by weight of clay. The more salts it contains, the higher the likelihood of stains appearing on the masonry.
Therefore, clean rainwater will be the best option. To achieve uniformity of the finished mixture, you need to use fine sand. It is added after the clay has been soaked. When laying flat, 20 liters of such mortar is enough for 45–50 bricks.
Cement mortar is not recommended. It cracks under the influence of high temperatures, which will lead to the destruction of the masonry.
Advantages of cooperation with 2Projector
By entrusting all the worries about completing the redevelopment of a two-room apartment to specialists, you will significantly save time and not waste energy and nerves: in the shortest possible time, your redevelopment will be approved by the Moscow Housing Inspectorate.
This result is achieved thanks to the high professionalism of 2Projector employees (lawyers, designers, engineers), extensive experience in the field of coordinating redevelopments, as well as customer focus - our specialists work even with complex cases, each stage of registration of redevelopment is necessarily agreed with the customer, the project is developed taking into account all wishes and requirements.
The pricing policy of “2Projector” is distinguished by loyalty - comprehensive services for coordinating redevelopment can be paid in stages, after the completion of each of the phases of redevelopment.
I-209A redevelopment of a bathroom in a two-room apartment
Moscow, st. Matveevskaya
Difficulty of execution 6/10 Time frame 17 days Estimate for work 92,500 rub.
Our company carried out a standard renovation option in house I-209A - to combine the bathroom and toilet
First, we carry out dismantling work: monotonously, carefully and slowly we dismantle the aceite slate cabin, so that its structural elements do not fall onto the heated towel rail pipe.
Bathroom 150x135 before renovation
Toilet before renovation
Dismantling of slate plumbing cabin
And so, step by step, we remove the doors, plumbing, partitions and ceiling, break the plumbing box in the toilet, cut the water pipes. We remove the old tiles from the floor.
At this stage of work, the service company’s employees carry out the necessary work to re-weld the riser pipes, and we purchase all the necessary building materials.
The next day we build new walls.
Construction of new partitions
Aligning internal walls in the bathroom
White slatted ceiling + lighting
As soon as the walls are ready and plastered, our plumber begins his work. We re-lay the water supply completely, starting with the shut-off valves. First, we install water meters, filters and a comb. Next, the wiring goes to the toilet, hygienic shower, shower, washing machine, washing machine and sink (kitchen).
We replace old cast iron sewer pipes with new ones made of PVC.
New sink in the bathroom
Beige textured tiles with decorative borders Shakhtinskaya Kordesa
Shower corner with tile tray
In the new combined bathroom, we build a plumbing box, cover all the pipes and the installation for the toilet with it. To access the taps, we install an invisible hatch under the tiles. All electrical wiring in the bathroom is being changed.
Toilet, moydodyr, shower corner, washing machine
Shower tray lined with mosaic
Hanging sink with mirror
We build a tray for the shower corner. Then we cover it with mosaic. The interior walls of the bathroom are lined with beige “Kordesa” tiles (Shakhtinskaya tiles). There is a decorative border in a circle. The 33x33 floor tiles are laid at an angle and have decorative bronze inserts.
Wall-hung toilet + hygienic shower
General view of the bathroom after remodeling
At the end of the renovation, we install a slatted ceiling with spotlights, install plumbing (shower corner, sink and mirror, washing machine, toilet).
Floor tiles with bronze inserts
Wall border (Shakhtinskaya Kordes tiles), pencil, grout
review
17
Order an estimate visit
beige bathroom shower corner flowers hygienic shower borders and decors washing machine in the bathroom diagonal tiles redevelopment hidden hatch toilet with installation
How to renovate a typical three-room apartment in a block house
Briefly
As a result of the redevelopment, the number of rooms in the apartment did not increase, but their functionality changed. In place of the former walk-through living room, a bedroom appeared, and the new living room was combined with the kitchen to accommodate everything necessary. Designer Lyudmila Danilevich shared details of the renovation.
Details
The apartment is located in a block house of the I-209A series. Initially, the customers wanted to make cosmetic repairs, but while working on the project it became clear that they were not comfortable living in the existing layout. All family members are quite tall (the customers’ son is over two meters tall), so it was necessary to increase the height of the openings and replace the cramped bathtub with a shower.
Lyudmila Danilevich completely “redrew” the space. The kitchen was combined with the next room, creating a living room in it. The room, which previously had a walk-through living room, was made isolated. Now it houses the son’s bedroom, and next to it is the parents’ bedroom. The bathroom was also redesigned: the designer designed a comfortable shower instead of a bathtub.
“We tried to use a lot of natural and aged materials in the decoration. For the floor we chose a parquet board with a very textured surface; the wall in our son’s room was finished with barn boards.
By the way, on the walls in the kitchen and living room there is not an imitation, but real antique brick, sawn into tiles.
In the bathroom, microcement was used on all walls, except for the shower area: it fit well into the concept and did not eat up the centimeters we needed,” says Lyudmila Danilevich.
The redevelopment helped to place storage systems so that they do not clutter up the space. We made niches for all the cabinets in the hallway, son's room and bedroom - this way we got rid of protruding corners. All cabinet products are made to order.
The colors in the interior are warm and complex: the designer used different shades of green, beige, and brown. In my student son’s room, the walls, all the furniture and the ceiling were painted the same color. This technique works well in small spaces: it does not crush surfaces and visually increases the height of the ceiling and the area of the room.
“I don’t like to get attached to one specific style,” says Lyudmila Danilevich. “And this project was no exception: it combines loft, country and modern functional elements.”
Furniture and decor support this mixture of styles: some of the furniture was found at IKEA, some was bought in designer showrooms, and some were made to order. For example, the sofa in the living room is a one-off: its size and depth were calculated based on the tall height of the customers. It turned out convenient and comfortable.
Layout
Plan with furniture arrangement
Brands represented in the project
- Hallway
Finish: paint, Caparol Flooring: tiles, Cicigres Furniture: bench, IKEA - Decor: hooks, birds, everything - Artefacto.ru; painting, online gallery of contemporary art Smart
- Living room
Finish: paint, Сaparol Flooring: parquet boards, Lab Arte Furniture: tables, IKEA Carpet: Dovlet House Textiles: - Lighting: chandelier and sconce, Pinoccio
- Bedroom
Finish: paint, Caparol; wallpaper, York Flooring: parquet boards, Lab Arte Furniture: bed and chest of drawers, EthnicraftTextiles: - Lighting: chandelier, Spider
- Son's room
Finish: paint, Saparol Floor covering: parquet board, Lab Arte Textiles: ; Zara Home - Decor: painting, online gallery of contemporary art Smart
- Kitchen
Finish: paint, Caparol; tiles, Self Natura; brick, “German Brothers” Flooring: parquet boards, Lab Arte Furniture: chairs, Le Home Set: “Stylish Kitchens” Appliances: oven, dishwasher, extractor hood, all - Bosh Faucets: Omoikiri Takamatsu - Lighting: lamp above the table, Barcelona Design
- Bathroom
Finishes: porcelain tiles, Cir Ceramiche Flooring: tiles, Tarima Roble - Faucets: Hansgrohe
Do you want your project to be published on INMYROOM? Send photos / 3D visualizations to
Source: https://www.inmyroom.ru/posts/19450-kak-sdelali-remont-tipovoj-treshki-v-blochnom-dome
Description
The I-209A series of houses was designed as a development of previous series of block houses, such as II-18/09 and II-18/12. The number of floors in the tower-type building was increased to fourteen. After calculations, a further increase in the number of floors in block buildings was considered inappropriate, so for houses of higher number of storeys they began to use panel-block structural schemes, where only internal walls were built from concrete blocks, and external ones were made from hinged three-layer panels.
From the experience of constructing previous block series, it became clear that the external walls made of 400 mm thick concrete blocks did not fully meet the thermal insulation requirements. As a result, at certain times of the year, freezing of the external walls occurred, on the internal surfaces of which mold and mildew formed. Particularly vulnerable in this regard were the rooms located in the corners of the building, where the area of the external enclosing walls was greatest. To solve this problem, in the I-209a series, additional heating radiators were installed in the corners of the building, which were supposed to protect the outer walls from freezing. It should be noted that in this series, when the heating power is insufficient, problems sometimes arise with freezing of the enclosing structures and the formation of condensation on their inner surface. Unfortunately, external walls made of concrete blocks in the I-209a series do not meet modern requirements for thermal insulation and energy efficiency, so in Moscow 77% of houses underwent major renovations with insulation of external walls and installation of a ventilated facade system [ source not specified 724 days
].
The internal load-bearing walls of the series are located in 6-meter increments and are made of concrete blocks 400 mm thick. The external walls are also made of expanded clay concrete blocks (most often grade M-75). On each floor at the ends of the building, as in series II-18/12, there are stiffening diaphragms made of reinforced concrete panels 200 mm thick, which absorb wind loads from the end facades. The floor slabs are made of prefabricated reinforced concrete hollow-core slabs 220 mm thick, supported by internal load-bearing and external end walls.
Compared to the block series II-18/12, the standard series I-209A has an increased number of apartments per floor. Also added to the layout were spacious apartment-sized loggias, which occupy the entire facade of the building and because of which this series cannot be confused with any other. Despite the increase in the total number of apartments on the floor, three-room apartments were still retained in the layout. Moreover, the windows in such apartments overlook three facades of the building.
The houses in this series have a technical underground and a technical floor used for wiring utilities.
The advantages of this series, in addition to those already mentioned, include the absence of load-bearing walls inside the apartments (with the exception of rigidity diaphragms), which allows for many redevelopment options.
In addition to the insufficient thermal insulation of the external walls, the disadvantages include the lack of a freight elevator and the small areas of the apartments.
Series I209A
A series of block 14-story single-entrance towers. Structurally similar to series II-18, and similar in apartment layouts.
This is explained by the fact that residential buildings of the I-209A series were designed as an improved version of the II-18.
The number of floors has increased (from 12 to 14), all apartments without exception have been equipped with balconies or loggias, plus several new layouts of two-room and three-room apartments have appeared. A second elevator was also added, which buildings II-18 lacked.
Apartments in the I-209a series of houses have from one to three rooms. Apartment layouts may include both separate and walk-through rooms. The area of one-room apartments in the I209a house series is about 35 sq.m.
Two-room apartments are presented in three variations of layouts (linear with separate rooms, linear with walk-through rooms and corner double-sided with walk-through rooms), the area of two-room apartments is from 38 to 45 sq.m.
In three-room apartments, the rooms are located one behind the other in a “trailer” style, and the windows face three sides. Kitchens in all apartments are 9 or 10 meters high.
The outer walls in I-209A are expanded clay concrete blocks 40 cm thick, the internal walls are expanded clay concrete blocks (50 and 39 cm). The thickness of the gypsum concrete non-load-bearing partitions is 8 cm. The ceilings are hollow-core panels 22 cm thick. Ventilation is carried out by natural exhaust through ventilation blocks in the bathroom and kitchen.
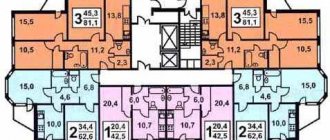
Series I-209A typical section layout
Source: https://apb1.ru/seriya-i209a.html
Installation principle of the locking mechanism
Before implementing a scheme for installing a device in a sewer, be sure to make sure that the structure you purchased is strong, the internal structure must be working, and the installation must be adjusted, if necessary, with your own hands.
Installation of an air valve on a separate outlet
Take the instructions for the device and carry out installation according to it, or follow our following tips.
- We shut off the water supply from the main water riser. For some time we forget about the existence of drainage, that is, we do not use the sewer system.
- We select the desired area and get rid of it using a special tool. The cut on the 110th pipe can be made using a grinder.
- A device is installed in this place in the pipe to protect against odor penetration. It is securely fixed into the riser.
- If the sewer structure is horizontal, follow the direction of the arrow on the locking device. It must correspond to the direction in which the drains move.
- If a certain number of mm on the valve and pipeline do not match, you can correct the situation by installing additional rubber cuffs, but it is better to observe this nuance even at the time when you buy a return aerator.
- The fan ventilation aerator is attached without compromising the integrity of the pipeline. It is a device with a cylinder-shaped lid. When draining, the shut-off membrane opens, and when the pressure in the system increases, the element closes under the influence of a spring. Look at this photo, which shows a diagram of how a sewer check valve can be mounted.
By installing a vacuum valve for sewerage on the riser, the owner of the house will forever forget about fetid odors, at least if the pipeline and aerator have reliable characteristics.
Promising options for redevelopment of the house series I 209A
- One of the rooms can be repurposed as a large dining room and combined with a kitchen. The partition is removed if there is no ventilation in the wall. The large loggia is divided into two, used from the kitchen, living room and room side. An exit is made through the window-door block;
- If you do not make a large dining room, you are left with a room with two exits. It is proposed to make a large spacious room. Internal partitions, as a rule, are not a structural element. It is not prohibited to change configurations in rooms. Openings and decorative partitions in the form of a window are made;
- In typical apartments, the bathroom area is 5.6 m2. To install a jacuzzi, a not entirely successful exit to the hall is sewn up, where there is a wet area at the entrance. The partition is removed and the bathroom and toilet are combined.
It is forbidden to move risers where the bathroom, toilet and kitchen are located. Everything else can be changed, but must first be legalized. In the future, for any real estate transactions, it is necessary to obtain other documents for the new layout. Any redevelopment without exception is subject to legal registration.
Redevelopment of a 1-room apartment
The apartments in this series have both separate and walk-through rooms. Typical projects in the series include two types of two-room apartments and several types of three-room apartments, the most successful of which is considered to be the one with one isolated room and two balconies.
DETAILS: Requirements for the composition of the project for the reconstruction and (or) redevelopment of premises in an apartment building and a residential building
The advantage of the buildings in the series is the minimum of load-bearing structures inside the apartments. This allows you to do redevelopment in many ways and, thus, increase the comfort of housing and give it individuality.
In a house of this series, in a 2-room apartment in the load-bearing wall between rooms, it is possible to move the opening from the middle of the room to the edge in order to extend the corridor and isolate the rooms. It is possible to move the opening in a house of the I-209A series starting from the 4th floor. The cut opening in the load-bearing wall is reinforced with a channel frame, according to the redevelopment project from MNIITEP.
We provide a work contract, SRO approval, a hidden work certificate, and a guarantee.
General view of the opening, reinforcement scheme and manufacturing of the opening groove
Please note that the installation and dismantling of openings in load-bearing walls requires permission from the housing commission. When making an opening, it is necessary to reinforce it with metal strips. In houses of this series, actions cannot be carried out with balconies, despite the fact that they seriously darken the distant parts of the living spaces and there is often a desire to change this situation.
The small size of kitchens in houses forces owners to expand their territories by changing the area of the corridor. A popular type of redevelopment of i209p is the combination of a bathroom and toilet into one more spacious block. Dismantling of the partition must be carried out with permission from the regulatory authorities, with all engineering calculations performed.
Another option in a three-room apartment, when one of the rooms is a walk-through room, is to destroy the partitions between two bedrooms next to each other and move the new partition towards the expansion of the room bordering the balcony. After which an additional entrance is made from the corridor. That is, in this case there are three doorways in the corridor for all rooms. This redevelopment eliminates the need for a walk-through room in the apartment.
Our specialists will draw up a standard and individual project in accordance with building codes and obtain the necessary permits to bring the design concept to life.
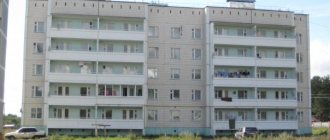
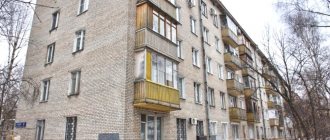
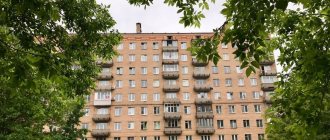
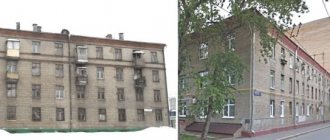
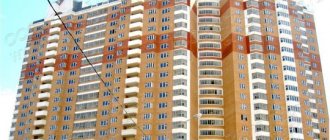
Photo of a series of houses I-209 (with staggered balconies)
Photos of houses of the I-209A series
Apartment plans before and after (two redevelopment options)
3-room apartment I-209A
1. One-sided two-room apartment I-209A with a load-bearing wall between the rooms
2. Corner two-room apartment I-209A without load-bearing internal walls
Redevelopment of one-room apartment I-209A
see also
Redevelopment of a two-room apartment in building I-209A
Redevelopment affects load-bearing structures. Coordination of redevelopment according to a standard project takes place according to a simplified procedure.
Features of apartment layouts
The apartments in this series have both separate and walk-through rooms. Typical projects in the series include two types of two-room apartments and several types of three-room apartments, the most successful of which is considered to be the one with one isolated room and two balconies.
The advantage of the buildings in the series is the minimum of load-bearing structures inside the apartments. This allows you to do redevelopment in many ways and, thus, increase the comfort of housing and give it individuality.
Design features of the series and facade finishing
Load-bearing external walls in high-rise buildings of the I-209A series are made of expanded clay concrete blocks with a thickness of 400 mm, load-bearing - 500 mm. The internal walls are built from the same material with a thickness of 390 mm, and the interior partitions are made of gypsum concrete 8 cm thick. Hollow-core panels (220 mm) serve as interfloor floors. You can recognize the houses in the series by their facades, lined with granite chips, and a row of windows at the end.
Ventilation is carried out through ventilation ducts running inside the block walls and having exits in the bathroom and kitchen. Central water heating in houses I-209A is designed according to a standard communications scheme. Hot and cold water supply is provided from the citywide network. To accommodate utility networks and communications in I-209A, a technical floor under the roof and a technical underground were designed.
In addition, problems with previous series of block houses, which had insufficiently thick outer walls, which led to their freezing and the formation of mold and mildew on their inner surface inside the apartments, were taken into account; I-209A provides additional radiators in the corners of the house.
Prohibited work when remodeling apartments of series I-209A
The renovation of apartments in houses of the I-209a series is subject to the same restrictions as for any other apartments. During redevelopment it is prohibited:
- demolish load-bearing walls;
- expand the bathrooms at the expense of the living rooms and kitchen;
- combine loggias and balconies with rooms and kitchens;
- increase the kitchen area at the expense of the living room;
- combine a kitchen with a gas stove and a room without installing a door;
- move and expand doorways in load-bearing walls without prior inspection and creation of design documentation by a company with SRO approval.