Thanks to the advantages of plastic pipelines, most owners of residential and industrial premises replace pipes in the bathroom and toilet with their own hands. You just need to know the properties of metal-plastic materials, as well as the installation features of the structure.
Most owners replace bathroom pipes with their own hands.
How to dismantle
Replacing pipes in the bathroom and toilet with your own hands takes four steps.
The first step is preliminary work.
Step two. Dismantling process.
Step three. The installation process itself.
Step four. Diagnostics of the result.
Step 1. Preliminary work.
One of the important parts of fruitful work is preparation. When you clearly understand what you want to see as a result, and have prepared all the tools for this, then the rest of the process will go quickly and “painlessly”.
First, let's decide what the final look should be for your bathroom. In some apartments, guests do not see the pipes, but that’s because they are hidden. If you want exactly this option, then the question arises: how to hide the tubes?
Masters offer several methods. They directly depend on the parameters and features of a particular room.
Places where pipes can hide:
- In the space under the kitchen sink.
- Under the bathroom.
- You can also hide the pipes in a special earthenware stand under the sink (the sewer pipes are also located there).
- In special plasterboard structures, which are later covered with plastic.
The last method is especially good. After all, it does not involve dismantling the wall or laying decorative tiles in the event of an accident or breakdown.
Dismantling the old structure
Moving the toilet to the side begins with disconnecting the device from the water supply.
- First of all, you should inspect the product. If the stem is cemented, use a drill or hammer to cut through the cement layer. Caulking work is carried out at a distance of 1 – 2 cm from the base.
- Next, you need to clean the fittings from putty, remove the toilet mountings and remove the outlet from the socket of the sewer pipe.
- Using gentle movements, loosen the body. For greater effect, you can use a chisel placed under the base as a lever.
- Carefully lift the fully released device. Now you can move the toilet and put it aside.
- Clean and dry the sewer pipe inlet. Remove construction waste.
The preparatory stage is over.
Equipment secured with sealing collars and silicone sealant can be removed easier and faster. The connecting seam is pre-wetted with a special sealant remover. The transition sealing gasket is removed with a construction knife.
A few words about mistakes when soldering PVC pipes
Soldering plastic pipes is a fairly simple process. Many novice craftsmen quickly master this technology and replace pipes in the bathroom on their own. To solder PVC pipes, you only need the pipes themselves and a special soldering iron. The pipe parts are heated and connected.
When the plastic cools, a strong and reliable structure is obtained. Despite its simplicity, beginners almost always make a number of mistakes during soldering that worsen the quality of the connection. Flaws can appear already during the operation of the pipes, so it is better to do everything correctly from the very beginning.
Here are some tips to help you complete your work without errors:
Dirt and/or water in the soldering area when heated can cause significant deformation of the material. The work must be carried out in a clean room, and immediately before soldering the pipes should be thoroughly wiped. As soon as the pipes are removed from the soldering iron, they need to be connected immediately, literally within a couple of seconds. Otherwise, the material will cool, which will weaken the strength of the connection. Allow the material to cool before removing the melts.
Careless handling of a newly welded pipe can cause significant deformation. Excessive force when connecting heated parts of pipes can lead to the formation of a large pool inside the structure, which will prevent the free movement of liquid flow. Insufficient force when connecting pipes can also lead to disastrous results. In this case, the thickness of the pipe at the soldering site will be uneven: too thick in one place, and not thick enough in another, which reduces the structure’s resistance to water hammer.
Overheating of PVC pipes during soldering is a common mistake. The heating time depends on the diameter of the structure and must be strictly adhered to
Another important point when soldering is heating time. It varies depending on the diameter of the pipe. If the material is not heated enough, it will not be possible to connect the pipes correctly. But more often there are cases when the material is overexposed on a soldering machine.
As a result, its fluidity increases, while the risk of pipe deformation during their connection increases several times. Proper soldering of PVC pipes requires precision and care. Inexperienced craftsmen should take the time to watch professionals at work, or practice a little first.
How to correctly adjust the size of PVC pipes for corner connections is described in detail in the following video:
The need to replace the pipeline
Metal products for water and sewerage are no longer popular, and maintaining a steel system is expensive. If the threads rust, then a gas cutting machine is required to dismantle the area. A rotten water supply or sewer riser can collapse at any time, leading to unpleasant consequences.
Metal-plastic eliminates many problems and makes it easier to repair the structure. In this case, a leak can only form at the pipe joints. And it is easier to eliminate it than in metal. If installed correctly, the plastic pipeline will not only last 20-30 years, but will also not spoil the elegance of the bathroom, decorated with tiles.
In addition, metal-plastic parts are flexible. If there is no need to create an acute angle, then the plastic can be bent by hand. Installation and dismantling are much faster and easier.
The pipes themselves do not need to be painted. Plastic can be connected by threading or soldering. Unlike metal, metal-plastic is sawn quickly or easily separated with special scissors.
Installation of a heated towel rail
A heated towel rail is an essential attribute of every bathroom, especially if there is no balcony. Its replacement is also a pressing issue, since over time, metal pipes become overgrown with a layer of rust, becoming less efficient. The replacement of the heated towel rail is carried out jointly with the water supply networks and is thought out in advance. The procedure for dismantling and installing the dryer is carried out according to the following rules:
- The heated towel rail is installed on heating or hot water pipes. The second option is easier to implement and does not require coordination with utility services.
- We install taps on the branches prepared in advance, which will allow you to turn off the device in case of an emergency.
- We fix the taps in the bends and immediately transfer them to the closed state.
- After the tap, we install an adapter of the required diameter, which will allow us to continue the network and connect the heated towel rail to the water supply network.
- We tighten the union nuts until they are completely secured and open the taps, starting the flow of water into the system.
To check the functionality of the heated towel rail, leave both taps open for a day. If during this time the system does not begin to leak, and water oozes from the connections, then the device is installed correctly and will work fully.
Installation of a heated towel rail
Necessary tool for plumbing work
For high-quality installation and dismantling, specialists use the following tools:
Bulgarian. Essential for fast and efficient pipe cutting.
- Electric drill. The tool is necessary for firmly fixing the structure;
- Welding machine for polypropylene pipes. The tool will be needed when installing plastic or polypropylene pipes. Without it, you will not be able to connect the ends of the products.
- Thread cutting tool. You can use an electric clamp. To cut threads correctly, you need to select a specific nozzle.
- An adjustable wrench selected according to the diameter of the pipes;
- Pipes, fastenings and additional equipment for them.
What materials and tools will be required?
The first step is to prepare the equipment and materials that will be required for the work:
- grinder with a metal disc for cutting old pipes and fasteners;
- a manual die, the diameter of which must match the size of the material (usually this figure is one inch). Instead, you can use another device designed for cutting threads on metal pipes located in the apartments above and below;
- a hammer drill (preferably an impact type), which will be needed for drilling holes for fasteners, as well as for laying pipes through walls;
- a pipe cutter or a special cutter that allows you to cut sections of the required length from pipes;
- electric soldering iron with attachments for installing the system;
- adjustable wrench;
- technical petroleum jelly, FUM tape;
- hammer;
- screwdriver;
- chisel;
- marker and tape measure, which will be needed to apply dimensions.
It is also necessary to stock up on materials, calculating their supply in advance. To accurately determine the quantity, it is better to draw up a communication plan. It is advisable to add a small reserve for unforeseen circumstances to the resulting result.
Certain expensive tools necessary for pipe installation (for example, clamps) can be rented. The costs will be recouped due to the low cost of repairs done on your own
For a standard bathroom you will need:
- pipes with a diameter of 25-32 mm; for installation of the system there are enough elements, the total length of which will be 20-30 m;
- end and corner fittings (15-20 pieces of each type);
- shut-off valves for each unit;
- wall mounting;
- two adapters from metal pipes to plastic ones.
In addition, you may need screws, tees and other elements.
Pipe layout diagram
Tee and manifold pipe layouts
Having determined the number of plumbing fixtures that will be connected to utilities, a choice is made of the location where it will be located.
It is necessary, first of all, to determine where which plumbing fixtures will be installed.
To do this, you need to mark all the places where plumbing items will be located and circle the kennels on the floor, and then remove the equipment from the bathroom. Now you need to draw a diagram of the room on a piece of paper and put on it a diagram of how the pipeline will run.
To do this, it is advisable to use principles such as:
- Undesirability of crossing pipes;
- It is recommended to lay the water supply very close to the sewer. This is necessary so that they can be easily closed with a box in the future;
- When the plumbing is installed, there should be easy access to the place where the pipes will be connected to flexible hoses. In this case, most of the system should be hidden behind a special box.
There is no need to complicate the pipe layout; it is advisable to make everything as simple as possible:
- all main communications must be laid below, directly above the floor;
- It is imperative that water outlets be made through tees, which will be directed perpendicularly upward relative to the main pipes;
- It is recommended to make sewer outlets without a vertical part, using them only as tees to which flexible hoses will be connected directly.
What are the consequences of illegal bathroom and toilet remodeling?
Unauthorized transfer or expansion of the bathroom is fraught with trouble. If the supervisory authority learns about the violation, the owner will be visited with an inspection, following which they will be obliged to either legalize the repair or return the bathroom to its original state. At the same time, they will issue a fine for unauthorized redevelopment - from 2,000 to 2,500 rubles (Part 2 of Article 7.21 of the Code of Administrative Offenses of the Russian Federation).
If the neighbors below suddenly flood, the culprit will have to compensate for the damage from his own pocket. In this case, it is necessary to prove that the flood occurred due to illegal redevelopment.
Housing with unauthorized alterations in the bathroom is difficult to sell. Buyers will start asking for a discount. And banks do not approve loans for the purchase of apartments with unauthorized changes.
Solving organizational issues
It is necessary to provide a pipe laying diagram and make the necessary measurements. You need to draw up a project on paper, it is advisable to write down all the data, and decide on a water supply layout.
To lay pipes, you need to take measurements.
It is necessary to count the number of shut-off valves, lintels, tees, and holding anchors. Then you need to decide on the material of the products, the method of their installation (threaded or soldered).
When replacing a sewer system, special attention is paid to the riser in an apartment building. Here it is necessary to warn neighbors from above not to use the toilet during this period
How to install a sewer
To install sewer pipes with your own hands, you need to take into account the following:
- comply with the standardized slopes according to GOST;
- do not allow corner joints at 90 degrees;
- there must be cleaning points to remove debris;
- when connecting to the toilet, pipes should be chosen at 100 mm, and for bathtubs and sinks at 50 mm;
- pipes for draining water in the drain socket should be installed with a gap of about 10 cm from the joint.
Before you start laying the pipes, do not forget to install a control valve, followed by a coarse water filter. After this, meters are installed that control water consumption, followed by a fine filter. In those places of the water supply system where the water pressure may exceed the permissible pressure, it is better to install reducers.
Installation of internal wiring
After installing the riser, it is necessary to change the internal wiring in the apartment. The work rules include the following recommendations:
- The wiring is carried out from the central riser to the plumbing fixtures (toilet, sink).
- It is necessary to install not only rigid, but also moving elements of the pipeline. Moving elements made of corrugated pipes relieve the internal stress of the system.
- The sockets should be positioned towards the flow of wastewater, this reduces the risk of leakage.
- The sewage system must be installed at a slope towards the drainage direction.
- A pipe with a diameter of 110 mm is used to drain water from the toilet.
- For all other plumbing fixtures, a 50mm diameter pipe must be used.
After installing the wastewater disposal system, the drain tank is connected and a test run is performed. The correct operation of the flush tank depends on the correct connection to the toilet and the tightness of the connection with the supply pipe. There are also cistern models that need to be mounted to the wall. All necessary components for installation are usually supplied with the equipment. Also, the cistern device can be hidden inside a plasterboard structure, which will add aesthetics to the restroom room.
Compliance with simple recommendations for laying a drainage network guarantees the reliable operation of all plumbing fixtures in the apartment, the absence of leaks, extraneous noise and odors. If difficulties arise when carrying out the work yourself, you can call qualified specialists.
How to choose pipes?
The defining parameter is reliability. The pipes in the bathroom must withstand maximum pressure. For centralized systems it ranges from 2 to 7 Atm. at a norm of 4 atm. In autonomous ones - up to 5 atm. It is necessary to take into account not only the thickness of the main wall, but also the reliability of the connecting elements - fittings, welded or threaded structures.
Review of pipes for arranging bathroom water supply:
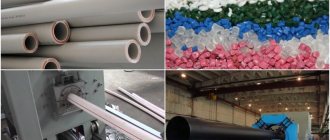
- Plastic. Manufacturing material – PVC, polypropylene (PP). To increase reliability, they have a multilayer structure - reinforced with aluminum foil or fiberglass, a barrier against air entering the water. Connected by welding, cold or hot. An example is the Rehau universal pipes of the Rautitan Flex series.
- Metal-plastic. They are similar in contraction to plastic ones; the material is PE (polyethylene), PE-X (cross-linked polyethylene) or PE-RT (for heating and hot water supply). The connection is mechanical, using steel couplings. They have better flexibility than plastic ones and the ability to quickly replace individual sections of the water supply system.
- Metal. They are rarely used, the reasons are rusting, large mass, and labor-intensive installation. The connection is welded; threaded couplings are less commonly used.
The diameter affects the water pressure, which is important for water supply systems. The smaller it is, the greater the pressure
For piping in the bathroom, pipelines with a diameter of up to 20 mm are used. If the total length of the highway exceeds 30 m, you need to increase this parameter to 32 mm. When installing water supply in a bathroom from polypropylene pipes, you need to take into account the thermal expansion of the material. For extended sections, installation of compensation loops is required.
Plastic pipes
- Long service life, up to 30 years
- No corrosion
- Quick installation
- Good thermal insulation
- Thermal expansion, expansion loops are needed
- Part is destroyed by exposure to sunlight
- A welding machine is required for connection.
Plastic pipes for water supply: sizes and diameters, characteristics of materials The use of plastic pipes for water supply has made it possible to get rid of the bulky steel networks that were previously equipped in almost all residential buildings and public buildings. Durable and comfortable in…
Metal-plastic pipes
- Impermeable to oxygen, there will be no airing
- Mechanical resistance
- No special tools are needed to install couplings
- Minimum bending radius up to 5 diameters
- Maximum water temperature up to +95°C
- Flammability
- Different bore diameters for pipes and fittings
Steel pipes
- High strength
- Working in high pressure systems
- Good tightness, no airing
- Maximum water temperature up to +95°C
- Flammability
- Different bore diameters for pipes and fittings
When connecting steel pipes with fittings made of other metals, rapid oxidation will occur at the joint.
Procurement of building materials
There is no ideal building material. In each case, a different option is selected that is most suitable for specific conditions.
When replacing pipelines in a toilet, you must purchase the pipes themselves, fittings and taps for them in advance. It wouldn’t hurt to design a camouflage box in advance and purchase finishing materials for it. Then all work will take a maximum of one day.
Selection of pipes for sewerage
It's easiest with sewer pipes. If the existing cast iron riser does not have cracks or holes, then it is not worth replacing. Otherwise, you should choose plastic tees and bends.
These pipe products are light in weight and easy to install. They are connected to each other in a socket with a rubber cuff. The most difficult thing is to cut such pipes with a hacksaw into a piece of the required length, not forgetting to treat the end from burrs.
Cast iron sewer parts should be separated carefully; this metal is very fragile - hitting it with a hammer or pressing a break with a large lever is prohibited
For installation in a toilet, polymer sewer pipes are sold from:
- PVC.
- Polypropylene.
- Polyethylene.
The cheapest option is polyvinyl chloride. But polyethylene and polypropylene are more resistant to household chemicals and temperature changes that occur when hot water is drained down the drain. However, in general, any of these materials is suitable for a toilet in an apartment or private house.
Previously, cast iron pipes were connected with cement or sulfur. In the first case, the joint will have to be slowly peeled apart with a screwdriver, and in the second, it will have to be heated with a torch.
One element should be removed from the other carefully by loosening it back and forth, otherwise the socket will crack and you will have to change a lot more pipes. To connect plastic and cast iron, an appropriately sized rubber cuff will be sufficient.
Types of pipes for hot water supply and cold water systems
Water pipes for replacement in the toilet can be taken:
- stainless steel;
- copper;
- polypropylene;
- polyethylene;
- polyvinyl chloride;
- metal-plastic.
Steel and copper pipes will have to be connected by welding (soldering), so they are rarely taken for self-installation. Stainless steel is often used by plumbers to replace old iron water pipe risers.
This option is the most reliable. When properly welded, the joints between new and old sections of such a pipe almost never leak.
When independently replacing toilet pipelines for hot water supply and hot water supply, it is recommended to choose plastic pipes; they are cheap and easy to connect in various ways
For cold water supply in an apartment, plastic pipes should be purchased with the PN10 marking. This thin-walled version is designed for a working pressure of 1 MPa and water temperature up to +200C. This is quite enough for HVS. For DHW you will need an analogue with PN20 and higher. It has thicker walls and higher operating parameters in terms of temperature and pressure.
PP pipes are joined by diffusion welding using fittings and butt joints. The connection is permanent. For installation of metal-plastic, compression or press fittings are used. This is the simplest material for self-assembly of a pipeline. Plus, if necessary, the water pipeline can be easily disassembled for replacement or insertion of new plumbing.
PVC is mounted on glue with a butt or fitting connection. PE (HDPE) is connected at home using electrofusion welding or compression couplings.
Metal-plastic pipes are good because they can be bent in the corners of the room; they are the most flexible of all plastic analogues. However, fittings for them will be expensive. Polypropylene water pipes are cheaper to connect, but due to the large thermal expansion, they often sag during hot water supply. PVC is cheap, but to supply hot water you will have to choose a different option.
Features of metal structures
Today, laying pipes in the bathroom practically does not involve cast iron and galvanized water supply and drainage systems. The reason for this is the complexity of installation of structures. However, sewer lines made of cast iron are distinguished by good noise insulation and high wear resistance compared to products made of polymers.
Galvanized steel water supply structures are completely inferior to their plastic counterparts. They are susceptible to corrosion during prolonged and intensive use. In addition, a common problem with such products is the formation of plaque inside the pipe.
Metal pipes are inferior to plastic ones, since the latter are not subject to corrosion
Metal products can only be connected using a welding machine, which is not always possible at home.
When the pipes in the bathroom are changed
This is an example of what pipes in need of replacement look like.
The process of replacing pipes is most often associated with major renovations in the bathroom and toilet. Sometimes it is necessary to dismantle old pipes and install new ones on an emergency basis due to a leak.
To avoid an emergency situation, you should take care of replacing old communications in advance. The first signs of failure of old pipes:
- multiple traces of rust on the surface of the connections and other joints;
- gradual decrease in water pressure;
- leakage of water in pipes and taps.
Before partially or completely replacing the old water supply system, it is necessary to develop in advance a plan for the work and location of pipes in the bathroom or toilet.
Sequence of work
Some may think that dismantling old communications can be done quickly and without problems. However, it is necessary to take into account that the riser passes through several apartments, which means that if it breaks, many people will suffer. Dismantling is a plumbing job of increased complexity. Some experience working with tools and equipment and compliance with safety precautions are required. Therefore, such responsible work must be entrusted to qualified specialists.
To completely eliminate possible emergency situations, it is necessary to perform the following manipulations:
- turning off the water flowing through the riser;
- disconnecting the hose that goes directly to the toilet;
- dismantling the toilet, for which you unscrew the mounting bolts;
- all unnecessary materials, equipment, household appliances and plumbing fixtures are removed from the room so that there are no unnecessary obstacles to dismantling;
- pipes located a little further from the riser are dismantled with a hammer;
- get rid of structures leading to the riser;
- A special cuff is installed on the socket of the tee, for which the old lubricants are removed in advance. If this is not done, then it is impossible to talk about high-quality installation of the new system.
Important! Careless installation of the cuff can damage the tee. In such a situation, it will be necessary to replace a certain section of the riser, which will entail additional costs.
Stages of pipe replacement work
So, replacing communications with your own hands is carried out according to the following scheme:
- preparatory stage, which includes the selection of tools, development of a network diagram, purchase of pipes and fittings;
- dismantling old communications;
- installation of new pipeline systems.
Preparation
When preparing to replace pipes, it is first necessary to develop a diagram of future communication networks and decide on the method of installing pipes.
The water supply diagram includes locations:
- connecting fittings;
- taps and other types of shut-off valves;
- connection points for plumbing fixtures and household appliances;
- pipe attachment points.
An example of a typical water supply distribution in an apartment
Using the diagram, you can easily determine the total length of the pipes, as well as the types and number of connecting fittings required to assemble the system.
Pipes in the apartment can be laid:
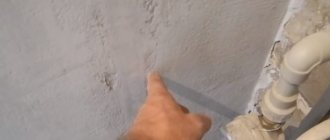
hidden method (in the walls). To carry out wiring in this situation, it will be necessary to preliminary groove the walls in accordance with the developed scheme and subsequent finishing;
Laying pipes in walls
open method, that is, by attaching to the walls from the outside. This method is less aesthetically pleasing, but it allows you to quickly identify the formation of leaks and carry out pipe repairs without unnecessary problems.
Fastening pipes to walls
The final stage of preparatory work is preparing the tools. To replace pipes you will need:
- Bulgarian;
- perforator;
- pipe cutter;
- thread cutting tool;
- equipment for welding, if installation of communications is made from plastic pipes;
- hammer and chisel for chipping walls;
- marker, tape measure, building level;
- adjustable wrench;
- materials for sealing threaded connections (linen thread, FUM tape, etc.).
Dismantling the old pipeline system
After carrying out a full range of preparation work, you can begin to dismantle the old pipes. Instructions for performing the work:
- turning off the water supply in the apartment. If you are only replacing the wiring, then it is enough to turn off the inlet taps in the apartment. If during the work it is necessary to replace the riser, then to turn off the water supply you will need to contact the management company;
- disconnecting and dismantling mixers;
- cutting pipes and removing shut-off valves;
When performing work, it is recommended to use personal protective equipment: goggles, respirator, gloves.
- installing plugs at pipe cut points;
- removal of fasteners.
Trimming old communications
At the next stage, if necessary, the walls are chipped.
Preparing for hidden pipe routing
Installation of new pipes
Installation of a new pipeline system is carried out in the following way:
- assembly of the pipeline system in accordance with the developed diagram. At this stage, meters, taps and other fittings are installed;
Installation of meters in the water supply system
- connecting the pipeline to the inlet line. Can be equipped by installing an additional tap or by welding (soldering);
- fixing pipes to the wall;
- connecting faucets, toilets, household appliances.
The entire process of replacing pipes is presented in detail in the video.
After completing all of the above work, the tightness of the system is checked by supplying water with maximum pressure. If no leaks are detected within 15 minutes of checking, then the pipes can be sealed and the system put into operation.
Procedure for dismantling communications
To perform dismantling, a precise algorithm of actions is required. Only by following consistency can the work be completed efficiently.
Water supply shutdown
First you need to turn off the water in the room. If the riser needs to be replaced, then that too.
Cutting and removing pipes
You need to disconnect all network devices - taps, cistern, bathtub, toilet, heating boiler. It will be necessary to disassemble the old communications into separate parts.
To dismantle, you need to disassemble the old communications.
Sewer pipes of large diameters are sealed in adjustable cups. You won’t be able to remove them with a simple tool; you’ll have to cut them with a grinder.
However, more often such parts are already rotten from the inside. Therefore, just hit them with a hammer and the pipe will break off.
Replacing shut-off valves and drain system
Replacing the pipeline involves shutting off the water supply. If you turn off the entire riser, then there will be no water in all apartments of the entrance connected to it.
The shut-off valve that shuts off the water in the room should be changed immediately after dismantling the old system. To do this, you must first close the riser. After installing the valve in the room, you need to turn it off and supply water.
Removing dowels and laying grooves
Before installation, you need to remove the dowels from the wall, which served as holders for the old components. If the gasket is of a closed type, then it will be necessary to lay grooves. Moreover, it does not matter what type of water supply scheme is parallel or sequential. It is necessary to provide access to the shut-off valve so that the water can be turned off.
Before installation, you will have to lay grooves.
How to dismantle a cast iron pipe
If a pipe is “welded” to a wall or floor using sulfur or aluminum, it will be very, very difficult to destroy such a coating.
To get started, you must first turn off the water supply to the apartment. Then you need to free the bathroom from unnecessary items that you can damage during work. This includes the sink, washing machine, laundry basket, etc.
Next, you need to disconnect the flush tank from the water supply and dismantle the toilet itself. Problems may also arise here, since Soviet toilets were screwed to the floor conscientiously, in other words, tightly.
Try to unscrew the bolts that attach the toilet to the floor and remove it from its place. If you succeed, consider yourself half done.
Now comes the turn of the pipes themselves. Cast iron, as you know, is not particularly strong, so at some distance from the riser you can simply break the old pipe with a hammer. It is much more difficult to remove the remains of pipes from the old riser and clean them before installing new ones.
To dismantle pipes, you may need:
- A hammer with a rubber or plastic tip.
- Chisel
- Torch or blowtorch
- Mask
Quite a strange combination, isn't it? However, a gas mask is necessary to comply with safety precautions if the joints of sewer pipes in your bathroom are filled with sulfur.
The easiest way to remove sulfur is by heating it. However, when heated, the sulfur mass releases toxic substances into the air, which are extremely harmful for humans to inhale. That is why it is better to protect yourself with a gas mask in advance.
So, dismantling must begin at the point of greatest distance from the riser. Here, most craftsmen do not bother with the torch, but simply break the pipe with a hammer. This is much simpler, but can cause some complications.
Make sure that when broken, pieces of pipe do not fall into the sewer passage. They can cause serious clogs in the drain, which will be much more difficult to get rid of than getting rid of old pipes.
With a hammer, you can destroy the pipe up to the crosspiece inserted into the riser. Here it is somewhat different and filled with much more sulfur.
To free the pipe and cross from the layer of sulfur, you need to heat it. The impact of a burner or blowtorch can last for several hours, while harmful substances will be constantly released.
Before you start heating, isolate animals and household members, cover furniture or other furnishings located in the immediate vicinity of the riser, and put on a gas mask.
During the heating process, you can easily chip off pieces of sulfur until the pipe is sufficiently clean. Now, the cross inserted into the riser must be loosened if possible and removed from the riser.
The dismantling of the old pipeline is carried out as much as possible. That is, all possible pipes are removed, and others are installed in their place.
Connecting a new PVC pipe to an old cast iron riser will require certain operating skills. Please note that you must clean the connection area as much as possible from the same sulfur and rust.
To make the job easier, use a special coupling that is specifically designed to connect cast iron pipe and PVC pipe.
If you still have questions, take a look at ours and ask them there. Our experts will help you understand the intricacies of good construction and renovation.
From time to time, the pipeline wears out under the influence of mechanical load and the sewer pipes in the apartment need to be replaced. Most often, this problem is faced by residents of old houses, where over the years cast iron pipes rust, cracks appear and leaks occur.
To change drain lines, you must first properly dismantle the old pipes. Successful completion of the task requires the availability of the appropriate plumbing tools and necessary components.
General rules
Any change in the position of utility networks in the apartment is a redevelopment. If a sewerage system is being transferred, all actions must be roughly divided into 2 stages:
- approval of redevelopment, obtaining permission to carry out work;
- execution of the technical part.
The relocation of sewerage in the apartment must be approved by the BTI and other authorities. Without going into details, we note the complexity of this procedure. First, you need to do a survey of the premises and consult with specialists. It is necessary to find out to what extent the proposed changes are possible and acceptable.
Secondly, you will need a detailed plan for the upcoming changes. It needs to be approved, then the work will have to be coordinated with the architecture department, etc. Officials or responsible persons are reluctant to accommodate apartment owners who want to make drastic changes. There are clearly defined rules:
- moving the sewer riser in the apartment is prohibited. Several restrictions apply simultaneously here regarding property rights (the riser belongs to common property of the house) and technical ones (changing the configuration of utility networks is prohibited). In addition, the placement of wet rooms above the living rooms of neighbors below is prohibited by housing legislation;
- It is prohibited to destroy or reduce the size of load-bearing walls. Similar actions are often carried out when combining two apartments or joining a kitchen to a room;
- if the kitchen is moved into the living room, the sewer may leak and flood the neighbors below. Regardless of whether the flood occurred in a residential or auxiliary premises, claims will arise against the culprit.
Given these difficulties, officials try not to take risks and do not give permission to carry out the work. The consequences of improperly performed sewerage relocation may affect the person who gave permission for this step. Moreover, the rules talk about changes in the general sewerage system of the house, and these include any work.
Therefore, before installing a sewer system in an apartment to another room, you should critically consider your plan and weigh its weaknesses. If there are too many of them, it is better to look for other, less problematic options. This will help save time, money, and eliminate unpleasant conversations with neighbors.
Also read: Shambo sewerage: what it is, how to do it, features
Installation of a pipeline when replacing pipes in an apartment with your own hands
Having chosen a DIY method for replacing plastic pipes, you will need a small set of tools for the job. The main device is a special soldering iron with nozzles of different sizes to suit the diameter of the pipes used. You will also need PVC scissors and materials for work. Step-by-step instructions for replacing the pipeline with polypropylene look like this:
- According to a pre-drawn diagram, take measurements using a tape measure and cut the PVC pipes in accordance with them.
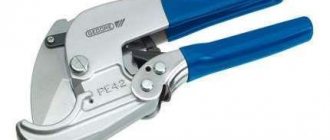
- To cut polypropylene, special scissors with a ratchet are used. They are very simple and convenient to work with. If the scissors are branded, the cut is even and smooth.
- After cutting a piece of pipe to size, clean the end of it from dirt.
- Screw a suitable nozzle to the soldering iron and put a fitting on one part of it (angle, tee, tap, coupling), and insert a pipe into the second part.
- Warm-up time depends on the diameter of the pipe. You also need to set the appropriate temperature on the soldering iron (approximate numbers are indicated in the instructions for the device).
- Pull the pipe and fitting out of the soldering iron at the same time, and then connect them together in one smooth, precise motion. Insert the pipe into the fitting and hold still for 10-15 seconds to allow the melted plastic to harden.
- In the same way, solder all other corners, tees, contours, taps and other fittings or shut-off valves.
When the work is completed, open the inlet valve and fill the system with water. Check carefully to make sure there are no leaks anywhere. If any are found, immediately eliminate them by resoldering the problem area.
If the process causes difficulties, or you simply don’t want to tinker with it yourself, in San Remo you can order professional pipe replacement. Our craftsmen arrive on time, complete the work promptly, and we provide a multi-year guarantee!
Installation of a new pipeline
The choice of the type of pipeline installation is made exclusively by the homeowner himself.
Selection of pipe laying system
Each type of wiring has different features, advantages and disadvantages, but does not in any way determine the type of room. You can choose any layout scheme.
Necessary tools and consumables
When solving the problem of how to replace pipes with your own hands, prepare the following tool:
- hacksaw for metal;
- special scissors for metal-plastic products;
- open-end wrenches, gas, adjustable;
- a hammer drill or drill for drilling holes for anchor holders;
- sealant - tow, fum tape, plumbing flax, sealant (paste or glue);
- silicone gaskets;
- special soldering iron for soldering pipes;
- marker;
- tape measure for measurements.
To replace pipes, you need a hacksaw.
There are 3 types of consumables: straight, angled and tees. They may have the same or different type of thread - external or internal. The first one is needed for installing valves. The second is for connecting parts together.
Pipe installation instructions
To install the pipeline correctly, you need to follow simple rules and carry out the work consistently. It is easy to connect pipes, but it is difficult to ensure that there are no leaks at the joints.
It is recommended to perform installation according to the following algorithm:
- Markers are placed on the walls, which are the approximate locations for placing faucets and other water sources.
- Pieces of products are measured with a tape measure. Then the material is cut with scissors or sawed with a hacksaw.
- Depending on the type of wiring, soldering or connection with fittings is carried out.
- There is a connection to the consumer system - cistern, toilet, bathtub, sink, etc.
- The reliability of connections and sealing of the structure is checked by supplying water to it.
- The pipeline is attached to the walls using anchor holders.
- An additional check is carried out, because During installation, parts are subjected to physical stress.
Pipeline pressure testing
Air pressure testing means supplying it to a closed water supply system. It is carried out with the aim of applying pressure several times higher than natural during operation. If the system passes this test, then it is considered suitable for further use. The procedure allows you to identify areas that may soon develop leaks and eliminate holes or cracks.
Pressure testing of the pipeline is carried out in order to supply high pressure.
To do this, use a special pump or a circulation pump, which is part of the autonomous heating system. Pressure testing is carried out with both air and water. More often - the first, since liquid can get outside the system.
The procedure must be performed by a certified employee. Completion of pressure testing by a specialist is accompanied by the preparation and signing of a water supply testing report.
Crimping is necessary in the following cases:
- at enterprises where a complex water supply system is installed;
- before first commissioning;
- after repairing the system or replacing its part;
- after idle time without use.
Also, crimping is part of a routine inspection of some pipelines and sewers consisting of polymer parts. It is also carried out after flushing the system if aggressive chemicals were used. They can weaken the walls of plastic products and cause leaks at the joints.
Cleaning with chemicals also poses the risk of leaks. Therefore, pressure testing should be carried out as planned for sewage drains.
System health check
Functional testing without pressure testing is carried out from the riser to the end of the system. In this case, you should pay attention to checking:
- Joints on pipelines and sewers.
- Tightness when supplying hot water.
- Correct and reliable installation of plumbing fixtures - sinks, toilets, hoses, metering devices.
- Pressure in the system - whether it became clogged during installation.
The system's functionality is checked from the riser to the end of the system.
At first, it is recommended to keep the taps closed to determine the tightness at the joints, and then open them one by one.
It is worth making sure that the sewerage and pipeline are designed in accordance with the project. Each element of the system must be in the place indicated in the plan.
Installed devices must be cleaned of debris. There should be no deflections or subsidence in the places where metering equipment is installed or in the spans between joints.
It is better to use pressure testing with water, since the high pressure liquid will wash away the remaining construction debris in the system. This is especially true for high vertical areas. If you find a leak or weak seal, fix the problem and recheck.
Features of entering communications into the apartment
Having decided on the type of pipe layout in the toilet and bathroom, we finish drawing up the project
For the system to work flawlessly, it is important that the entry of communications into the apartment is done correctly. Let's figure out how to do it right
First of all, there should be a shut-off valve at the inlet, which will make it possible to shut off the water supply if necessary. If the shut-off valves are already in place, it is necessary to check their quality.
In new buildings, good quality components are usually installed; in old houses, outdated devices may be installed. It is advisable to install a good quality ball valve at the inlet.
Important point. If you need to close/open the device, this must be done smoothly. A sharp turn of the handle can provoke a water hammer, which can damage plumbing equipment.
Mandatory elements at the entrance of the water supply system to the apartment are shut-off ball valves, coarse filters and meters. Pressure control equipment, fine filters and other devices can be installed upon request
Immediately after the ball valve, it is recommended to install a special leakage protection system equipped with a controlled shut-off valve. After this, a self-cleaning main filter is installed. It will remove coarse impurities from the water, which significantly extends the service life of the devices.
Water meters should be installed behind it, if needed.
Next you can install the water flow regulator. This is not a mandatory element - it is only needed where there are problems with water pressure. Next, serial or collector wiring of open or hidden installation type is performed.
Transferring the riser
The most technically difficult option is to move the toilet over a long distance, exceeding 1.5 meters. There are two ways to solve the problem:
- sewerage refurbishment,
- installation of a pumping unit.
Displacement of the riser to the required distance
Such actions require mandatory legal approval. The technical part of the task is classified as complex - it is recommended to hire a plumber.
Connecting pumping equipment (sololift)
Installing the device allows you to solve all the problems associated with restrictions on SNiP standards. It becomes possible to avoid additional construction and installation work. When choosing a model, focus on samples designed for high temperatures. The higher the permissible temperature values, the longer the service life of the pump.
The compact mechanism is mounted inside the drain tank, less often - on the rear wall of the tank. Detailed installation instructions are given in the manufacturer's instructions.
How to install a pipeline to a heated towel rail
The supply structures can be extended to the dryer from the heating riser or the hot water main, but do not forget that if you have central heating, the radiator will only work during the heating season. In addition, if you insert taps into the heating system, you will need to shut off the water at the riser, and this should be previously agreed upon with the utility company in your home.
It is best to connect from a hot pipeline, and for convenience and in order to save hot water, it is better to install a bypass jumper between the dryer and the main line, connecting the forward and return pipes. Ball valves before and after the coil will be able to cut off the dryer if it is necessary to change it or to preserve warm air in the room.
Polypropylene pipes
Replacing pipes in the bathroom is a rather long and labor-intensive process, especially if it is done independently, without the help of professionals. After all, at any stage of work various problems can arise. For example, accumulated sediment on the walls of cast iron and copper products can cause poor drainage. To prevent this from happening to plumbing products in the future, it is necessary to promptly replace old pipes with new ones made of polypropylene.
Changing pipes in the bathroom
Advantages of polypropylene pipes:
- have high flexibility;
- easy to replace (soldering);
- when using pipes for cold water, the warranty period is 50 years, and for hot water – 30 years;
- not subject to rotting, oxidation, rusting;
- are light in weight;
- environmentally friendly.
Quality of work and cost of execution
Let's consider a comprehensive bathroom renovation (for which we have discounts), and in particular only plumbing work for such a renovation, then their total cost is 30-40 thousand rubles. And if you only install pipes, then prices rise to 40-50 tr. Therefore, it is always more profitable to do a bathroom renovation with one company, it will always be more profitable, there are two main reasons: the renovation is cheaper and one contractor is responsible for all the work.
When installing plumbing, we use only high-quality and expensive materials, this guarantees the durability of the entire system.
Heated towel rail in the bathroom after replacing pipes
Pipe laying includes the following work: disconnecting risers for installing inlet valves, gating walls, installing a manifold and valves, plugs, fittings and other fittings. All work on laying polypropylene pipes involves the use of a special soldering iron.
Plumbing work, collector assembly, installation of meters, pipe laying
After collecting the entire water supply and sewerage system, a check is made to identify defects and leaks. If no problems are identified, then the tiler gets to work, preparing the walls: plastering, erecting boxes and installing inspection hatches on the risers.
Calculation of sewer pipeline
Selection of sewer pipe material
Of all the possible types of sewer pipes for DIY repairs, choose pipes made of polymers.
Advantages of plastic pipes:
- Corrosion resistance.
- Chemical resistance.
- Easy to assemble.
- Light weight.
- Smooth wall surface (inner).
- Resistant to low and high temperatures.
- Easy to repair.
- Durability.
Compared to metal pipes, plastic products are more fragile, so care must be taken when handling and storing them. This disadvantage is compensated by its light weight and ease of installation.
Selecting the diameter of the sewer pipe
Minimum permissible diameters:
- Bidet, washbasin, sink – 40 mm.
- Shower cubicle, bath – 50 mm.
- In the case of including several plumbing fixtures in one pipe - 85 mm.
- The riser (main) of a house or apartment is 100 mm.
The versatility of the system can be achieved by using a 50 mm diameter pipe to connect all plumbing fixtures, except the toilet, and make the main riser from a 110 mm diameter pipe; connect the toilet to the same 110 mm sewer pipe.
Calculation of the number of system elements
To calculate the pipeline and install sewer pipes, it is necessary to draw up a diagram of the future system. Simply take a sheet of paper and place on it all the plumbing fixtures that need to be connected.
Approximate diagram of an intra-house pipeline
It must be taken into account that it is not recommended to use bends with an angle of 90°. In this case, it is better to use two 45° bends, which significantly reduces the likelihood of blockage in the pipe.
A large assortment of fittings - angles, crosses, tees, couplings - will allow you to select the necessary element of the desired configuration and the required diameter. If you plan to install another plumbing fixture in the future, then determine the installation location and add it to the diagram. When installing the system, this outlet will be closed with a plug until it is needed.
Having selected all the necessary pipes and fittings according to the diagram of the future pipeline, you can proceed to the next stage of repair.
Which water pipes are better?
It is impossible to say unequivocally which pipes are best for wiring - there is no ideal material, there are more or less suitable ones for given conditions. Let's look at the most popular options, their advantages and disadvantages:
Polypropylene pipes
The option is good for everyone, except for the large thermal expansion - up to 5 cm per 1 meter, which is a lot. If the route is long, it is necessary to install a compensator or use reinforced pipes. Their thermal expansion is several times less, but their prices are higher. For hot water, you definitely need to use reinforced pipes, but whether you use fiberglass or foil is up to you. The routing of cold water pipes can be done with a regular PPR pipe for cold water - here thermal expansion is not so critical.
Polypropylene pipes for water supply distribution are an excellent choice
Another point that is relevant if you are doing the work yourself, or if you are planning to install hidden communications, is the quality of the connections. In principle, there is nothing complicated in soldering polypropylene, but without experience you can “mess up”, as a result, after a while the connection may leak. If you have no experience in welding polypropylene, it is very undesirable to hide joints under finishing. In this case, it is better to choose an open installation method.
The installation of polypropylene pipes in the bathroom and toilet has many positive aspects:
- a correctly made connection turns out monolithic;
- there is no narrowing of pipeline diameters at soldering points;
- high maintainability;
- long service life;
- ease of installation.
In general, it’s not for nothing that this material has been so popular lately.
PVC for water supply
When laying PVC pipes, an adhesive connection is used. There is a special glue that dissolves the top layer of polymer. Both parts to be glued are lubricated with it, pressed against each other and held for some time. As a result, the connection is almost monolithic, strong and reliable.
PVC pipes can bend
There are two types of connections: butt, when two pieces of pipe are joined, and using fittings. It is easier to work with fittings, but the joints are narrowed. With a butt connection there are no narrowings, but it is much more difficult to do it qualitatively.
In principle, all the pros and cons are the same, with the addition of a few disadvantages - it is only suitable for transporting cold media - no more than +40°C, that is, you will have to use other pipes for hot water supply. Scratches and chips reduce the strength of the pipe, therefore a threaded connection is excluded.
Metal-plastic
The water supply system made from metal-plastic pipes is also suitable for hot water supply - it can withstand temperatures up to +105°C. A positive difference from all of the above is its high plasticity - these pipes can be bent with a fairly small radius. This simplifies and reduces the cost of installation (fittings are expensive).
Metal-plastic is not the best choice
The disadvantage of using metal-plastic pipes for water supply is the strong narrowing at the joints - in the fittings. This leads to a significant decrease in pressure in the system. This is precisely what limits their use.
Dismantling Guide
Due to the fact that the sulfur used to connect sections of communications tends to harden, demolition will be difficult. So how can you understand what composition was used for fastening? To find out, you need to bring a blowtorch to the connection. An unpleasant odor and melting indicate the presence of sulfur.
Dismantling joints with a torch or blowtorch
To destroy a pipeline where there is a connection using sulfur, you will need a hammer, chisel, blowtorch or torch. Sulfur is a chemical element, so when heated it will begin to release harmful substances into the air. They are poisonous to humans and harm everything around them. Moreover, the heating process can last several hours. Therefore, you will need a gas mask and other protective equipment to prevent the fire of nearby equipment or furniture. You can use a protective screen made of a metal base or asbestos.
Detailed instructions on dismantling communications
Dismantling the system begins with the elimination of pipes located at a distance from the riser. For operational work, use a hammer and chisel. After all, cast iron itself is a rather fragile material, and accordingly, it is easily susceptible to mechanical destruction.
Important! To disassemble pipes, it is not recommended to use a hammer with a metal attachment. If you do not calculate the force of the impact, the hammer will fall inside the pipe, which can cause a large-scale blockage of the sewer system or the lumen of the pipeline will close.
A hammer with a polymer attachment is suitable for the job.
The pipe removal process includes several stages:
1. Work with a hammer is carried out until the cross in the riser becomes visible.
2. It is necessary to loosen the crosspiece. This procedure is easier to do when there is a small section of pipe remaining. However, some wizards do not leave extra in order to fully open the connection.
3
Wear all protective equipment and take precautions using protective screens. If two professionals are involved in dismantling, the work will take less effort and time
One specialist heats the sulfur, the second, at the same time, loosens the pipe, breaks off and removes the viscous sulfur.
4. The crosspiece can be easily removed from the riser when most of the sulfur has been removed.
Important! Care should be taken when removing pipe attached to a tee. Part of the pipe is cut off with a grinder. In this case, a fragment no longer than 10 cm should remain.
Then this segment must be loosened and removed.
In this case, a fragment no longer than 10 cm should remain. Then this segment must be loosened and removed.