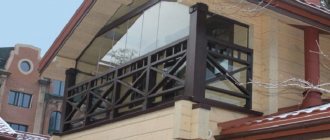
Currently, they are trying to make country houses reliable and solid, because people often live in them not only in summer, but also in winter. This involves using reliable and high-quality materials with a good service life for roof finishing. Ceramic tiles are one of the common solutions in this case, as the tiled roof is reliable and durable. Replacing a roof on an old house involves inspecting the roofing surface to identify damaged elements. If any are found, they are changed.
Ceramic tiles are characterized by a good level of strength. The service life of this material is almost on par with a copper roof. Damage to individual tiles can be caused, but this is not so easy. To split a tile in two, a very strong blow with a heavy object is required. In practice, this happens when a tree falls on the roof: it is clear that this does not happen every day. Sometimes, in a strong wind, individual tiles can be torn out of place: replacing the roofing in this case comes down to installing new elements in their place. This involves dismantling a small area, inspecting the sheathing and rafter structure below.
Complete replacement of the old roof with a new one is carried out only if there is significant damage to the roofing system. After restoration work, the removed tiles can be laid back if they have retained their integrity. This concludes replacing the roof on an old house with your own hands. If you decide to completely cover the roof, you need to choose what to cover the roof of your dacha inexpensively in order to save money.
Roof replacement: common options
Every homeowner dreams of seeing their home warm, dry and comfortable. In many ways, it depends on the condition of the roof. If there is something wrong with the roof, then problems will begin to make themselves felt one after another. So, one way or another, issues related to its current, or even major, repairs cannot be avoided.
Many people wonder what is better, permanent roof repairs or roof replacement. From a budget point of view, it is undoubtedly preferable to patch it thoroughly. However, as practice shows, frequent minor repairs do not particularly contribute to improving the condition of the structure: it continues to wear out, and the cracks only multiply. A more rational option would be complete dismantling.
Ideal place
The house and plot ideally suited the architect's needs: on a hill, overlooking a pine forest, no boundaries, no neighbors, practically a farm. Pleasant bonuses - a fully stocked pond with running water, a mature garden. Tatyana says that even if the house was dilapidated, she would buy it just for the location. But it was in excellent condition - the foundation was without cracks, the frame was strong. That’s why they asked for a high price for it – 11 thousand dollars.
“The interesting thing is that I marked it on my map before and even came here,” says Tatyana. “However, everything looked very well maintained, I thought it was not for sale.”
Before the reconstruction began, it was a simple village house with a gas stove in a cold outbuilding, a stove and two grubs. Inside, the space was divided into two rooms - a kitchen and a bedroom. A solid, but not modern house, with amenities in the yard.
“The purpose of the planned reconstruction is to get a place for me first of all,” says Tatyana. - So that I can spend my free time there - regularly 2-3 days a week. I had been under a lot of work pressure for many years, so I wanted to stop. The village gave this opportunity: you sit in the garden and feel the minutes, yourself, enjoy life, the moment.
While making the reconstruction project, Tatyana imagined what her house should turn out to be.
— I wanted maximum connection with nature, so the project included a large glazing area. For example, the gables are glass - I woke up, and outside the window there was a garden, a pond and a forest, and you can admire it without getting out of bed. And also a panoramic window with access to the terrace in the dining room - in the morning you sit at the table, drink coffee, and outside your window it is raining, or there is snow, or the garden is blooming. The bathroom also has a window - you can take a bath and listen to the birds. And also that there must be a fireplace, and the wood in it would crackle. When I showed the initial sketch of the reconstruction project to my son, he said “this is a dream house!”
When do you need a new roof ↑
A fairly convincing argument for replacing the roof of a garage or residential building will be a wet spot that spreads across the ceiling during heavy rain, not to mention water dripping from its surface.
An annual preventive inspection of the roof and truss structure will reveal the extent of the repair work and, if necessary, develop a strategy for replacing the roof yourself:
- remove the coating completely or use it as a substrate under a steel sheet. test the condition of the supporting structure, including the sheathing; check the correspondence of the diagonal measurements, otherwise due to violations in the rafter system you will get different overhangs.
Repair work involves three possible options:
1 If we are talking only about cracks in the roofing covering, and the damage did not affect the rafter system, then it will be enough to change the covering to a new one, for example, replace a soft roof with corrugated sheeting.
2 If rot or fungus is found on the sheathing under the roof covering, then the frame will also need to be repaired.
3 And finally, in case of serious damage to the rafter system, thermal insulation, or holes in the flooring, we are dealing with the most difficult option. A complete reconstruction is necessary here, since, unlike the previous case, the damage to the thermal insulation layer is sufficient to justify replacing the roof insulation. A significant scale of work leads to an increase in cost. The price for 1m2 will be formed from the total amount of all expenses for dismantling, purchasing and installing new material.
Content
- Types of roofs
- Roof structure - terms
- How to calculate a roof with your own hands?
- Step-by-step instructions How to properly attach the Mauerlat?
- Installation of the rafter system Attaching the rafters to the mauerlat
- Fastening the rafters in the ridge
- How to strengthen the system?
- Comparison of roofing materials
Types of roofs
The construction of a roof begins with the selection of a design design, that is, with the determination of its future shape. In modern private construction, the most common types are:
- Shed roofs . The design option with one slope is the least labor-intensive, quickly erected and allows significant savings on materials. The main disadvantages are the impossibility of arranging a full-fledged attic and attic, due to the low roof space, as well as use in snowy areas at small angles of inclination.
- Gable roofs (gable roofs) . The design with two slopes and two gables is the most common in private construction, as it provides a balance between labor intensity, cost and practicality. Allows you to create a full-fledged attic space and effectively cope with significant precipitation in winter.
- Hip roofs . The most reliable structures in terms of resistance to atmospheric phenomena: wind and snow loads. They are distinguished by significant weight - they require a strong foundation and strong load-bearing walls, as well as a well-thought-out rafter system. Also, due to the large area of the roof covering and significant heat transfer, additional insulation is required. Hip roofs . The structures consist of four slopes, in which the side slopes are shaped like an isosceles trapezoid, and the end slopes are shaped like a triangle. They have minimal resistance to wind loads and an attractive appearance, but are difficult to calculate and install.
- Half-hip roofs (Dutch) . The frame structure is similar to the previous one, with the exception of the triangular slopes, which have a truncated appearance, as a result of which small pediments appear. The main advantage is the possibility of arranging a full-fledged living space. However, such a roof requires the creation of a complex rafter system due to the large number of angles.
- Hip roofs (pyramidal) . Systems of four identical slopes in the form of isosceles triangles converging at one point. The design has the best aerodynamic properties and resistance to heavy precipitation, thanks to the uniform drainage of water. The main disadvantage is the complexity of designing and constructing the frame.
- Multi-pitched roofs (multi-gable) . They are combined pitched roofs for buildings in the shape of the letters “P”, “G”, “T”. The most difficult to design, manufacture and assemble. They are used extremely rarely in private construction.
If you cannot determine what shape of roof to build with your own hands, all other things being equal, compare the appearance of the structures and see which option is the most attractive.
Roof structure - terms
Also, immediately before starting to build a roof with your own hands, you need to familiarize yourself with the basic elements and terminology, which will make it easier to understand the process and allow you to find a common language with the builders.
- roof - the upper part of the assembled building structure;
- roof – the upper element of the roof (covering);
- Mauerlat - support beam laid along the perimeter of the walls of the building;
- bench - support beam laid on the internal load-bearing walls of the building;
- rafters (rafter legs) - structural elements of the roof that support the roof covering;
- purlins - horizontal longitudinal beams supporting the rafters from the inside;
- ties - horizontal transverse beams connecting the legs of one pair of rafters;
- crossbar - a tie installed directly in front of the ridge of the structure;
- ridge - a horizontal rib located at the junction of the slopes at the very top of the roof;
- racks - vertical beams placed on a bench or other support, designed to support the purlin;
- struts (rafter legs) - inclined beams connecting the rafters to the supporting elements and located at an angle of 45°;
- counter-lattice - rows of boards laid along the rafters on top of the waterproofing material;
- sheathing - rows of boards laid on rafters/counter-lattice at an angle of 90°;
- cornice - the hanging part of the roof, which covers the upper part of the external walls from the negative effects of atmospheric manifestations;
- fillies - boards with which you can lengthen the rafter leg;
- valley - an internal angle formed at the junction of two slopes in multi-gable roofs;
- hip - a triangular roof slope at the ends / covered pediment with a slope;
- pediment - the upper part of the facade of a building, which is limited by two slopes.
How to calculate a roof with your own hands?
After the design design has been developed, it is necessary to calculate the amount of materials for its manufacture. This is necessary in order to know in advance the volume of lumber and order the appropriate batch from the manufacturer.
The online roof calculation calculator from KALK.PRO allows you to perform the most accurate calculation of materials, as well as receive a set of drawings and a 3D model of the structure.
It is also recommended to perform a roof calculation for permissible loads in order to select the cross-section of the load-bearing elements. For example, one of the most important parts is the rafter leg - for it, the height and width of the beam is selected based on parameters such as:
- roofing materials;
- snow load;
- laying step;
- span.
However, most often, such detailed calculations are neglected and the choice of rafter sections is made on the basis of general recommendations, but with a slight margin, since the tables do not take into account the specifics of a particular situation.
Dismantling ↑
The old covering from the old slate is removed using a crowbar and a hammer. If the sheets are intended to be used a second time, then the work should be done as carefully as possible and always by two people. If not, then simply punch holes where the slate is attached to the sheathing and throw it to the ground.
Coverings made of corrugated sheets, metal tiles or other modern materials can be reused in small areas, so they are dismantled as carefully as possible.
Common mistakes
The correct thermal pie for roof insulation is installed in compliance with many nuances.
Non-professionals often make the same mistakes that affect the quality of attic insulation:
- lack of ventilation gap from the ceiling to the membrane. As a result, the insulation freezes and stops working;
- severe sagging of the membrane - this reduces the gap required for ventilation and leads to the formation of condensation;
- attempts to save on insulating materials, laying them without the necessary joints, as a result of which gaps are formed and heat comes out, warming the roof, not the room;
- compacting the material to such an extent that it warps and wrinkles, losing its properties;
- unlined cornices - this leads to the fact that precipitation has free access to the insulation and saturates it with moisture;
- lack of ventilation;
- absence of adhesive tape or tape at the joints of sheet material.
Technology for replacing roofing with metal tiles and price ↑
When replacing a slate roof with metal tiles, it is usually necessary to rebuild the frame. Of course, theoretically, after dismantling the slate, the rafters underneath may be undamaged, but even in this case, some reconstruction will be required. It should be taken into account that slate is placed on one row of sheathing, and metal tiles on two. The second sheathing is necessary to provide ventilation. Only in this case, water will not collect at the bottom of the metal tile sheets.
- The work begins with a visual inspection of the rafter system. Having discovered rot on the wood or areas eaten by bark beetles, the rafters are either cleaned and treated with antiseptics or completely replaced. Lay out the hydrobarrier and attach it to the rafters using a construction stapler. They fill the sheathing by installing bars (most often with a section of 25 by 120) perpendicular to the ridge. It will finally secure the waterproofing layer. Install the counter-lattice, starting from the edge, from bars of the same section. A cord is pulled diagonally, with the help of which the accuracy of the level is checked during the work. Sheets of metal tiles are laid from right to left in accordance with the locking system. The lower edge of the sheets is placed below the rafters by approximately 70–100 mm. All protruding places are cut off with a grinder.
An example of calculating the cost of replacing a roof with metal tiles
| Types of jobs | Price | |
| 1. | Dismantling the old coating | 50 |
| 2. | Installation of a hydraulic barrier | 50 |
| 3. | Installation of counter-lattice | 50 |
| 4. | Leveling the slope plane (if necessary) | 50 |
| 5. | Installation of sheathing | 80 |
| 6. | Laying metal tiles | 200 |
| Total: 480 rub./m2 |
Technology for arranging the attic floor, main stages
Any construction process consists of several stages and flooring is no exception. To obtain a quality foundation, it is necessary to think through the process in advance and draw up a project containing a drawing and calculations for the purchase of building materials.
The process can be further divided into the following stages.
Laying floor beams
In most cases, beams are laid in specially prepared wall grooves. This option is used at the stage of building a house. In this case, installation in this order:
- The wood is treated with special antiseptic agents that reduce the risk of frame rotting and protect the wood from damage by bark beetles and mold.
- After complete drying, trim the crossbars at an angle of 60 degrees. The edges are painted with bitumen mastic and wrapped with two layers of roofing material for waterproofing purposes.
- Installation should begin with laying the outer two crossbars. The distance from the wall should be no more than 5 cm.
Important! The logs are inserted into the grooves on average 10 cm, leaving a gap of no more than 3 cm.
- To control the horizontality of the crossbars, an even block is laid on top of the beams, on which a level is placed on top.
- To level the beams according to the bubble level, special blades are used, which are placed in the grooves under the beam. They must be treated with bitumen paint.
- To eliminate the creaking of the crossbars and eliminate the passage of air, the gap is filled with tow or insulating wool.
- Having leveled the horizontal level of the base using a control bar and a level, the remaining beams are laid relative to it. The technology for laying in the grooves is the same as for the outer two.
- Every 5th crossbar must be attached to the wall using anchors.
Technology for laying beams
If the house is already ready, the floor beams can be secured in another way.
- First of all, the logs are treated with antiseptic substances.
- Markings are made on the walls for the location of the crossbars.
- At the marked places, supports are fixed in the role of clamps or corners.
- Fastening with self-tapping screws.
- Having laid the logs on the supports, they are fixed using the same self-tapping screws.
- Having finished crossbars, you can move on to arranging the floor.
Replacement with corrugated sheet ↑
Many people prefer to replace slate with corrugated board. Such a choice has its advantages. Profiled sheets:
- They are light in weight, so they do not require reinforcement of the rafter system; resistant to mechanical and natural influences; incomparably more durable than slate; they can be laid independently and reliably protect the roof from leaks; can be considered a budget coating, with the exception of models covered with pural.
Installation diagram
- If possible, carefully dismantle the slate, taking care not to damage the rafters. The roof is inspected for replacement or repair of some sections of the supporting structure: rotten ones are replaced, the wood is impregnated with antiseptics. Vapor-waterproofing is arranged: the film is laid overlapping without much tension. Expanded polystyrene boards or rolled mineral wool are most often used as thermal insulation. The corrugated sheeting is mounted with an overlap in one or two waves, starting from the end part. On a flat roof, sealant is applied to the overlaps. To fasten corrugated sheets, use only self-tapping screws equipped with rubber gaskets (with the exception of the valley). This is necessary to completely protect the structure from moisture. Self-tapping screws with heads that are painted to match the color of the corrugated sheets do not stand out on the roof surface. Corrugated sheeting is a noisier material than slate. Sound insulation can be partially improved if the sheets are tightly fixed.
As for the price, dismantling costs between 100–150 rubles/m2, and installing a new one depends on the number of operations.
Why corrugated sheets
Of all the roofing materials offered on the construction market, and, as you know, there are quite a few of them (article on roofs), we chose profiled decking. It has a number of advantages:
- High resistance to mechanical stress.
- Anti-corrosion treatment.
- Durability and practicality.
- Reliability in use.
- Wide range of colors.
- Quite simple and quick installation, easy to transport.
- Its use significantly reduces the cost of the construction process.
Information for the curious - not much theory.
Corrugated sheeting is made by rolling galvanized steel of various thicknesses, which is given a trapezoidal shape. Common types and markings of corrugated wall sheeting: PS-8 (S-8), PS-10 (S-10), S-12, PS-15, PS-20, etc.
The number in the product labeling indicates the height of this very trapezoid from 8 mm to 128 mm.
The sheets are coated with a polymer coating or other composition. The service life of the profiled sheet depends on the thickness of the coating.
Profiled flooring is distinguished according to the following criteria:
— shape and height of the corrugation;
According to its purpose, it is divided into three types:
- for walls, fences;
- for flooring and fencing.
To increase the rigidity of corrugated sheets, they are profiled (corrugated). Corrugations can be of various shapes and heights.
Typically, those with a low wave height are used for fencing and cladding, while corrugated sheeting with a wave height of 20-45 mm is suitable for roofing.
Now they produce double-sided profiled flooring, which is intended for double-sided fences, gates, as well as double-sided internal partitions.
According to the developer, when using double-sided corrugated sheeting on a fence, the savings are about 1/3 per 1 m². This material will help save money, since it was often necessary to sheathe the fence on both sides, but now this issue has been resolved.
But, to be honest, I have not yet seen anyone stage it.
It is usually attached to metal screws or rivets.
The service life of double-sided corrugated sheeting, i.e. painted on both sides with a metal thickness of 0.45 mm for at least 15 years.
Load-bearing corrugated sheeting is essentially the same roofing sheeting, but has a slightly different scope of application. It is used as the bottom sheet in a stacked roofing pie, where it serves as a load-bearing structure; under formwork, for between floors. For such purposes, a profile with a height of at least 57 mm (for example, PK-57 or N-75 corrugated board) and a thickness of 0.65 mm or higher is used, which gives resistance to corrosion and the ability to withstand heavy loads.
How to choose corrugated sheets
- Thickness,
- Quantities of galvanizing,
- Thickness of the polymer coating.
To choose corrugated sheeting, you need to take into account its length and choose the type of material - the price usually depends on these factors.
↑ How to replace the roof of a wooden house with your own hands
This question arises when old structures become unusable, or the roof needs to be updated for aesthetic reasons. When renovating fairly old houses, it is likely that the roof covering will have to be removed.
- When inspecting the frame, special attention should be paid to the condition of the rafters. The roof is completely repairable - every part is replaceable. In this case, additional strength fixings are used. For this purpose, boards are suitable, which can be used to temporarily connect existing beams that cannot be dismantled. After this, you can safely remove low-quality rafters, since the frame will definitely not collapse. The Mauerlat requires no less attention. If signs of rot are found, the damaged parts must be cut out and new ones inserted and securely fixed with plate linings or using tightening bolts. In principle, the Mauerlat can be completely replaced with a new one, carefully dismantling it in parts and replacing it with new ones around the perimeter. Having repaired the roof frame, the covering is laid again.
Source: stylekrov.ru
Strengthening the foundation in an old house
The first thing you must do is check the foundation: are there any vertical cracks visible in it, are there any distortions in the windows or signs of destruction of the foundation masonry. If there is, the foundation needs to be restored. The second point is the analysis of the materials from which the private house is made, because the restoration technology will depend on the material.
Scheme of strengthening the foundation: A - double-sided; B - one-sided; 1 - foundation; 2 - anchor; 3 - reinforcing mesh; 4 - formwork; 5 - concrete mixture.
- The foundation in a wooden private house can be completely replaced. To do this, you need to dig under the old foundation (if there is one) and put the house on jacks. Then use iron reinforcement, 3 meters long, to make the initial frame. Next, you should fill the prepared frame with concrete to the required height. With this you can not only strengthen, but also raise the foundation.
- Complete replacement of the foundation in an old brick or stone house is impossible. Repair is considered a more complex and important process that requires responsibility and caution! Due to the fact that the structure is heavy, it is impossible to dig under a weakened foundation, because severe settlement is possible, which can ultimately damage the structure in an old house. The only option is a monolithic belt (a reinforced concrete structure that helps hold the masonry at the base of the floor).
Step-by-step modification of the roof into an attic
Before you build an attic on the roof of a residential building, you should make sure that all load-bearing structures are guaranteed to withstand the weight of building materials, furniture and residents. If necessary, the rafters should be strengthened with wooden or iron beams.
If there is any doubt that the foundation of your house is not designed to withstand such loads, you should abandon this idea, or strengthen the foundation. As an example, the strengthening of a strip foundation is shown. To do this, formwork with additional reinforcing mesh is installed around the existing strip, which is rigidly connected to the foundation, and then concrete is poured into the formwork. This will increase the foundation's support spot on the ground and thereby increase its load-bearing capacity.
The conversion process will vary depending on the type of attic roof. We present these instructions using the example of a regular gable roof.
Preparatory stage
At this stage, you need to make a layout of the future attic and determine where the attic windows and staircase will be laid. This is necessary to strengthen the rafter structures of the roof and the interfloor ceiling of the house.
In addition, it is necessary to provide a plan for the electrical and heating systems that will need to be connected to the home systems. And at the end of the preparatory stage, depending on the design of the engineering systems of your house, you need to think about the placement of exhaust and supply ventilation, as well as the placement of vent risers coming from the bathrooms. If there are no problems with this, you can move on to the next step.
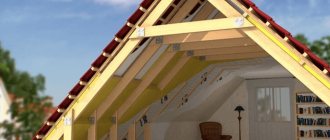
Attic insulation
Insulation is one of the most important and critical steps when converting a roof into an attic. Due to the fact that the roof loses heat much faster than the lower floors, you should not save on insulation.
In a properly constructed roof (regardless of whether there will be an attic underneath in the future, or an unheated attic), under-roof waterproofing is laid under the roofing material in compliance with the ventilation gap necessary for ventilation. Roof rafters, as a rule, are installed with a pitch of 600 mm - this is a convenient size for laying insulation between them, getting rid of undercuts and thereby reducing its consumption.
All that remains to be done to install the correct roofing pie is to provide proper thermal insulation. Thermal insulation occurs by laying insulation between the rafters, and the width of the material should slightly exceed the distance between the structural elements. In addition, between the insulation and the sheathing it is necessary to make a small ventilation gap of 3-5 cm, which will protect the thermal insulation layer from the accumulation of moisture in it.
Insulation sheets, in most cases, are installed in two layers staggered (that is, the joint of the sheets of the first row should not coincide with the joint of the second) to prevent through ventilation.
When insulating an attic, you must understand that heat loss also occurs through the end walls. In this regard, the insulation is mounted on them, forming a closed warm circuit.
In addition, if necessary, the floor is insulated. We have already discussed the insulation of a wooden floor earlier, so we will not dwell on it in detail here.
Installation of vapor barrier
After installing the insulation, the internal space of the roof is covered with a layer of vapor barrier. This is necessary in order to completely prevent the thermal insulation from getting wet (and, as a consequence, losing its properties). Thus, the insulation is protected from moisture from all sides and will work throughout its service life.
All joints between layers of vapor barrier are taped with special adhesive tape to achieve complete tightness.
After laying the insulation and installing the vapor barrier, finishing work is carried out. The material is selected solely based on the preferences of the home owner, but it is still better to give preference to lightweight options so as not to additionally load the structure.
Dormer windows
It should be noted that dormer windows installed on the gables of the attic do not provide daylight to the constructed room. Moreover, they are not present in all projects. The best option for the attic is the so-called dormer windows.
They are presented on the market in a large assortment from a huge number of manufacturers. And each brand of windows has its own installation technology. In general, all technologies are somewhat similar, but they also have their own distinctive features. In this article we will not dwell on the technology of installing roof windows, because this is the topic of a whole article.
I just wanted to note that today’s proposals are not just standard window designs. This is a large number of additional options that increase the performance of windows. One of the new options is a roof window, which, when opened, forms a small balcony.
Advantages and disadvantages of reconstructing a roof into an attic
As a rule, the main reason when deciding to install an attic on the roof of a residential building is the possibility of obtaining additional living space without the need to build an extension. However, against the backdrop of undoubted advantages, there are also some disadvantages of such a reconstruction, which should also be paid attention to.
The advantages include the following aspects:
- The appearance of an additional living room or even several rooms.
- Lower financial costs compared to building an extension or adding a full floor.
- Views from the mansard roof windows.
- Increase in price of your property.
The disadvantages include:
- The need to insulate the roof, cover it from the inside, as well as install special expensive roof windows, which leads to increased costs for remodeling.
- There is no heating and communications on the roof that need to be taken care of, which also requires expenses.
- The need to build a staircase to the attic, which will take up part of the space under the attic and add costs to the estimate.
- If necessary, it will be necessary to manufacture non-standard furniture of suitable size, which costs significantly more than standard furniture.
Thus, all the disadvantages of rebuilding the roof into an attic are based on the need for monetary costs. Despite this, arranging the roof of a house as an attic will cost less than expanding the living space by adding additional rooms or floors.
By getting rid of the unnecessary attic and spending a little time and effort, you can get a full-fledged living room in return, which will be a great place to relax regardless of the time of year. As confirmation, we invite you to watch a video with interesting ideas for arranging an attic
Source: strhouse.ru
Tips on how to make a floor in the attic if the floor beams are weak
If, when purchasing a finished house and wanting to make a living room in the attic, the problem of a weak ceiling arises, experts recommend strengthening it. The following methods are used for this:
- The beams are sheathed on both sides with plywood, 15–20 mm thick. Or metal sheets. This action will significantly increase the load-bearing capacity of the crossbars.
- The next method is to connect the beams together with blocks that are attached to the bottom of the crossbars.
- If there is no access for nailing boards from below, you can lay the beams against each other, securing them with special devices.
- Another effective way is to nail 6-8 mm wire along the beams in the shape of an English letter V. Fix with bent nails.
- If the problem is a large distance between the beams, then on the side of the walls on which the emphasis is placed, it is necessary to make jumpers attached to the ends of the crossbars. Place cross beams on these lintels.
- All methods of increasing the load-bearing capacity are carried out by first supporting the beams from below.
To summarize, we can say that it is convenient to use the attic as a living space, the main thing is to equip the attic surfaces and perform high-quality insulation. The floor in the attic can be made directly on the floor beams; the main condition for obtaining a reliable foundation is to comply with the requirements of the installation technology.
Cost of roof reconstruction work
How much does it cost to redo a roof? The price will depend not only on the area of the roof, but also on the type of defects, which include:
- Presence of roof leaks and condensation;
- Presence of cracks and swellings;
- Wear of roofing material;
- Deformations and displacement of the roofing covering;
- Deformation of rafters and purlins;
- Uneven heating or uneven cooling of the roof;
| Name of works | Prices for work in rubles | Roof type complexity factor | Units |
| Construction of a new roof with a full roofing pie | 950 | 1 | m2 |
| Reconstruction into a warm attic | 1250 | 1 | m2 |
| Installation of metal tiles | 300 | 1 | m2 |
| Installation of soft tiles | 300 | 1 | m2 |
| Installation of natural tiles | 600 | 1 | m2 |
| Laying waterproofing | 80 | 1 | m2 |
| Installation of sheathing | 90 | 1 | m2 |
| Laying 150 mm insulation | 300 | 1 | m2 |
| Installation of valleys | 300 | 1 | linear m. |
| Installation of spotlights | 420 | 1 | linear m. |
| Installation of lining | 420 | 1 | linear m. |
| Drainage system design | 330 | 1 | linear m. |
| Construction of the rafter system | 500 | 1 | m2 |
| Installation of a roof window | 6000 | 1 | PC. |
The main rule
Even if you have already decided which insulation is best for you, it is too early to start the work itself. First, you need to understand the sequence of these works, and for this you need to get a general idea of the structure of the insulated roof. Or, as the professionals put it, a roofing “pie”.
From top to bottom, the components of the pie are:
- the roof itself (corrugated sheeting, tiles, slate);
- sheathing;
- counter-lattice;
- waterproofing material;
- thermal insulation;
- vapor barrier;
- ceiling finishing.
That is, when installing thermal insulation, the main rule should be taken into account first of all - the insulation must be protected both from external (atmospheric) moisture and from internal moisture rising from the room. Otherwise, condensation will inevitably accumulate, which will ultimately lead to the most disastrous consequences not only for the roof space, but also for the entire house.
If you decide to insulate a finished attic roof from the inside, then, as can be seen from the list above, you already have all the layers of the “pie”, up to and including waterproofing. All that remains is to lay the insulation, cover it with a vapor barrier membrane - and you can finish the ceiling. It would seem that everything is simple. But here you need to strictly follow the established rules, otherwise all your work will be in vain.
When is roof reconstruction required?
- The structure has deteriorated so much that its further operation is not possible.
- The builders initially made significant mistakes and now a complete reconstruction of the roof at the dacha is required.
- Major repairs have not been done for a long time (applies to apartment buildings).
- You are not satisfied with the design features.
- You have decided to convert the attic space into a living space (into the attic), but this is impossible due to the lack of good ventilation.
Features of attic reconstruction
Many home owners are wondering how to convert the roof of a house into an attic. There are no difficulties in this, but you need to understand that attic reconstruction differs depending on the shape of the roof, therefore, the complexity of further work and its cost will depend on this.
The best option for renovation is a classic gable roof, which can also be raised without much effort by building up the walls of the house. But the hip roof has a significant drawback in the form of four slopes, which significantly reduce the total attic area, including the height of the room.
Based on the design of the rafter system, you can determine what the attic walls will be like: inclined or vertical. The inclined option, unlike the vertical one, allows you to use the entire space of the attic, but at the same time limits the possibility of placing standard-sized furniture near the walls.
To better illustrate the interior of attic floors, we offer you a small selection of real houses with attics.
However, the following factors may force you to refuse to convert the roof of a wooden house into an attic:
What kind of service is this?
Remodeling the roof of a wooden house means dismantling the old roofing and installing a new one. This work is quite complex and requires certain tools, devices, and equipment. In order to remodel the roof efficiently, you need knowledge and experience in carrying out construction, waterproofing and soundproofing work. It is important to understand the types of cladding and roof construction. Therefore, it is better to order rework from professional craftsmen.
The service may be needed in the following cases:
- Wooden elements are rotten.
- The roof is made of outdated materials and needs to be modernized.
- The roof began to leak.
- There are areas that cannot be repaired.
- The structure has collapsed or dilapidated.
The process of replacing the roof of a wooden house is as follows:
- The technician inspects the condition of the coating.
- Old and unusable elements are being dismantled.
- New elements are being laid. Hydro- and sound insulation is carried out.
- Additional parts are installed.
Pricing factors
Roof reconstruction can cost varying amounts of money. The following factors influence the final price:
- Type and quality of materials.
- Conditions of work.
- Season.
- Working area area.
- Building height.
- Difficulty of work.
- Urgency.
- Master's qualification.
- type of equipment and mechanisms used.
- the need for additional work.
- the prestige of the company, its pricing policy.
Varieties
Depending on what material is used, the roof covering can be:
- Profiled sheeting.
- Ceramic tiles.
- Bituminous shingles.
- Ondulin.
- Metal tiles.
Roof alteration can be:
- Complete (the structure is completely replaced).
- Partial (worn areas are replaced).
Depending on who the performer is, the work can be completed:
- An employee of a construction and repair organization.
- Private team.
- With my own hands.
According to the execution time, the order is classified into two types:
Wall installation
Depending on what material the walls of the new house will be made of, you should prepare the required amount. At the same time, it is worth making sure that there is enough material to build the internal walls of the house around the old one.
- The walls of a new building should be laid no earlier than six months after the foundation is poured. It is during this time that the basis will gain its strength. In this case, the first row of masonry or the crown of the building should be mounted on a layer of waterproofing laid on top of the plinth.
- So, let's start building walls. If the house is made of brick, then it is necessary to carry out masonry with obligatory reinforcement every 4-5 rows. If the house is made of timber or rounded logs, then as a standard we place the material in bowls and boxes like a construction set.
Important: to ensure that when laying the walls of a new house in an old house there is a sufficient level of natural light, it is necessary to immediately install window openings at the stage of laying building materials. And then, because it is through the windows that the dismantled house will subsequently be taken out.
- We raise the height of the walls in accordance with the design level of the new house. If necessary, we dismantle the roof of the old house and cover it with a thick film.
Important: if the old house has stove or gas heating, you should be very careful with the pipe when dismantling the roof. She must remain intact.
- As soon as the outer walls of the house are ready, it is possible to construct the internal partitions of the house in the place where the premises will presumably be set up for temporary housing during the period of demolition of the old house and the completion of construction of the new one. To do this, you should carefully dismantle some of the rooms of the old house and free up space inside the new box for the construction of temporary permanent housing.
- As soon as the internal masonry is ready and sufficiently dry (if it is brick), you can install the ceiling beams and cover the roof of the room with temporary dense material.
Important: after erecting the walls of a new room, it is necessary to supply electricity to it and decorate the inside of the room for quality living in it.
All things from the old hut are transferred to the finished new premises and the old house is carefully dismantled. If the hut is wooden, then it is dismantled log by log and carefully removed through the door or window openings of the new building. If the house was made of brick, then you should slowly break up the old masonry and remove construction waste outside.
Approximate price
Approximate prices for remodeling the roof by craftsmen from Russian construction companies are shown in the table below.
| Expenditure | Cost depending on the type of roof, rubles | ||
| ondulin, metal tiles, corrugated sheets or flexible tiles | ceramic tiles | rebated covering | |
| Material purchase | 250-400 | 900-1000 | 500-600 |
| Removing the old roof | 100-700 | 100-700 | 100-700 |
| Installation of a new frame | 100-300 | 100-300 | 100-300 |
| Laying insulating materials | 50-200 | 50-200 | 50-200 |
| Additional work (installation of soffit, drainage, snow guards) | 200-400 | 200-400 | 200-400 |
| the total cost | 700-2000 | 1350-2600 | 950-2200 |
Construction of a new roof costs from 800 to 1200 rubles per square meter. Construction of an attic will cost from 1200 rubles/sq.m . Installation of a new window in the attic will cost 2,500 rubles . Equipment for the rafter system costs about 400-600 rubles per square meter. Installing the sheathing will cost about 100 rubles per square meter.
Diagnostics of roof covering
A typical mistake is the decision to simply replace the old roofing material with a new one. Its consequences can be very dire. Therefore, before taking any action, it is necessary to carry out diagnostics and identify all existing defects and shortcomings of the roof. You need to find out what condition it is in:
- sheathing;
- heat-insulating materials;
- waterproofing layer;
- rafter system.
Let us immediately note that replacing the sheathing is almost inevitable. It can only be avoided if the new and old roofing materials are identical. We remind you that the quality of installation is directly related to the properties of the lathing. Therefore, it will definitely have to be changed if the old roof is replaced with a different covering.
Don't forget about heat-insulating materials. If you live in a country house for some time in winter, they definitely won’t bother you. Unless, of course, you are going to freeze in your house. Moreover, thermal insulation is quite cheap. Their installation does not take much time and is easy to install. It is best to use mineral wool in this case. To do this, it is best to lay two layers of insulation boards in a checkerboard pattern. This will be enough to create reliable thermal insulation. Let us add that you can save money by placing a two-layer film instead of the second layer of mineral wool.
Pay sufficient attention to the rafter system. It represents a base that will have to hold the mass of all the necessary layers. If the roof has leaked, there is a high probability that the rafter system is damaged. If the roof has been in use for more than ten years, we can confidently say that at least some of the slings will need to be dismantled and replaced.
Where, from whom and how to order?
If there is a need to remodel the roof of a wooden house, then you need to decide who will perform this work: a private team of craftsmen or specialists from a construction and repair organization. In terms of quality and reliability, it is better to choose the second option. Masters from a specialized company carry out all work efficiently and issue a warranty card. Hiring a private team will be cheaper than hiring a well-known company. But private craftsmen do not provide a warranty card. Among them there are often low-skilled workers. It will not be possible to make a claim against a private team.
The most budget option is to redo the roof yourself. But this method is very time-consuming and labor-intensive. It is worth resorting to it only if you have partners, knowledge and experience in carrying out such work.
If your budget allows, then it is better to contact the specialists of a construction and repair company. The algorithm for ordering a service will be as follows:
- Choosing a company.
- Communication with the company manager regarding the terms of cooperation and approximate prices.
- Call a specialist to the site.
- Preparation of estimates by the master. Coordination of work deadlines.
- Registration of the contract.
- Commissioning of the object.
- Reception and payment of work.
Source: skolkos.ru
Which film to choose
Vapor barrier
Vapor barrier membranes are supplied by several foreign and domestic companies. Among Russian manufacturers, Izospan stands out. It offers conventional and superdiffusion films for buildings with high humidity. The company offers the best prices per 1m2.
The price list of the Juta company will cost a little more. It is comparable to Izospan in terms of performance characteristics. The company offers models for both single-pitch and gable roofs with a high slope angle.
Foreign manufacturers Fakro, Delta and Folder attract consumers with the increased service life of their membranes and extended warranty.
Tyvek membranes (a branch of the world-famous DuPont corporation) always use the most advanced technical solutions and scientific developments. Technological leadership also determines high prices: on average, twice as expensive as similar products from Izospan.
Waterproofing
Waterproofing films are offered by the same manufacturers as vapor barriers. Delta's three-layer high-diffusivity membranes, designed for installation on a continuous substrate, stand out here.