23.11.2020
,
Every year, new ideas for wall decoration appear in interior design, which, if not surprising, then undoubtedly deserve attention. Laminate on the wall is one of the most interesting ways to decorate. Flooring first appeared in the early 70s of the 20th century. And every decade the scope of its application has gradually grown. Today it is a universal finishing material for all surfaces in the house, from kitchen countertops to ceiling beams. A huge range of textures and patterns allows you to use practical material on the walls of any room.
Advantages and disadvantages of laminate on the wall
Laminate boards are a fairly strong, durable material - the panels on the floor and walls are highly wear-resistant and do not wear out. This is achieved by applying a special coating to the surface of the board. Depending on your needs, you can purchase a laminated panel of the required class; manufacturers provide a guarantee of at least 20 years.
Other advantages of laying laminate on walls are:
- hiding wall defects - the material will hide chips, stains, unevenness (when using sheathing);
- absence of contamination - dust does not settle on the laminated material;
- absence of fungus, mold - due to biological inertness, fungi do not multiply on the laminate; some brands of laminate are even treated with silver and other antiseptics;
- cost-effectiveness - when purchasing a laminate of class 21–23 with a small thickness, the cost of repairs will be inexpensive;
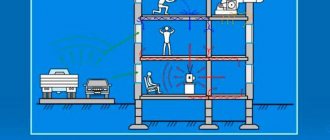
- good soundproofing (a number of manufacturers even make a special membrane backing for the panels);
- variety of colors, textures - the range of laminate flooring in stores is large;
- Can be washed with different detergents.
Unfortunately, the cheapness of laminate boards lies in its disadvantages. Thin material reacts to temperature changes; it cannot be glued on the balcony, next to radiators. This laminate does not tolerate high humidity; even the rays of the sun will be unfavorable for its appearance and performance properties. For high-quality products you will have to pay more, which will increase the cost of repairs.
The disadvantage is the need for perfect alignment of the horizontal or vertical base. If the base is curved, it must be leveled as much as possible. Only in this way will the glued laminate last a long time and lie beautifully. This will significantly increase the cost and time of creating the coating. If a frame (sheathing) is made for installation, this will reduce the area of the room. It is not advisable to use the panels in the bathroom or kitchen - the material will deteriorate from constant moisture.
Universal connection
Liquid nails are a large group of adhesives for joining various materials: gypsum, plastic, wood materials and even stone and metal.
With such diversity, it is obvious that installing laminate flooring on walls using liquid nails adhesive is not the most difficult task for these compounds. What distinctive property allows us to combine all these varieties into one group? The composition of the “liquid nails” type, in addition to the glue itself, includes a fine filler (for example, chalk). Thus, the glue does not spread, which allows you to connect parts without the need for a tight fit to each other. This is exactly what finishing walls with glue-based laminate is like.
Liquid nails should be used with caution when gluing products made of polyurethane, polystyrene, and polypropylene, as the glue can dissolve or deform these materials.
However, installation of laminate flooring on a wall with glue, as a rule, occurs where these polymers are not used. Still, it is advisable to understand from what components a specific type of liquid nails is made.
Laminate for walls - what is suitable
Since the wall will not be subject to daily stress, you can buy a thin laminate to cover it. The lower the strength class, the thinner and cheaper the coating. Typically, laminate grades no higher than 21–30 are purchased for walls. If you plan to finish a balcony, it is better to choose a class closer to the upper limit; the thinnest material is suitable for creating a coating in an apartment.
Depending on the locking system, the laminated material can be:
- Glue. The panels do not have locks at all; fastening is done by gluing. Due to the small contact area with the surface, adhesive laminate is not used on the sheathing.
- Sheet piling. The material must be secured using a tongue and groove lock. Even if you don’t glue the lock, it will hold securely and firmly. This type of laminate is well suited for walls.
- Clicky. The locks are a more advanced tongue and groove system, so the panels are perfectly and quickly connected to each other. This material is considered the most suitable for the adhesive method of attaching laminate flooring; it can even be glued to the sheathing.
- Kleimerny. It is attached using special devices - clamps; it is advisable to attach it to a wooden frame.
Color solutions
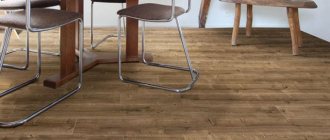
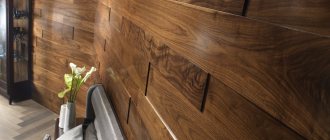
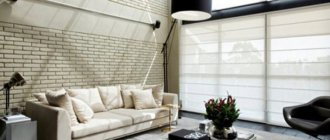
Most often, classic laminate flooring is laid on the walls under wooden panels. In private homes and classic interiors, it looks good as the main material.
But you can also use it instead of an accent: to decorate functional areas, a niche for a TV, or the space behind the head of the bed. In small rooms it looks stylish when creating a transition between wall decoration and floor decoration. This technique visually enlarges the room and corrects its geometry.
Light, bleached or aged laminate will fit into rustic country and romantic Provence. And dark panels imitating precious wood are good in neoclassical, English or modern styles.
How to hide TV wires on the wall: 12 ideas
Fastening laminate with glue
There are two main ways to attach boards to walls vertically - glue and frame. Attaching the material to the wall with glue is considered the simplest method; you can create such a coating with your own hands. It is important that the wall is level; discrepancies and defects of more than 3 mm should be eliminated.
Tools and materials
To install laminate flooring, you should prepare the necessary equipment and materials in advance. To attach the sheathing to concrete or brick walls, you will need a hammer drill or drill with a high-quality drill bit. You may also need a screwdriver and a jigsaw during the work process. To cut the board, you can use a regular hand hacksaw instead of a jigsaw. Other repair tools:
- hammer;
- pliers;
- roulette;
- marker (pencil);
- level;
- container for mixing glue;
- glue stick or construction mixer;
- trowel (rule);
- plumb line;
- spatulas - small and large;
- cloth for glue.
To tap the panels, you will need a block, and a boss is also useful - the panels are driven through it with a hammer. If you have to level the surface, you should buy putty (dry or ready-made) and a primer. It is also important to buy glue that will properly attach laminated panels.
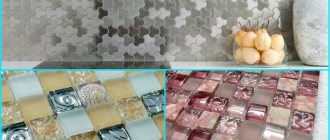
Selection of glue
Which glue to choose? There are ready-made adhesive compositions or mixtures that need to be diluted. Laminate adhesive must meet all the necessary characteristics. When temperature changes, the laminate tends to change its geometry, so a joint that is not too mobile may not hold the vertical coating. It is recommended to buy non-toxic compounds that are resistant to deformation and can be easily removed from the surface of the board.
It is best to use “liquid nails” type adhesives, but their price is quite high. The product must contain polymers or polyurethane. The following laminate adhesives have proven themselves to be the best:
- Tomzit;
- Kisel;
- Cleo Laminate.
From “liquid nails” you can stick the laminate onto a Henkel brand product with a green bottom of the can. All of the adhesives listed have excellent water-repellent properties, good viscosity with minimal fluidity, long service life, and are environmentally friendly. Material consumption – 20–30 g/sq.m. m.
Alignment of walls
If small unevenness in the floor is perfectly compensated by the substrate, then on the wall there is no such possibility. Due to its high cost, the glue must be applied in a thin layer, and it will not hide wall defects. The remaining defects and irregularities will reduce the adhesion area and make the coating unreliable. To level the walls you need to use starting putty. Purchase good quality compounds that have high adhesion to the surface.
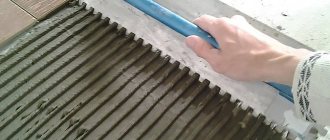
After puttying, you need to wait enough time (1–2 days) for complete drying. Then the surface of the wall is primed 1-2 times, which will improve adhesion to the glue. You can’t neglect priming - the laminate is quite heavy, without a primer it will stick worse on a vertical base. After the soil has dried, you can begin gluing the laminate. The glue should be diluted according to the instructions if a ready-made composition is not used. Before laying, you need to mark the wall so that the laying of the laminate is perfectly level.
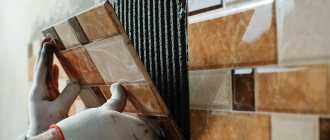
Laying process
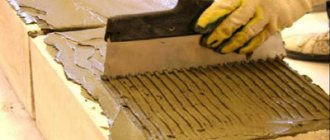
You should start gluing the material from the lower left corner. Take the first panel, cut it in half, coat it with glue, then apply it to the wall and press it. You need to hold the bar for a few seconds, then tear it off so that the glue wears out a little. Then the board is pressed again for final setting. Then continue the row upward, leaving a gap of 2 cm between the board and the floor. To do this, you need to lay a gasket from laminate scraps. Afterwards, this gap will be closed with a plinth. To create a level surface, use a level and gently tap the top of the boards with a hammer. The last board in the row is also cut to the required length.
The second row starts with a whole panel so that the installation is done in a checkerboard pattern. This will make the coating more beautiful. When the glue is not weathered, a technological break is taken after 2–3 rows. This is necessary for the glue to set well, otherwise the panels may “float”.
Types of Liquid Nails
There are two main types of adhesives:
Water-based adhesives are used, as a rule, for interior decoration, including various methods of attaching laminate flooring to the wall with adhesive.
Acrylic compositions have a number of advantages:
The disadvantages of water-soluble acrylic adhesives are that they lose their adhesive ability at subzero temperatures, so they can only be used in heated rooms.
It is impossible to use such liquid nails for any method of attaching laminate flooring to a balcony. Another disadvantage of these adhesives is hydrophobia. They are not recommended for use in the bathroom.
Neoprene-based adhesives do not have the disadvantages of acrylic compounds. Their basis is neoprene - synthetic rubber. Therefore, neoprene liquid nails are not afraid of moisture and frost.
In addition, they have higher strength compared to acrylic ones. The method of installing laminated finishes with glue using such compositions guarantees greater strength and durability of the connection.
However, their disadvantages are also quite significant: 1. They contain flammable components and are easily flammable. 2. They have a pungent odor. Weathering requires at least 72 hours. 3. Toxic, which limits the possibilities of their use indoors.
From the above, it follows that for attaching laminate panels to the wall, it is better to install them with an acrylic-based liquid adhesive. If you have to use a neoprene composition, then you must adhere to the safety rules:
Frame mounting method
Wood is used to create the frame, since the metal profile is not suitable for laminate. Self-tapping screws for metal will gradually become loose, and the cladding will sooner or later deteriorate. A vertical or horizontal frame is mounted before starting work. To create a horizontal frame, the lathing is assembled vertically, for a vertical frame - horizontally.
The features of the frame are as follows:
- the pitch of the supporting bars is calculated as ½ the length of the board;
- It’s better to buy 30*30 mm bars, three meters long;
- First, they place the outer bars, securing them strictly according to the level;
- threads are pulled between the bars, the middle bars are fastened along the threads;
- for insulation, you can place insulation between the cells (for example, mineral wool);
- After creating the frame, the panels are attached to it using clamps (staples), using a construction stapler, by gluing - in any way.
Instructions for use
The vertical surface on which the panels will be glued must be well cleaned of dust, dirt, loose plaster, etc. The cleaned surface does not need to be leveled until smooth - for better adhesion it should be porous or rough.
However, if the surface of the wall is loose, then it is better to strengthen it with the help of an appropriate impregnation, for example a latex primer.
In order to glue the cladding using liquid nails, after applying the composition it is necessary to apply the panel to be glued to the surface and press with the maximum possible force. In this position, the panel must be fixed for 2-5 minutes.
Then the pressure can be released and the panel fixed using available means. It takes 10 to 40 minutes for the glue to set. However, the final completion of installation is the time for the adhesive to completely dry, which can take up to 72 hours.
Compared to installation using fasteners, installation with glue is faster, but additional time is required for the adhesive to cure.
During installation it may be necessary to remove the adhesive. For freshly applied acrylic composition, the solvent is water. For neoprene liquid nails, mineral solvents for synthetic rubbers should be used.
You can try to remove the dried layer of glue using contrasting temperatures - for example, alternating exposure to an industrial hair dryer and ice. By heating the old glue and then cooling it with ice, you can quite easily pick up the hardened compound with a spatula and separate it from the surface.
Some useful tips before gluing:
When laminate is not suitable for laying on a wall
Laminated board is a rather heavy material, so it is not recommended to be mounted on plasterboard walls. This may cause the structure to collapse. It is also impossible to make laminate cladding for light partitions, too cold rooms, or those where humidity is high. Cellars and basements are not finished with material due to dampness and cold temperatures.
In the kitchen, the material, if it is located next to the stove, will quickly become unusable. Laminate is also not suitable for children's rooms - if a child paints on it, it will be almost impossible to wash off the stains. It is also not recommended to use laminated panels for the walls of apartments where there are animals - scratched and “marked” boards will have to be replaced regularly.
Work examples
Interior design example
Interior in modern style
Room design option
Interesting design idea
Design solution in the interior
Ideas brought to reality
Ways to decorate a room
Example of designers' work
Formation of the first row
For an objective understanding, it should be noted that you can start laying laminate flooring from any convenient point in the room, even from the middle. However, in the vast majority of cases, this convenient place is the far wall without doorways.
It is more correct to choose a left-to-right layout for assembling panels; this will allow you to place “groove” type locks on already laid panels. Thus, assembly will be carried out by inserting the tenons of new panels into the grooves of already assembled ones - this is much more convenient.
For the first row, the required number of panels is assembled, connecting them together in transverse locks. There should be a strip from wall to wall. The last plank is sawed taking into account the gaps - the assembled row should have the necessary gaps on the left and right. Then the entire row is moved towards the starting wall, spacer wedges are inserted to form a gap.
Without a doubt, the first row will not be able to be aligned in a perfect straight line - there is minimal play in the transverse locks and therefore the panels may deviate from the straight line. To form a straight row (still not ideal), panels with overlapping seams need to be inserted into the longitudinal locks of our strip, like a second row, but without connecting the transverse locks. This temporary measure will help level the first row as much as possible and adjust the spacer wedges along the starting wall.
The rare wall from which installation begins has a perfectly flat plane, so the gap may vary, and in some places it may be unacceptable. Therefore, it is quite possible that the first row will have to be disassembled and the connection to the wall will have to be cut in some places. After sawing, the row is reassembled and leveled with additional panels, and wedges are inserted.
How to care for the coating
Floor coverings often require cleaning during use. Small scratches appear on the floor. To extend the service life of the laminate, manufacturers recommend using:
- Liquid wax. Allows you to make the surface glossy, well-groomed, shiny. Brightens up minor cosmetic defects and eliminates creaking floorboards.
- Vacuum cleaner. The electrical appliance must be equipped with rubberized wheels to avoid unnecessary scratches. It is better to give preference to washing models equipped with brushes with a large amount of bristles.
- Pencil for laminate . This is an excellent remedy for combating minor scratches and imperfections.
To clean the floor from heavy dirt, use water and a rag. The coating withstands the effects of household chemicals: detergents, gels, vinegar (at the rate of a quarter glass per liter of water).
Installation of skirting boards
The plinth is installed at the final stage of finishing. Before installation, it must be cut at an angle of 90°: this will ensure the strength of the connections. There is no need to adjust all the planks at once: it is better to do this during fastening. When one element is fixed, the next one is joined to it, and only then is it fastened.
You cannot attach the baseboard to the laminate itself. It is fixed to the wall. How exactly to attach the profile depends on what material it is made of. If you chose the laminated MDF option, look at the back side - there should be a groove there. A special clip is attached to the wall, and the profile itself sits on it. The joints are coated with glue. Proceed with caution: if you try to fix the baseboard several times without success, the grooves will become loose.
A miter box is used to work in corners. The profile is inserted with the side closest to the user, and the edge is located at the bottom of the tool. Then the baguette is cut at an angle of 45°. Hold the baseboard firmly while cutting, otherwise the seam will be uneven and a gap will appear during joining that cannot be sealed.
Before attaching the corner, check whether the elements fit tightly. If everything was done correctly, there will be no gaps.
Seam sealant
In general, I would recommend refraining from buying sealant, because often something that is closer in properties to glue is sold under the guise of sealant. It is not recommended to glue locks together; this can lead to unpredictable defects during operation. If the panels stick together, it will be extremely difficult to disassemble part of the covering to replace some boards without damaging the locks and edges!
Sealant is needed to protect locks from moisture. Some manufacturers impregnate locks with something like paraffin, in which case there is no need for sealant. This type of laminate is not difficult to recognize by picking the lock with your fingernail. If the locks are not impregnated, when installing even in a dry room, there is a risk that the floor will creak.
If you nevertheless purchased a laminate with non-impregnated locks, it’s okay, you just need to be more careful in choosing a sealant by contacting a competent sales consultant. Having purchased a sealant, you can test its properties by coating and testing two pieces of laminate. After a couple of days, separate them. If the lock opens freely, the sealant remains elastic and can be easily removed - everything is in order.
Alternatively, instead of sealant, you can use impregnation for locks and treat each panel with this solution before installation.
Recommendations from experts
Laminate for heated floors
If you need to put finishing material around heating pipes , first make markings on the board. Afterwards, holes are made 2 cm larger than the diameter of the pipe. Then a cut is made at a 45 degree angle, which is joined back to the board.
At the junction of the laminate and parquet boards with the wall surface, it is necessary to leave a gap of 1-1.5 cm so that the boards can expand. For clearance , wedges made from timber are used. When laying on a concrete floor, a gap is left every 10 m, and the gaps themselves are covered with planks that match the color of the rest of the coating.
When installing heated floors, it is necessary to choose a laminate that can withstand high temperatures.
Before laying out, you need to make sure that after placing the boards on the floor, the door will open unhindered . If there are difficulties, the door leaf is slightly filed from below.
Substrate
I think there is no point in singling out any type of substrate as being of higher quality - they are all quite good.
The cheapest foamed polyethylene fully satisfies all requirements. The only note is that you should not choose a substrate thicker than 2 mm, the floor on it will sag unnecessarily when walking. If there is a need to raise the level of the finishing coating, then it is better to use other materials, for example fiberboard sheets. The disadvantages of foamed polyethylene include slight subsidence over the years - 1-2 mm.
Cork backing does not sag, but is more expensive. By and large, it is no different from polyethylene.
A backing made of thin EPS sheets is also no worse. However, this material is very inconvenient for flooring: there are many seams and they all need to be taped.
Whatever underlay you choose, it is not necessary to spread it over the entire area - I spread it as I lay the laminate.
Features of locks
The vast majority of laminate flooring is available with two types of locks on the transverse edges: conventional and easily assembled (the so-called “Quick-step”).
Conventional locks are latched by connecting the ends at an angle and then lowering one of the panels. This type of flooring is assembled in rows: first, all transverse seams in the row are connected, and then the assembled row is snapped at an angle to the already laid canvas.
Easy-to-assemble panels are mounted one at a time: the longitudinal seam is connected at an angle, then the die is lowered and snapped into place with the previous one. This coating can be assembled either in rows or with a ladder.
There is information on the Internet that there are transverse locks of the “LOCK” type - they supposedly snap into place in the stacked position by tapping the row from the end. From my own experience and the experience of my colleagues, I can say that I have never seen such locks. It is quite possible that such castles exist (existed), but I am inclined to believe that someone wrote something stupid, and others simply stole it. Unfortunately, this phenomenon does occur.
Often, for panels with conventional locks, you can find similar nonsense in the attached instructions: a row is assembled without connecting the transverse locks, and then these locks are connected using a clamp and a hammer. However, in reality the design of the lock does not allow this. As a result, when trying to connect the transverse seams, either the locks or the place where the clamp stops break. This suggests that you cannot always trust the manual from the manufacturer, especially an inexpensive one.
In the above-described options, the longitudinal locks are connected in the same way: at an angle, followed by lowering. Laminate flooring with more complex locks is very rare. Mostly they are found in square dies, which are assembled without spacing subsequent rows. Such locks are assembled in the same way, at an angle with lowering, however, to snap the lock into place, you must lower the attached panel lower than the previous one. This can be done by placing a small gasket, a few centimeters thick, such as a square, under the already laid one.
The canvas with “complex locks” is assembled in separate panels: first the transverse lock is attached, and then the longitudinal one. Such locks do not fall apart when the row is slightly lifted to attach new dies.
Installation near pipes
If pipes come out of the floor, they need to be bypassed with a gap, similar to the walls. The gap should be at least 10 mm. First, a hole for the pipe is marked on the panel, taking into account the gaps. Then the round hole is sawed out or drilled - whichever is more convenient.
To insert the pipe into the panel, the hole must be extended to the closest edge - this can be a cut to the wall or to the lock. The sawn piece is simply placed in its designated place after installing the panel.
The resulting gap around the pipe can be left as is or closed with a special overlay - the so-called “guard”, which comes in various wood-like colors. You can also use a collapsible plumbing reflector as a decorative element, but it has a big drawback - its silver color.
Do not fill the space around the pipe with any sealant or putty - the panel will lose the ability to “float”.
Preparing the base
As a standard, the base is considered sufficiently leveled if the differences do not exceed 2mm. by 2 m. I’ll add on my own behalf: laminate is not afraid of more significant changes, the main thing is that there are no sharp “steps”.
If laying is done on a screed, then the latter must dry (at least 2 weeks). There is no need to seal various sinks and local potholes - this is why laminate is popular in budget renovations.
Whether the base is wooden or concrete, it must be cleaned of local deposits of putty and other dirt (which is sure to remain after rough repairs).
Particular attention should be paid to the angles where the walls meet the floor: in 9 out of 10 cases, these areas are not treated in any way during the repair process, and are written off as “being covered with baseboards.” Therefore, the corners, as a rule, have beads and are rounded. I usually walk around the perimeter of the room with an old chisel/chisel and knock down the sagging.
The floor is thoroughly swept/vacuumed. If the base is very dusty, it can be primed with a deep penetration primer.
See also: “Screed for any floor covering”