The operation of the entire plumbing unit completely depends on the flush mechanism for the toilet. Since it is used to flush waste by pressing a button or lever. He is also responsible for filling the tank with water and closing its supply when the set level is reached. High-quality parts and correct installation will ensure a long service life of the drain mechanism and no problems in the future.
Pneumatic, push-button and pull-out
According to the principle of operation, drainage mechanisms are divided into the following:
Exhaust devices work as follows: the rod is lifted up by the handle, and as a result, the drain hole opens. This mechanism is practically no longer found in new toilet models.
Pressure drain devices are divided into 2 types:
- with one mode;
- with two buttons.
The single-mode mechanism consists of one button. By pressing it, the water is discharged. But such mechanisms are considered uneconomical.
In devices with two modes, there are two buttons, or rather, one divided into 2 parts of different sizes. One discharges the water completely, and the other discharges half. The amount of water discharged can be adjusted independently.
There are devices with a pneumatic mechanism. Their main advantage is ease of use, since pressing the button does not require much effort. The water release button is built into the variable-volume chamber. This entire drain assembly is connected via a connecting hose to a variable-volume chamber of the mechanism with a drain valve that closes the water discharge hole.
Kinds
The most common is the push-button mechanism. Unlike old lever models, they are more functional and easy to use. The operating principle of push-button devices is quite simple - using a system of levers, water is drained when the button is pressed.
If we talk about a complete classification, we can distinguish the following types.
- Lever. Drainage occurs when the shut-off membrane is raised. The flow of water stops the moment the lever is lowered. Currently, such models are practically not used.
- Button. As the name suggests, water is released by pressing a button. It activates a system of levers that hold the membrane open until a certain water level in the container is reached. It can be single-level (draining the entire volume) or two-level (the design has two buttons, one of which activates a full drain, and the second a partial one.
- Automatically. Installed mainly on expensive models. Drainage is carried out automatically when the corresponding signal is transmitted from the sensors.
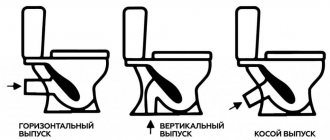
The choice of one model or another directly depends on the design of the cistern. Particular attention should be paid to the location of the water supply hose. It can be either side or bottom.
Advice
Manufacturers often provide the opportunity to select a set of shut-off valves with one or another type of water supply connection.
With top and bottom liner
The drainage mechanisms differ from each other in the method of connection - upper and lower side. The top connection is more common and simpler in terms of installation method. The main disadvantage is that the hose from the toilet to the water pipe will be noticeable, since it cannot be hidden. Also, with a side connection, the water will fill with noise if a special soft tube is not installed inside the tank.
With a bottom connection, the hose is invisible, but installation of this type of device is more difficult. Since the water is filled from the bottom up, this toilet cistern does not make noise.
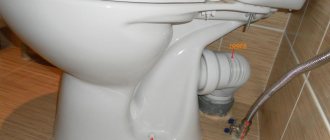
Installation of Alcaplast drain.
To correctly install the Alcaplast drain, follow the instructions below. In general, all drainage devices are installed according to the same principle; there are only small nuances that we will discuss here.
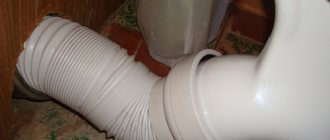
1. Place the bottom of the drain on the prepared surface. The initial installation should be made without the neck, grille or water seal. In the kit you will find a special lid to protect the bowl from debris and concrete. Install this cover on the bottom of the drain, and then connect the unit to the sewer pipe. It usually has a diameter of 50mm and fits tightly around the bowl bell due to the connecting rubber ring inside the pipe.
2. After filling the space around the installed block with concrete, level it and wait until it dries completely. Filling is done flush to the protective cap. After the applied composition has dried, remove the cover and apply waterproofing to the surface. The choice of waterproofing layer is yours.
3. After applying the floor waterproofing, use waterproofing tape to connect the seam formed between the block and the concrete. The tape should extend onto the collar of the device and completely cover unprotected areas. Ultimately, only a hole should remain on the floor.
4. Install a water seal inside the hole; if the kit includes two models of the seal, install any one. There is an O-ring on the water seal, which ensures a tight fit between the parts. Press it down to ensure a tight fit; it should not move in the seat.
5. Measure the distance to the future floor surface, measure this distance on the neck with a margin for insertion inside the lower bowl. You need to measure from the grille side. Cut off the excess with a hacksaw or any other cutting tool, focusing on the grooves when cutting. Pull the rubber O-ring over the lowest groove of the neck and install it into the drain body. The fit will be quite tight; to make it easier, use lubricant, or at least soap. Misalignment during installation will subsequently develop into a leak.
6. (If you have a dry bolt) place the ring lock inside the neck and turn it to secure the block inside. If you have a combined or wet shutter, the fixation is done with the top cover of the shutter itself. By turning it clockwise, you will find that the ascending ribs begin to rest against the neck guides. This is enough for normal shutter fixation.
7. Cover the hole with any available material and make the final screed by filling it to the bottom of the frame. For proper drainage of water from the floor surface, a slope towards the hole should be made of at least 2% on each side. If there is no slope, it will be more difficult for water to get into the drain and it will be able to collect on the floor forming puddles.
8. After laying the tiles, fill the joints between the frame and the tiles with elastic sealant. The tiles should be laid flush with the frame, leaving gaps (seams) for the sealant.
9. Upon completion of installation of the drain ladder, check that there is no debris left in the neck, install the grate and check the correct assembly by test draining the water. Assess in which direction the water flows over the surface, whether there are any puddles forming, whether the water quickly goes into the drain, whether the shutter is working correctly.
The installation of the ladder can be considered complete. Drain devices do not require special care. They are unpretentious and durable. If large particles or hair or threads get inside, remove the grille and clean the shutter block. To clean the internal sewer pipe, pour a bucket of water into it and assemble the device.
Replacement, setting and adjustment with double button
One of the common causes of problems with the drain mechanism is low-quality parts. They quickly become unusable.
Low-quality plastic products may be initially crooked, and as a result, water will constantly leak. When purchasing an imported drainage mechanism, you should install a coarse filter, since these devices are sensitive to water quality. If it is hard or contains impurities, the drain mechanism will quickly fail.
Before you begin to adjust or replace any parts, you must remove the lid from the toilet tank. To do this, you need to unscrew the water release button (unscrew it using the rim of the button). Having pulled out the button, carefully remove the cover and put it aside so that it does not interfere and is not accidentally damaged.
How to remove a toilet lid
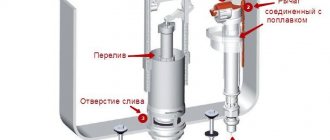
To adjust the filling level of the tank, there is a rod on the float. The less its upper part is visible, the more the tank fills with water. To reduce water consumption, tighten the adjusting screw. As a result, the float is installed lower and the volume of water discharged at one time is reduced.
To completely remove the drain mechanism, just twist it slightly and pull it out.
Replacement of parts may be required in the following cases:
- Water is continuously supplied to the toilet cistern. This problem often occurs due to a misalignment of the float lever, but if nothing has changed after adjustment, then most likely the float has become leaky. The water penetrated inside it, making it heavier. Therefore, he is no longer able to close the water supply hole in the tank. This problem is corrected by replacing it or the entire mechanism, since it is not always possible to find the exact model. Manufacturers are constantly updating their devices.
- Water leaking into the toilet is one of the most common problems. It can be solved by cleaning the mechanism or replacing the drain valve - a rubber band that covers the discharge hole. Over time, it may burst or harden. In this case, it is recommended to replace it with a new one. The elastic band is easy to remove and put on. Or you can try to restore the hardened gum by immersing it in warm water (not boiling water) for half an hour to soften it.
It is best to adjust fittings with two buttons according to the manufacturer's instructions. On some models, to set the small flush, you must move the small flush float up or down relative to the overflow pipe. As you move down, the volume of water discharged increases.
The full flush setting is adjusted using a special flap relative to the glass. When moving upward, the water consumption per discharge decreases.
Design features from different manufacturers
Why know the features of the drainage mechanism in various models? Without this, it is impossible to fix even a small problem that may be specific to a particular device. In this case, you can do the repair yourself without calling a specialist.
Let's look at the most popular models from various brands.
The simple design of the Cersanit toilet cistern directly affects its reliability. It is made according to the classical scheme - the bulb fixes the position of the water supply shut-off mechanism. The most common problems faced by users are.
- Incorrect water supply valve setting. The result is high fluid consumption.
- Large pear size (for Compact model). Sometimes it gets caught on rough thermal walls, which leads to overflow.
But in general, the products of this company can be described as high quality and reliable.
A special feature of the Keramin toilet cistern is the location of the float. They, like their foreign analogues, are mounted not on a horizontal rocker arm, but on the vertical axis of the valve. This design is more reliable and almost completely protected from possible jamming of the float.
In addition, the location of the safety valve should be noted. It is part of the design of the drain system, which makes it possible to significantly reduce the dimensions of the entire mechanism.
One of the simplest and most reliable models to use are models from Porta. The manufacturer initially strived for simplicity in the functionality of the designs. Most models have a one-button water release option. However, thanks to simple adjustment of the location of the bulb, you can set almost any level of filling the container.
At the same time, it is worth noting the design flaws. It is designed for a small tank volume. Therefore, these shut-off valves are installed mainly in their own products.
Sanita and Colombo toilet cisterns are characterized by similar design features. Despite their apparent simplicity, to repair them you need to know the basic principles and rules for carrying out restoration work.
The most popular drain mechanisms are Cersanit, Gustavsberg, Geberit, Ifo and Alkaplast
Cersanit is a Polish company producing bathroom products. Cersanit drain fittings can last 6-8 years. The price starts from 1400 rubles.
Gustavsberg is a Swedish manufacturer of sanitary equipment. The cost of simple devices starts from 1,300 rubles (price without a nut for fastening and without a drain button). The warranty on some device models can reach 8-12 years.
Geberit is a Swiss brand. The products of this company are of excellent quality. 5 year warranty (subject to compliance with operating rules and installation technology). Price from 1300 rubles.
Ifo is a Swiss brand. One of the largest manufacturers of sanitary equipment. The cost of drain fittings starts from 900 rubles.
Alkaplast is a reinforcement made by a Czech manufacturer. Warranty on drain mechanisms for 6 years. Prices for Alkaplast devices start from 500 rubles.
Table with prices at which you can buy drain mechanisms from different manufacturers:
| Name | Price, rubles | |
| Alkaplast | With stop button | 560 |
| Single-mode, A2000 | 830 | |
| SA2000S ½ | 770 | |
| Ifo Hitta, Fargen, Orsa | 940 | |
| Ifo Frisk, Arret | 1200 | |
| Geberit | Impuls | 2340 |
| 282.300.21.2 Double | 2800 | |
| 136.912.21.2 Double | 1330 | |
| Gustavsberg | Siamp | 1300 |
| Nordic, Artic, Logic | 2600 | |
| Cersanit | 1390 | |
The greatest demand is for devices in which you can regulate the volume of water discharged, as this helps to significantly reduce its consumption.
You can repair, adjust or replace the toilet flush mechanism yourself. The main thing is to follow the fittings manufacturer's instructions. The drain mechanism will last a long time if all its parts and the tank are cleaned in a timely manner and used correctly.
State:
New product
Alcaplast SA2000S tank drain kit
- Flush mechanism A2000
- Water drain start/stop
- Wide range of height adjustment
- Possibility of regulating water drainage
- Intake mechanism A17
- Bottom eyeliner
- For ceramic tank
- Plastic thread 1/2″ (3/8″) in diameter
- Low sensitivity to pressure changes in the water supply system
Troubleshooting the most common problems
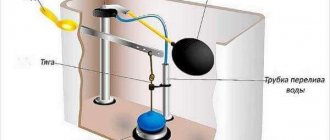
During the operation of a plumbing fixture, situations often arise when the drain tank does not operate correctly. In this case, repair work must be carried out. Let's look at the most common situations when a breakdown can be fixed yourself. To do this, you need to know the general structure of the valve.
Constant flow of water
There are two main reasons for this defect. One of them is float misalignment. To resolve, you must perform the following steps.
- Unscrew the locking ring at the shutter release button and remove the cover.
- Then carry out a visual inspection of the float - if it is under water, then it is necessary to lift it. Most often it clings to the drain valve levers.
- After this, you need to check the correct operation of the mechanism. To do this, you need to drain the water and, without putting on the lid, visually check the rise of the float. As soon as it reaches the desired level, the valve should shut off the water supply.
Over time, the O-ring membrane may lose its elasticity. Purchasing it separately is quite problematic. Therefore replacement is recommended. To do this, you need to read the instructions and select the same device model.
Advice
After dismantling the old one, the integrity of the tank gaskets is checked. It is also advisable to replace them.
This especially applies to the elements of fastening it to the bowl. After this, you can install a new drain device.
Now, knowing the structure of the toilet cistern and how to troubleshoot problems, you can carry out minor repairs yourself.
About the author: vremont
« Previous entry