The era of small ceramic tiles, which we are all accustomed to in our interiors, remains in the past. From year to year it becomes more and more clear that the future of interior design lies in new, large-format ceramic tiles. It not only offers completely new, previously unavailable aesthetic and stylistic possibilities, but also unsurpassed quality, reliability and durability, which no other cladding material can match today.
However, new materials require new knowledge, skills and craftsmanship. Tile Moscow, a leading domestic supplier of premium ceramic tiles, with the assistance of the legendary Spanish manufacturer of ceramic tiles Porcelanosa Grupo, decided to prepare in advance for you a clear and simple installation guide for large-format solutions. So, when you are ready to take a step into the future, you will have a ready-made manual with which you can make the renovation of your dreams come true!
Why do you need a comb?
The reason for using a toothed comb is very simple. When the material is pressed to the surface, the glue will be distributed evenly, filling the voids. If you apply the bonding mixture smoothly, when you press, the excess glue will either come out or accumulate in one place. Thus, the grooves provide better grip on the surface.
The use of a comb helps:
• uniform distribution of glue over the surface; • saving glue consumption; • saving time; • connection reliability.
Considering these features, the choice of a notched trowel for laying tiles is quite logical and justified. If the master needs to perform a large amount of decorative work, then squeezing out and removing excess glue will lead to a decrease in the pace of installation. In addition, overuse of glue leads to overspending on purchases.
Advice. The most convenient to use is a comb with two serrated sides and two smooth sides: you do not have to change tools during the process.
When is a straight edge tool used? This cladding procedure is justified in the case of leveling the wall with glue. However, only experienced tilers can handle this.
Basic tile laying technologies
This publication presents technologies for laying tiles intended for finishing bathrooms and toilets. This will also be of interest to professionals, since non-standard examples are given below, as well as to owners interested in the essence of the issue for informational purposes in anticipation of a major overhaul.
Actually, there are only two classical technologies for laying tiles - “combed” and “slapped”
, the principle of which lies in the methods of applying tile adhesive to the back side of tile materials or to the surface of walls and floors. Details about the characteristics of tiles and professional nuances are published in the tips: rules for laying tiles.
Comb laying technology
This is the most effective method of laying tiles, used for leveled floors using a concrete screed (for floor tiles) and plastered walls under the “lighthouse” (for wall tiles). In this case, notched spatulas with a tooth depth of 6 to 8 mm are used, with the help of which the applied adhesive is “stretched” along the laying plane. The resulting uniform grooves allow you to quickly and accurately lay tiles without so-called “voids” in the adhesive mass, which is very important for flooring - tiles with mortar voids are most susceptible to damage, especially corners, in cases of accidental impacts and falls of even small objects.
This is also justified on heated floors, where elevated temperatures cause natural evaporation of moisture, and, accordingly, expansion of air in the sinuses of the solution voids, which can also, for obvious reasons, play a cruel joke.
Laying method "slap"
Among serious tilers, the technology in question is considered unacceptable, as stated above, due to the possibility of voids appearing in the adhesive composition and low efficiency during leveling.
The adhesive is distributed before laying in even piles according to the size of the tiles, which are placed on top of the mortar, pressed down, tapping with a rubber hammer until the required vertical or horizontal levels are achieved. The adhesive under the tiles, in theory, should be distributed evenly, but in practice this result is rarely achieved, since the mortar is applied “by eye.”
However, the practice of "slaps"
has the right to exist in the conditions of laying wall and floor tiles on vertically “littered” walls or uneven concrete foundations, which occur when bypassing a number of rough stages of major repairs: in the absence of cement-sand screed and plastering work. This is often found in practice due to cost savings on building materials and work.
But it must be remembered that the glue under the tiles in such cases can reach over 2 cm, which in itself does not contribute to high-quality installation due to the ability of the mortar mass to “spread” with a large layer. Therefore, before saving on the work of pouring concrete screed or plastering, it is better to think about the possible consequences.
Glue solution
As for tile adhesive for tiles, porcelain tiles, marble, granite, and other artificial and natural materials, today the choice of products is very extensive. We can only highlight a series of adhesive mixtures that have been proven in many years of practice by most tilers:
- "Unis"
for various purposes; - "Fliesenkleber"
.
The latter is especially recommended when laying tiles on heated floors.
Observations from practice and our experience
We admit that the technology for laying tiles given below will raise doubts among some readers, but nevertheless, the trial, rather risky experience withstood all sorts of tests, including a 4-year period after the completion of the renovation and finishing of the bathroom. We will talk about laying tiles made of natural marble, dimensions 305x305x10 mm, laid using the “comb” method on pre-plastered walls with Teplon gypsum plaster.
Teeth size
How to choose a trowel for laying tiles, and what tooth size is best? The choice of tooth size depends on the size of the facing material.
Let's look at examples:
- 4x4 mm - used for facing products measuring 1x10 cm;
- 6x6 mm - used for finishing with standard dimensions of a facing product 15x15 cm or 20x20cm;
- 8x8 mm - for products 30x30 cm.
For large-format tiling structures, combs with teeth from 10 to 20 mm are used, for example, a trowel for floor tiles.
The shape of the comb teeth comes in three types:
- square;
- semicircular;
- triangular.
Toothed comb for laying tiles: varieties, application during installation
Finishing the surface of walls and floors of premises for various purposes with ceramics provides a high-quality coating that has not only a beautiful appearance, but also a number of other important qualities. The tiled surface has a long service life, is not afraid of exposure to moisture and many other aggressive environments, is quite resistant to mechanical stress, and is easy to care for during operation.
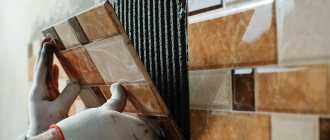
The correct process of laying tiles is ensured by a spatula-comb
But in order for all these properties to fully manifest themselves, and for the floor in the bathroom or kitchen not to lose their original appearance and serve for a long time, you need to be very scrupulous in choosing the basic materials, tools and devices that will be used when carrying out facing work.
Not the last place in this list is occupied by a notched trowel or, as it is also called, a comb, because it is with this tool that the main work of laying ceramics will be done.
Also, depending on the size of the spatula for laying tiles, the consumption of tile adhesive depends, which will ultimately affect the cost of tiling work.
The comb, for laying various finishing materials, primarily ceramic tiles, on the floor or wall, has the form of a trapezoidal plate with a handle attached to it.
Most often it is made of stainless steel, which ensures high-quality application of the adhesive composition to the surface and a long service life of this device.
The notched trowel used in facing work, depending on the way the handle is positioned, comes in two types:
- The handle is fixed on the working plane.
- The handle is located perpendicular to the working plane.
A universal spatula is less common; on its two long sides there is a comb with different sizes or shapes of teeth, which allows its use with different adhesive consistency for laying tiles on the floor or wall. Professional finishers do not use this tool in their practice, because a tool of this design does not have a handle, and working with it is inconvenient and difficult.
A notched trowel is primarily needed for coating tiles, walls, and floors with a primary layer of adhesive.
Another rare specimen is a trowel made of plastic. It is also not widely used due to the short service life of the tool, due to the rapid wear of the teeth, as well as the inconvenience of working with it due to sliding on the surface of the glue.
In addition, the spatula for laying tiles has a wide range according to the following parameters:
- Tool size. There are from 10 cm to 45 cm.
- Tooth shape. There are teeth of square (rectangular), semicircular or triangular shape. Depending on the shape of the teeth, the comb is marked accordingly with a set of alphabetic and numerical symbols. For example, a tool with the designation a1 or a2 has triangular teeth and small spaces between them.
A notched tile trowel has proven itself well, with a handle on the working plane of the tool, having a comb on two sides for distributing the glue over the surface, and the other two sides are used for applying glue to the tile or floor.
Selecting a suitable trowel depending on the shape and size of the teeth
To obtain high-quality installation of ceramics, rational and economical use of expensive glue, you need to choose the right comb, namely the size and shape of the teeth.
Form:
- Square. They are used for applying mixtures with thicknesses from 5 mm to 10-12 mm.
- Semicircular. Used when working with synthetic compounds, or when distributing adhesive with a ridge height of more than 12 mm from cement mixtures.
- Triangular. This tooth shape should be chosen when working with moving mixtures or applying a thin layer no more than 5 mm thick. For example, when laying PVC tiles on the floor, it is convenient to work with an a2 or b1 spatula.
Depending on the size and thickness of the tile, tools with different tooth sizes are used.
Size:
- With teeth from 0.6 -1.2 mm are used to apply the thinnest layer of the mixture.
- Having teeth dimensions of 0.3x0.3 cm, they are used for installing mosaics.
- With teeth parameters of 0.4x0.4 cm, used for installation of ceramics having a size of 10x10 cm.
- With teeth 6x6 mm, suitable for laying fragments with dimensions of 15x20 cm or 20x20 cm.
- ceramics with sides 30x30 cm, laid using a tool with teeth 0.8x0.8 cm.
- When installing large formats on the floor, or tiles with a thickness of more than 12 mm, you need to choose a spatula with ridge parameters of 10x10 mm or 12x12 mm.
Sometimes when laying tiles of the same format, different types of spatulas are used. So, if the floor has significant unevenness and depressions, use an A2 spatula in convex areas, and in recessed areas choose a tool with teeth parameters of 10x10 mm or even 12x12 mm.
You can choose a comb for applying glue based on the recommendations of the glue manufacturer. The packaging indicates the size of the spatula needed for use with this material. For example, on the container it is written that you need to choose comb a2 or b1.
The width of the trowel should be the same width as the element being laid or be slightly larger.
Laying tiles under a comb is much faster and does not require special qualifications of a specialist
Glue application technology
Having dealt with the question of which tool to use in a given situation, let’s consider the technology for installing the finishing material. The process of laying tiles using a comb trowel consists of the following operations:
- A small amount of glue is applied to the floor or wall. For this procedure, a regular flat trowel is used.
- The mixture is distributed with a spatula, and peculiar ridges with the specified parameters are formed.
- The mounted elements are applied to the surface and pressed lightly until the excess mixture and air contained in it are displaced.
- In the next 12-25 minutes, the tile can still be adjusted and its position on the surface changed.
- After final setting, the seams are processed and sealed with a fugue.
After completing all the work, carefully clean the tools used during the installation process from any remaining material, because the same trowel, a reusable device, will last for many years with proper care.
Source: https://zonaplitki.ru/instrument/zubchatyiy-shpatel.html
Teeth shape
How to choose a notched trowel for tiles of the correct shape? If the size of the tooth depends on the size of the decorative product, then the shape must be selected taking into account the thickness of the adhesive composition.
An example of using the clove shape:
- comb up to 12 mm thick - square shape;
- the ridge from 12 millimeters and above is semicircular;
- ridges up to 4 mm are applied with a tool with triangular teeth.
Cutting, grinding and drilling large format porcelain tiles
| № | Name of works | Unit change | In Moscow | In St. Petersburg | In Kazan |
| 1 | Straight-line cutting of large format tiles | p/m | 400 rub. | 370 rub. | 350 rub. |
| 2 | Sanding the end of large format tiles | p/m | 800 rub. | 700 rub. | 600 rub. |
| 3 | Drilling holes 51-100 mm | PC. | 1500 rub. | 1300 rub. | 1100 rub. |
| 4 | Square holes | PC. | 2000 rub. | 1800 rub. | 1700 rub. |
| 5 | Installation of wide-format tiles at 45 degrees (both sides) | p/m | 1400 rub. | 1200 rub. | 1000 rub. |
A separate item displays such parameters as the amount of grout (cutting tiles at an angle of 45°) and the type of grout.
Which spatula is better
How to choose a trowel for laying tiles, taking into account the length of the teeth and the thickness of the adhesive? Practice shows that a craftsman should have combs of different shapes and tooth lengths in his arsenal. This is due to the uneven surface of walls and floors. Other cladding must be laid on a thicker layer of adhesive in order to level out the recess in the wall or the slope of the floor.
Advice. In order not to buy several combs, it is better to purchase one with teeth of different lengths on the edges.
There are plastic combs on sale, but you should not buy them. Firstly, they have difficulty contacting the glue. Secondly, they quickly wear down and become unusable.
Grouting tool
Jointing, or grouting, can be done without using any tools. However, this type of finishing requires a lot of time, patience and dirty hands. Therefore, purchase a special spatula for grouting tile joints.
Types of jointing devices:
- rubber products of various sizes;
- professional graters;
- distribution spatulas;
- jointing gun.
Rubber products are very convenient to use. When choosing, you need to pay attention to the elasticity of the material: it should be elastic, but not soft. Hold it in your hands: the handle should be comfortable. It is not recommended to purchase a tool with a wooden or plastic handle: it is inconvenient.
A spatula for tile joints in the form of a grater is used by professional tilers who perform complex finishing. It has a rubber or rubber surface. Distributing spatulas are somewhat similar to a mop and are used for finishing tiles with an uneven surface. The jointing gun is also used when finishing decorative stone products, terracotta and other uneven surfaces. You can make your own syringe from a durable plastic bag by cutting a hole in the corner. However, a limitation in the use of the gun is the density of the grout: it is used with mixtures of liquid consistency.
Myth 3. Large format tiles are used only for floors and walls
Previously, everything was exactly like this, but today porcelain stoneware production technologies have reached a level that has expanded the possibilities of using the material. European factories produce ultra-thin slabs with a thickness of 3.5 and 5.6 mm and sizes up to 3 meters and even more - for the following applications:
- Finishing countertops . Kitchen sets, coffee tables and dining tables - such porcelain stoneware can be used to create a particularly durable and stylish surface. If you require an unusual shape, professional cutting can come to the rescue.
- Furniture design . In addition to countertops, porcelain stoneware is widely used in finishing cabinet doors, shelving, and even door structures.
- Fireplace cladding . If the fireplace has become the central element of your living room interior, large-format porcelain tiles with a fashionable metal or stone texture will enhance the visual impact.
Preparation for finishing
Inexperienced craftsmen often ask the question: is it possible to lay tiles on putty? Of course, you can veneer any working surface. However, the question is: will the structure hold up?
- To do everything correctly, follow the rules:
- Determine the type of working surface: most require plastering and priming.
- Clean the walls as much as possible from old coverings: paint, wallpaper.
- Level the surface by plastering or installing drywall.
Only after this proceed to finishing. Experienced craftsmen can also install it on putty, having previously made notches and primed the base. In this case, the putty must be checked: knock on the wall. If the response sound is “empty”, installation cannot be done: it will still fall off along with the putty.
How to apply glue correctly
The main thing in this work is not to leave a void between the cladding and the base. The grooves that the comb forms help squeeze air out of the adhesive composition. However, novice tilers may make mistakes when finishing, which can lead to the material peeling off from the base.
So, the sequence of work:
- We take a spatula for laying tiles with smooth edges and apply a lump of glue to the product.
- Using a toothed comb, level the mixture over the entire width and 2/3 of the length.
- We tilt the tile towards the container with glue and distribute the mixture along the entire length, discarding the excess.
- If the working solution is not enough, add another lump of glue.
- Next, apply the working solution to the wall/floor and press the cladding.
Price list for laying large-format porcelain tiles in Moscow (on a leveled surface):
| № | Name of works | Unit change | Price in Moscow | Price in St. Petersburg | Price in Kazan |
| 1 | Laying large-format porcelain tiles 600 mm × 600 mm | m² | 2200 rub. | 2000 rub. | 1700 rub. |
| 2 | Laying large-format porcelain tiles 800 mm × 800 mm | m² | 2800 rub. | 2500 rub. | 2100 rub. |
| 3 | Laying large-format porcelain tiles 900 mm × 900 mm | m² | 2800 rub. | 2500 rub. | 2100 rub. |
| 4 | Laying large-format porcelain tiles 1000 mm × 1000 mm | m² | 2900 rub. | 2600 rub. | 2200 rub. |
| 5 | Laying large-format porcelain tiles 1200 mm × 600 mm | m² | 3000 rub. | 2700 rub. | 2300 rub. |
| 6 | Laying large-format porcelain tiles 1500 mm × 500 mm | m² | 3000 rub. | 2700 rub. | 2300 rub. |
| 7 | Laying large-format porcelain tiles 1500 mm × 800 mm | m² | 3100 rub. | 2800 rub. | 2500 rub. |
| 8 | Laying large-format porcelain tiles 1200 mm × 1200 mm | m² | 3200 rub. | 2900 rub. | 2600 rub. |
| 9 | Laying large-format porcelain tiles 1500 mm × 1500 mm | m² | 3300 rub. | 3000 rub. | 2600 rub. |
| 10 | Laying large-format porcelain tiles 1600 mm × 800 mm | m² | 3500 rub. | 3100 rub. | 2700 rub. |
| 11 | Laying large-format porcelain tiles 1800 mm × 900 mm | m² | 3600 rub. | 3200 rub. | 2800 rub. |
| 12 | Laying large-format porcelain tiles 1600 mm × 1600 mm | m² | 3800 rub. | 3400 rub. | 3000 rub. |
| 13 | Laying large-format porcelain tiles 1400 mm × 600 mm | m² | 3800 rub. | 3400 rub. | 3000 rub. |
| 14 | Laying large-format porcelain tiles 2400 mm × 800 mm | m² | 3900 rub. | 3600 rub. | 3200 rub. |
| 15 | Laying large-format porcelain tiles 2400 mm × 1200 mm | m² | 4300 rub. | 3800 rub. | 3300 rub. |
| 16 | Laying large-format porcelain tiles 2600 mm × 1200 mm | m² | 4500 rub. | 4000 rub. | 3500 rub. |
| 17 | Laying large-format porcelain tiles 2800 mm × 1200 mm | m² | 4600 rub. | 4200 rub. | 3800 rub. |
| 18 | Laying large-format porcelain tiles 3000 mm × 1000 mm | m² | 4900 rub. | 4500 rub. | 4000 rub. |
| 19 | Laying large-format porcelain tiles 3000 mm × 1500 mm | m² | 5100 rub. | 4800 rub. | 4400 rub. |
| 20 | Laying large-format porcelain tiles 3200 mm × 1600 mm | m² | 5800 rub. | 5500 rub. | 5100 rub. |
Grouting joints
Before starting, you should thoroughly clean the work surface. Remember the rule: grouting should not be done over the entire surface at once, but in parts. The facing material and tools should be periodically moistened, and the mixture should be pressed into the openings between the tiles. After jointing is completed, the surface must be cleaned of traces of the mixture.
Which putty is better to joint the seams of paving slabs? Outdoor pavement is susceptible to moisture and temperature fluctuations, so the choice of composition should be approached taking these features into account. Stores sell a special fugue for exterior work, however, you can make it yourself from cement putty and primer. The mixture for laying paving slabs must be diluted to the state of liquid sour cream. Then a durable plastic bag (you can take it from a milk bag) is filled with a fugue and grouted.