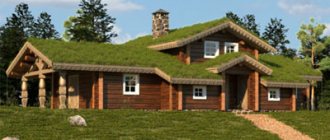
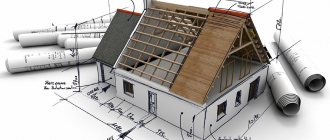
Over the past few years, the construction market has been flooded with so-called frame houses, which are erected weekly in huge numbers both by companies and with their own hands.
The reason for such love for “frameworks” lies in the ease of construction and the pace of construction.
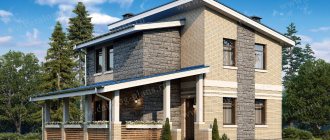
The phased construction of a frame house allows you to assemble a full-fledged residential building in one season, which will look quite presentable, and have an attractive price and cost-effectiveness in maintenance. The technology is easy to understand and implement with your own hands.
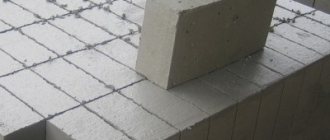
DIY frame house
What is the essence of building a frame house?
As the name implies, the technology consists of forming a kind of frame made of wood (boards or timber) or metal, with gradual, step-by-step covering of it with layers of films, membranes, insulation, etc.
This multi-layer wall design makes it possible to achieve good thermal characteristics with fairly thin walls.
Sectional view of a house wall without additional foam insulation
What materials form the wall?
- mineral wool insulation
- insulation foam sheets
- waterproofing in the form of a film or membrane
- vapor barrier in the form of a diffusion membrane
- OSB sheets
- external and internal finishing
Insulation of a frame house, as we wrote above, is best done in two types. We insulate the house from the inside with mineral wool, and from the outside with sheets of foam plastic.
Foam sheets will improve sound insulation, they are excellent wind protection and, if the properties of mineral wool decrease over time (this can happen when moisture or dew gets inside the walls), they will preserve the thermal characteristics of the house.
Do-it-yourself home insulation using mats
Waterproofing is necessary to protect the insulation from moisture that comes from outside in the form of precipitation.
It must be overlapped, secured with a special adhesive tape for insulation. This allows for 100% protection against water.
Waterproofing walls with isospan in a frame house
The vapor barrier is fixed on the inside of the wall and allows the walls to “breathe”.
Droplets of moisture that can condense in the wall are quietly discharged into the rooms, making the insulation last much longer.
When using high-quality membranes, the risk of mold formation on the walls, black mold spots and other side effects of sealed walls is reduced to a minimum.
And the installation of proper ventilation of a frame house completely eliminates these risks.
Vapor barrier of walls from inside the house using a do-it-yourself membrane
OSB sheets are nailed over the entire structure, and are the basis to which finishing materials will be attached.
Each stage of the work can be done with your own hands due to the lightness of the building material. The technology is quite simple, and it needs to start with the construction of the frame.
Sheathing a house with OSB boards
Dispute Resolution
8.1. Before filing a claim in court regarding disputes arising from the relationship between the Site User and the Site Administration, it is mandatory to submit a claim (a written proposal for a voluntary settlement of the dispute).
8.2. The recipient of the claim, within 30 calendar days from the date of receipt of the claim, notifies the claimant in writing of the results of consideration of the claim.
8.3. If an agreement is not reached, the dispute will be referred to a judicial authority in accordance with the current legislation of the Russian Federation.
8.4. The current legislation of the Russian Federation applies to this Privacy Policy and the relationship between the User and the Site Administration.
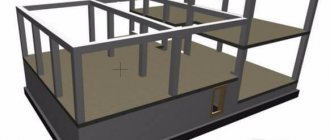
First stage of construction: foundation
Like any other construction, a frame house begins with the construction of a foundation.
The foundation can be:
- tape
- columnar
- pile
We will not consider the remaining types, since they are used extremely rarely.
What is the essence of these foundations?
A strip foundation is a monolithic foundation made of concrete, which is poured in a liquid state under load-bearing external and internal walls.
To do this, you need to apply markings using stakes and rope, mark the locations of future walls, dig trenches with your own hands or with an excavator (mini tractor).
Install formwork in the trench, which can be removable, permanent, purchased in a store, rented, or made from boards or plywood with your own hands.
We waterproof the finished formwork with ordinary film from the inside and fill it with cement mixture for the strip foundation.
When it hardens, it is necessary to remove the formwork and check the geometry. If there are differences in height, apply an additional layer of cement for leveling.
DIY strip foundation
A columnar foundation consists of pillars that are installed in certain places: in corners, in areas of overlap, at a distance from each other of no more than 2-2.5 meters.
The pillars can be cast in cement or prefabricated from blocks. Filled ones are made in the same way as with a strip foundation, but not trenches are dug, but holes into which square or rectangular formwork is installed. The formwork is also waterproofed.
Columnar foundation for a house
When using poured foundations, do not forget to use jibs, since liquid cement is often so heavy that it pushes apart the formwork that you put together with your own hands.
Important: do not forget to recess the reinforcement in the poured foundations or the mesh to make it stronger. It is also necessary to install anchor bolts at this stage.
Pile foundation for a frame house
A pile foundation resembles a columnar one, but the role of pillars is played by piles. They are driven into the ground in the same places where the pillars would be. And they have the same supporting function.
Piles can be used on difficult soils - clayey, for example. After installing the piles, the geometry must be carefully checked. Screw piles can be adjusted in height.
Definition of terms
1.1. The following terms are used in this Privacy Policy:
1.1.1. “Site Administration (hereinafter referred to as the Site Administration)” - authorized employees to manage the site, acting on behalf of the owners of the Site, who organize and (or) process personal data, and also determine the purposes of processing personal data, the composition of personal data to be processed, actions (operations) performed with personal data.
1.1.2. “Personal data” - any information relating to a directly or indirectly identified or identifiable individual (subject of personal data).
1.1.3. “Processing of personal data” - any action (operation) or set of actions (operations) performed using automation tools or without the use of such means with personal data, including collection, recording, systematization, accumulation, storage, clarification (updating, changing), extraction, use, transfer (distribution, provision, access), depersonalization, blocking, deletion, destruction of personal data.
1.1.4. “Confidentiality of personal data” is a mandatory requirement for the Operator or other person who has access to personal data to not allow their distribution without the consent of the subject of personal data or the presence of another legal basis.
1.1.5. “Site User (hereinafter referred to as User)” is a person who has access to the Site via the Internet and uses the Online Store Site.
1.1.6. “Cookies” are a small piece of data sent by a web server and stored on the user’s computer, which a web client or web browser sends to the web server each time in an HTTP request when an attempt is made to open a page on the relevant Site.
1.1.7. “IP address” is a unique network address of a node in a computer network built using the IP protocol.
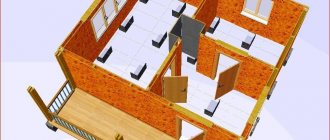
Second stage of construction: walls
At the second stage of construction, we build the frame of the future house.
To do this, we take timber 150, since it is best to use 150 mm insulation, and it fits perfectly between timber of this size.
Wall of a frame house in section
Before installing the frame, it is necessary to complete the strapping device. In total, each house has 2 types of piping - upper and lower.
Banding boards or beams fasten the entire wall structure together. We begin the installation of the lower piping with waterproofing the foundation.
That is, we put a film on the foundation, and we place strapping boards on top of it. We fasten them using anchor bolts, pre-recessed into the unfrozen foundation.
Timber frame
We start the frame by installing corner posts. Their role is played by timber 100x100 mm or 150x150mm or board 150x50 mm.
Corner posts must be rigidly fixed using metal corners, and always struts.
Between the corner posts, simple vertical posts should be located at a distance of a meter and a half.
All vertical posts are fastened to each other by horizontal beams made of timber. More information about the structure of the frame here.
Wall with a window in a frame house
When constructing the building frame, do not forget to make openings for windows.
They must be strengthened with crossbars that take the load and distribute it evenly to the foundation. Read more about inserting windows here.
After erecting the walls, it is necessary to proceed to the next stage.
Covering the first floor platform
The sheathing of the first floor floor platform will be made of osb/osp with a thickness of 18.3 mm tongue and groove. We draw the first sheet, save it as a component and then copy it along the horizontal axes with a step of 2442 mm and 1220 mm in a checkerboard pattern. We cut off the excess. The sheets are positioned with the long side perpendicular to the floor joists. As a result, for the 1st floor we will need 33 sheets of osb / pox with a thickness of 18.3 mm tongue and groove. In my case, the joists have different directions in the northern and southern halves of the house. We arrange the platform sheathing sheets in the same way;
Third stage of construction: roofing
Even while designing your house, you should have decided what type of roof will crown your building.
Most often, a gable roof is chosen for frame houses, however, single-pitch roofs are also in demand due to the ease of do-it-yourself installation, simplicity of design and lower price.
Rafter system diagram
The construction of the roof begins with the rafter system. The rafter system is the main frame of the roof.
The rafter system consists of the following elements:
- Mauerlat
- rafter legs
- racks
- runs
- puff
- sill
- struts
- sheathing
When the roof frame is completed, it is necessary to insulate it. The roof filling consists of almost the same layers as the wall.
From the outside, we insulate the roof with sheets of foam plastic or mineral wool, lay down waterproofing, which we fix with lathing.
Roof and its layers
On the inside we put a layer of mineral wool or polystyrene foam if the attic space is not intended to be residential. We fix the vapor barrier layer and cover everything with OSB boards.
We cover the roof with roofing materials depending on the slope of the slope and our own preferences.
Remember that soft roofing, which has become very popular recently, is laid only on a plane, so the sheathing must be supplemented with OSB boards. In this case, the angle of inclination can be small - from 5 degrees.
Principle of angle formation
The corners of the building are formed using special corner, end or row blocks.
The essence of the work is that concrete should fill the internal space of the thermoblocks, forming a monolith. Those block walls that impede the passage of concrete are cut out.
To pour concrete into the cavities of corner blocks, it is necessary to place four reinforcement rods connected by knitting wire into the cell with a ten-centimeter gap between them. This is how a reinforcement frame is formed.
The reinforcement should be placed along the rod and into two cells horizontally adjacent to the corner. The diameter of the reinforcement must be calculated by the architect at the project development stage.
If necessary, the thermoblock is cut with a regular saw at a certain angle to obtain the angle of the desired degree,
Fourth stage of construction: floors
On the ground floor, floors are most often installed on the ground. What does it mean?
The technology is as follows. We remove the initially fertile layer of soil and fill it with a layer of gravel.
It is necessary for drainage, since moisture will seep inside and have less contact with the cement screed.
On the ground we make a layer of sand of 30-50 cm, depending on the height of your foundation. Carry out compaction with your own hands or using equipment.
As a result, the sand layer should be located 5 cm below the foundation level to avoid cold bridges and freezing in the corners.
Scheme of rough screed on the ground in a frame house
Next, we perform a rough screed using liquid cement. If you take cement that is a little more liquid than for constructing a foundation, you will not have to level it with tools, since under the influence of gravity the cement itself will be evenly distributed over the ground. The most important thing is that the ground is level, otherwise the liquid cement will flow into one place.
When the rough screed is dry, you can continue installing the floor. To do this, we waterproof it with a film, on top of which we lay out the floor insulation.
Using a mesh, you can attach underfloor heating pipes (liquid or electric) on top of the insulation. And fill in the finishing screed.
The final part of floor construction is the floor covering. These can be wooden floors, tiles, laminate, etc.
If you do not want to use cement in the construction of the floor (for example, if construction takes place in winter), the technology of constructing wooden frame floors based on logs will help you. How to arrange such a floor, see the diagram:
Floor installation using logs
To set it up you need:
- board 25x100
- timber 200x200
- timber 70x195
- board 50x150
- wind protection
- insulation
- osb
- underlay and laminate or tile
You will find more information about flooring in a frame house here.
Purposes for collecting user personal information
4.1. The Site Administration may use the User’s personal data for the following purposes:
4.1.1. Providing the User with access to personalized resources of the Site.
4.1.2. Establishing feedback with the User, including sending notifications, requests regarding the use of the Site, provision of services, processing requests and applications from the User.
4.1.3 Confirmation of the accuracy and completeness of the personal data provided by the User.
4.1.4 Providing the User with effective customer and technical support if problems arise related to the use of the Site.
4.1.5 Providing the User, with his consent, with product updates, special offers, pricing information, newsletters and other information on behalf of the Site or on behalf of the Site’s partners.
4.1.6 Carrying out advertising activities with the consent of the User.
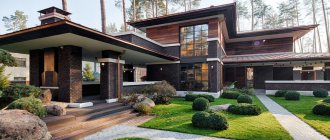
Fifth stage of construction: finishing
At the fifth stage of construction, the external and internal finishing of the house, installation of plumbing, connection of lamps, sockets, heating of the frame house and other work are carried out, which will make a real home for living or recreation from a simple box with walls and a roof.
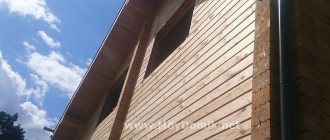
Since the walls of the frame house are covered with OSB boards, it will not be difficult to carry out external and internal decoration even with your own hands.
You can read about how to do external finishing and choose the right materials in our article here.
External finishing with plaster
Interior decoration depends primarily on the preferences of the home owners, and can be done using tiles, wallpaper, liquid wallpaper, plaster, in particular decorative.
The walls can be painted, covered with clapboard, siding, the ceilings can be whitewashed, or suspended ceiling technology can be used.
The floor can be covered with tiles, parquet, laminate. In general, there is room for your imagination to run wild.
Interior decoration with block house
By this time, you should already have all the pipes for installing plumbing installed (they are removed during the construction of the floors, during the rough screed), and the electrical wires should be laid out.
Construction of a frame house from the first to the fifth stage takes about 3 months.
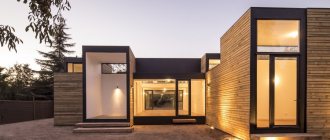
Historical reference
The very first houses built using frame technology arose in Europe more than five centuries ago. In Japan - even earlier. In Germany, the Scandinavian countries, the USA, Japan, and Finland, frame houses for individual families are built using this technology. Panel houses have been built in Canada for more than two hundred years.
In Europe, three- to four-story public buildings are being built everywhere. In Japan and most European countries, it is allowed to build frame houses up to seven floors high.
Additional terms
9.1. The Site Administration has the right to make changes to this Privacy Policy without the User’s consent.
9.2. The new Privacy Policy comes into force from the moment it is posted on this Site, unless otherwise provided by the new edition of the Privacy Policy.
9.3. All suggestions or questions regarding this Privacy Policy should be sent to the email address [email protected] dachny-ray.rf
9.4. The current Privacy Policy is posted on the page at: https://dacha-ray.rf