The monolithic floor slab has always been good because it is manufactured without the use of cranes - all work is carried out right on site. But despite all the obvious advantages, today many refuse this option due to the fact that without special skills and online programs it is quite difficult to accurately determine such important parameters as reinforcement cross-section and load area.
In this article, we will help you study the calculation of the floor slab and its nuances, and also introduce you to the basic data and documents. Modern online calculators are a good thing, but if we are talking about such an important moment as the roofing of a residential building, we advise you to play it safe and recalculate everything yourself!
Step 1. Drawing up a floor plan
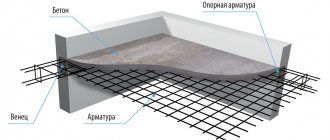
Let's start with the fact that a monolithic reinforced concrete floor slab is a structure that lies on four load-bearing walls, i.e. rests along its contour.
And the floor slab is not always a regular quadrangle. Moreover, today residential building projects are distinguished by their pretentiousness and variety of complex shapes.
In this article we will teach you how to calculate the load per 1 sq. meter of slab, and you will need to calculate the total load using mathematical formulas. If it’s difficult, divide the area of the slab into separate geometric shapes, calculate the load of each, then simply add it up.
Kinds
Monolithic slabs differ in device technology:
- Monolithic beams;
- Beamless;
- With permanent formwork;
- On corrugated sheets.
Beamless types of floors are the most common type, since their installation does not require a large amount of materials, which can significantly save money. Beamless construction consists of a solid slab supported by columns or capitals.
Corrugated flooring is most often used during the installation of terraces, garages and similar buildings. In this case, the corrugated sheet plays the role of an unbending base on which concrete is poured. A frame of metal columns and beams is used as a support.
It is very important to make the correct calculations and drawings for high-quality flooring of the room.
Step 2. Designing the geometry of the slab
Now let's look at such basic concepts as the physical and design length of the slab. Those. the physical length of the floor can be any, but the calculated length of the beam already has a different value. It is called the minimum distance between the most distant adjacent walls. In fact, the physical length of the slab is always longer than the design length.
Here is a good video tutorial on how to calculate a monolithic floor slab:
An important point: the load-bearing element of the slab can be either a hinged non-cantilever beam or a rigid pinched beam on supports. We will give an example of calculating a slab for a non-cantilever beam, because this is more common.
To calculate the entire floor slab, you need to calculate one meter of it first. Professional builders use a special formula for this. So, the height of the slab is always indicated as h, and the width as b. Let's calculate a slab with the following parameters: h=10 cm, b=100 cm. To do this, you will need to get acquainted with the following formulas:
Paying for three deliveries instead of one is cheaper than rebuilding a house
When importing building materials, one must not be negligent and put everything at one point. Professional builders know this, but amateurs will load everything into the elevator and get stuck at best.
Calculate in advance what materials will be needed and determine the time frame for deliveries.
Step 3. Calculate the load
The floor slab is easiest to size if it is square and you know what the planned load is. In this case, some part of the load will be considered long-term, which is determined by the amount of furniture, equipment and number of floors, and the other will be considered short-term, like construction equipment during construction.
In addition, the floor slab must withstand other types of loads, such as statistical and dynamic, while the concentrated load is always measured in kilograms or newtons (for example, you will need to install heavy furniture) and the distribution load, measured in kilograms and force. Specifically, the calculation of the floor slab itself is always aimed at determining the distribution load.
Here are valuable recommendations on what the load on the floor slab should be in terms of bending calculations:
Another important point that also needs to be taken into account: which walls will the monolithic floor slab rest on? For brick, stone, concrete, foam concrete, aerated concrete or cinder block? That is why it is so important to calculate the slab not only from the point of view of the load on it, but also from the point of view of its own weight. Especially if it is installed on insufficiently durable materials.
The calculation of the floor slab itself, if we are talking about a residential building, is always aimed at finding the distribution load. It is calculated by the formula: q1=400 kg/m². But to this value add the weight of the floor slab itself, which is usually 250 kg/m², and the concrete screed and finished floor will give an additional 100 kg/m². In total we have 750 kg/m².
Keep in mind that the bending stress of the slab, which along its contour rests on the walls, always falls on its center.
Programs for architects
Professional work on the design of buildings and structures is impossible without the use of technical programs for calculating floors. If building houses is your main occupation, it is worth making the effort to learn design tools.
ArchiCad program interface for floor calculations
The most common technical engineering programs in design organizations are ArchiCad, AutoCad, Lira, NormCAD and SCAD.
Advantages of engineering design programs:
- Versatility. Any of the programs can be used to construct and calculate all types of floors.
- Accuracy. The calculation takes into account a large number of factors that can affect the load and strength of the structure. Such detail in calculations allows you to obtain the most accurate data.
- Visualization. Having received the result, the builder clearly sees what and how he must install in order to obtain a guaranteed result.
- Preparation of project documentation. For professional developers, with the help of engineering programs, it is possible to prepare documentation that is accepted by all inspection bodies.
Disadvantages of engineering design programs:
- The claim that such tools are easy to learn is false. Often, their use requires special technical education, knowledge of strength materials and unified building codes.
- Volume of information: to work with engineering programs, you need to have a large amount of data, otherwise you can get unexpected calculation results.
- Access restriction: the programs are licensed; to use, you must purchase rights to use.
Step 4. Select the concrete class
It is the monolithic floor slab, unlike wooden or metal beams, that is calculated according to its cross section. After all, concrete itself is a heterogeneous material, and its tensile strength, fluidity and other mechanical characteristics have a significant spread.
What is surprising is that even when making concrete samples, even from one batch, different results are obtained. After all, a lot here depends on factors such as contamination and density of the batch, compaction methods and other technological factors, even the so-called activity of cement.
When calculating a monolithic floor slab, both the class of concrete and the class of reinforcement are always taken into account. The concrete resistance itself is always taken to be the same value as the reinforcement resistance. That is, in fact, it is the reinforcement that works for tension. Let us immediately make a reservation that there are several calculation schemes that take into account different factors. For example, forces that determine the main parameters of the cross section using formulas, or calculations relative to the center of gravity of the section.
Step 5. Select the reinforcement section
Failure in floor slabs occurs when the reinforcement reaches its tensile or yield strength. Those. almost everything depends on her. The second point is that if the strength of concrete decreases by 2 times, then the load-bearing capacity of the slab reinforcement decreases from 90 to 82%. Therefore, let’s trust the formulas:
Reinforcement occurs by tying reinforcement from welded mesh. Your main task is to calculate the percentage of reinforcement of the transverse profile with longitudinal reinforcement bars.
As you have probably noticed more than once, its most common types of sections are geometric shapes: the shape of a circle, rectangle, trapezoid. And the calculation of the cross-sectional area itself occurs at two opposite angles, i.e. diagonally. In addition, keep in mind that additional reinforcement also gives a certain strength to the floor slab:
If you calculate reinforcement along a contour, then you must select a certain area and calculate it sequentially. Further, it is easier to calculate the section on the object itself if you take a limited closed object, such as a rectangle, circle or ellipse, and carry out the calculation in two stages: using the formation of an external and internal contour.
For example, if you are calculating the reinforcement of a rectangular monolithic floor in the shape of a rectangle, then you need to mark the first point at the vertex of one of the corners, then mark the second and calculate the entire area.
According to SNiP 2.03.01-84 “Concrete and reinforced concrete structures”, the tensile strength resistance to A400 reinforcement is Rs=3600 kgf/cm², or 355 MPa, but for class B20 concrete the value is Rb=117kgf/cm² or 11.5 MPa:
According to our calculations, to reinforce 1 linear meter you will need 5 rods with a cross-section of 14 mm and a cell of 200 mm. Then the cross-sectional area of the reinforcement will be 7.69 cm². To ensure reliability regarding deflection, the height of the slab is increased to 130-140 mm, then the cross-section of the reinforcement is 4-5 rods of 16 mm each.
So, knowing such parameters as the required grade of concrete, the type and cross-section of reinforcement that is needed for the floor slab, you can be confident in its reliability and quality.
Differences between PC and PB hollow core floor slabs
In recent years, PC floor slabs introduced into circulation back in Soviet times have been replaced by a new generation of products - hollow formless molded bench panels of the PB brand (or PPS, depending on the project).
If PC reinforced concrete slabs are manufactured according to drawings of the 1.141-1 series, then there is no single document on the basis of which bench panels are produced. Typically, factories use shop drawings provided by equipment suppliers. For example, series 0-453-04, IZH568-03, IZH 620, IZH 509-93 and a number of others.
We have summarized the main differences between PC and PB boards into one table.
| PC | PB |
| Thickness | |
| 220 mm, or 160 mm for lightweight PNO slabs | From 160 mm to 330 mm depending on the project and required length |
| Width | |
| 1.0; 1.2; 1.5 and 1.8 meters | The most common are 1.2, but there are also stands with a width of 1.0 and 1.5 meters |
| Length | |
| For lightweight PNOs up to 6.3 meters with a certain pitch, individual for each manufacturer. For PCs - up to 7.2, less often up to 9 meters. | Since the slabs are cut to length, it is possible to produce the required size to order in increments of 10 cm. The maximum length can reach 12 meters depending on the height of the panel. |
| Load | |
| Typical 800 kgf/m2, upon request it is possible to produce a load of 1250 kgf/m2 | Although most often they produce a load of 800, the technology makes it possible to make slabs and any other load from 300 to 1600 kgf/m2 without additional costs. |
| Smoothness and evenness | |
| Still, the technology is old and all the molds are already worn out, you won’t find ideal slabs, but downright bad ones are rare. In appearance it's a solid 4. | They are manufactured on the latest benches and smoothed with an extruder. As a rule, slabs look much better, although there may be some exceptions. |
| Reinforcement | |
| Up to a length of 4.2 - simple mesh; longer panels are made prestressed, because the use of tension allows you to achieve the required strength grade at lower costs. | Prestressed at any length. Depending on the project, the strings can be either 12k7 or 9k7 ropes or VR-1 wire. |
| Concrete grade | |
| M-200 | From M-400 to M-550 |
| Sealing holes | |
| Typically performed at the factory. If you have not done this, be sure to fill it with M-200 concrete | Sealing of holes is not required, since the design provides for sufficient strength of the end sides even without additional reinforcement |