Household appliances of this type have long become an indispensable attribute for most households. Purchasing and connecting washing machines to sewerage and water supply has long become commonplace and most of us know how it’s done.
However, in this article we will dwell on the issue in detail and analyze all the nuances of connecting to water supply and sewerage, what methods exist, what tools and materials we will need, and how to avoid common mistakes.
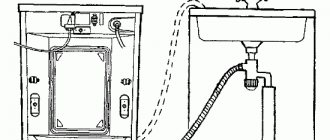
But first, let's briefly learn how to connect a washing machine: the hose for connecting cold water is screwed at one end to the water pipe, and the other to the filler fitting of the machine. The end of the drain hose at a certain height is connected to the sewer system. Below, we will look at all the processes in more detail.
Draining methods
Some people prefer to install large equipment without the help of specialists. Such actions help them save on the wages of the master, and fully ensure the quality of their work. There is an opinion that to drain dirty water during washing, it is enough to place the drain hose in the bathtub or sink. This is not true. It is much better to connect the machine to the sewer using the necessary equipment.
When connecting, do not twist or squeeze the drain hose - this will interfere with normal water flow.
| Basic connection methods | ||
| Connection type | Advantages | Flaws |
| Connection via siphon outlet | Reliable and secure connection; exposed parts can be covered with a decorative panel. | It may be difficult to connect to the siphon if it is too far away |
| Connection directly to the sewer | Used if the siphon is located too far from the car. | Difficulty connecting |
| Hose outlet to plumbing | The easiest way to connect. The height of the sides of the plumbing does not affect the drainage. | There is a high risk of the drain hose tearing off the side of the bathtub or sink and flooding the floor |
Connecting the drain via a siphon
Draining the washing machine directly into the sewer
Direct drain to the bathroom
Draining water into the bathtub and toilet
One of the most common ways to drain dirty water is by attaching a hose to the side of a plumbing fixture. However, with strong water pressure, the toilet lid may not hold the device, as a result it breaks off and heavily floods the bathroom floors.
Placing the flush hose on the edge of the toilet is dangerous
If the hose is positioned incorrectly, the toilet lid may also open slightly and the hose may slide off the side. The same actions occur if the surface of the plumbing is unstable. To prevent a flood, the outlet must be fixed to the side using a plastic hook included with the machine.
Draining waste water into the bath
Plastic holders
The advantage of this method is the ease of connection to the water drainage system. People don’t have to bother with pipes and siphons when connecting. In addition, the height of the bathtub side often varies from 60 cm to 80 cm. However, such a machine drain system in the bathroom also has a number of disadvantages.
Disadvantages of draining plumbing
With this kind of drainage, the plumbing fixtures are constantly in contact with dirty water. Rarely does water penetrate directly into the drain. Usually the edge of the hose only reaches the edge of the side of the plumbing fixture. When such a drain is made, the flowing water constantly contaminates the plumbing. The drainage of the toilet does not make it possible to use the toilet normally, which leads to additional inconvenience.
Water from the drain hose may contaminate the bathtub
One of the most important drawbacks is the drain hose getting tangled around the edges of the bathroom plumbing. This leads to damage to floors and flooding of neighbors. Moreover, the hose falls due to both carelessness of users and strong vibrations during rinsing or spinning. When the pump turns on, it can also break. This is due to the strong water pressure.
Connection methods via a siphon or directly into the sewer do not have such disadvantages. The complexity of the connection is justified by the tightness, the exclusion of water leaks, the cleanliness of the plumbing and the presence of unpleasant odors.
Connection to the sewer system using a siphon
To connect the drainage system this way, you need to install a siphon high under the sink. This will prevent water from returning to the machine. It is not easy to connect the drain under the sink; if the drain hose is short, it needs to be extended. The maximum size is indicated in the instructions for the machine. The only drawback of extension is the increased load on the pump. An additional section of the hose increases water pumping and the pump wears out faster.
Connection to the sewerage system via a siphon
The plastic siphon is equipped with a pipe to which the hose is connected. This connection must be secured with a coupling in order to prevent the penetration of unpleasant sewer odors into the machine and to seal the connection. The drain pipe allows water to enter the drain pump.
With this connection, dirty water is drained into the sewer without hindrance. There are no water leaks under the siphon above the floor. This is due to the sealing of the siphon using a rubber cuff.
In the bathroom, you can easily do what you need to do, since the sink or toilet is not occupied by a hose. Water flows directly into the sewer through a siphon. The only thing that may bother you is the liquid coming through the drain pump and slightly gurgling in the neck of the sink.
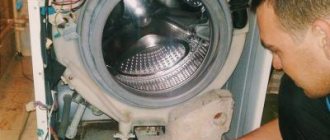
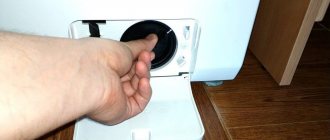
Removing shipping parts
After the washer is unpacked, you need to check and remove all transport parts that provide rigid fixation of the tank and other rotating parts, which are thus protected from damage during transport.
These parts will be bolts, holders, rods and brackets that need to be disconnected. It should be noted that if the machine is turned on before the shipping parts have been removed, this may cause irreversible damage and may cause the machine to fail.
The main type of transport parts are bolts. With their help, the tank is fixed, which, after unscrewing, should hang on springs. This is the normal operating condition of the tank. These holes, which remain after the bolts are removed, are usually plugged by the plastic plugs supplied with the kit.
The brackets provide additional rigidity for transportation, and they also help secure the power cord and drain. Sometimes additional transport beams are placed between the tank and the body, which can be removed after the machine is tilted slightly forward.
These transport parts that you removed should actually be stored in case of moving the machine to a service center, to a new apartment or cottage, they should be mounted back to avoid damage to the machine during transportation.
The correct procedure for removing shipping parts can be found in the owner's manual that came with your machine.
How to install a siphon
People often think about which washing machine siphon to use and how to connect it. Ideally, the new siphon is equipped with a pipe to which a hose is connected to drain the water. First, the product is connected to the neck of the sink. It is installed not in a horizontal, but in a vertical position. If this rule is not followed, leaks may occur.
The position and height of the connection also plays a very important role. Where the back cover is located, the drain hose must be at a height of at least 60 cm. The drainage system may be located lower. The back cover of the washing machine is usually equipped with a special fastener at the top, to which you can attach a hose to drain the water.
Connecting the siphon to the sewer pipe and to the pipe coming from the machine
Some craftsmen believe that the system should not be too tight, believing that the gaps prevent partial backflow of dirty liquid. This does not always work, so the system must be sealed. To prevent backflow, a special valve called an anti-siphon is used. After installing the siphon, you need to open the tap to check the connection.
After this, connect the drain hose using a cuff or adapter. If there is no cuff, then for tightness the adapter must be tightened with a clamp at the connection point. Often people use siphons that can be built into walls. One part of such a siphon is directed towards the sewer pipes, the second - outwards, to which a drain hose is connected and tightened with a clamp. To connect the machine as quickly as possible, a cold water outlet is installed nearby.
Installing a built-in siphon for a washing machine
If you do not want to connect a drainage system with a siphon in the bathroom, you can connect the machine directly to the sewer.
To start
Determine location
The most popular and most suitable places to install a washing machine are:
- bathroom,
- kitchen,
- restroom,
- combined bathroom.
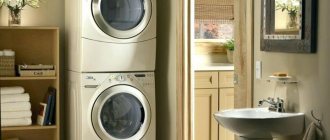
To ensure safe operation of the device and also reduce noise, it is necessary to install it on a flat and stable surface, away from heating devices. Ideally, at the repair stage, make a concrete screed under the device.
But you can come up with an alternative option that will be creative and interesting. It should be noted that the washing machine can be placed not only separately, but also built into various cabinets or even placed under the sink. The main thing is that the dimensions allow it. Therefore, even at the stage of choosing and designing a space, you need to find out the width, height and depth of the body in order to successfully fit into the allotted space.
Unpacking and Preparation
When the equipment is already at home, it should be freed from the box in which it was sealed by the manufacturer and the protective foam layer should be removed. From the factory, the machine sits on a shipping pallet, which must be carefully removed.
After unpacking, you will need to remove the shipping (locking) bolts. They secure the drum to prevent internal damage during transportation. In the space left empty after removing the bolts, special plugs are inserted, which are included in all units.
Tools
Everything you need for work can probably be found in every home:
- adjustable wrench,
- wrench,
- ball valve,
- fitting,
- tee or crimp coupling (the choice depends on what type of pipe),
- threaded adapter,
- withdrawal (if necessary),
- flexible hose.
How to connect a machine without using a siphon
Making a direct connection to the sewer is not difficult, the main thing is to use a tee and follow all the height rules. A tee with a diameter of 50 mm is installed in the socket of a plastic sewer pipe.
A plastic or polyethylene tee is mounted as follows:
- first you need to remove the old siphon;
- then insert the adapter;
- after this the tee itself is installed.
Sometimes it is necessary to use an additional plastic tube to connect to the sewer drain. How to connect the drainage system directly to the sewer?
Installing such a drainage system in the bathroom is easy:
- first you need to lower the hose into the pipe;
- then fix;
- and then connect hermetically.
If the connection is not airtight, sewer odors will enter the room.
It is not for nothing that the back cover of the washing machine is equipped with a special fastener for the hose, which is located much higher than the area from which the hose comes out. If it is in the correct position, even when the pump is turned off, dirty water does not flow back into the machine. If the cover does not have such fastening, you should make an S-shaped bend of the hose yourself.
Connecting the washing machine drain to the sewer
It is worth noting that a straight hose can always lead to the backflow of dirty water, and even well-washed clothes can “smell” with sewer odors. This is why it is so important to position the hose correctly. The adapter is used to improve sealing.
By the way, the same actions are performed when a hose needs to be replaced. Then the back cover is removed and the hose to which the drain pump is connected is replaced. Some washing machines are designed in such a way that when replacing the drain hose, the top cover of the machine must also be removed, which is put back in place after replacing the hose.
Diameters of sewer pipes made of different materials
Replacing a cast iron elbow with a plastic one
- Plastic sewer pipes have recently found their use more and more often. Without any problems, they are replacing cast iron products, which have been on the market for decades. Such products have comparative advantages, a diverse range and are easy to install. The assortment offers plastic pipes for internal sewerage with cross-sectional sizes of 32, 50 and 110 mm. A wide variety of shaped parts makes it easy to connect products. When joining pipes, the sockets are provided with rubber gaskets that prevent leaks from forming. The connection of products between each other and shaped parts occurs thanks to not only sockets, but also soldering, which is carried out with special installations. Such pipes allow drainage to pass through well. In addition, they are durable and do not cause serious accidents. External sewerage networks are installed from pipes with a diameter of 110 mm.
- PVC pipes are now widely used. They are characterized by high wear resistance and long service life. In addition, the products have good throughput. In practice, they occupy a leading position today in the installation of sewer systems. In addition to the most popular cross-sectional sizes of 32, 50 and 110 mm, the diameter of PVC pipes can be larger. When installing sewer pipelines outside buildings, products with a diameter ranging from 110–500 mm are used, and the walls can be up to 15 mm thick. Of course, pipes with such characteristics are laid for the construction of main pipelines.
- Although the good old cast iron pipes are becoming obsolete, they are still used today. They are rarely used for internal installation, but when laying external networks such products are still found. Modern cast iron pipes are made by casting. They resist corrosion well and have a coating on the inside that minimally interferes with the passage of wastewater. Pipes are connected using sockets using cuffs or sealing rings. The diameters of cast iron products are standard. Average diameters are determined by cross-sectional dimensions in the range of 50–300 mm. When laying main lines, the diameters increase to 1200 mm.
Note! To determine the diameter of the pipe, you need to look at the surface markings. The required value is written at the end of the text in numbers.
Connection height
When connecting a drainage system, a parameter such as height must be observed. The pump-out pump has limited power, so the hose must be placed at a height of 80 cm near the machine itself, and at a height of 60 cm or higher near the sewer.
If the hose is positioned lower, the machine pump can wear out quickly. Manufacturers also do not recommend extending the hoses by more than one and a half meters, or using low-quality materials - the pump may work slower or break.
Standards for connecting a washing machine to a siphon
The end of the hose, located at a level of 60 cm from the floor or higher, must be led into the sewer outlet and secured with a cuff or elastic band measuring 3.2x4 cm, overlapping with the pipe. When connecting to the outlet, the hose must not be in the water.
If the outlet is not equipped with a check valve, with an S-shaped connection this effect can be achieved due to the air gap. The lowest part of the hose should be located 50 cm from the floor or higher. If the sewer pipe is located below 50 cm, when connecting a drainage system without a siphon, a “siphon effect” may be created and a constant sewer smell may occur.
Question answer
Can it be installed on wood or laminate flooring?
If the washing machine is installed on laminate flooring, it will vibrate. And this unpleasant moment cannot be corrected by anything, not even by twisting the legs. Plus it will slide. If there is a leak, the laminate will quickly become unusable due to moisture.
If you install the equipment on an uneven wooden floor, there will be problems with the distribution of laundry and, as a result, the bearings will fly prematurely.
When installing on a wooden or laminate floor, be sure to place a rubber mat or polyurethane spacers under the legs. Rubber bands will protect the coating and reduce vibration levels.
What to do if the car jumps?
There are many reasons why the machine jumps during the spin cycle. Basically, they arise due to improper installation and operation of the device.
Most can be eliminated with your own hands:
- If the transport bolts have not been removed, a rigidly fixed, non-shock-absorbing drum will vibrate strongly. It is necessary to turn off the equipment and remove the bolts;
- the unit is unstable on the surface - this problem is easily solved. It is necessary to place a rubber mat and special anti-vibration pads (dampers, shock absorbers, stands, etc.) under the washing machine. They will remove excess vibration and the unit will stop jumping. From available means, you can use double-sided construction tape;
- the settings of the legs are lost - they should be adjusted and fixed;
- uneven distribution of laundry throughout the drum - manufacturers advise following all recommendations for the weight of loaded items (no more than 4 kg at a time). If the problem is caused by an imbalance, then you need to stop the spin cycle and remove some of the clothing;
How to connect a drain in a private house without a sewer system
At a dacha or in a private house there may be no sewerage system, in which case the drainage is carried out “overboard”. If there is no sewerage system in the house, you should not place a drain hose up to 500 cm long on the floor. A long hose collects an amount of water commensurate with the volume of liquid in the drum. Therefore, water can constantly be filled and drained.
It is not difficult to install a drainage system at your dacha; just install a large water tank and lower a hose into it. For pressure, install 2 tanks of water on the 2nd floor of the house.
Connecting the drain of a washing machine in a private house
If there are no large tanks at your dacha, and the water pressure is excessively low, you should think about purchasing a pumping station. This is necessary, because low water pressure leads to breakdowns of the washing machine.