Each home owner, when arranging the ceiling in the cellar and deciding what it can be made of, first of all studies the various flooring options, their advantages and disadvantages. Today, there are several technologies available that are used by most homeowners:
- monolithic concrete slab;
- prefabricated monolithic slab;
- from wooden beams;
- from metal beams;
- ceiling with corrugated sheets.
The ceiling can be made of various materials.
Each of these options can be done with your own hands, but it is always important to follow the technological process. The cellar is one of the rooms where the tightness of the ceilings is of particular importance.
Monolithic floors
Monolithic concrete flooring is considered one of the most reliable and durable options. However, it also costs slightly more than other options. You can save money by doing the construction work yourself.
The construction of concrete floors always begins with the arrangement of formwork. To keep it in place, special supports are made from beams. The walls of the cellar will also serve as support for the ceiling.
Important! The dimensions of the ceiling must be larger than the room being covered - this is the only way to support it on the walls.
When the formwork is ready, it is tied with reinforcing mesh. Sometimes metal rods are used instead. The rods or mesh cells should be located at a distance of 20-25 cm from each other.
In this video you will learn more about the ceiling in the cellar:
Concrete is poured over the reinforcing mesh as evenly as possible and in one step. The sufficient height of the formed slab in most cases is 30 cm. It takes about a month for the concrete to harden.
Slab floors
Monolithic flooring is not the only type that can be made of concrete. Often customers opt for a prefabricated structure, which can be erected faster. At the same time, it preserves the strength characteristics of reinforced concrete slabs.
The main disadvantage of this method is the need to adjust the dimensions of the cellar to the size of the slabs at the construction stage. In addition, lifting heavy slabs requires construction equipment, which reduces the possibilities for independent work.
Steel beams are used to connect the slabs to each other. Proper organization of thermal insulation plays a major role in this design. All hollow parts of the joints are filled with thermal insulation material.
Waterproofing is no less important. For it, either a special membrane or ordinary roofing material with bitumen mastic is used. Waterproofing materials are laid directly on the slab.
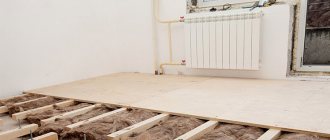
Using beams
When arranging the ceiling of a cellar, it is quite common to use beams - both metal and wooden.
Most often, rails are used as load-bearing metal beams. They are exceptionally accessible - they can be found at every metal depot. But this method also requires preparatory work at the stage of erecting the walls of the cellar.
So, in order to lay the beams in place, special holes or grooves are initially made in the walls at the ceiling level, where they are inserted. Once the beams are in place, the space between them is filled with reinforcement or mesh. They are fixed with wire.
After reinforcement, it is necessary to arrange formwork. It is made of wood, which is quite durable, and waterproofed, which, together with ventilation of the cellar, will ensure the absence of fungi and other harmful microorganisms.
Beams are often used when installing ceilings
At the final stage, concrete is poured into the formwork and leveled. The filling should be uniform.
Important! The concrete must be well compacted, for which a special wooden tamper is used.
What materials to use for the ceiling
The choice of materials to be used for the ceiling depends entirely on the technology used. So, if it is monolithic concrete, then you need cement, sand, gravel or a ready-made concrete mixture. If it is built from slabs, then they will be needed. A beamed ceiling will require metal or wooden support beams. In addition, any structure using concrete mortar requires reinforcing mesh, wood for formwork and nails.
Getting ready to build a ceiling for the cellar - preparatory work
Storage for grown crops is often arranged in a garage. When planning to build a basement in the garage with your own hands, it is important to take into account all the nuances:
- make sure that there are no utilities below the soil level at the work site. This requirement is especially relevant in urban areas, where various highways may be located. If it is possible to go deeper into the soil up to three meters, you can proceed to the next task;
- carry out survey activities aimed at determining the depth of aquifers and assessing soil quality. Professional surveyors will carry out research and provide an official conclusion. In case of increased moisture saturation, drainage and reliable protection of walls and floors should be provided;
- develop the optimal layout of the basement, taking into account all the features. You should pay attention to the shape and size of the basement, which should correspond in size to the contour of the garage space. It is important to choose the right material, as well as the technology for building the foundation.
A traditional cellar is designed so that its entire room is located below ground level.
To ensure a comfortable microclimate, it is important to pay attention to the following points:
- ensuring reliable moisture insulation. Under normal humidity conditions, dampness will not develop;
- implementation of effective thermal insulation. One of the main tasks in this case is the correct insulation of the ceiling in the cellar;
- construction of a ventilation system. Thanks to air circulation, comfortable conditions will be maintained.
Use of wood
Are you planning to build a cellar with your own hands? Use wooden beams - a proven, easy-to-work material.
If you are building a house made of wood, you can cover the basement with wooden beams
Perform the activities in the following order:
- Treat all parts of the wood structure with an antiseptic.
- Wrap two layers of roofing felt around the supporting surfaces of the beams.
- Install wooden beams on the top surface of the cellar walls.
- Secure the end part of the beams with small strips, providing a base for the knurling boards.
- Lay the plank and secure it using self-tapping screws.
- Form a heat-insulating contour, coat with mastic, cover with roofing felt or roofing felt.
- Fill the structure with soil if no structure is planned to be built above the structure.
Pay attention to the presence of grooves in the basement walls necessary for installing load-bearing beams.
Basement ceiling insulation
Parameters such as temperature and humidity in the basement directly depend on how the ceiling was insulated.
To insulate the ceiling surface, a solution of cement mixed with wood sawdust can be used. The thickness of the layer of such a heat insulator should reach 2-4 cm. A similar layer of insulation is applied evenly using a specialized tool.
After applying the solution, you must wait until the insulating layer dries thoroughly and only then begin finishing work. Of course, if there is such a financial opportunity, then it is better to insulate the ceiling using polystyrene foam, polystyrene foam or mineral wool.
Option on load-bearing beams
To make a high-quality ceiling for your cellar, you can use load-bearing beams. Metal beams are best for this. If possible, you can even use ordinary rails, which can often be purchased at construction warehouses or scrap metal collection sites. Often the beams from which the ceiling of the structure is supposed to be made are ordered individually at factories.
Even ordinary rails are suitable as load-bearing beams.
When choosing this method of creating a cellar ceiling, at the stage of its construction it is necessary to provide for the presence of special holes in the walls that are required for attaching load-bearing beams. The ceiling of your cellar will experience significant stress. That is why the walls must also be as strong as possible, capable of supporting the weight of the beams and soil poured on top. By and large, the walls will be the “foundation” for the ceiling.
Special holes are provided in the walls for laying beams.
The order of work is as follows:
- Load-bearing beams are laid in pre-prepared holes in the wall. By and large, this work can be done independently, but with several assistants, because even the rails have significant weight.
- In the space that will be formed after laying the load-bearing beams, it is necessary to mount reinforcing bars and then secure them with special wire. Next, the reliability of the connection and the durability of the beams are checked. If all is well, then wooden formwork is made and a waterproofing layer is applied to it.
- After installing the formwork, it is necessary to install supports that will be designed to take the load of the cement mortar.
- You can mix the cement mortar yourself or order it ready-made from any construction company. The solution must be poured as evenly as possible and without long breaks into the metal frame. All compartments of the frame must be filled with concrete; nothing should be left out. Upon completion of pouring, distribute the solution throughout the entire thickness of the structure.
- The ceiling that is obtained after using this method requires high-quality thermal insulation. In principle, any thermal insulation material is suitable for this.
As a result, you get a reliable floor slab that can withstand serious loads. In this case, the ceiling of the cellar will be perfectly strengthened, insulated and will not cause problems during operation. After all insulation work, the resulting floor must be covered with soil, making a small mound. In some cases, a gable roof is additionally installed, which will protect the cellar from precipitation.
Stage two. Formwork and concrete pouring
After a reliable reinforcement base for the future floor has been erected, formwork should be made that will hold the liquid concrete until it dries completely.
The best formwork for this type of work is strong plywood sheets attached to the bottom of the reinforcement around the entire perimeter of the basement. It is best to fasten plywood to the reinforcement base with thick wire, which is inserted into pre-drilled holes. Before pouring concrete, the plywood formwork sheets must be supported from below with wooden blocks.
Concrete for pouring the basement floor can be mixed using standard technology: for 100 kg of M300 or M400 cement you need 300 kg of sand and 400 kg of crushed stone or gravel. To make a concrete mixture, a small concrete mixer is sufficient.
The formwork can be removed within two days after pouring the concrete. After the concrete slab has completely dried (3-4 weeks), a layer of earth or sand can be poured on top of it.
A cellar is an indispensable building for owners of private houses, ensuring the preservation of food for a long time. It is a room located below the zero level and does not take up additional space on the site. The ceiling of the cellar, made in accordance with building codes, will ensure the strength of the structure, maintain a stable temperature throughout the year and will not allow the formation of dampness.
Storage for food, canned goods, and vegetables, despite its apparent simplicity, will serve its purpose if you approach the work responsibly and properly seal the cellar.
Work on covering the basement and cellar with your own hands can be done on your own
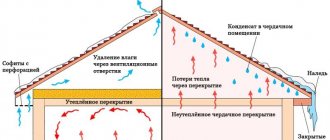
Ventilation
In most cases, the basement floor is used to lay an exhaust ventilation duct. It is designed to remove warm air saturated with moisture, odors and fumes from the room. The pipe should be raised as high as possible to ensure high-quality traction. It is better to install the exhaust vent on the side of the ceiling opposite to where the supply pipe is located. If the roof above the cellar is made of slate or other fragile material, it is advisable to run the pipe along the walls.
The supply channel should be deepened into the ground at least 50 cm. This is necessary so that the air passing through it is heated in winter and cooled in the summer heat. The pipe is brought into the room 5-10 cm above the floor level.
It is recommended to cover the upper sections of the supply and exhaust lines with a fine steel mesh to protect against insects, rodents and amphibians. To prevent water and snow from getting into the pipes during precipitation, umbrellas made of plastic or tin are installed on them. To improve draft, air conditioning systems can be equipped with fans that provide forced pumping of moist air.
Where to begin?
Before starting construction of a basement, a technical plan for the future structure should be made. You can complete the cellar plan yourself, the main thing is to take into account the following criteria:
- waterproofing method;
- internal dimensions of the cellar;
- thickness of external coating;
- type of building material.
A plan for the future construction will help to correctly calculate the amount of building materials required. The place where it is planned to build a cellar is selected according to the following parameters:
- entrance to the premises must be unobstructed;
- possibility of conducting electricity;
- the place should be dry, with solid soil;
- the distance between the building, foundation and groundwater level should be two meters.
It is best to carry out construction work in the summer, when there is no precipitation and the groundwater level is minimal.
Preparatory work
Procuring the necessary building materials for the construction of a basement floor is not the only factor.
The upper plane of the wall of the basement to be covered must be in the same horizontal plane. Small irregularities are leveled with a solution. To eliminate large differences, brickwork is made from fired clay bricks or fine-grained concrete. To lay concrete, formwork is made to cover the entire width of the wall, leveling it horizontally.
No matter how the work on covering the basement is carried out, before it begins, it is necessary to backfill the pit sinuses. Backfilling is carried out after completion of waterproofing, insulation of basement walls, and completion of drainage work.
Backfilling is carried out layer by layer with mandatory compaction. For backfilling, it is necessary to use clay, thereby creating a “clay castle” that provides an additional waterproofing layer. Leveling the soil after filling the cavities is necessary to organize free access to the basement floor at any point in the perimeter of the building.
Preliminary preparation of the pit
The area chosen for the construction must be cleaned as best , eliminating the fertile turf layer, thereby creating a platform for digging. The work is carried out manually, since any other technique can lead to damage to the edges of the pit, which is undesirable for such a cellar arrangement. To make digging much easier, you need to extract the soil, loosening each layer of it and carefully level the edges of the hole as much as possible. If the soil on a residential site is of a loose type, then the pit is dug with a certain slope - in this case, the earth will crumble much less. The upper part of the pit is marked 30−50 centimeters wider in each direction than the bottom. If the groundwater level is high, the pit also needs to be made wider and deeper by 40−50 centimeters; such space must be filled with waterproofing material, which will help protect the walls from dampness . To waterproof the walls and floor in such a room, you can use clay extracted from the pit; it is poured into the bottom of the hole after digging is completed and near the already constructed walls. The top fertile layer of soil is well suited for transferring to the beds of a vegetable garden or front garden, and other soil can be used, for example, to fill the lower layers of an alpine hill.
During these works, it is necessary to be careful and stop them at the slightest suspicion that the concrete has not completely hardened or is crumbling.
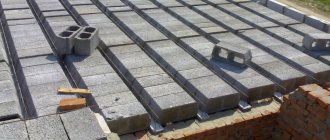
Specifics of installation of prefabricated monolithic slabs
The ceiling in the cellar can be formed using prefabricated monolithic slabs. To carry out construction activities, order special lifting equipment, which will significantly speed up the work.
Precast slabs are blocks that are laid between steel beams and then filled with a small layer of concrete
A number of difficulties arise associated with increased tolerances for the length and width of the slabs. They may simply not correspond to the actual storage dimensions. Considering that the length of the slabs ranges from 9 to 12 meters, before installation you should compare them with the dimensions of the building. If you plan to use monolithic prefabricated slabs, it is advisable to take this into account at the design stage. The width of the basement room must correspond to the parameters of the installed slab.
If the size of the slabs matches the basement, installation is carried out using a crane. Perform the activities in the following sequence:
- connect structural elements using steel profiles;
- fill the cavities in the joints with heat-insulating composition;
- fill the joint planes with concrete mortar;
- lay the roofing material on the surface using bitumen mastic.
Are you having trouble with how to cover a cellar? Use a prefabricated structure made from solid reinforced concrete slabs, which are inexpensive and reduce construction time.
Moisture protection
Reliable waterproofing in the cellar makes it difficult for moisture to penetrate and is carried out as follows:
- Apply a layer of plaster with the addition of liquid glass to the side surfaces of the basement structure;
- stick 2-3 layers of roofing felt onto the wet cement mortar;
- build brickwork, with the help of which you press the waterproofing to the walls.
Before pouring concrete to create a basement, you need to install reinforcement and formwork
Floor protection is carried out in a similar way, involving the preparation of a “cushion” 20 cm thick from a mixture of crushed stone and sand.
Types of overlap
When the pit is equipped and the walls of the cellar are made, it is worth thinking about how to make the ceiling of the cellar with your own hands. The materials and cost of such a structure are very important for the overall estimate for the work, therefore it is necessary to understand each type of ceiling and the features of the work on arranging the ceiling.
As a rule, the ceiling of the cellar is made with a flat ceiling, but in some cases it can be made domed. Such a vaulted ceiling will provide a comfortable microclimate in the room, since the air masses in it mix differently than in other arrangement options.
Some scientists claim that the arched ceiling gives a special aura and energy to the room, which contributes to better preservation of vegetables fresh than in a building with a flat roof.
Concrete ceiling
How to fill the ceiling in a cellar with concrete to avoid collapse and damage to the base of the structure? It is important to calculate the loads in advance, figure out how to fill the cellar with the mixture, determine the sequence of work and the features of concreting buildings of any configuration.
Monolithic slab
Covering the cellar with your own hands in the form of a monolithic slab is done using a frame made of reinforcing rods, filled with concrete mortar. With this design, there is no need to use special equipment or cranes, which will significantly save time and construction costs.
To begin work, you need to prepare plywood (15-20 mm thick), beams for the frame, beams and racks for support, concrete mortar, reinforcement and wire for strapping.
Sequence of work on how to make a ceiling in a cellar made of concrete:
- The ceiling must be made so that it is located on the walls of the structure, which themselves will serve as its support. It is necessary to make special support beams on which the formwork will be located. This design will help maintain the integrity of the concrete slab being poured, even when it hardens;
- The boards from which the formwork is made must be sealed so that the solution does not leak out during pouring. It is also important to saturate all parts with antiseptics. The weight of reinforced concrete will reach 500 kg per square meter if a layer of 20 centimeters is poured. The formwork is placed around the perimeter of the building;
- After the installation of the formwork is completed, a frame is erected from the reinforcement inside, it can be either rods or mesh. When installing it, you need to maintain the correct uniform distance between the rods, usually about 20 centimeters. The lower ends of the rods should rest on the beams as a supporting structure. Such an iron frame protrudes beyond the edges of the slab by 4 centimeters on each side;
- As soon as the rows of reinforcement are laid horizontally and vertically, all elements of their connections must be tied with wire, keeping the mesh size of 15-20 mm. After installation is completed, the frame is checked for the strength of all joints;
- After installing the mesh, concreting begins. The process is carried out extremely quickly from cement mortar as a binder, sand and crushed stone. The height of the slab being poured should be about 20 centimeters;
- The concrete mass must be poured into the formwork evenly, without interruptions, to the very end of the slab. It is important to maintain a uniform pouring direction, avoiding voids. To avoid this, the solution is subjected to vibration. You can use a special vibrating screed, or you can use ordinary wooden blocks;
- At the end of the work, the concrete mass is closed from exposure to the sun, rain or wind. Protect the stove from mechanical damage. After 3 weeks, the formwork is removed.
A layer of reinforcement will be sufficient, but to increase the strength of the structure, repeated, additional reinforcement can be done. As soon as the pouring is completed, the concrete is left to harden, waiting for about a month, during which time it acquires the necessary strength.
Experts recommend using monolithic slabs for cellar floor slabs, since this solution is the most durable, reliable and practical. The surface formed by a slab of concrete can be the foundation for another building built above the structure.
Construction of houses
A cellar is a mandatory extension in a country house or near a private house. In this room, the optimal temperature is maintained all year round to preserve vegetables, fruits, preserves and preparations. It is quite possible to build a cellar yourself. To do this, it is necessary to assess the condition of the soil, determine the optimal type of structure, select materials and adhere to the chosen technology.
Requirements for arranging a cellar
The optimal place for canned food and grown crops is the cellar. This room maintains natural conditions and a temperature of about +4°C. A favorable microclimate is necessary to preserve the presentation and taste characteristics of fruits and vegetables.
Some people confuse the concepts of cellar and basement. However, these are completely different structures. The basement is located in the basement of the building. The cellar is arranged separately - separately on the plot. The design is made invisible, or, conversely, acts as a striking element of landscape design.
Practical use of vegetable storage is possible subject to certain conditions:
- the presence of low temperature - the cellar is built underground or arranged in a basement in contact with the external wall of the house;
- darkening - windows are excluded from the cellar design;
- constant filling with clean and fresh air thanks to natural and supply and exhaust ventilation;
- air humidity is about 80-90%.
Selecting the optimal design and materials
Depending on the depth of burial, the following types of cellars are distinguished.
The ground structure rises above the surface, the depth of the structure is no more than one meter. Essentially this is a small bin for vegetables. A storage shed can be erected anywhere, even in small lowlands.
The construction of a “garden” storage shed is the optimal solution for waterlogged areas and low-lying areas. A distinctive feature of an above-ground cellar is the lack of overlap. As a rule, a gable roof made of boards is installed. Thanks to this, the time and final cost of constructing a vegetable storage facility are reduced. An additional plus is the ease of building such a cellar with your own hands.
A more spacious above-ground cellar - externally the building resembles a small house. Earth is poured on top of the ceiling, covering the ceiling with a thick layer. The end side with the door remains unprotected. Lawn grass is planted on top of the backfill, decorating the area and keeping the soil from crumbling with its roots.
A semi-buried cellar is the most popular type of structure. The structure is externally similar to a ground structure, but part of the room (about 1.5 m) is located underground. The entrance door to the bins is located below the ground surface, so it is necessary to provide a system for draining melt/rain water. The door structure is thoroughly insulated.
A sunken cellar is well suited for compact areas. However, its construction is possible only when groundwater is low or with thorough drainage and waterproofing. The entrance can be covered with a heat-insulating removable cover or decorated with a special cellar - a small house with a hatch in the ceiling. The cellar can be used as a utility room for storing gardening equipment, various household items or vegetables.
Cellar walls are built from different materials: stone, brick, concrete or asbestos-cement sheets. It is not advisable to build a building from metal, since it is difficult to achieve a suitable temperature regime.
When using earth as the main material for the walls, the inside of the bin is lined with wood. The wooden slats must be thoroughly dried, sanded, treated with an antiseptic and dried again.
Making a cellar with your own hands: video on selecting materials
How to make a cellar with your own hands: recessed design
Assessment of terrain and soil conditions
The best location for the cellar is a hill, hillock or hill. Groundwater in such cases passes far from the surface of the earth. When placed on a hill, rainwater ingress is reduced. In addition, you will be able to save on waterproofing materials.
Many people prefer to build a cellar next to a residential building in order to quickly get to and take the necessary products during the cold season, in the rain, etc.
Before starting construction, you need to find out the type of soil and the possibility of constructing a buried/semi-buried vegetable storage facility. To do this, you need to do a little test:
- At the site where the bin is being built, place a scrap of natural wool and a raw egg on top.
- Cover the “structure” with a jar and leave for one night.
- Evaluate the result of the experiment:
- if the wool has dew droplets, then groundwater is located nearby;
- if the egg and wool are dry, then the waters are deep and you can safely start working.
Before building a cellar with your own hands, it is advisable to evaluate the type of soil:
- Peat is the optimal type for bunding. This soil minimizes food spoilage, which is especially important when storing root crops.
- Quicksand is heaving soil that is not suitable for building an “internal” cellar. This soil contains loam, sand and sandy loam. To be able to build a vegetable storage facility, you will have to replace the soil and add sand.
- Sandy soil is well suited for arranging the foundation. This natural material is often added to reduce heaving and moisture content.
Materials and tools
To build a cellar in your country house with your own hands you will need:
- crushed stone and gravel;
- rack sand;
- clay mortar;
- rolls of roofing felt;
- brick;
- cement;
- boards for arranging the floor frame;
- concrete grade 100;
- molten bitumen;
- grid for reinforcement.
Tools you should prepare:
- concrete mixer;
- manual tamper;
- shovels;
- screws, screwdriver, nails, hammers;
- welding machine;
- grinder;
- primer;
- brush;
- hacksaw
Pit preparation
The construction of an underground storage facility begins with digging a pit. The work is performed in the following sequence:
- Clear the area of stones, sticks and vegetation.
- Mark and dig a hole. Traditional cellar dimensions: length/width – 2.5 m, depth – 2.3 m. To dig a pit, it is better to use the services of an excavator.
- Level the walls of the pit with a shovel, scraping off excess soil and giving them a flat surface.
- The depth of the pit depends on the type of cellar being built. When determining this value, it is necessary to take into account that the space will be partially occupied by a hatch or entrance, shelving, and a ladder. In view of this, the pit must be dug with a certain reserve.
- Compact the bottom of the pit, pour sand and gravel into the hole. The thickness of the sand cushion is 20 cm, the gravel cushion is 10 cm.
Application of rolled metal
Are you deciding what to cover your basement with? It is possible to use ordinary rails. I-beams are used as load-bearing beams and are highly durable.
The installation of railway profiles is carried out in special grooves provided in the walls of the building. This allows you to securely fix the structural elements. The length of the beams must correspond to the dimensions of the basement, the walls of which are the base for them.
Form the load-bearing surface using the following algorithm:
place steel reinforcement bars between the beams and secure them with wire;
- mount wooden formwork, lay a waterproofing coating on it;
- install a power frame under the formwork to support the concrete mass;
- fill the structure with solution, ensuring uniformity of the layer and continuity of work;
- lay the roofing material on the surface.
How to calculate?
In fact, the calculation of the basement floor is based on the use of simple formulas for establishing the bending moment M and the moment of resistance W , and their ratio must satisfy the condition: M/W<=Rd, where Rd is the permissible resistance of the structure in MPa, at a load q that can withstand the beam and its length l. M=(ql2)/8.
According to GOST 26519, published in 1985, a safety factor of 1.3 must be taken into account for beam floors. For basements built into residential buildings with a permissible load of 151.0 kg/m2 with a margin, this value is equal to: 151 x 1.30=197 kg/m2.
Intervals made of light blocks with a layer thickness of 180 mm and D 500 create a load: 500x0.18 = 90 kg/m2 . A reinforced screed with a layer of 55 mm and a density of 2000.0 kg/m3 creates a load: – 2000*0.055=110 kg/m2.
The total floor load will be: 197 +110+90=396.0 kg/m2. The deflection is calculated based on the total load for an I-beam Ry=2000 kg/cm2, span length l=4.5 m
Find Mmax Qmax . Based on the results obtained and Wtr and Itr and rental tables, select the I-beam number:
In this case, I-beam No. 14 is quite sufficient.
External device
The estimated size of the future cellar depends on what you are going to store in it. Its shape in the layout can be a circle, a square or even a polyhedron. Typically, a cellar has two parts: a lower part, which goes into the ground, and a cellar - an above-ground part that protects the structure from heat and frost. It can be used as a storage room.
Covering depending on the type of cellar:
- An ordinary earthen cellar is covered with a gable roof, lowered to the ground itself. It can be constructed from straw mixed with clay, branches or reeds. The roof itself is made of boards, under which roofing felt or roofing felt is laid. It is possible to insulate with peat to avoid freezing.
- A cellar with a cellar has a pitched roof and protruding overhangs, which helps keep the walls dry.
- A stone cellar can be made strong and reliable with the help of a correctly calculated and laid masonry vaulted roof.
- An above-ground, bunded basement has a roof made of clay mixed with straw, which is then covered with polyethylene or roofing felt.
Ventilation systems are often installed in basements. You can bring out 2 pipes through a hatch, or directly through the ceiling, or simply build in a hatch for ventilation.