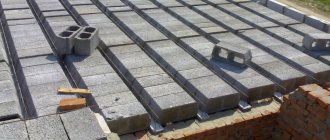
The easiest way to cover spans and install horizontal supports is to lay floor slabs. Such slabs come in different types and each of them has its own special characteristics, operating rules, sizes and shapes. It is thanks to the wide selection of floor slabs that they can be used to cover spans of any complexity. However, you should definitely take into account the special criteria for installing floor slabs.
Floor slabs: pros and cons
Precast concrete slabs are primarily designed to delimit floors and dissipate the load, which is then transferred to load-bearing walls and foundations. Due to the considerable number of positive qualities, floor slabs are used both for conventional residential construction and for the construction of industrial buildings.
Most often, slabs with voids are used, the holes in which can have different shapes and diameters. Let's study the main advantages of hollow products:
- Compared to the production of monolithic floors, much less money and labor is spent.
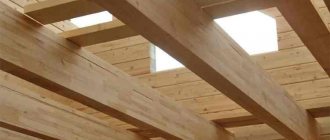
- High strength is achieved due to the reinforcement of the product. The same cannot be said about prefabricated or wooden floors.
- Due to technological voids, heat and noise insulation throughout the building increases.
- Compared to monolithic floors, which greatly load the load-bearing walls and foundation of the building with their weight, hollow core slabs have less weight.
The disadvantages include the possibility of covering only rectangular spans; in other cases, it will be necessary to resort to the use of monolithic floors. You also need to order special equipment to install the slabs.
What are the main types of reinforced concrete slabs?
| Purpose | Peculiarities | Appearance |
| PB, 3.1PB and 1.6PB | Lightweight slabs 1.6PB and 3.1PB. They have a thickness of 160 mm and are used only in the construction of low-rise buildings. PBs have the usual height for floor slabs of 220 mm. Development is carried out on special machines where formwork is not used. After hardening, the workpiece is cut into slabs of equal size. | |
| PNO and PC | PNOs are lightweight, their thickness is 160 mm, and PCs have a standard height of 220 mm. They are produced using older technology using formwork; reinforcing mesh and special void-forming structures are installed in the mold and concrete is poured. Smoothing is carried out on special vibrating machines. |
Factories also produce special slabs that are used for construction in seismically active areas. Such slabs are called ribbed due to the presence of additional stiffeners on both sides.
How are floor slabs installed on walls of different materials?
Very often, inexperienced builders have difficulty with how to install reinforced concrete slabs on load-bearing structures. It all depends on the material from which the “box” of the future building was made. Let's study a couple of examples.
Brick walls
When installing reinforced concrete slabs on structures made of brick or concrete, they can be laid directly on load-bearing walls using a special solution of sand and cement approximately 2 cm thick. However, the planting depth must also be taken into account; for brick walls this is 12 cm.
Expanded clay blocks: wall structures
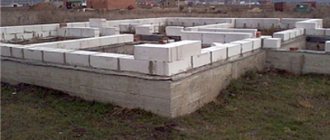
The question of how to lay floor slabs on expanded clay blocks is quite difficult for builders. Since these blocks are not as strong as, for example, bricks, the rules recommend installing a belt of reinforcement on load-bearing structures with a maximum thickness of 20 cm, which will distribute the load more evenly.
Naturally, the slabs are installed only after the belt has gained strength and is able to withstand reinforced concrete slabs. The best support depth for expanded clay blocks is 10-15 cm.
Aerated concrete “box”
As in the case of expanded clay blocks, aerated concrete requires the installation of a reinforcing belt over the entire area of the supporting structure.
Depending on the layer of the reinforcing belt and the size of the slabs, the planting depth for aerated concrete should be in the range of 10-17 cm.
Walls made of porous blocks
In the case of porous blocks, the floor slabs are laid on a so-called cushion of 3 centimeters of mortar and reinforcing mesh. The diameter of the wire used is 4 mm, and the mesh cells are 5x5 cm in size.
There are other layout methods. For example, they make a layer of three layers of hollow brick, on which slabs are subsequently laid.
Calculation of parameters
According to regulatory documentation, the depth of support for floor slabs for brick supports is in the range of 9-12 cm. In this case, the minimum support depends on:
- length of the finished reinforced concrete product,
- span masses,
- presence of thermal insulation,
- wall thickness,
- cladding,
- actual or expected load,
- seismic resistance of the building.
The minimum acceptable indicator is taken as the main indicator. So, for example, the smallest support for products along the length is:
- up to 4 m – 71 mm;
- more than 4 m – 91 mm.
The calculation takes into account the duration of the load, its nature - permanent or temporary. It is best to have the calculations carried out by a qualified builder or engineer.
Storage of slabs on site
To store slabs on site for a long time, the following rules should be observed:
- If the task is to store a large number of slabs, then the height of one stack should not be more than two and a half meters.
- Laying reinforced concrete slabs on top of each other without wooden spacers is strictly prohibited.
- Wood blocks are installed on both sides with a 20 cm indentation from the edge between each slab.
- The lowest slab should be laid on a large beam so that the slab cannot come into contact with the ground surface.
Correct support of the slabs
We have already described above how to lay slabs on different materials. However, it should also be recalled that designers must specify a standard value when drawing up the technical plan. This value should be 12 cm.
As a rule, in the process of designing the construction of load-bearing structures, designers start from the length of the floor slabs and subtract 24 cm from it, which is equal to the depth of the supports on both sides. The result of this work is the correct amount of emphasis.
Rules for designing interface nodes
When carrying out a detailed design for the installation of floor slabs, in addition to the basic layout of the elements, it is necessary to provide detailing of the nodes , indicating all the nuances when pairing horizontal and vertical elements.
With external walls
The working drawing of the interface between a prefabricated reinforced concrete floor slab and a vertical enclosing structure should show the following details:
- Sectional view of a slab of a given thickness.
- The complete composition of the external wall, including cladding, backfilling and insulation.
- The depth of embedding the structure into the wall.
- Fastening elements to ensure connection (c/p mortar, embedded parts).
- If there is a reinforced concrete belt, a section along this element.
- Scheme of reinforcement of the interface.
- The presence of an elastic insert at the end of the plate.
- Scheme of filling the space between the ceiling and wall cladding.
- If provided for by the project, a diagram of a clean floor with a connection point to the internal part of the vertical enclosing structure.
- When detailing a unit on a typical floor, an image of the overlying external wall.
If the floor slab simultaneously rests on sections of the wall with different designs (for example, at the location of the lintels above window openings), then the assembly must be duplicated for all situations.
With internal carriers
When detailing the support of the slab on internal load-bearing walls, all elements of the drawing are indicated similarly to the algorithm described above. If there are additional design parts, they are also indicated on the unit :
- If the slab is not located in the extreme span, the designer depicts 2 horizontal structures and describes solutions for their connection.
- If the pairing of elements involves twisting or welding, then such parts are also indicated in the project with the designation of the pitch, seam length and other features.
- If there are ventilation ducts located in the thickness of the load-bearing internal wall that affect the installation diagram, such sections are drawn out in a separate drawing.
All additional consumables included in the project are also displayed in the specification for the drawing, indicating their brands and quantities.
Cell division
You need to pay close attention to the layout of the floor slabs. To calculate this, you need to know exactly the area of the span to be covered and, based on this information, select slabs of the appropriate size.
The maximum length of a reinforced concrete slab can be up to 11 meters, and the width can be from 1 to 1.8 meters.
When drawing up a floor plan, you need to specifically mark openings for communications, for example, ventilation or a chimney. Therefore, we should not forget about monolithic floors, which in the future will need to be carried out directly on site.
Floor installation process
Typically the layout process consists of 5 steps:
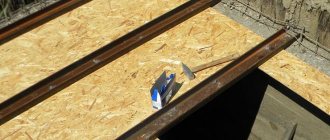
- Preparatory stage - this process begins after installing the reinforcing belt or laying the last row of bricks. It is necessary to adjust the height of the structures on which the slabs will be installed. This is done to reduce flexion. Careful preparation and leveling of the wall surface for installation is carried out. In the process of installing reinforced concrete slabs on the foundation, you need to make sure that the waterproofing is reliable.
- Mixing the mortar - a mortar of cement and sand should be mixed in a ratio of 1:3 to a thick consistency. The laying of their solution is laid out in a layer of 1.5 to 3 centimeters for the slab. Some craftsmen, based on their experience, can prepare a pillow for several slabs at the same time. Depending on the material of the load-bearing walls, a reinforcing mesh or a belt of their reinforcement is laid.
- Installation of reinforced concrete slabs - as a rule, the installation process begins from the place closest to the crane or from the places where the communication passes.
- Leveling the slab - this procedure is carried out simultaneously with laying the slab on the load-bearing walls. When the slab is already lying on the wall, it cannot be moved after a couple of minutes and alignment is carried out strictly along the axis of the wall using crowbars. At the end of the installation process, the slings are removed and you can proceed to work with the next slab.
- Anchoring - the procedure involves joining the floor slabs together with ties made of flexible reinforcement of small cross-section. The slabs are joined to the walls using an L-shaped fastening.
Functions of a brick armored belt
The main task of the armored belt is to perceive and distribute multidirectional loads and forces of varying magnitude.
In small commercial and residential buildings, a brick belt will successfully replace similar concrete monolithic structures. The brick belt provides sufficient stability of the walls under strong wind loads, subsidence of the soil and uneven heaving. Unlike a concrete structure, the quality of a brick belt is not affected by the timing of its installation: a monolithic belt should be poured simultaneously around the entire perimeter, and bricks can be laid without haste, at any time.
Aerated concrete is an excellent wall material, but it cannot be tied firmly enough to other building structures. This is a problem not only with gas silicate, but also with other porous, lightweight blocks for building walls. This disadvantage of porous blocks is compensated by the construction of an armored belt - it contains various fastening embedded parts for connections with the structures of floors and roofs.
Slab cutting
In some cases, it is impossible to lay a solid slab on the site or you simply need to make a technological hole for laying communications. It is in such cases that the technology of cutting reinforced concrete slabs is used. However, it is worth noting that cutting this type of product is an extremely traumatic undertaking. Plus, this leads to a deterioration in the quality of the slab, in particular, the declared strength. It is recommended to order this procedure from the manufacturer or professionals.
Naturally, situations arise when you need to cut a slab quickly and right on the spot; in this case, you need to stock up on a grinder for cutting concrete and an autogen for sawing reinforcement.
Be sure to follow the sequence of actions:
- Apply markings.
- Find a rigid substrate that matches the shape of the slab and place the slab on it.
- Make a cut along the previously drawn lines using a grinder.
- Knock out the cut material using a sledgehammer; you should start from the hollow areas, this will be easier.
- Cut the reinforcement very carefully with an autogen so that the metal does not lose its connection with the concrete.
- Next, you need to fill the voids in the slab with a solution with self-expansion property.
Video description
We suggest watching the following video, which will help you understand in detail the procedure for forming a hatch leading to the basement of a private house: When cutting reinforcing elements with a grinder, you should act with extreme caution. The geometric parameters and characteristics of the tool used can cause the grinder to become jammed between the protruding parts of the reinforcement. This phenomenon may cause injury to the installer. In the absence of an autogen, a small cut is made on the sledgehammer, and then the cut site is hit with a sledgehammer.
vote
Article rating
Filling joints between slabs and voids in them
Experienced builders strongly recommend sealing the joints between slabs and void openings. This procedure is performed with the usual solution of sand and cement.
There are several ways to seal the joints between slabs. It depends on the width of the gap:
- Floor deficiencies and large gaps are filled using monolithic pouring technology with reinforcement.
- The average size of the seam is a gap of 2 centimeters; it is filled with high-hardness concrete and longitudinal reinforcement is laid.
- Small gap - up to 2 cm wide, filled with cement.
Life hacks and difficulties you may encounter
To lay a slab on a brick wall, its last layer must be bonded. The reinforcing belt can be erected using homemade formwork.
Filling the voids with mortar is required only in those areas that will go outside the building; this protects the structure from severe freezing. Installation of holes for communications must be done on the ground, when there is free access to the slabs, otherwise this may become a problem.
It is necessary to prepare the site for the crane in advance. If the soil at the construction site is loose and crumbly, then this will definitely lead to difficulties. Cranes should not be used near basements; the load on the ground may cause the slab to break. To do this you need to use equipment with a long boom.
If you need to order floor slabs, you should contact IS GROUP. We are ready to provide various designs to any region of the country. Here you can find various road slabs, airfield slabs, FBS blocks, PILES, floor slabs and many other reinforced concrete slabs. Delivery is carried out by rail. If there is no company in your city that can provide you with building materials, then be sure to contact us by phone +7 (495) 175 23 21.
What does the concept mean?
Floors always operate in a building within one floor, taking permanent and temporary loads from their own weight, the mass of floors, equipment, furniture and people using the room.
When external forces are applied, internal forces arise in the element , which determine the geometric section and make it possible to calculate the span structure according to 2 groups of limit states.
At the same time, in the floor slab, along with the loads applied to it, support reactions arise, which are concentrated in places where the elements rest on walls or point vertical structures. These reactions are distributed over the support area and the larger its area, the smaller the load on each cm2 of the vertical element.
Thus, the depth of embedding of the floor in the wall is an important parameter that affects both the value of the supporting transverse force Q in the slab and the axial force N arising in the wall or column. Also, the size of the embedment affects the possibility of local crushing or chipping of the reinforced concrete product during load transfer .