The most important thing in installing fence posts is to ensure that they do not rise due to heaving forces or fall from other influences. These natural forces can not only mow the fence or ruin all its beauty and harmony, but also prevent the owner of the fence from leaving his own yard. This happens when, due to the movement of the pillars, the wicket and gate jams. Of course, this is an extreme case. It can occur in regions where the depth of soil freezing breaks records and saddens many owners of private houses.
How to avoid problems with the fence due to improper concreting of the posts? If you don't want to get depressed over wasted money and wasted time, do it right the first time. You won’t have to suffer or spend money redoing the fence again. It will stand without any changes, causing the envy of neighbors and the admiration of passers-by. But that's not the main thing. It is important that it is beneficial, convenient and pleasant for you personally.
What are heaving forces and why do pillars bulge?
Soil heaving forces are a natural phenomenon that depends on the following factors:
- depth of groundwater;
- the presence of water in the soil in addition to groundwater;
- low temperatures in winter.
When groundwater is close, the soil is more susceptible to heaving forces. They are the result of the action of two factors - the presence of water in the soil structure and the depth of its freezing. The latter directly depends on the magnitude of low temperatures. That is, in cases where one of the factors (water or sufficiently severe frost) is absent, heaving does not occur.
When soil saturated with moisture freezes, it expands, which is why it, following the laws of physics, raises the pillars. This process can be compared to squeezing a pimple - if you press hard enough in certain places, the contents will come out. The soil also pushes out the pillars if they are concreted to an insufficient depth. Frosty heaving of the soil can greatly damage the fence - from raising the pillars to different heights (with all the ensuing consequences) to completely falling to the ground. So it’s better not to joke with the notorious forces of heaving.
How to avoid such bleak prospects by insuring yourself against the effects of frost heaving? The answer is simple: place one end of the post below the freezing level of the soil. But knowledge of this banal truth, which many homeowners can boast of, does not guarantee an ideal result. We will tell you about the best ways to install fence posts that allow you to bypass the negative effects of natural forces.
Installation
When installing prefabricated fence posts, first check the modules for the absence of voids and moisture content in the material, so as not to impair the strength of the product.
Column cross section
Supports used for concrete blocks for a pillar require a foundation, which can be columnar or strip. The position points of gates and gates are marked on the ground, the entire territory and space for installing supports of prefabricated structures are marked.
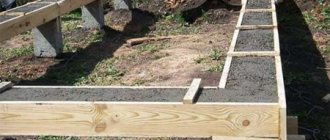
Installing the base
For a columnar foundation in the marked parts:
- Dig holes up to 1.5 m deep, with a diameter of 10–12 cm larger than the stand.
- Sand (40 cm) is poured onto the bottom of the pit, spilled with water, and compacted.
- Hammer a metal tube into the center of the pit or fasteners from fittings.
The height of the frame approximately corresponds to the height of the structure. After this, the pit is filled with concrete in several layers, compacting sequentially layer by layer.
The strip foundation is usually dug along the perimeter of the fence. The dimensions of the trench depend on the scale of the entire structure:
- if the foundation depth is 60 cm, then the hole for the racks is deepened by 1 meter;
- The width is made slightly larger than the width of the element.
Concreting is carried out in the same way as with a columnar foundation.
During installation
Next, the supports are constructed using typesetting technology. All elements of this structure are connected to each other by a reinforcing frame made of steel rods.
Nuances:
- crushed stone or cement can be used together with sand;
- the walls of the trenches can be insulated with roofing felt;
- formworks are installed;
- The dimensions of the reinforcement frame should be several cm smaller than the dimensions of the formwork.
When the concrete in the trench has hardened, the foundation walls are smeared on the sides with mastic and the roofing material placed in the trench earlier is glued.
Installation of blocks
After the foundation has hardened and gained strength, after three to four days they proceed directly to the installation:
- It is necessary to purchase some ingredients for the solution in advance. Prepare a solution for fastening the blocks, which contains water, cement, sand, and plasticizer.
- Start laying the first row of blocks evenly and check with a level gauge. The voids are filled with cement mortar and each layer is compacted. In this way, all modules are laid one after another.
- Mortgage elements are installed in several places to attach gates, gates, and fence sections to them.
Installation diagram
If you plan to provide lighting or install video surveillance or an intercom, you must purchase and lay insulated electrical cables inside the units in advance.
Concrete fence posts are quite easy to assemble. The installation ends with the installation of the cover. It is designed to protect the structure from bad weather, debris and gives a complete aesthetic appearance.
Pole Installation Tools
You may need the following tools:
- Shovel . This tool can be useful for digging holes for posts and other earthworks.
- Boer. You can only use a hand drill, which it is advisable to lengthen so much that it is enough to make a hole of the required length. And to speed up the process, a motor drill won’t hurt.
- Drill . If you have soft, pliable soil along the future fence line, then you may not need any additional devices for digging holes for the posts. For those who encounter difficulties in such work, the secret of increasing the efficiency of “hole production” can help. First, you can make preliminary holes in the soil using a large drill. It makes it possible not only to drill deep, but also to loosen the soil to facilitate the work of the drill. To do this, the drill must be lengthened by the required amount by welding a suitable pin to it.
- Drill. To use an extended drill, a good, powerful drill will help. Although you can do without it if you weld the drill to the handle (like a drill). This will allow you to use it manually. True, this option is more labor-intensive and requires more time to drill holes.
- Roulette . You definitely can’t do without it. This construction tool is essential for various measurements during the preparation and installation of fence posts.
- Plumb . This is an indispensable assistant in the construction business. It can be constructed from a thin rope and a metal tip. An incredibly simple and ancient thing still works great, helping everyone - both beginners and professionals. A plumb line allows you to determine the exact location for the holes for the posts if you hang it on a stretched wire/rope/line that marks the future fence line.
- Level . This tool helps to install the poles perfectly straight, which is important not only for aesthetics, but also from the point of view of the laws of physics. Vertically located posts direct the entire weight of the fence down. As a result, it does not affect the pillars (does not tilt them). To install fence posts, you can use any building level. But the most convenient are two of their varieties: straight with magnets (easily attached to a metal pole) and angular (produced specifically for this type of work).
- Wire, rope or fishing line (string) . These helpers are irreplaceable. First, they stretch from one edge to the other, showing where the fence line will be. Secondly, using a plumb line, they can be used to accurately mark the locations for the pillars. The string needs to be pulled not along the bottom, but along the upper level of the pillars.
- Metal pin . This tool may be needed to mark locations for drilling holes. If you want to mark several such points at once, you can take the appropriate number of pins or wooden sticks (the depressions marked in the soil can be covered with something, so stuck pins are more reliable).
- Hammer and sledgehammer. These tools may also be needed in this type of work. Hammer - for driving pins into the ground, bending cut fasteners on poles and other work. Sledgehammer for hammering in reinforcement and poles.
- Board . You will need a wooden board 150 cm long and 5 cm wide. It is needed to compact concrete. Instead, you can take a suitable stick of sufficient thickness or a metal rod with a “heel” at the end.
- Metal gutter . It may be needed to pour concrete mixture inside a plastic pipe, which is used in one of the concreting methods. The gutter can be easily made from thin metal (for example, galvanized).
- Bulgarian. With its help, you can make cuts on metal poles for better adhesion of the pole to the concrete.
- Electric or gas welding . It may be needed to weld the necessary elements to the pillars.
- Ladle from a bottle . This homemade tool will allow you to scoop out water from a hole made in places with close groundwater. It’s very easy to make such a ladle: take a plastic bottle, cut it on the side in the central part in the form of a circle or oval, and put the open neck on a hot metal pipe. The second mounting option is to tape the bottle to an ordinary wooden stick, onto which the neck is placed.
- Funnel . It may be needed to fill a metal pillar with concrete mixture. A funnel can be made from a large plastic water bottle.
Which ones are better?
Of course, each type of support has its own advantages and disadvantages. The same plastic, with its convenience, versatility and ease of installation, although it creates an imitation of a brick pillar, can never compare with it in strength.
Stone products have other advantages, for example:
- Durability.
- A huge number of facing materials provides a pleasant appearance.
- During operation, they require virtually no repairs.
- You can make them with your own hands, showing not only skill, but also creative qualities.
- Flexible pricing policy - if you lack funds, you can choose a cheaper type of stone or use artificial options.
And in this case, making it yourself will take much more time.
In addition, they need special processing, just like wooden ones. Only proper protection will protect them from corrosion and rotting. Used pipes, such as tubing, must be reprocessed.
But you don’t need to take care of them, and water only makes them stronger. Their price is more than affordable.
Reliable ways to install poles
Below we take a closer look at the most effective ways to install fence posts. Here they have improvised names.
- The “Forever” method.
- "Super support."
- "Reinforcing" method.
- Soviet way.
- Economy option.
- Simplified way.
- The old grandfather's way.
Method “For centuries”
This method is more expensive than conventional concreting (for it you additionally need to purchase plastic sewer pipes with a diameter of 11 cm and a length of 1 m). It is designed for regions where the depth of soil freezing is more than 1.2 m. The pillar must be taken at least 20 cm longer than this treacherous depth (or better yet, more) in order to secure it well in the non-freezing layer.
Stages of concreting a pillar using plastic pipes:
- Drilling post holes using a hand or electric drill (for very deep holes, the hand drill will need to be extended). When using a drill, the hole is 18 cm in diameter.
- Concreting part of the pillar. According to this method, it is necessary to concrete the space of the pillar above which the plastic pipe will be located. You can calculate its length as follows: from the place where the pillar will emerge from the ground, you need to measure 70 cm.
- Concreting with a plastic pipe. The expanded part of the plastic plumbing pipe needs to be cut off. As a result, it will be 85 cm. 15 cm should be left above ground level, and the mentioned 70 cm of plastic pipe should be placed on a pole above the previously concreted part and also filled with concrete mixture. A metal gutter will help with this. The placement of the plastic pipe 15 cm higher is explained by the fact that in winter the soil can rise upward by approximately this distance (perhaps less). It will slide across the plastic without going beyond it or touching the metal part.
- Filling the outside of the hole. The remaining gap between the hole and the plastic pipe must be filled with a sand-gravel mixture. In case of heaving in winter, the soil will move upward, sliding along the pipe. In this case, the pillar will remain in place due to two factors: fastening below the freezing level and sliding of the soil with the sand and gravel mixture over the plastic.
- Filling pillars with concrete. In order for the pillars to stand as long as possible without corroding from the inside, it is best to fill them with concrete. A funnel made from a plastic bottle is useful for this. Arguments in favor of this method: when concreting, water will not get inside the column either from above or below from the soil. This approach is considered more reliable than welding, because the seams may not be perfect, so sooner or later moisture still enters the pipe.
Super support method
This method is particularly reliable. It is used on railways for the installation of reinforced concrete semaphore supports. It can be used in the construction of fences, wickets and gates.
Stages of concreting a pillar with the creation of super-supports:
Digging holes
In this case, you will need a shovel, because the hole for concreting needs to be much wider than the drill allows. The size of the widest part depends on the diameter of the pillar, its height and purpose, which implies a certain load. Everyone can calculate it based on their individual indicators. For example, here are the parameters that apply to the railway:
- the length of the metal pole from ground level is 5 m;
- its diameter is approximately 15-20 cm;
- The length of the concrete support is 1 m, its shape is a truncated pyramid, the dimensions of the upper part are 50x50 cm, the bottom part is 65x65 cm.
Concreting in a special form
To create a “super support” you need to prepare a form from plywood or other suitable material. Alternatively, its dimensions can be as follows: at the bottom 35 cm, and at the top 25 cm. The form consists of four trapezoids, which are fastened together from the outside with something, forming a truncated pyramid.
Concreting fence posts can be done in four ways:
- the pillar is concreted to the selected depth (that is, lowered into the ground to the length of the truncated pyramid);
- Below the soil freezing level, the column is usually concreted, and above it is in the form of a truncated pyramid;
- below the freezing level, the pillar is driven into the ground, and above it is filled with concrete in the appropriate form;
- Below the freezing level, the pillar is concreted in the shape of a truncated pyramid, and above it is covered with a sand-gravel mixture.
Backfilling with sand and gravel mixture
Such backfilling is carried out depending on the concreting option. The voids are filled with a mixture of gravel and sand.
This method is very reliable due to the heaviness of the concrete support. Heaving forces do not lift the pillar, which has a kind of anchor. It is advisable to treat it on top with bitumen mastic, which will increase slip and protect from moisture. It is most advisable to use such supports when constructing gates and gates, where special reliability and absence of movement of the pillars are required. But it is also suitable for arranging a reliable fence.
Pouring concrete into the inside of pillars is a good alternative to plugs and caps on them. And if this is a post near a gate or gate, then it will not be burned through during welding and will not rattle when closing.
"Reinforcing" method
This method is suitable for lightweight fences (for example, from corrugated sheets) in places characterized by strong heaving of the soil and a large freezing depth. In order to avoid negative consequences due to the forces of nature, in such regions it is advisable to immerse the pillars as deeply as possible. But since using long poles for this is inconvenient, irrational and expensive, craftsmen found an effective and ingenious solution. It consists of dividing the pillar into two parts - underground and aboveground.
Stages of work using reinforcement:
- Driving reinforcement into the ground . For the underground part, long reinforcement with a cross section of 14 mm is taken. For one column you will need two pieces of reinforcement, 3 m each. It does not need to be concreted - this simplifies and reduces the cost of the process. The reinforcement is simply driven into the ground to almost its entire length. Before driving, it must be treated with polymer bitumen mastic so that it does not corrode. To immerse reinforcement bars in the ground, you can first make holes using a drill and a long drill of the appropriate diameter. This refers to a specially elongated drill obtained by welding on an additional rod. With this drill you can make holes 1 m or more in length. This is enough for the initial immersion of the reinforcement. Next, it should be driven into the ground, which is quite possible for a healthy man. After the reinforcement for one metal post is completely driven in, two pins should protrude above the ground approximately 15 cm. This height should be sufficient to ensure that the finished fence does not come into contact with the soil (including in the case of soil heaving). Each pair of reinforcement bars must be placed not along, but across the fence line at a distance of 20-25 cm from each other. In this case, the outer rod should protrude beyond the edge of the upper post by about 3-5 cm. And the inner one should be located opposite the outer one (going deeper into the area from the fence). The conditional line running from one rod to another should be perpendicular to the future fence.
- Welding corner and post . Next, a piece of corner is welded horizontally onto these two pins, and a metal fence post of the required length (above-ground part) is welded onto it. As we mentioned above, the pillar is located from the outer pin 3-5 cm deep into the site. But that is not all. In order to ensure the stability of such a pillar, it must be strengthened with a jib. It is welded at one end to the inner end of the corner, and at the other to the post (about 15-20 cm above the bottom of the post, forming a triangle with it and the corner). The jib can be made from a metal corner or a piece of profile pipe. At this point, the work on installing the pillar is completed. Such pillars, which are subsequently connected to each other in the fence, will no longer be pushed out by heaving forces. And with high-quality welding, they will not fall from the wind or other mechanical impact.
Soviet way
There is one undeservedly forgotten method of concreting pillars, which was successfully used in Soviet times. Proof of its reliability are the old fences that can be found along railways and in many other places. This method is quite simple and not particularly expensive. The secret of its effectiveness is in the form of concreting. It is this that allows the pillars to resist the forces of heaving, thanks to which the fence can stand for decades. The mentioned fences used concrete pillars reinforced with four rods.
Stages of installing a fence the Soviet way:
- Preparing the hole for the post. Such pillars were immersed in the ground to a depth of 1 m to 1.2 m. Holes for them were made with a diameter of 35 cm in the lower half and in the form of a truncated cone, expanding to 40 cm, in the upper half. That is, the hole resembles the shape of a glass.
- Backfilling with sand and gravel mixture. The lower half of the hole was filled with a sand and gravel mixture, compacting it well and placing the post in a vertical position.
- Concreting. Next, the remaining upper part of the column was concreted. In this case, the concrete took the shape of an inverted truncated cone. That is, its wide part was located on top. This simple method made it possible to strengthen the pillars due to the rather wide part formed by hardened concrete. Heaving forces practically did not lift them, which is explained by the following factors:
- the conical shape of the concreted part - it offered resistance not only due to its relatively large mass, but also due to its expansion towards the top;
- the additional weight of the reinforced concrete pillar itself measuring 13x14 cm.
Economy option
This method also involves partial concreting, only “the other way around”. In the economical version, the lower part of the pillar is poured with concrete mixture.
Stages of work:
- Preparing the hole. Its diameter depends on the size of the drill, the method of digging and the wishes of the owner of the future fence. The lower part can have any size (a wider one will hold the pole better). The hole is dug below the soil freezing level by at least 25 cm (for reliability, 30-40 cm is possible).
- Concreting. The part that is below the freezing level of the soil is filled with concrete mixture. Before this, you can throw a small layer of drainage at the bottom.
- Backfilling with sand and gravel mixture. The rest of the post is filled with a sand-gravel mixture and carefully compacted (so that the gravel/crushed stone and sand are compacted as much as possible).
As a result of such actions, the main effect is achieved - the column is not lifted by heaving forces, because they do not affect the heaviest concreted part. It holds it in place due to its mass and placement below the freezing level. In addition, the sand-gravel mixture is much less susceptible to heaving and, under the influence of the surrounding soil, is able to slide along the pillar. The larger the diameter and depth of the concreted part (below the freezing level), the higher the likelihood that the pillar will not stick out.
This method allows for significant savings on cement. If desired, you can concrete the small upper part of the post so that it stands as firmly as possible without moving to the sides. But this is not necessary if the fence has low windage (for example, made of mesh). With compacted backfill and sufficient concreting, the pillar will stand securely and firmly.
Simplified method
This method can be divided into two options:
- Installation of a concrete or metal pillar with backfill (butting) . This method is also called dry concreting. It is done very simply: dig a hole of the required diameter and depth (preferably below the freezing level). A small drainage is made from small stones. An existing post is inserted and tightly covered with a sand and gravel mixture. In this case, it is important to carry out compaction using a special vibrating rammer (vibrating foot) or manually using a board, stick or metal device. According to those who have actually tested the effectiveness of this method, the pillars stand perfectly well without bulging after winter. But in this case, one drawback may be observed: in strong winds and high windage of the fence, the posts may “move” a little to the sides (i.e., become loose). To avoid this, a shallow foundation is made along the fence line. It holds the posts, protecting the lower part of the fence from exposure and water penetration. If desired and possible, you can save money by concreting not the entire strip, but only a small upper part of the pillars.
- Installing a metal pole by hammering. This is an even simpler option. Driving posts allows you to save a lot on cement, sand, crushed stone and gravel. In this case, it is also better to place the lower part of the column below the freezing level of the soil. It must be remembered that a shallowly driven post will sooner or later become loose. Therefore, it is necessary to immerse at least half of the total length of the pole into the ground. This method is suitable for completely or partially “transparent” and low fences (made of mesh, picket fence and combined materials). Driving posts is much easier if you first make holes to about 60% of the required depth. They must be smaller than the diameter of the pillars. An elongated large drill bit is suitable for this type of work.
Both options can be used on heavy heaving soils. According to experts, butting prevents heaving by forming a drainage layer that drains water into the soil. Driving the post below the freezing level of the soil also contributes to its fixed position in the event of frost. The soil slides along the pillars, first rising and then falling.
The old fashioned way
This is the most ancient method, which has been used by people since time immemorial and is the cheapest. It consists of installing wooden pillars without concreting. They must first be prepared for immersion in the soil so that they last as long as possible. The following processing methods are suitable for this and can be combined:
- firing (charring) of a wooden pole - during the combustion process, the wood is charred, clogging the wood fibers, which further protects it from moisture and rotting;
- treating the pillar with hot resin or a mixture of resin and diesel fuel creates a protective layer that prevents the penetration of water;
- coating the pillar with soaked clay - it protects the pillar from moisture and preserves the wood (after coating the pillar, it is advisable to dry it).
Wooden posts must be processed 20 cm above the level where they will enter the ground. It is in this part that the wood is exposed to water, which can cause it to deteriorate. If wooden poles are reliably protected in this part, they will last for a very long time. Proof of this can be found in centuries-old wooden houses built on burnt oak piles. Installation of pillars can be done by filling them with clay, earth or sand and gravel mixture with drainage at the bottom of the holes.
And finally, a small life hack for wooden poles. The most durable option for using them is to install them on metal anchors that are concreted in the ground. That is, the pillar consists of a concrete underground part, an anchor in it and a wooden part at the top. As a result, the wooden pole is mounted above ground level, which eliminates the impact of water. With proper treatment of such a pillar (especially in the lower part) and timely touch-up, it will serve for a very long time (at least several decades).
On very heaving soils, the pillars do not need to be concreted to ground level. If you do this below the zero mark by 50-70 cm, the heaving forces, which are most evident in this layer, will not be able to pick up and push the pillar up. A gap of 50-70 cm should be filled with sand and gravel mixture. It is less susceptible to heaving and, under the pressure of the surrounding soil, tends to slide along the pole. During this period, the metal pole must be treated against corrosion.
Shape selection
Metal pillars are distinguished by height, thickness, and length. For their production, profile, round, screw pipes are used. The shape of metal fence posts is selected depending on:
- soil composition (heaving, sandy);
- type of fence (light, heavy);
- service life (temporary, long-term);
- planned budget.
An economical option is to cut rolled metal into pieces of the required length, followed by welding the logs and crosspieces. This will require special equipment and thorough treatment with an anti-corrosion agent.
Profile pipes
Experts recommend pillars made of profiled steel pipes with a rectangular or square cross-section. Their advantages are as follows:
- strength, durability. The production facilities carry out automated washing and cleaning of pipes. They carry out painting with polymers using modern technologies, galvanizing;
- Convenience and speed of fence installation. Parts for joining with joists and fence sections are securely fixed on the poles;
- modern design. Suitable for fencing made of different materials: corrugated sheets, Euro picket fences, forged products, chain-link mesh. Painting the posts green or brown gives the finished fence a finished look.
The classic option is a profile pipe with a cross-section of 60 x 60 mm, a height of 3 m, and a wall thickness of 3 to 5 mm. The post has two eyes for attaching logs; plug to prevent moisture from entering; anti-corrosion outsole. The pillars are secured with concreting.
Round pipes
In terms of cost, pipes with a round cross-section are slightly cheaper than profile ones. They differ in wall thickness, cross-section diameter (57, 89, 76 mm), height. Equipped with two welded plates for fastening joists. They need additional painting and treatment with anti-corrosion agents. The pillars are driven into the ground or fixed by butting.
Screw posts
For difficult soils, screw piles with a wall thickness of 50 mm or more are used. The post is screwed into the ground, and the cutting blade securely fixes the support.
The secret to a stronger connection between the pillar and the concrete
In order for the metal pole to hold more firmly in the concreted part, additional fastenings need to be made. Options for such fastenings on the bottom of the pillars:
- Cut the metal post in the shape of the letter “H” and unscrew the resulting ends at an angle of 90 degrees. At the same time, the pillar will have “ears” (two on opposite sides). This is the most rational option that allows you to do without welding.
- Weld two small pieces of reinforcement to the bottom of the post (preferably perpendicular). An option for those who find it easier to use welding.
- Make a rectangular cutout in the profile pipe at a distance of 12-15 cm from the edge of the lower part. The length of the neckline is arbitrary (also 12-15 cm). This is the simplest option, which allows concrete to get inside the pillar and thereby further strengthen it. It will be almost impossible to pull out such a pillar.
Thanks to such fastenings, the post will better adhere to the concrete and will not be pulled out by a strong gust of wind or other impact.
Coloring
When choosing unpainted supports for installing a fence, you will need to carry out work to protect them from corrosion. There are two inexpensive products on the market (bitumen varnish and metal enamel), the effectiveness of which has been tested by time.
Before applying bitumen varnish, the surface of the pipe is specially prepared:
- clean from dirt with soapy water and rinse under running water. Wipe dry;
- remove rust with a metal brush;
- degrease the surface (wipe with a cloth soaked in solvent).
- covered with a layer of varnish. Wait for it to dry completely (about 4 hours).
Processing of pipes with metal enamel is carried out on clean, dry surfaces. Having previously primed the support with GF-021.
The following will help protect the lower part of the pipe from an aggressive environment: bitumen and polymer mastics. They are applied to the support in advance so that the product dries completely before embedding.
How to install the pillars exactly in one line?
To do this, you need to correctly tension the metal wire or rope (they also say string or lace), placing it not at the bottom, but at the top of the pillars. The tension must be done from one corner point to another, placing the ends on already installed pillars. For greater convenience and control, you can tighten the string at the top and bottom at once. But this doesn’t have to be done, because each pillar is still checked for level, and its location is precisely determined using a plumb line.
If the length of the fence is very large, another pillar is installed between the extreme corner points, which supports the string, preventing it from sagging. To secure it to the pole, you can grab a nut. In this case, it will not move, accurately showing the ideal line.
Pros and cons of the driving method
The fence can be installed in this way independently in a relatively short time and for little money due to the fact that:
- no need to dig holes to install supports;
- the cost of the structure is reduced, since there is no need to buy materials for concreting the pillars;
- installation does not require the use of complex machinery and equipment.
Therefore, if the groundwater runs deep enough and there is no risk of the support being loosened due to ground movement, a fence with posts driven into the ground will be quite stable and durable.
When installing a fence using the drive-in method, it should be taken into account that:
- If the soil is not dense enough, the pillars may warp. The situation is aggravated by increased windage. Therefore, before deciding on the method of installing supports, everything should be carefully calculated.
- Only lightweight fences are installed using the driving method. If the weight of the fence is high enough, then the entire structure may shrink.
- The poles are driven only into finely stony soil to prevent the pipe from hitting an obstacle in the form of a large stone.
- Impacts may cause the upper part of the support to become deformed.
If the owner of the site decides to install fence posts using the driving method, he must clearly determine the type of soil on the site and calculate the windage, as it affects the recommended depth and method of installing the supports.
How to save money on metal fence posts?
Let's consider this issue in the context of our topic today. Since the task at hand is to avoid the effects of heaving forces, we will have to use rather long poles for the fence. Most often they are metal. How can you save money on such poles? The solution to this problem is simple and obvious: take pipes of shorter length and lengthen them with reinforcement rods. The welded part will be located underground.
In order to further save on the price of fittings, it can be purchased at ferrous metals collection points. The savings due to this solution are greater, the thicker the pipes for the fence are taken (accordingly, the higher their cost). It is more convenient to weld the fittings from the outside. To do this, you can use 4 rods for square posts and 3-4 for round ones. In order for the added part to have the desired shape, at the end (and if the length is long, in the middle), you need to weld sections of the same pipe 5 cm long.
When the pillars are completely concreted (without backfilling with sand and gravel), quite significant gaps can be added using reinforcement - in the underground part it is enough to leave 50 cm of pipes, adding the rest with reinforcement. In addition, a couple of small pieces can be welded perpendicularly to a bundle of rods for better fixation in concrete.
Manufacturing technology of fence blocks
There are two ways to make individual blocks. They were already mentioned at the beginning of the article; these are cast concrete blocks and pressed ones. Both types are fairly easy to make at home. You just need to make a shape, but difficulties may arise if you want to decorate the plate with patterns.
Concrete
Fence blocks are made by vibration casting by molding concrete mixtures. To make such elements with your own hands you will need: sand, gravel, expanded clay, cement, plasticizer, any coloring pigment, marble or quartz chips.
Plasticizer for concrete
To make a reliable and durable concrete block, you need not only high-quality raw materials, but also special equipment and devices:
- a vibrating table with a drive to create maximum structural density and remove voids from the solution;
- special forms;
- a concrete mixer that ensures thorough mixing of the components;
- auxiliary materials: tampers, trowels and water tanks.
The usual square shape is not suitable for making blocks. She must have:
- framework;
- steel inner insert;
- four fiberglass plates;
- external bolts;
- texture elements with grooves.
Sequence of work:
- the assembled form is laid out on a vibrating table;
- We make concrete for pouring fence posts in the following proportions: 2 parts sand, 1 part cement grade 400–500 and the required amount of plasticizer;
- to give a decorative effect, you can add 2 parts of granite screenings, small crushed stone, etc.;
- for high-quality preparation of the mixture you need a concrete mixer;
- the volume of the mold is filled and air bubbles are eliminated;
- the filled forms are placed on the table for drying;
- After three days, the form is removed, and the finished concrete block is left to dry completely.
Pressed
The process has significant differences. The most important thing is that one form is enough to work.
- as in the case of concrete mortar, prepare the mixture in the same proportions: 2 parts sand, 1 part cement grade 400–500;
- add 2.5-3 liters of water;
- mix the mixture well using a concrete mixer;
- gradually filling the volume of the mold, make tamping;
- remove the form;
- leave the blocks to dry.
Recommendations for block production
- the solution must be compacted very well;
- stands for forms when concreting must be sprinkled with sand or covered with polyethylene;
- After removal from the mold, the blocks are dried on each side for 2–3 days.
Additional measures to protect against heaving forces
If you live in a region where frost heaving forces work wonders and break records, take note of the following information. In order to protect the pillars from bulging, you need to take care of eliminating at least one of the factors - the presence of water or exposure to severe frosts. That is, you need to protect a certain space near the pillars from saturation with water and/or freezing. Of course, compared to conventional methods, this is more labor-intensive. But for some, such actions will help save the fence and protect themselves from unnecessary expenses in the future.
You can limit the flow of water using a drainage system, similar to the one used to drain water from the foundation. And reduce the impact of frost by insulating the soil around the pillars using polystyrene foam. Not all builders and home owners know about these secrets. Wrap it around and apply it.
Join our Facebook group