The use of reinforcement technologies for monolithic floor slabs in low-rise residential construction is a prerequisite. Concrete and metal in monolithic structures complement each other. Concrete protects the reinforcing bars and provides a strong floor surface. The reinforcement takes structural loads and protects the concrete layer from destruction.
As a result, the structure receives a strong and durable floor. To enhance its strength and stability, in addition to the supporting reinforcement, the structure is provided with a crown that connects the frame being installed with the ends of the reinforcement of walls, columns, beams, and pylons.
For reinforcement, metal rods with a diameter of 6-25 mm made of smooth (AI) or ribbed (AIII) steel are used. Specific parameters are indicated in drawings, diagrams and reinforcement specifications.
Solid slab
The thickness of the ceiling is most often taken to be 200 mm. The reinforcing frame in this case includes two meshes located one above the other. Such meshes must be knitted from rods with a diameter of 10 mm. In the middle of the span, additional reinforcement bars are installed in the lower part. The length of such an element is 400 mm or more. The pitch of the additional rods is taken to be the same as the pitch of the main ones.
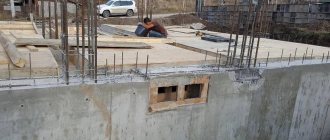
Additional reinforcement must also be provided at the support points. But they place it at the top. Also, at the ends of the slab, U-shaped clamps are needed, the same as in the foundation slab.
Example of floor slab reinforcement
Calculation of floor slab reinforcement by weight for each diameter should be performed before purchasing the material. This will avoid overspending. A reserve for unaccounted expenses is added to the resulting figure, approximately 5%.
Tying reinforcement for a monolithic slab
To connect frame elements to each other, two methods are used: welding and binding. It is better to knit reinforcement for a monolithic slab, since welding under construction site conditions can lead to weakening of the structure.
To perform the work, annealed wire with a diameter of 1 to 1.4 mm is used. The length of the blanks is usually taken to be 20 cm. There are two types of tools for knitting frames:
- hook;
- gun.
Knitting methods
The most common knitting method
The second option will significantly speed up the process and reduce labor intensity. But for building a house with your own hands, the hook has become very popular. To complete the task, it is recommended to prepare in advance a special template similar to a workbench. A wooden board with a width of 30 to 50 mm and a length of up to 3 m is used as a blank. Holes and recesses are made on it that correspond to the required location of the reinforcing rods.
Expenses
Reinforcement costs depend on:
- Depending on the accepted option for constructing a monolithic floor slab: with removable or permanent formwork.
- Support method: beam or beamless.
- Its dimensions: length-width-thickness.
In addition, the cost will increase when using a manual method of tying reinforcement versus a machine one .
Average prices for individual stages of creating a reinforced frame for a monolithic floor slab are summarized in the table:
| Name of works | Units | price, rub. |
| Reinforcement with continuous mesh, laying of reinforced structures | m2 | 100 |
| Knitting horizontal mesh 1 rod | tn | 17000 |
| Knitting a vertical mesh in 1 rod | tn | 15000 |
| Frame knitting | tn | 9600 |
| Reinforcement with mesh 100×100 mm | m2 | 450 |
| Reinforcement with 100×100 mm mesh fixed to the base | m2 | 570 |
| Reinforcement with mesh 200×200 mm | m2 | 550 |
| Double-layer mesh reinforcement 200×200 mm | m2 | 930 |
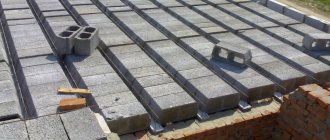
Laying reinforcement
Diagram of a reinforced floor slab.
When installing such a floor, it will be quite important to correctly calculate the reinforcement of the floor slab. For such structures at home, it is necessary to use hot-rolled steel reinforcement, which has class A3. The diameter of such reinforcement will be approximately 8-14 mm, depending on the load being calculated.
The slab must be reinforced in 2 layers. The first mesh is laid at the bottom of the slab, and the second at the top. The grids will be located in the middle of the concrete. The protective layer created by the formwork must be at least 15-20 mm. The reinforcement is tied into a mesh using binding wire. The cell dimensions should be 200×200 mm or 150×150 mm.
The reinforcement in the mesh must be solid, without any breaks. If the length of the reinforcement is not enough, additional reinforcement must be tied with an overlap equal to 40 diameters of the reinforcement. If you plan to reinforce the floor with d-10 reinforcement, then you will need to make an overlap of 400 mm. The joints of the reinforcement should be staggered, staggered. The edges of the upper and lower reinforcement in the meshes must be connected to each other using U-shaped reinforcement.
Loads on the reinforced concrete slab will be transmitted from top to bottom and distributed completely over the entire coverage area. Therefore, we can draw the following conclusion: the main working reinforcement will be the lower one, which experiences tensile loads. The top one will receive compression loads. Engineering calculations must take into account additional reinforcement, but there are some general rules.
During the procedure for reinforcing the lower mesh, additional reinforcement should be laid in the middle between the load-bearing supports. When connecting the upper mesh, reinforcements are laid above the load-bearing supports. In addition, additional reinforcement is required in places where loads and holes accumulate. Additional reinforcement is made with separate rods, and they should have a length of 400-2000 mm depending on the width of the spans. The lower mesh is reinforced in the opening between the walls.
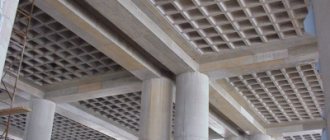
Scheme of an insulated reinforced slab.
The upper mesh should be reinforced above the load-bearing walls. Do-it-yourself reinforcement of such structures in places where they rest on columns. It will be very different from traditional reinforcement. These areas require additional volumetric reinforcements.
The floor slab is poured using a concrete pump. When pouring, it is imperative to compact the concrete, for which an internal vibrator is most often used. The process of concrete hardening is accompanied by its shrinkage, which will increase as the concrete solution dries. Microcracks may appear on its surface.
Materials
Reinforcement is the strengthening of a concrete block from the inside using various materials. Rods or fibers can be used that, when the block is stretched, do not allow it to crack.
In practice, reinforcement materials can be divided into 3 groups:
- metal rods,
- composite reinforcement,
- fiber.
Steel bars
The standard length of a steel bar for reinforcing concrete structures is 11.75 m. The reinforcement can have different diameters and grades. Depending on the marking, the rods are joined into a reinforcing frame by welding or knitted with wire.
In the mass of concrete, the connection between the steel rods and the mortar is quite strong due to the corrugation on the rod. The steel frame inside the monolith redistributes the loads and keeps the concrete from cracking, since the metal has greater tensile strength. At the same time, concrete, in turn, protects the metal from corrosion.
Steel reinforcing frameComposite material
Such fittings have a fairly wide range of source materials, increasing almost every year. To date, fiberglass and basalt plastic rods with spiral wrapping, simulating the periodicity of the steel reinforcement profile, are more or less used.
In addition, the construction market offers polyethylene rephthalate and hydrocarbon fittings, which have not yet received widespread popularity. The undeniable advantage of the composite is its low weight. But when constructing foundations or retaining walls, this advantage is of little importance, but the strength characteristics are very important.
Composite reinforcement is usually used in horizontal building elements supported on the ground
Fiber fiber
Fine material (fiber) is added to the solution at the mixing stage. Moreover, the fiber itself can have different diameters and lengths.
Fiber is made from fiber based on:
- become,
- glass,
- polypropylene compounds,
- basalt.
Fiber fiber to enhance the tensile strength of concrete
Advantages and disadvantages of continuous reinforced floors
The reinforced concrete floor is made in the same way as ready-made slabs from 2 materials:
- iron rods;
- cement mortar.
Concrete has high hardness, but it is brittle and cannot withstand deformation and is destroyed by impacts. The metal is softer and tolerates bending and torsion well. When these two materials are combined, durable structures are obtained that can withstand any load.
Advantages:
- absence of seams and joints;
- smooth, continuous surface;
- the ability to make floors for any shape and size of premises;
- installation and assembly of fittings is carried out directly on site;
- a reinforced concrete monolith strengthens the structure and binds the walls together;
- there is no need to seal joints and align transitions after installation;
- the local large load on the floor is evenly distributed over the foundation;
- It is easy to make various openings between floors for stairs and communication wells.
The disadvantages of reinforcement include high labor costs for assembling the reinforcing mesh and the long process of drying and hardening of concrete.
Making bends
Special requirements are imposed on the joints and locations of the bends of the rods, since they determine the strength characteristics. When determining the bend location of the rod, follow the recommendations:
- maintain the interval from the bend to the outer surface (no more than 50 millimeters);
- do not use short rods that have one inclined section and are freely located in the frame (“floating” rods);
- ensure the bending angle to the axis of the product is 45 degrees. It is allowed to increase the angle value for tall structures (more than 80 cm in height) up to 60 degrees, and for low structures working with point forces, decrease it to 30 degrees;
When placing bends, you must ensure that in the area where they are placed according to calculation, in any section normal to the axis of the beam, there is at least one bend
- make a bend on one longitudinal rod in each of the planes of the frame of the product, which has a width of less than 20 centimeters. When increasing the width of the product, bend at least 2 rods in each plane;
- position the bent parts of the rods symmetrically relative to the axis;
- Determine by calculation the interval between inclined sections of rods located in different planes of the frame.
Order of reinforcement and filling
Formwork installation
Reinforcement of floors begins with the installation of formwork. The following requirements are imposed on the formwork: it must withstand the weight of the raw mixture without visually deforming. This is a fairly large load; with a layer of concrete of 200 mm it will be 500 kg per square meter. Therefore, the formwork design must be quite impressive. For panels you can use plywood with a thickness of 18...20 mm, for beams, racks, crossbars you can use timber with a section of 100x100 mm.
You can use professional formwork. Its advantages are that it is designed for high loads; it includes telescopic stands that can withstand significant weight and allow you to adjust the level. This is quite expensive equipment, but now you can find a company that rents out both formwork and racks.
The formwork assembly diagram is easy to find in the literature, and if you take professional formwork, then instructions are attached to it. The main thing is to check the horizontal position after assembly using a level or other available means.
Installation of fittings
Plastic clamps are necessary to create a protective layer of reinforcement in the lower part of the ceiling.
The reinforcement is done in this way: we lay the bottom row on clamps - special plastic supports 25-30 mm high to create a protective layer. We place the rods with the same spacing, parallel to each other. We place the next row on them at an angle of 90? and tie with knitting wire at each intersection. Then we install the mesh separators, bend them, and tie them with the same spacing. The drawing given here will tell you which one. The reinforcement of the floor at the edges is supplemented with reinforcements. Longitudinal and then transverse reinforcement bars are laid on the separators and U-shaped reinforcements. The upper level of the finished reinforcement should be 25-30 mm below the upper plane of the formwork. The assembled reinforcement should be a fairly rigid frame that can withstand the weight of a person without much deformation.
Fill
After the reinforcement is completed, you can begin pouring. This work is best done using a concrete pump, making sure to compact the mixture using a special deep vibrator. It is advisable to fill it in one go. As concrete hardens, it shrinks. The faster the drying, the greater the shrinkage, which can lead to the appearance of microcracks. To prevent this from happening, you need to wet the surface of the hardening slab with water for 2-3 days. This is best done by spraying. But you shouldn’t pour it on a rainy day either; it is recommended to protect the fresh mixture from precipitation. The slab must dry for 30 days, only after which the formwork can be removed.
Excavation
The soil is marked according to design standards, increasing its perimeter by 50 cm on each side for the installation of a drainage system
- The soil is marked according to design standards, increasing its perimeter by 50 cm on each side for the installation of a drainage system. It is worth remembering that the slab itself should protrude beyond the walls of the future house by 10 cm on each side.
- Pegs are driven into the ground and a marking cord is pulled. The axes of the future slab should also be drawn.
- The soil is removed from the pit to a depth of 60 cm. At the same time, you should carefully monitor the quality of the soil being removed. If early digging of soil is observed on a building site, then the loosened soil must be removed layer by layer until you reach layers untouched by a shovel. Here, according to the instructions, you will have to remove layers of soil around the entire perimeter of the pit in order to completely level it. After this, the bottom of the pit is compacted and filled with sand to the design level of the pit. If this is not done and the foundation is mounted on soft soil, then the force of the house’s pressure on the slab will simply break it over time precisely in the place of loose soil.
- A drainage system is laid around the design base area in the form of special perforated pipes with their slope towards the storage well or central storm drain.
- Then you should lay a layer of crushed stone 20 cm thick and carefully compact it according to the principle of laying a sand cushion.
- Now we install the formwork from high-quality wooden panels. Their height should be at least 40 cm. It is advisable to clean the inner walls of the formwork. The formwork is fastened with bolts, screws or self-tapping screws. From the outside, the wooden frame can be supported with wedges for greater stability.
Why is reinforcement made?
The foundation is based on concrete, which can withstand compression, but has low bending and tensile strength. When constructing a building on a concrete foundation, the load on it will be distributed unevenly - this contributes to the occurrence of bending moments. This feature is very dangerous for concrete structures, so the installation of reinforcement or reinforcing mesh is designed to neutralize the negative impact of these forces. The combination of concrete, which takes on compressive loads, with reinforcement that takes bending, will ensure the reliability of the structure.
Main objectives of strengthening
Discussing the issue of strengthening reinforced concrete structures with a rectangular profile, we will dwell separately on terminology. In specialized construction sources, the process of increasing the strength of concrete structures associated with the installation of reinforcement is called reinforcement of reinforced concrete products. What do the letters of the abbreviation stand for? We will answer:
- Ж
– abbreviated designation for the presence in the structure of iron (steel) reinforcing bars or mesh frames, which help to increase the strength characteristics. - B
– characterizes the material concrete, the mass of which is reinforced with embedded elements.
The main objectives of strengthening reinforced concrete beam elements are:
- Ensuring high load-bearing capacity of products.
- Increased strength characteristics.
- Resistance to destruction.
- Increased resistance to the perception of increased loads.
Solving the assigned tasks to ensure strength is carried out through reinforcement and implementation of special methods aimed at:
- assessment of strength characteristics;
- testing the endurance of a concrete support under the influence of multiple loading cycles;
- control of the stability of a reinforced concrete beam, maintaining its integrity and location.
Most factory products are manufactured using prestressed reinforcement
A typical example of calculating a reinforcement frame for a monolithic foundation
Cross section of a slab with dimensions. For the calculation, we take a monolithic slab with overall dimensions of 6x6 meters, the thickness of the slab for a private house is 20 cm. In the example, the calculation of the reinforcement belt in the interface zone will be used:
- Foundation area: 1.2 sq. meters.
- Minimum reinforcement area 1.2*0.3% = 36 sq. cm.
- The reinforcement area for one horizontal belt, taking into account the interval between the belts of 100 mm, will be 36/2 = 18 sq. cm.
GOST 5781-82 contains the entire permissible range of reinforcing bars with their cross-section and permissible length. Therefore, for this example it is advisable to use 12 rods with a diameter of 14 mm each. Then you need to make a drawing of the future frame in order to calculate the required amount of reinforcement. For a side 6 meters long, it is advisable to take a horizontal belt pitch of 300 mm, and for a vertical belt - 300 mm using reinforcement with a diameter of 8 mm.
If we summarize all the data in tables, taking into account the use of U-shaped connecting reinforcing clamps, then to reinforce a monolithic slab with an area of 36 sq. m will have to buy and invest 515.2 m of reinforcement with a diameter of 12 mm and 56 m with a diameter of 8 mm.
A typical example of calculating a reinforcement frame for a monolithic foundation
Cross section of a slab with dimensions
For the calculation, a monolithic slab with overall dimensions of 6x6 meters is taken, the thickness of the slab for a private house is 20 cm. In the example, the calculation of the reinforcement belt in the interface zone will be used:
- Foundation area: 1.2 sq. meters.
- Minimum reinforcement area 1.2*0.3% = 36 sq. cm.
- The reinforcement area for one horizontal belt, taking into account the interval between the belts of 100 mm, will be 36/2 = 18 sq. cm.
GOST 5781-82 contains the entire permissible range of reinforcing bars with their cross-section and permissible length. Therefore, for this example it is advisable to use 12 rods with a diameter of 14 mm each. Then you need to make a drawing of the future frame in order to calculate the required amount of reinforcement. For a side 6 meters long, it is advisable to take a horizontal belt pitch of 300 mm, and for a vertical belt - 300 mm using reinforcement with a diameter of 8 mm.
If we summarize all the data in tables, taking into account the use of U-shaped connecting reinforcing clamps, then to reinforce a monolithic slab with an area of 36 sq. m will have to buy and invest 515.2 m of reinforcement with a diameter of 12 mm and 56 m with a diameter of 8 mm.
Calculation step by step
An online calculator will help you automatically calculate the floor slab for a residential building - you just need to enter the geometric dimensions of the structure and the grade of concrete used. The calculation is made on the basis of standard parameters and loads, which are regulated by SNiP 2.01.07-85.
We will consider the method of independently determining parameters below.
Determination of the estimated length of the slab
The basic concepts when designing the geometry of a monolithic slab are design and physical length. The concept of “calculated length” should be understood as the minimum distance between the most distant walls. From this we can conclude that the physical length will always be greater than the design length.
A monolithic floor slab can be single-span (supported along the length by only 2 load-bearing walls) or multi-span (supported by 3 or more wall structures). Support on the walls can be done rigidly (with pinching) or hinged.
Figure 3. Scheme of rigid support
Figure 4. Scheme of hinged support
Figure 5. Scheme of a multi-span monolithic floor
The thickness of the slab can be calculated according to the ratio of 1:30 to the calculated floor area. Usually it is at least 200 mm.
Preliminary determination of reinforcement class and concrete grade
The calculation of the interfloor (interfloor) floor begins with determining the class of reinforcement. This can be done manually or selected from the table in Fig. 6.
Figure 6. Formula and table for selecting a reinforcement class
The reinforcement class without calculations is selected according to the aR value, indicating the distance from the center of the cross-section of the bar to the lower level of the slab. As this distance increases (its minimum value must be no less than the diameter of the reinforcement itself, but not less than 10 mm), the adhesion strength of the rod to the concrete increases. It can also be taken by the coefficient ξR, which is calculated using the formula shown in Fig. 6.
When choosing a brand of concrete, it is necessary to take into account that this material is heterogeneous, therefore its physical and mechanical properties (even if samples are made from one batch) are characterized by a significant scatter.
It is important to know that when making calculations, you need to take into account both the grade of concrete and the class of reinforcement. In this case, the compressive resistance of concrete is not allowed to be greater than the resistance of the reinforcement - i.e.
in essence, it is the reinforcing frame that will work in tension.
As a rule, when constructing floors in residential buildings, concrete mixtures of grades M250-M350 (B20-B25) are used. For the reinforcing frame, A400 or A500 reinforcement is usually used.
Determining the load on the slab
The calculation of a concrete floor slab is always aimed at determining the distributed load. To do this, you need to sum up the dead weight of the horizontal structure and the vertical loads.
The mass of a future slab 200 mm thick is determined taking into account the density of concrete and, as a rule, is within 500 kg/m2. According to building codes, the standard loads from overlying building structures on floors in residential buildings are taken to be from 200 to 800 kg/m2 - we take the average value of 500 kg/m2. As a result, we obtain a total distributed load of 1000 kg/m2.
The basic principles of how to calculate a floor slab are discussed in the following video:
The maximum bending stress always occurs at the center of the monolithic floor, which rests on the walls along the contour. To calculate the bending moment, you need to use the formula shown in Fig. 7.
Figure 7. Effect of bending moment and formula for its calculation
An example of calculating the bending moment acting on a monolithic floor slab during a span of 6 m:
Mmax=(1000×62)/8=4500 kg/m
Selection of reinforcement section
To create a reinforcing frame, corrugated reinforcement is used. According to building codes, the diameter of the rods is selected to be at least 10 mm for double-row and 12 mm for single-row knitting, depending on the length of the overlap. The size of the mesh cells is selected to be 200x200 mm or less, but in this case the total weight of the monolithic structure will increase.
Photo 8. Appearance of the reinforcing frame
When connecting formwork to a stone wall, a reinforcing frame is used in several ways, shown in Fig. 9
Figure 9. Methods for connecting formwork to a stone wall
Gain Errors
In the process of reinforcing concrete structures, violations of the reinforcement technology occur, causing a decrease in the strength of concrete products. When performing work, pay attention to the following points:
- It is not allowed to use aluminum products, industrial waste, wire and substandard metal of any configuration instead of working pipe fittings. The use of these materials that do not have the necessary performance characteristics will cause concrete deformation and cracking.
- It is forbidden to heat the bend areas with an autogen, or use a grinder to file deformed areas. This causes weakening of the rods and will lead to irreparable consequences under the influence of forces. All operations for bending rods are carried out without artificial heating.
- Class A-III reinforcement rods are bent at an angle of no more than 90 degrees using a special mandrel, the radius of which is equal to 5 times the cross-sectional size of the reinforcement. Performing a bend at a full angle (180 degrees) reduces the strength of the structure by 10 percent.
Design features
Reinforced concrete products combine the properties of solid concrete (stone) and metal, which has elasticity. Concrete is better able to withstand compressive loads, while metal is better able to withstand tensile loads. In building structures, the load on the floors in all cases will be directed vertically downward and generally distributed evenly over the entire area. The load consists of its own weight and all objects, structures, and people that will be there.
Double reinforcement of the floor: 1. working rods of the lower zone; 2. rods of the upper zone (their diameter is assumed to be less than or equal to the diameter of the rods of the lower zone); 3. reinforcement that redistributes loads; 4. wire rod stands.
The floors bend and are reinforced in such a way as to withstand just such a load. It always contains two meshes of reinforcement, upper and lower. Reinforcement bars in meshes are placed along the span and across the span. The reinforcement spacing (the distance between parallel bars) in industry is determined using engineering calculations based on the design loads. In individual construction, when making the floor yourself, the pitch is usually 150-200 mm.
The reinforcing mesh should be located in the thickness of the concrete at a distance of 25-30 mm from the surface. The reinforcement bars are tied together with tying wire at all intersections. You can also use ready-made welded reinforcement mesh. Independent reinforcement of a monolithic floor using welding is not recommended, since stress concentrations are formed at the welding points, which will subsequently lead to ruptures. In production conditions, welded mesh is subjected to a technological operation to relieve stress.
Components of a monolithic floor: concrete, supporting reinforcement, crown, floor.
Separators are installed between the upper and lower reinforcing mesh - vertical reinforcement elements (a kind of clamps) designed to ensure that the distance between the upper and lower reinforcing mesh is the same in all directions. The mesh separator can be of various types: a bent hook, a loop - whatever your imagination allows. They must be located with a certain step. The drawing presented here shows a schematic distribution of reinforcement.
The edges of the ceiling must be reinforced with additional reinforcement - U-shaped and L-shaped elements (see drawing). They especially require strengthening of the support area. If the slab is supported along the entire contour, then reinforcement must be done along the entire perimeter.
Let's look at the section drawing. The upper part will work in compression, and the lower part will work in tension. The main tensile load falls on the lower reinforcement, so it needs to be made thicker than the upper one.
Drawing diagram of the reinforcement of a monolithic floor.
The larger the span, that is, the distance between the supports, the greater the requirements for its strength characteristics. The recommended span is up to 6 m. Above this size, additional reinforcement will most likely be needed. It is possible to say more accurately whether they are needed or not only after strength calculations. But there is a general pattern: directly above the support the upper layer of reinforcement is strengthened, and in the middle between the supports the lower layer of reinforcement is strengthened. The principle of arrangement of reinforcements is reflected in the presented drawing.
Reinforcement bars must be continuous. If they consist of separate elements, then the overlap must be at least 40*d, where d is the diameter of the reinforcement. For example, for reinforcement with a diameter of 10 mm, the overlap should be 400 mm. For floor slabs, hot-rolled steel reinforcement, class A3, is used. Recommended diameter – from 8 to 14 mm
By taking these recommendations into account, you can refine your drawing.
For residential premises with a span of up to 6 m, supported along the contour, at any aspect ratio, we can recommend a slab thickness of 200 mm, reinforcement spacing of 200 x 200, diameter of the lower mesh rods 12 mm, diameter of the upper mesh rods 8 mm.
What conclusions can be drawn from all of the above?
So, from the above, we have decided on the main thing: reinforcement for the monolithic production of such a material as a monolithic floor support must be purchased only if you know the seller or manufacturer.
Also, when reinforcing floors, it is advisable to calculate the diameters, although this is an additional expense, it will certainly save money on strengthening the structure and prolong the operation. If you have any doubts about the calculation of this design, it is better to contact a specialist. Professionals will provide you with a detailed cost estimate, nuances and aspects that may arise during installation.
But first, find out reviews about this or that company, since there is a high probability of not only not getting the necessary information, but of turning to ordinary scammers who just want money and will not fulfill their duties to the required extent.
A monolithic ceiling is a rather serious matter, on which the safety of people may subsequently depend.
It is best to seek advice from loved ones or acquaintances who have either already dealt with this industry or have extensive experience in this area. You can resort to the Internet by consulting people on numerous forums.
In any case, in order for the support to meet the highest quality, and there is no other way to resolve this issue, it is necessary to carefully weigh all the pros and cons and only then proceed with the selection and purchase.
Remember that we are talking about a rather serious matter, on which the safety of people may subsequently depend.
Bandaging reinforced slabs
Manufacturing a monolith is impossible without the use of reinforcement. It acts as a bonding material in reinforced concrete structures - stair steps, reinforced slabs, arched and reinforced lintels.
Bandaging of the floor should be carried out using reinforcement having a cross-section of 8-14 mm, provided that the slab will differ in thickness up to 150 mm. However, it is worth noting that the thickness of the reinforcement may vary depending on the type of product. This requires a load calculation.
Reinforced floor slabs make it possible to solve the concept of building warm houses. They can be used in commercial, residential and industrial construction to organize roofing and interfloor horizontal floors.
Scheme of reinforcement of cement concrete pavement slabs.
Bonding of floors and coverings makes it possible to obtain warm interfloor floors as a final result, in addition to providing good protection from the cold of the attic and the used attic and the absence of cold bridges.
Reinforced concrete slabs, like ordinary concrete, have special markings, which it is recommended to pay special attention to when choosing slabs. Reinforced concrete is marked with marks that consist of numbers and letters
The semantic loads of the letters will indicate the type. For example, PC – floor slab, PNO – lightweight flooring slab, NV – internal flooring. The numbers that come after the letters (placed with a hyphen) make it possible to recognize the size of the slab: length and width in decimeters.
The most insidious in decoding is the last digit, which indicates the permissible load on the floor slabs in kilopascals. It should be remembered that any unit that will be contained in the last digit indicates 100 kg per 1 m². For example, the number 7 warns that the maximum possible load on the product will be 700 kg per 1 m².
Preparation for construction
- hammer with nails;
- wooden beams (100*100) or metal spacers (2.5 and thicker);
- roofing felt;
- polyethylene;
- reinforced rod A500S;
- the wire is soft.
Installing formwork between floors with your own hands. The formwork is installed immediately on the floor where the work will be carried out
It is important here that the entire area is done conscientiously and all joints match correctly one to one. The walls should be nailed vertically to the bottom, because
if they are nailed to the edge, there is a chance that the nails may not be able to withstand the pressure of the concrete (exceptional cases, but they do happen). A support system consisting of wooden beams and metal spacers is installed under the formwork with your own hands. Beams are installed on every m², while spacers can be installed in a ratio of 1 to 2, i.e. 2 times less often. Absolutely each one must be perfectly installed, and then checked three times for stability. The pressure from the concrete on them will be 500 kg, and at the same time they should not even move. Otherwise, all the work may come to nothing. Once the system has been properly installed and checked from below, you should climb up and double check everything again. Just walking on top with a heavy step will be quite enough. If everything is firm under your feet and there is no longer any doubt, the correct way to lay the floor for waterproofing with your own hands is with roofing felt or polyethylene, after which the material is pressed with something heavy and you can proceed to the next stage of work. Reinforcement is carried out as follows: rods are laid out along the entire length in increments of 0.5 m, after which a similar layer is laid out on them in a cross. All connections at the joints are made using soft wire. As soon as the bottom sheathing is ready, you should begin making the top one. It is done in a similar way, but under no circumstances should they be connected with each other. The staples are made by hand using the same reinforcing rod. They are bent in the shape of a U (inverted, of course) and installed with a frequency of 1 piece per 4 m². The upper level is mounted at a height of 25 mm from the pouring ceiling, and the lower level is mirrored from the formwork. Everything is tied with soft wire and tested for strength. If the fittings do not have free movement, then this is a well-done job, but if there is free movement, then the reason should be found and remade. During the pouring of concrete, nothing should be damaged due to such defects.