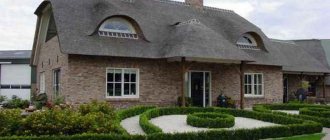
Are you just about to build your house and are looking for an unusual and energy-saving project? Then it’s time for you to think about a pitched roof, which is also called asymmetrical or asymmetrical. This differs from a regular roof in that its two slopes have different lengths or angles of inclination.
Most often, a gable roof with different slopes is implemented when it is necessary to create a single complex from a house and an extension, although recently the classical canons of roof construction have begun to be forgotten and about ordinary architectural tasks. Want to know why? This is interesting!
Fantasy games or invaluable benefits?
- placing one slope to the south;
- the second at a different angle, or longer, to the north;
- correctly calculating all loads from wind and snow;
- wisely organizing the interior space of the house,
Such a builder achieves much more efficiency from his creation than if he built an ordinary two-story house under a gable roof. Those. all the disadvantages were reclassified as advantages, and the originality remained at its best:
As modern architects have calculated, installing just one angle above 45 degrees significantly reduces the unused area of the house. And this is worth a lot.
Roofing pie device
The veranda belongs to the category of extensions that are built for such purposes as evening tea, barbecue, billiard room and setting up a summer kitchen in a country house. All this suggests that on the veranda there will always be water vapor from food and people, and, due to its closed nature, the temperature will always be higher than outside. This means that you cannot build a simple roof without the necessary insulation from vapors and condensation.
On the other hand, for pitched roofs the arsenal of roofing coatings is much more open, while for the same flat roofs one often has to limit oneself to rolled materials or liquid rubber. Therefore, if your veranda is open, like a terrace, and you don’t plan to cover it with the same as on the house, seriously consider modern rolled materials - these perfectly protect the interior space of the veranda from precipitation and do not require additional roofing layers:
In other cases, you will need reliable waterproofing. This film or the membrane does not allow moisture to enter the insulation, and we will definitely use insulation in the gable roof of the veranda.
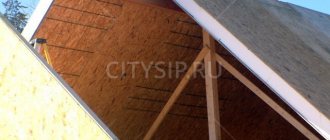
Next, under the waterproofing film, if you look from top to bottom, the insulation itself should be located. This can be mineral wool, glass wool, ecowool and any other modern insulation. The main thing is only to protect it from rain moisture and melt water, for which a film or membrane is spread over it:
But on the ceiling side of the veranda, the insulation also needs to be protected from moisture. We are talking about a vapor barrier film. This insulation is designed to withstand, as far as possible, invisible water vapor rising upward, which can cause a lot of damage to the insulation.
As a vapor barrier, we do not recommend that you use unusual inexpensive films that protect the insulation by only 50-70%, but modern dense membranes. You don’t want to completely go through the rotten gable roof of the veranda in 2-3 years, do you?
In addition, if according to the plan there will be something like tea and coffee on your veranda, then take a waterproofing film that is anti-condensation and must be breathable, with special drainage holes. Such, if moisture does penetrate into the insulation (and it will, for example, a high-quality vapor barrier film can withstand water vapor up to 90%, and yet there is this 10% that penetrates the vapor barrier), then it will bring these droplets out through itself, where they will be picked up by the ventilation flow.
This is how we smoothly approached the issue of gable roof ventilation:
Advantages and disadvantages of pitched roofs
What is so good about an asymmetrical roof that for the sake of its benefits many are willing to risk both the strength of the house and the durability of the roof over their own heads? Let's list them.
Uniqueness and design
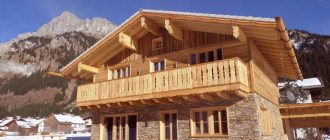
The asymmetrical roof always looks stylish in any location. In our country, after so many centuries of constant construction of gable gables, any such projects are already striking, causing surprise and leaving an indelible impression.
Moreover, if you want to create a completely unique house architecture, then the easiest way to realize your crazy idea is with the help of such a solution as different slopes.
Advantageous architecture
And many more valuable advantages:
Often, an asymmetrical roof is also used to install any necessary equipment, for example, solar panels.
Resisting the Elements
This approach solves the problem of distributing the load from wind and snow at a time, whereas it is usually difficult to decide whether to make the roof peaked, thus getting rid of tons of snowflakes, or flat so that it does not get torn off in the first storm.
And how difficult it usually is to calculate the snow and wind loads of a roof, this video will tell you:
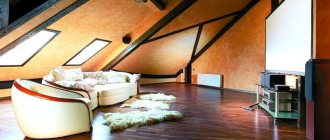
A real “salvation” for the attic
In this case, the geometry of the attic is no longer so unusual, and one of the walls may well even be vertical if you, without regret, lose some half a meter of sharp space under this slope:
To make or not to make such a roof?
Essentially, you have two aspects on the scales:
- On the first bowl: uniqueness, design and some functional advantages.
- On the second side: the difficulty of executing such projects.
Features of one-story buildings
Before we talk about the roofs of one-story houses and their structure, let’s find out the essence and features of low buildings. In recent years, the construction of low-rise cottages has become the most popular option for private housing construction, due to many advantages:
- The construction of such houses takes place in a shorter period of time.
- For one-story buildings, lightweight foundations are laid, which means cheaper construction in terms of excavation work.
- In the design of such buildings, simple design solutions are mainly used.
One-story buildings have recently become increasingly popular
- The absence of a second floor is an additional convenience for the elderly and safety for children.
- One-story houses are an ideal organization of space, where all the necessary premises are located within one plane (40–200 m²). Compact and nothing superfluous.
Video: projects of small private houses
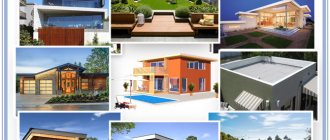
Review of the most successful projects and examples of construction
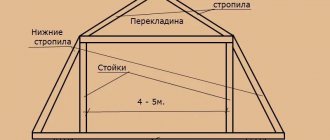
Different angle of inclination, but equal length of slopes
Note that this option is the most gentle for designing a pitched roof and it exerts almost no different pressure on the foundation. And here’s how to build a gable roof with different slope angles of equal-length slopes:
The only disadvantage of this option is the design. Believe me, it is much easier to calculate the slopes that are at the same angle of inclination, and it is much easier to attach them to the ridge.
Different lengths of slopes, but one angle of inclination
In this option, one of the slopes is slightly or significantly longer than the other. Like in this example:
Here one of the slopes is much longer than the other, thanks to which the roof covered not only the house, but also the attached veranda nearby. And at the same time, the long slope itself rests not only on the house, but also on the extension, thereby maintaining a balance in the load from the roof.
Here is another good example of the construction of such a roof, however, the longer slope here covers not an extension, but part of the house itself:
Another project:
But in this project, the roof of the house has the same slopes on one side, and different slopes on the other:
Slopes of different shapes and lengths
But this option is more rational in terms of uniformly distributing the load on the walls of the house, because thanks to the fracture there is no longer one pushing force of the rafter system:
Please note that under the refraction, such a roof has additional supports. And keep in mind that any kinks are always the most problematic areas of the roof.
The most unusual gable roofs
Such projects of pitched roofs no longer belong to those listed above due to their non-standard nature. But these are rare:
And one more project as an example, with one broken slope:
Gable roof with offset center ridge
It’s more difficult to figure out the skate, but everything is doable:
By the way! It will be interesting to know: How to attach a gazebo to a bathhouse: extension options
But especially carefully it is necessary to design the load from a displaced ridge on a timber structure. After all, the walls settle quite strongly in the first year, up to 15%, and therefore it is important to prevent the entire roof from skewing later:
Modern options and photos
Various forms of stingrays can be grouped into individual species:
- single-pitched;
- gable;
- hip;
- half-hip;
- tent;
- multi-pincer;
- broken;
- domed and conical.
Single-pitch
This is the simplest and most inexpensive option for a pitched roof. The roof is a plane inclined to one side. Typically, such a structure, which completes the top of a building, is used in the construction of workshops, garages, sheds and cottages. It should be noted that sometimes architects use this type of roofing structure in original designs of private houses.
Gable
Gable roofs are widely found in villages, urban settlements and suburbs of megacities. The roof consists of two slopes resting at the top on a ridge beam. The ends of the attic are covered with gables - a continuation of the facade walls. As a rule, a spacious room is formed under the slopes, which can be a cold attic or attic.
Hip
Four-slope hip varieties differ from the model described above in that the place of the fronts is taken by triangular-shaped slopes (hips), and the other two parts are trapezoidal slopes . All 4 elements rest on the ridge girder. Hip roofs have several subtypes, including the three-pitched version.
The 4-slope rafter system is more complex than the supporting frame of the 2-slope structure, but it has an increased load-bearing capacity. Hip roofs can withstand hurricane-force wind loads without accumulating large volumes of snow on their surface in winter.
Half-hip
They differ from the previous roof in that the hips are shortened at the bottom . Thanks to this feature, in attics it becomes possible to install windows in the gables, rather than cutting them into the roof.
Otherwise, the upper part of the hip is “cut off”, forming triangular pediments under the roof. They make it possible to embed window openings into them, which are called “dormer windows”.
Tent
If four hips are combined with a ridge knot, they will form a tent. Typically, such roofs are erected on buildings whose outer walls are square in plan.
If this is a regular polygon, then the number of hips will be equal to the number of faces of this geometric figure.
The original solution for the upper fence of the house attracts developers with its simplicity and aesthetic appearance.
Multi-pincer
Multi-gable structures are a set of gable roofs with numerous intersections of slopes, forming a large number of internal angles - valleys and pediments. Such buildings are considered the most complex roofing structures .
Completing the upper part of houses with multi-gable roofs gives a private house a unique individuality of special beauty.
Broken
Attic houses include sloping roofs. Two slopes have a kink, dividing them into two planes with different angles of inclination, which makes it possible to obtain a large space under the roof. This is one of the opportunities to almost double the living space of your home.
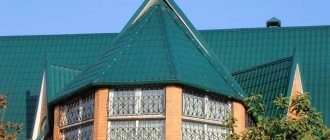
Dome and conical
Domed upper ceilings are most often erected for exhibition complexes , food and clothing markets. They act as roofs for hangars, boathouses and other structures. Domes can also be found on residential buildings.
Conical roofs can be found on separate towers or round extensions to the main building. If they form a polygon in plan, then the conical surface will consist of several hips.
Advantages and disadvantages of a gable roof in a bathhouse
Before installing a gable roof, you need to study its functional disadvantages and advantages. This will avoid unpleasant surprises in the future.
Among the main advantages of a roof with two slopes are:
In addition to the functional and useful advantages, a gable roof has one drawback.
And if the project plans for a large bathhouse, it will require a lot of material. This can significantly hit your budget.
Features of gable roofs
The structural basis of a gable roof is the most simplified of all possible design options with multiple slopes. The concept of a gable roof is the formation, through slopes, of two inclined planes and gables on the opposite side.
Moreover, the equivalence of the slopes is not at all necessary. This allows you to not be too strictly tied to the equivalence of the lengths of these slopes, so the length indicators can also be completely different. By the way, it was this feature that made it possible to build roofs with non-identical slopes in terms of parameters and opened up more possibilities in the design of house structures, which led to such popularity of these roofs.
As a rule, the intersection of the slopes is located at the location of the ridge; it forms a parallel with the long side of the building. The simplicity of this design determines the traditional form of the building.
The advantageous aspect of gable roofs is their excellent protective functions. The building will not be at risk of damage caused by bad weather conditions, since the absence of creases in the slopes allows rainfall to flow freely from the roof surface, and the absence of concave corners (also called ends), which are formed in the place where the slopes intersect, solves the problem accumulation of snow in these areas.
The symmetrical parameters of a gable roof form a triangle with equal hips in the upper part. However, those who do not want to take a standard and common approach to roofing their home should consider more interesting and sophisticated options for gable roofs.
The broken structure of a gable roof with different slopes gives residents of the future building the advantage of increasing the living space inside the house. This could be the arrangement of additional space for a large attic or the construction of an attic.
Another approach is the lack of symmetry in the design of a gable roof. From the outside, this solution has a rather unusual and original appearance, but the space created in the attic is much smaller.
Moreover, there are other types of roofs with two slopes. The multi-level arrangement of slopes ending at different heights does not converge at the location of the ridge. This causes the broken roof structure. Of course, only a specialist in this matter can do this option, however, the funds invested in the construction of such a plan are fully justified by the excellent result.
How to calculate the angle of inclination of a gable roof for a bathhouse
The angle of inclination of a roof with two slopes in the construction of a bathhouse must be understood as the degree between the horizontal level, which coincides with the wall and the line of the rafter.
Depending on the angle of inclination, roofs are divided into the following types indicated in the table:
Angle in degrees
Classic gable roofs are made at an angle of 45°. It is important to understand that such a structure requires reliable fastening, since it is not intended for any terrain. The most common roof slope is 0-45°.
In addition, such an approach to construction does not allow correctly calculating the cost of materials, as well as optimizing the usable area in the under-roof space.
For reliable design of a bathhouse structure with a gable roof, special attention should be paid to the choice of slope. A number of factors need to be taken into account:
Calculation of the roof slope for a bathhouse can be calculated using the height of the ridge and the width of the gable using the formula:
Vk – height to the roof ridge, m;
Shf – width of the bathhouse wall, m.
If the width of the wall is 9.50 m, then the height of the ridge will be:
Vk = 9.5 m /3 = 3.17 m
Tilt angle Tg = Vk/(Shf/2) = 3.17/4.75 = 0.667
Using the Bradis table, you need to find the value of the tangent of the angle. Or you can use an engineering calculator for these purposes. Its value will be 34°.
This method of calculation is more than 50 years old. Many roofers still use this method when designing a roof.
Prerequisites for the appearance of asymmetrical roofs
Throughout the existence of mankind, architecture has undergone significant changes. A huge number of the most diverse designs were invented, built and remodeled - and time after time new, increasingly sophisticated architectural solutions and ideas were found, which were implemented to the best of their ability, sometimes becoming unintentional masterpieces.
All this fully applies to roofing structures. The roof of residential buildings has changed incredibly over the past millennia, passing through a lot of historical eras and geographical features. At different times, this element of the building was used both to solve purely practical problems and to demonstrate the degree of freedom of creative thought.
Over time, the fashion for sophisticated solutions began to fade - perhaps precisely because creative thought began to run counter to common sense and the functional purpose of the roof. The knowledge gained and interesting developments did not go away, they simply began to be used more rationally and wisely.
As for gable roofs, one of the solutions that proved to be quite profitable was the following:
- One of the roof slopes was located on the south side;
- The opposite slope was located at a different angle or increased in length;
- The loads on the roof were carefully calculated, as well as the internal areas of the building.
Making such changes to the classic roof design made it possible to increase its efficiency and give it an original look. An important factor is the ability to more competently distribute the free internal space in the building.
How to make a gable roof for a bathhouse with your own hands
The work of building a gable roof with your own hands should be carried out in stages. The installation of each element does not require special skills; the main thing is that you need to carefully monitor the quality connection of the elements.
To build a roof for a 5*5 m bathhouse with your own hands, you will need the following materials and tools:
The entire stage of work can be divided into the following important steps:
After the roof of the bathhouse is made, it is necessary to check the main components of the “skeleton”; it is important that the technology is performed correctly.
"Fundamental" questions
If the foundation was not originally shared with the house, then make it as strong as the scale of the extension requires. For a massive stone veranda, it is better to build a strip one, for a log house - a columnar one, and for a frame - a perimeter beam.
Here is a good example of how to build a strong columnar foundation:
- Step 1. We dig holes in the ground up to 1 meter deep.
- Step 2. Next, we install pipes from rolled roofing felt in them.
- Step 3. We pour sand inside these pipes and then pour concrete. In the process, we pat these pipes on the sides, thereby replacing the work of the vibrator.
- Step 4. Now we install the ceiling. To do this you will need 6 bars 50x150 and 8 bars 50x100 two meters each. We make the ceilings along the contour, and in the middle of the beams, with a span between the boards of about 1 meter.
- Step 5. Now we lay down the floor boards, for which it is most convenient to use a regular inch.
Here's what it looks like in practice:
With walls it’s even easier; such a veranda is built no more difficult than any other extension:
Tips and tricks
In order to build a gable roof with your own hands with high quality, you need to take into account several recommendations before starting work. They will help to avoid mistakes during construction and increase the service life of the bath:
Do-it-yourself options for bathhouses with a gable roof can be seen in the photo:
Two-story houses
The versatility of a gable roof lies in the fact that it can complement the architecture of a house built from any material: wood, brick or concrete.
Photo: proroofingsv.com
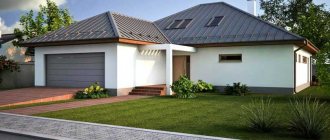
For private estates that include several buildings, multi-level gable roofs with the same slope are best suited.
The gable roof of the main house can be combined with the hip roof of an extension - porch, veranda, terrace or garage.
See also: Hip roof: 65 photos of private houses
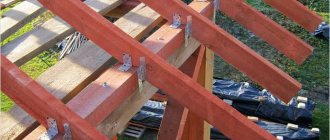
Main parts of the rafter system design
When thinking about the design of a roof truss system, you need to know what parts this system consists of.
#1. Mauerlat is like the foundation of the entire system. It helps to evenly distribute the load on the walls.
#2. The rafter leg determines the angle of inclination of the slope, as well as the general appearance of the roof, rigidly fixing individual elements.
#3. Purlin – holds the legs of the rafters together. The ridge purlin is at the top, the side purlins are on the side.
#4. Tightening - prevents the rafter legs from moving apart, connecting them at the bottom.
#5. Racks and struts - give the legs of the rafters additional stability. They rest against the bed (which lies below parallel to the ridge).
#6. Lathing - is stuffed perpendicular to the rafters and is in the form of edged bars or boards. It is designed to transfer the entire load from the roofing material to the rafter legs.
#7. The ridge of a roof is where two roof slopes meet. A continuous sheathing is installed along the ridge to strengthen this part of the roof.
#8. Fillies - used to create an overhang if the length of the rafter legs is not sufficient.
#9. A roof overhang is an element designed to protect against excess rainfall on the walls.
By the way! It will be interesting to know: Drip line for metal tiles: instructions for installation and arrangement
The above are examples of wooden roof trusses; in addition, in some cases, trusses made of concrete and metal are used.
- Types of roofing materials for different types of roofs
Instructions for performing work
Before making a pitched roof, you need to choose the right lumber for the rafter system and sheathing. In this regard, we will give the following recommendations:
- for a span of up to 4.5 m wide, rafters made of 15 x 5 cm timber are suitable, up to 6 m - from 200 x 50 mm boards, spliced in pairs or lengthwise;
- timber 150 x 50 mm will be used for the wall frame (mauerlat) and the beds;
- cross-section of racks, struts and purlins – 10 x 5 cm;
- the sheathing is made of boards 20-25 mm thick and 10-15 cm wide.
For waterproofing, you will need roofing felt and a superdiffusion membrane, and for laying the finishing coating, metal tiles, corrugated sheets or other roofing material. If we are talking about a residential building, do not forget about insulation: prepare mineral wool of the required thickness (or other insulation) and a vapor barrier film.
Laying the Mauerlat
The strapping beam should be placed on 2 opposite walls, where the rafter legs rest. If it is planned to support the layered system on internal partitions, then a board called a bench is also laid on them. The exception is log and frame houses, whose walls are ready for the installation of rafters.
The technology for laying Mauerlat on walls made of different materials looks like this:
- Studs are pre-embedded into the brickwork, onto which the strapping beam is attached. Before installation, the stone wall is covered with 2 layers of roofing felt. If the studs were not installed, then the Mauerlat is secured with anchor bolts or pulled together with steel strips.
- Before installing the Mauerlat, porous walls built from aerated concrete should be tied with a reinforced concrete belt, as done in the diagram. The studs for fastening are placed into the monolith during pouring.
- In wooden extensions (verandas, terraces) built with your own hands, to support the rafters you need to attach a second board of the same width to the top trim beam of the wall. To install the upper end of the rafter leg, you need to screw a horizontal beam 15 x 5 cm to the wall of the existing building. This operation is demonstrated in more detail in the video below.
Installation of rafters step by step
Before building the frame, you need to determine the actual length of the rafters, taking into account the extensions beyond the walls that form the eaves overhangs. However, the canopies can be extended after installation by nailing boards cut to size to the rafter legs - the so-called fillies. The minimum length of the roof overhang is 300 mm.
Then proceed in this order:
- To increase the internal partition to the height of the inclined plane of the roof, assemble a frame from vertical supports connected at the bottom by a plank and at the top by a purlin. The location of each rack must coincide with the pitch of the rafters that will rest on them. For stability, secure the frame with struts.
- Try the rafter in place and cut it from below at three support points in order to increase the area of contact with the Mauerlat and the beds, as shown in the photo.
- Install the rafter leg and attach it with self-tapping screws to the steel corners. Repeat the operation at 3 points, then move on to the next beam.
- Trim the legs of the eaves overhangs, and then sew them up from the bottom and sides with clapboard. It is more convenient to do this before the roof covering is laid.
If the side gables are not laid under the slope of the future roof, then they should be covered immediately after assembling the rafter system. Otherwise, you will then have to do this work from ladders or build scaffolding. For installation of a truss system for a pitched roof of a large building, see the next video:
Lathing and finishing coating
Before laying the boards on the roof slope, the rafter system is covered with sheets of super-diffusion membrane, which provides protection from wind and moisture entering the attic space. The canvases must be laid horizontally, starting from the bottom, and secured to the upper plane of the rafters with counter-lattice bars with a cross-section of 5 x 5 cm. The membrane should sag slightly between the rafters to drain water, and adjacent canvases should be glued together (the overlap is 15 cm).
The sheathing boards are nailed to the rafters in increments depending on the type of roofing:
- under metal tiles – 35 cm;
- for corrugated board and slate – 50-60 cm;
- Under shingles, bitumen and ceramic tiles, the sheathing is continuous.
The last step is the installation of coating and insulation (if necessary). Thermal insulation of a pitched roof is best done along the ceiling, leaving the unused attic cold. How to properly insulate ceilings is described in our guide.
Types of rafter systems - how they differ from each other
This or that type of rafter system is not chosen spontaneously, but depending on the design of the house being built and its size. Next, about each type of rafter systems.
Hanging rafter system
Here are a few important facts about their design:
- Repairing the roof of a private house - therapy for the roof
Layered rafter systems
What you need to pay special attention to:
Advantages and disadvantages
All types of pitched roofs have their advantages and disadvantages. The table below highlights their main pros and cons.
| View | Advantages | Flaws |
| Single-pitch | Simplicity of design | No attic |
| Gable | Vertical attic windows | High gables |
| hip | High load-bearing capacity | Complex rafter system |
| Half-hip | — « — | — « — |
| Tent | — « — | Limited application |
| Multi-forceps | Lots of attics and balconies | Expensive |
| Broken | Comfortable attic volume | Presence of high gables |
| Dome | Covering large areas | Difficulty of construction |
| Conical | Decorative design | Limited application |
Roof and roofing
It is very important to distinguish between the words “roof” and “roof”. Roof - consists of rafters, roofing, insulating parts, encloses the house from above. Rafters are a beam that creates a slope, the load-bearing system of a pitched roof.
Roofing is the top shell of the roof, which is made from various building materials. The reliability and practicality of using a house depends on the roof.
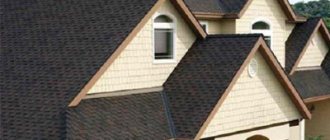
Metal roofs
Photo: nikas-trade.com
Metal tiles almost reliably imitate their ceramic counterpart, but at the same time they are much cheaper. Gable roofs made of metal tiles not only look catchy, but also harmonize perfectly with brick and log facades.
The photo shows a private house with a roof of an interesting two-level design, implemented using metal tile roofing.
Many color and texture varieties of metal tiles allow you to choose a roof for any architectural style: classic, modern or rustic.
Elements of the roof truss system
The load-bearing elements of the rafter system include:
Mauerlat is the basis for fastening the rafters; it is laid along the perimeter of the walls. It is laid so that the load is uniform. To make a Mauerlat, a beam of 20cm*20cm or 15cm*15cm (for small structures) is taken.
Inclined beams, with the help of which the load from the roof, wind and snow is transferred to the structure of the Mauerlat - these are rafter legs. They are most often mounted from the ridge to the eaves.
The beam on which the roof parts rest is a purlin. The diameter of the purlin is affected by its span, most often 20*20 cm is taken.
The truss system of a wooden roof also includes: struts, racks and tie rods. Their main function is to reduce the severity of the basic elements.
An element of the rafter system is also a truss. This structure includes: tie rods, rafters, racks, struts. The farm is built in the shape of a triangle, due to which it has good stability.
The connection nodes of the rafter system are of the following categories: the connection point between the mauerlat and the legs, the connection point between the elements of the wooden truss and the legs.
The method of connecting the Mauerlat and rafters is sliding and rigid.
Having a drawing of the rafter system, where all structural elements are indicated, will effectively help in working on the system.
The drawing is presented below.
Subtleties of the hip roof device
A hip roof has slopes on all sides and is called a hip roof. There may be more slopes (roof edges) if the shape of the building in plan is more complex than a simple rectangle. All slopes are completely lowered to the cornice. Two of them have the shape of a triangle, two (or more) are trapezoidal.
A typical Polish house project with a straight hipped roof and a small gable above the porch. Large roof overhangs are practical and beautiful
The hip structure, when properly approached, is strong and reliable, but is more difficult to construct than a gable structure. Accordingly, it costs more. Visually, the hip roof makes the house lower; due to the lack of vertical walls, the real height of the building cannot be read. The corner rafters bear a greater load, so they must have a stronger cross-section.
The design of a hip roof is more complex than a hip roof.
A four- or multi-pitched roof also allows you to equip living quarters in the attic. Like a gable roof, the rafter structure of a hip roof can be straight or broken. With straight rafters, large overhangs will be appropriate: they will protect the walls from rain and will allow you to raise the height of the attic without disturbing the proportions of the building.
A nice house with a residential attic under a sloping hip roof, which is decorated with a side gable with a balcony.
Glass doors and vertical cuckoo skylights fill the rooms with sunlight. A typical structure for northern France.
The roof is hip, but there are more than four slopes
A hip roof can also be curved, approaching the dome type. The production and installation of such structures will cost much more.
Roof ventilation system
Streams of water vapor very often pass from a warm room into the attic, which creates condensation on the roof coverings. Wooden parts and insulation suffer from condensation.
Ventilation is done to eliminate moisture in the rafter system and in the attic.
Water vapor that enters the attic must exit without obstacles through windows and special holes made in the roof ridge.
In houses where flat roofs and attics are used, there must be space with ventilation.
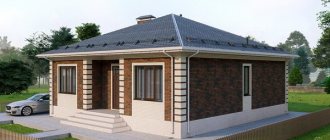
Projects of one-story houses with a gable roof
One-story cottages with a gable roof are one of the most popular options for houses that developers choose for individual suburban construction.
It is important to note that for almost all developers the issue of roof shape is important, since the costs associated with roof installation account for approximately 30% of the total construction cost. You can reduce your roofing budget by choosing a one-story house with a pitched roof, a different roofing material, and a rafter system.
Our catalog of one-story houses with a gable roof includes a large number of standard and custom designs, which allows the client to choose and buy the project that best suits his requirements. Our prices for projects of one-story houses with a 2-pitch roof (photos, drawings can be viewed on the website) are at the market average level.
Plans for one-story houses with a 2-pitched roof: characteristics and advantages
One-story houses with a gable roof, videos and sketches of which are collected in this section, are more in demand than projects of houses with a pitched roof, since they have a number of advantages:
- The simplicity of the design of a gable roof ensures lower installation costs;
- With such a roof, the use of metal tiles will result in minimal waste;
- A gable roof can ideally cover rectangular buildings. This design is good for attic houses. The windows located on the fronts provide sufficient ventilation and illumination of the attic room.
We invite our clients to consider our best one-story houses with a gable roof and choose a project that is as close as possible to the developer’s dream home.
Project plans for one-story houses with a 2-pitched roof: types of roof construction
Private one-story houses with a gable roof can have one of the following roofing design options:
- Simple gable roof;
- Mansard gable roof;
- Gable roof vaulted type;
- Gable mansard roof with hatches.
Schemes of one-story houses with a gable roof (with an attic) can often have a broken roof structure. In this case, the angle of inclination of the lower blade can be increased (within 65-80°) in comparison with the upper one (25-30°). Thanks to this roof design, you can increase the attic space.
Enjoy viewing the collection updated in 2021 and we wish you to choose an architectural project that will suit your taste!
Types of gable roof rafter frame
A gable roof is a structure in which two rectangular planes, called slopes, are installed at a given angle to the walls, and the triangular parts of the building act as gables.
A roof with two slopes is the most common design, which blends perfectly with any landscape and perfectly protects from bad weather.
For roofs with two slopes there is a huge variety of architectural and technological solutions
Video: rafter system of a gable mansard roof
But recently, thanks to designer imagination and modern roofing materials, private houses are increasingly being crowned with unusual gable structures, which become the highlight of the exterior, attracting the eye with their originality and beauty.
Gable roofs with an unusual rafter structure are distinguished by their original appearance, but this shape reduces the usable area of the attic space
However, such extravagant types of roofs often reduce the usable area of the roof space, therefore, when planning a gable structure, it is still advisable to combine your preferences with expediency.
Regardless of the configuration, the rafter system must fulfill its main purpose - to accept all loads and evenly transfer them through the supports to the walls and foundation
According to its structure, the supporting system of a gable roof is divided into two types.
The layered rafter system is most often installed when it is necessary to span spans up to 7 m long in buildings with internal main walls
By the way! It will be interesting to know: Do-it-yourself attic roof construction
It is not necessary to lay a mauerlat under a hanging rafter frame; it is enough to place a board on the waterproofing layer to level the surface and increase the support area for rafters or trusses
Often, in addition to the main types, a combined rafter system is used, which includes individual links of both structures.
The combined rafter system simultaneously uses the characteristic elements of layered and hanging structures
According to the material, the rafter system of a pitched roof can be:
- wooden, most often from coniferous wood with a moisture content of no more than 20–22%;
- metal, consisting of trusses and purlins;
The rafter system of a gable roof is made primarily of wood, however, in climatic regions with high humidity, it is recommended to install metal or combined rafter frames
Reinforced concrete trusses are load-bearing structures of increased strength that cover large spans
If you decide to build a roof on your own, then you need to start by forming a sketch and understanding the features of the gable structure as a whole and each of its elements separately.
The construction of a gable roof should begin with making a sketch with the main dimensions of the building on it.
Video: basic concepts about the gable roof truss system
Internal arrangement of the roof
Correct installation of the rafter system is, of course, important, but it is equally important to prepare the roof for laying roofing material and properly insulate the structure.
Installation of roofing pie
The arrangement of the under-roof space consists of several stages and is carried out from the eaves overhang towards the ridge.
| How to install a roofing pie | |
| Photo | Instructions |
| Kapelnik A drip tray is a metal strip through which condensate flows into the roof drain; it is the first to fill. More precisely, first a board is nailed under the drip, and then the drip is screwed to it with self-tapping screws and a press washer. | |
| Stop The stop is a board that is installed between the rafters and rests on the mauerlat. It serves as a lower barrier for installing thermal insulation. | |
| Tape for drip line The under-roof windproof membrane must fit tightly with the drip line; to do this, you must first stick K-2 butyl rubber elastic tape onto the drip line, and double-sided tape is already mounted on it. | |
| Wind protection In some sources, such a membrane is called waterproofing, but this is not entirely true; in fact, it is a vapor-permeable diffusion membrane. From the bottom side steam can escape from it onto the street, and from the top it protects from moisture and is a waterproofer. And remember - polyethylene is not suitable for these purposes. On the canvas, the vapor-permeable side is rough, but usually there is a mark there.
| |
Installation of wind protection
| |
| Counter rail A counter batten or counter batten provides a ventilation gap between the membrane and the roofing; usually a 50x50 mm block is used. In order for the block to tightly press the windbreak to the rafters, thick foam tape is glued onto it. | |
| Roof sheathing The step of fastening the board of the under-roof sheathing depends on the type of roof, for example, for metal tiles this step is 30 cm. The thickness of the board itself is 20 - 25 mm, width 100 mm. The entire sheathing is arranged in strips, the windbreak is secured, the counter batten is filled, the sheathing is filled, and then the next roll of windbreak is rolled out and so on until the ridge. | |
| Skate protection Wind protection is mounted on top of the ridge with an overlap, as in the photo on the left. | |
Insulation
Exclusively mineral wool is used as insulation on pitched roofs. It is better to take dense cotton wool slabs; unlike soft mats, they do not shrink over time.
The slabs are cut 2 cm wider than the distance between the rafters, after which they are inserted tightly between the rafter legs, and a vapor barrier is stretched on top and fastened with a stapler; then you can attach the interior finishing of the attic, for example, plasterboard or lining.
In the northern regions, sometimes they add another batten and insert a second layer of insulation between the slats, the technology is the same, only there are more layers.
Important! Any vapor barrier, in any place, is installed in the same way as a wind barrier, that is, so that steam escapes from the house to the street.
Roof insulation with mineral wool is considered the best option
Important! Pitched roofs cannot be insulated with either polystyrene foam or extruded polystyrene foam. These types of insulation do not allow steam to pass through, so all the water will accumulate in the wood of the rafter system and eventually the wood will begin to deteriorate.
At the last stage, a drainage roofing system with gutters and downpipes is installed, but this is a separate topic; how to make a drain from the roof with your own hands can be read and seen in detail with photos and videos “HERE” and “HERE” .
How to make a roof with your own hands video:
How to make an attic roof at home with your own hands:
How to make a pitched roof with your own hands:
How to calculate the rafter system of a gable roof
The main parameters for calculating the rafter system will be the following values.
When calculating the rafter system, it is necessary to use a snow load map, from which it is easy to determine the region number and correctly calculate the snow load in winter
Correct calculation of wind loads using a map eliminates errors when constructing a gable structure
Table: k coefficient value for different types of terrain
| Building height, m | Coefficient k for different types of terrain | ||
| A | IN | WITH | |
| ≤ 5 | 0,75 | 0,5 | 0,4 |
| 10 | 1,0 | 0,65 | 0,4 |
| 20 | 1,25 | 0,85 | 0,55 |
| 40 | 1,5 | 1,1 | 0,8 |
| 60 | 1,7 | 1,3 | 1,0 |
| 80 | 1,85 | 1,45 | 1,15 |
| 100 | 2,0 | 1,6 | 1,25 |
| 150 | 2,25 | 1,9 | 1,55 |
| 200 | 2,45 | 2,1 | 1,8 |
| 250 | 2,65 | 2,3 | 2,0 |
| 300 | 2,75 | 2,5 | 2,2 |
| 350 | 2,75 | 2,75 | 2,35 |
| ≥480 | 2,75 | 2,75 | 2,75 |
| Note: "A" - open coasts of seas, lakes and reservoirs, as well as deserts, steppes, forest-steppes, tundra; "B" - urban areas, forests and other areas evenly covered with obstacles more than 10 m high; "C" - urban areas with buildings over 25 m high. | |||
The value of the standard wind pressure Wo for climatic regions is given by the table given in paragraph 6.5 of SNiP 2.01.07–85.
Table: standard wind pressure by region
| Windy areas | Ia | I | II | III | IV | V | VI | VII |
| Wo, kPa | 0,17 | 0,23 | 0,30 | 0,38 | 0,48 | 0,60 | 0,73 | 0,85 |
| Wo, kg/m² | 17 | 23 | 30 | 38 | 48 | 60 | 73 | 85 |
To determine the standard snow load, the table from clause 5.2 of the same document is used.
Table: values of standard snow loads by regions of Russia
| Snow regions | I | II | III | IV | V | VI | VII | VIII |
| Sg, kg/m 2 | 80 | 120 | 180 | 240 | 320 | 400 | 480 | 560 |
Calculation of loads on the rafter system
To make the calculation procedure more clear, let’s look at its stages using a specific example. Let's assume that:
When all layers of the roofing pie are laid on top of the rafters, the wooden structure remains visible inside the room and performs an additional decorative function
We calculate the loads on the rafter system.
- The tangent of the slope angle is defined as the ratio of the roof height to half the span. This means tan α = N / D = 2.8 / 3.25 = 0.861. Using the table of tangents, we find the value of the roof inclination angle, which in our example is 41°.
For the convenience of carrying out calculations of the truss structure, you should use drawings with the main dimensions marked on them
To accurately calculate the thickness of the insulation, you need to use the thermal conductivity map by region included in SNiP II-3–79
Planning a gable roof
A correctly drawn up drawing of a gable roof is the starting point for future construction, since it not only allows you to think through and visualize the structure of the roof in detail, but also to assemble the required amount of building materials
When deciding on the type of future covering for a building, the following key factors must be taken into account:
Opportunities for construction financing
If the cost-effectiveness of the roof is important, then it is not recommended to choose a structurally complex structure; it is better to choose the standard equal-slope option.
Necessary functionality of the under-roof space. A gable roof is the optimal solution for installing an attic under the roof, both for summer holidays and for permanent residence. The best option for this is to install a sloping roof, which allows you to make maximum use of the area of the under-roof part.
Features of the location of the future home. This is important because wind and snow loads must be taken into account when designing slope angles to ensure minimal negative impact of atmospheric factors and eliminate possible unpleasant consequences. Planned material for outer covering. Each type of roofing material has its own technological features and specific requirements for the construction of a gable roof truss system, which must be taken into account at the design stage. Having collected general information on these factors and selected a suitable roof design, you can begin to calculate the dimensions of the elements and draw up drawings
Having collected general information on these factors and selected a suitable roof structure, you can begin to calculate the dimensions of the elements and draw up drawings.
By varying the initial parameters, you can optimize both the amount of material and the design itself. Another possible calculation option would be to use standard mathematical formulas and lookup tables, based on which you can manually calculate the sizes and locations of elements.
Roof truss drawing
It should be noted that when talking about drawings of a future roof, as a rule, we mean the definition and detailing of the rafter part, since it is its design that is responsible for functionality, reliability and safety. However, a self-made drawing will not replace a full-fledged project completed by specialists.