If the construction of a house is carried out from aerated concrete, the best floor for it is wooden. This is the most economical option that can be made by hand.
Installation requires only two people. Another advantage of wood is its light weight, which is very important for aerated concrete.
Wooden floors in aerated concrete houses can be interfloor, basement and attic. The fundamental difference between them is small, but there are some features of their arrangement.
Advantages and disadvantages compared to floor slabs
Wooden beams boast of being lightweight and easy to install. There is a misconception that light wooden floors do not require a reinforcing layer. This is fundamentally wrong.
Important!
For aerated concrete walls, regardless of the type of flooring, an armored belt is always required!
In the case of wooden floors, its construction will distribute the load from the beams along the entire perimeter of the walls and prevent cracking of aerated concrete from point loads.
The advantages of wooden beams are:
- Environmentally friendly, since wood is a renewable natural material.
- Small mass.
- Low thermal conductivity compared to concrete structures.
- Low price compared to other types of floors.
- Large assortment to choose from.
- Easy to install beams.
Wood also has its downsides:
- Fragility. Sooner or later, even the best floors can begin to rot.
- Low strength - wood will not be able to withstand as much weight as a concrete floor could.
- Flammability (natural materials are highly flammable).
Important!
Despite such significant negative qualities, wood is still chosen much more often, and here’s why: special compositions for impregnating wood can extend its service life and protect it from rotting and fire. And low strength is eradicated by using more beams and reducing the laying step.
Now let's look at concrete floors and their disadvantages:
- The first and most significant disadvantage is the high cost of concrete flooring. Not only are the floors themselves expensive, but their installation and transportation also requires special equipment (a crane). So you will have to pay a certain amount of money for installation. Wooden floors do not have this disadvantage - you can install them yourself. If the beams are small, then two or three people will be enough. The heavier and more massive they are, the more people will have to be involved.
- High weight. We have already said that installation will require special equipment. You will also need a more expensive foundation.
As you can see, all the disadvantages are related only to the price. To make your final decision, read the article about floor slabs in an aerated concrete house.
Installation of rafters on a log house
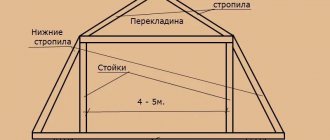
Let's look at an example of how you can connect rafters to each other in the ridge area.
Step 1. To connect the rafters end-to-end, you need to saw off their upper part in such a way and at such an angle that two opposite elements meet each other above the ridge beam.
How will the rafters be connected?
Step 2. Next you need to make two wooden overlays (the shape is shown in the picture). They are applied on one and the other side of two previously joined rafter legs.
You also need to make two wooden overlays
Step 3. After this, the linings need to be secured with long nails on the rafter legs. You can also connect the rafter legs in the ridge area using a special toothed plate.
Fastening wooden linings
A special plate can also be used
The last crown of the frame should be checked for horizontalness so that the rafters lie correctly and evenly transfer loads to the structure. Then the installation locations of the rafters are marked. If the gables of the structure are made of timber or logs and the ridge beam rests on them, then the technology for installing the rafters differs from standard rigid fasteners using notches with a tenon and metal corners.
Pediments made of logs or timber change their size during the shrinkage of the log house, decreasing by 10-15 centimeters in height. Thus, rigid fastening of the rafter legs to the walls and ridge girder will lead to deformation of the rafter legs, and, as a result, cracks will form in the entire roof or in the gables during shrinkage. To avoid such consequences, special sliding fasteners are used when installing rafters.
When determining how to install rafters on a log house, it is necessary to take into account that in this case the connections of the rafter legs in the ridge part are made movable - it should be possible to change the angle when the gables shrink. To do this, the rafter legs are attached overlapping with a bolted connection, or using special metal mounting plates (in this case, end-to-end with a required gap).
In all cases, a special fastening element made of durable metal – a “sled” – is used as fastening. The fastening can be open or buried type. It allows the rafters to move without deforming the roof. Before attaching the rafters to the frame, you should select the correct fasteners. Models differ in the stroke length of the moving element (from 60 to 160 mm), the number of holes for fastening.
If the roof will experience serious snow loads, “sleds” are mounted on both sides of the rafters. When installing a sliding joint on a log house log, it is necessary to prepare a flat platform for the plate fastening site.
Types of beams, advantages and disadvantages of each type
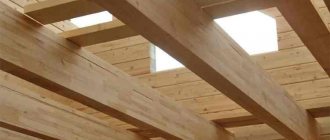
To build floors between floors of a building, I usually use only three types of wooden beams:
- Whole.
- Glued.
- I-beams.
Let's figure out which of them are most suitable specifically for each design, highlight the disadvantages and advantages of each type.
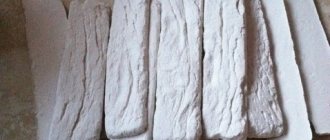
Made from solid timber
Beams made from solid timber are distinguished by their strength, but are inferior in terms of the maximum possible length. To prevent the beam from bending over time, it is recommended not to install it longer than 5 meters . That is, timber floors are only suitable for small houses.
One of the significant disadvantages is that without proper treatment, floors may begin to rot and become moldy over time. The risk of fire should not be excluded.
Attention!
For large structures, experts recommend using floors made from other types of beams.
From laminated veneer lumber
Beams made of laminated veneer lumber have one undeniable advantage - their length without deflection can reach 12 meters .
Glued beams have the following advantages:
- Particular strength.
- Ability to cover spans up to 12 meters.
- Small mass.
- Longer service life.
- Do not deform over time.
- Relatively fireproof compared to conventional timber.
However, such material costs much more.
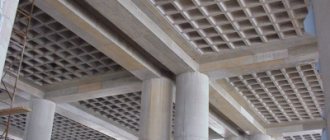
Wooden I-beams
I-beams are considered one of the most durable and reliable due to their profile shape , because they consist of several layers, each of which is protected by various impregnations.
The advantages of I-beams include:
- High strength and rigidity due to its shape.
- No deflections.
- Quiet operation - structures do not creak when pressure is applied to them, unlike other types of floors.
- The material does not crack or dry out over time.
- Easy to install.
Installation of rafters on a log house
Installing rafters on a log house has its own characteristics, since structures made of wood change their geometric dimensions during the shrinkage process, as well as with changes in air humidity.
The last crown of the frame should be checked for horizontalness so that the rafters lie correctly and evenly transfer loads to the structure. Then the installation locations of the rafters are marked. If the gables of the structure are made of timber or logs and the ridge beam rests on them, then the technology for installing the rafters differs from standard rigid fasteners using notches with a tenon and metal corners.
Pediments made of logs or timber change their size during the shrinkage of the log house, decreasing by 10-15 centimeters in height. Thus, rigid fastening of the rafter legs to the walls and ridge girder will lead to deformation of the rafter legs, and, as a result, cracks will form in the entire roof or in the gables during shrinkage. To avoid such consequences, special sliding fasteners are used when installing rafters.
.
When determining how to install rafters on a log house, it is necessary to take into account that in this case the connections of the rafter legs in the ridge part are made movable - it should be possible to change the angle when the gables shrink. To do this, the rafter legs are attached overlapping with a bolted connection, or using special metal mounting plates (in this case, end-to-end with a required gap).
The lower part of the rafter leg can be attached to a groove made in the upper crown of the wall. In this case, the rafter is installed with an overhang, the size of which is determined during the design. If necessary, the rafter leg is installed with the lower edge on the log without a groove. An option is also used when the attachment point for the rafter leg is a horizontal beam.
In all cases, a special fastening element made of durable metal – a “sled” – is used as fastening.
. The fastening can be open or buried type. It allows the rafters to move without deforming the roof. Before attaching the rafters to the frame, you should select the correct fasteners. Models differ in the stroke length of the moving element (from 60 to 160 mm), the number of holes for fastening.
If the roof will experience serious snow loads, “sleds” are mounted on both sides of the rafters. When installing a sliding joint on a log house log, it is necessary to prepare a flat platform for the plate fastening site.
Calculation of the required cross-section depending on the span length and loads, laying pitch
The number of beams, their dimensions, and installation pitch depend directly on the area of the room and the expected loads. Most experts believe that the optimal load on floors is 0.4 tons per square meter of area (400 kg/m2) . This load includes the weight of the beam itself, the weight of the rough and finishing floor covering on top and the ceiling below, insulation, communications, as well as furniture and people.
Advice
The best cross-section for rectangular wooden beams is considered to have a height to width ratio of 1.4:1.
The cross-section also depends on what kind of wood the floors are made of. Now we present the average recommended values for a laying step of 60 cm :
- If the span is 2 meters, then the minimum cross-section should be 7.5 by 10 cm.
- With a span length of 2 and a half meters, the beam should have dimensions of 7.5 by 15 cm.
- If the span is three meters, then it is customary to use beams 7.5 by 20 cm.
- With a beam length of 4 and 4.5 m, it is customary to use them with a section of 10 by 20 cm.
- To build a five-meter floor, crossbars with a section of 125 by 200 mm are used.
- The six-meter ceiling is made of beams measuring 15 by 20 cm.
If the step increases, then the size of the beam section should also be increased.
Here is a table of sections of wooden floor beams depending on the span and installation pitch, with a load of 400 kg/m2:
| span (m)/installation pitch (m) | 2,0 | 2,5 | 3,0 | 4,0 | 4,5 | 5,0 | 6,0 |
| 0,6 | 75x100 | 75x150 | 75x200 | 100x200 | 100x200 | 125x200 | 150x225 |
| 1,0 | 75x150 | 100x150 | 100x175 | 125x200 | 150x200 | 150x225 | 175x250 |
If you do not plan to load the floors (in the case of a non-residential attic for storing light items), then lower load values from 150 to 350 kg/m2 are acceptable. Here are the values for an installation pitch of 60 cm:
| Loads, kg/linear m | Section of beams with span length, m | ||||||
| 3,0 | 3,5 | 4,0 | 4,5 | 5,0 | 5,5 | 6,0 | |
| 150 | 50x140 | 50x160 | 60x180 | 80x180 | 80x200 | 100x200 | 100x220 |
| 200 | 50x160 | 50x180 | 70x180 | 70x200 | 100x200 | 120x220 | 140x220 |
| 250 | 60x160 | 60x180 | 70x200 | 100x200 | 120x200 | 140x220 | 160x220 |
| 350 | 70x160 | 70x180 | 80x200 | 100x220 | 120x220 | 160x220 | 200x220 |
On the Internet you can find online calculators for calculating the load-bearing capacity of wooden beams. I will give a link to one of them: https://vladirom.narod.ru/stoves/beamcalc.html
Also, for example, you can replace one beam with a section of 100x200 with two boards 50x200, sewn together with bolts or nails every meter. They do this for various reasons:
- beams with the required cross-section are not available for sale;
- boards with a smaller cross-section weigh lighter, so they can be lifted to the top alone and fastened there.
It is recommended to sew the boards together so that the wood fibers are in different directions. This increases the strength of the structure.
Extension of rafter legs
The following methods are used to splice rafters and lengthen them with fillets:
overlap The length of the overlap is at least a meter, the nails are driven in a checkerboard pattern;
end-to-end The parts are cut down at right angles, joined and secured on both sides with wooden plates. These two methods apply to a flat board;
with an oblique cut. The ends of the square beams are cut down diagonally, connected, and fixed through with a pin. When drilling a hole for a stud, make sure that there is no play left, which will cause unnecessary bending load.
This is how the rafters are attached.
If you are not confident in your own abilities or you do not have time to do this, contact us at STM-Stroy. We will install a rafter system for you or perform a complete roof installation quickly, inexpensively and efficiently.
+7(495) 241-00-59
Installation and repair of roofing and facade coverings from economy to VIP class
Calculate online
my experience is your saved money and nerves.
I advise everyone who contacts me, even if you later leave to join another brigade. Ask questions, don’t be shy, I answer everyone - it’s free
+7(495) 241-00-59 I am available for calls 7/24 - I will be happy to help you, please contact me!
Installation work
The main stage is, of course, the installation of beams. It implies competent preparation at the stage of construction of the first floor.
First, the wood should be pre-treated with a fire-retardant compound, as well as an anti-rotting liquid (this must be done with the entire crossbar). This must be done immediately after purchase. If the material will lie for some time before laying, it needs to be rearranged: a row of beams, then 3-4 bars across, then the next row. This will allow the board to ventilate and dry out. This will prevent mold from appearing.
The part of the beam embedded in the wall should also be coated:
- Bitumen or primer.
- Ruberoid, roofing felt or glassine.
- Liquid waterproofing agent consisting of bitumen.
- Linocrom.
This is done due to the fact that wood, when in contact with concrete and blocks, can absorb moisture and begin to rot over time .
Reference
For aerated concrete, an operating humidity content of 3-5% is considered normal. No matter how dry the blocks may seem, direct contact of wood with this material is unacceptable.
The beam must be embedded into the load-bearing wall at least 12 cm. The ends are cut at an angle of 70 degrees in order to ensure the removal of moisture.
Attention!
There is no need to cut off the end of the beam with waterproofing material. Otherwise, access to moisture evaporation will be blocked. It is required to leave a small air gap between the end of the beam and the wall.
Beams are laid on a reinforced surface (to enhance the strength of the structure). Instead of an armored belt, some manufacturers in small houses allow a 6x60 mm metal strip to be supported on aerated concrete with a lining.
The beams are fastened to the reinforced belt in houses made of gas silicate using anchor bolts.
To insulate the street side, insulation can be placed in front of the beam. As a rule, the outer ends of the beams are insulated from the outside with expanded polystyrene.
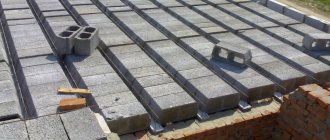
Filling the voids between the laid beams is done with gas blocks. Gaps of 2–3 cm are left between the gas silicate and the timber. They are tightly packed with mineral wool, thus preventing the formation of condensation and dampening of the beams.
Do not forget to think about the placement of the stairs to the second floor , since the opening must be provided immediately:
Well, that's all, the floors are ready. Now you can begin the subsequent finishing.
Requirements for flooring for a house made of aerated concrete
A house made of aerated concrete is built no higher than three floors, since the cellular structure of the blocks has less compressive strength compared to conventional concrete. The ceiling in such buildings should be selected taking into account:
- self-gravity and floor walls, or weight load calculations;
- strength and optimal rigidity;
- sufficient degree of sound insulation;
- fire safety factor.
The resulting force on the load-bearing walls is redistributed by the ceiling. It is recommended to make a reinforcing belt for any of its types, which enhances the spatial rigidity of the building and provides protection against crushing of fragile aerated concrete.
The upper cut of load-bearing walls must be strictly horizontal; if a defect is detected, elimination can be done by erasing aerated concrete blocks for leveling.
Concrete armored belt
Formwork
Removable design
The general design of the formwork consists of prefabricated elements - wooden panels made from boards. Instead of boards, you can use old furniture boards.
The formwork is fixed on the wall:
- On the sides (using reinforcing pieces or metal wire)
- On top (stiffeners are constructed from wooden scraps of 40x40 mm, which are nailed to the upper parts of parallel formwork panels in increments of 150 cm).
- To prevent the formwork from shifting, its most loaded lower part is secured with a cross section of reinforcement.
The thickness of the formwork boards is directly affected by the height from which the solution will be poured: the higher the height, the thicker the formwork.
To prevent the solution from leaking out through cracks and gaps, all joints, corners and turns must be securely sealed .
The next step is the installation of a reinforcement frame made of steel elements with a diameter of 12 mm, connected together with knitting wire. Inside the formwork, the frame is installed on plastic stands (in extreme cases, wooden blocks 3 cm wide can be used).
Next, the structure is filled with concrete mortar.
The formwork is dismantled using a nail puller:
- In summer - after 24 hours.
- In winter - after 72 hours.
It is worth noting that the thermal conductivity of concrete is several times higher than gas silicate. Therefore, this method of constructing formwork is acceptable only when the walls are fully insulated from the outside or for internal load-bearing walls. Otherwise, there will be constant freezing of the wall in the zone of the armored belt. The next method eliminates this drawback.
Using U-blocks
In order to prevent significant heat loss at the junction of two different materials (reinforced belt concrete and gas silicate walls), so-called permanent formwork is used.
It is made from factory standard box-shaped U-blocks.
The reinforced belt is constructed as follows:
- An adhesive mixture is applied to the top row of blocks, onto which the U-blocks are installed with the hollow side facing up.
- Additional thermal insulation of the outer side of the wall is carried out by laying polyurethane foam, polystyrene foam or stone wool into the internal cavity.
- A connected metal frame is laid, similar to the formwork method.
- The concrete mixture is poured and compacted.
When installing an armored belt in this way, there is no need to install and dismantle the formwork, which has a positive effect on the speed of work. However, the cost of U-shaped blocks is much higher than that of wooden panels. Also here you will need to saw aerated concrete material for formwork.
Combined method
On the outside of the wall, blocks 150 mm thick are laid on glue. And on the inside, formwork is constructed from wooden panels or OSB boards (pictured below), as in the first method.
Insulation
After installing the formwork, the future seismic belt should be insulated (if comprehensive insulation of the house on the outside of the walls is not provided). Insulation work is carried out using various thermal insulation materials:
- Extruded polystyrene foam (EPPS). This is a dense material with low thermal conductivity. Is the best solution.
- Polystyrene foam brand PSB-25. Its use is also justified. Thermal conductivity is low. A the brittle properties of this material are not a hindrance in this case. In the design of the armored belt, the insulation does not experience loads. In addition, the price of polystyrene foam is lower.
- Mineral wool boards. The main disadvantage is that this insulation absorbs moisture from the concrete solution. When wet, this material loses its thermal insulation qualities.. We do not recommend this type of insulation.
How to fasten rafters if a Mauerlat is used
You can do without a Mauerlat in frame and wooden houses, but sometimes it is a mandatory part of the structure. For example, when using foam concrete blocks and similar materials for walls:
- transfer of moisture from the walls to the rafter system;
- features of the material due to which the fasteners do not linger in it;
- fragility of walls;
- inability to support the roof without using a Mauerlat.
If the house is built from a material that does not shrink, it is advisable to use a rigid fastening, otherwise the connection may have a degree of freedom. The rafter system is first attached to the mauerlat, and at the free ends it is connected to the floor beams.
Rigid mount
For a rigid connection, you will need to cut out a rafter beam or use a retaining strip. This type of fastening is used both to create a shed roof and for other types of construction.
The step-by-step execution of the cutting method is as follows:
- Cut out all the blanks according to the template. To begin, install the beam for the future rafter leg with a certain angle (laid in the project), and then mark the location of the notch. Its depth should be no more than a third of the height of the bar. After making one rafter leg, use it as a sample. You will need to make the rest identical. It is important not to make a mistake at this stage.
- Place each rafter leg with a saddle on the Mauerlat and secure with nails. First, hammer two at an angle to each other, from the sides of the rafter system. The third one must be driven vertically - it ensures the strength of the structure.
This way you will get a rigid rafter connection that can withstand any load. Remember that cutting cannot be done in the Mauerlat, as this will weaken it. Look carefully at the photo to understand how to correctly cut and assemble rigid fasteners.
There is another method of rigid fastening: when using it, meter-long bars are hemmed to the rafter legs, which rest against the mauerlat. They must be secured with metal corners.
Main connecting nodes
The main components of the rafter system are:
- rafter truss - connection of a pair of rafters, braces, as well as racks and braces;
- ridge knot - combination of two opposite rafters;
- a link made of a mauerlat and a rafter resting on it;
- a module including a run, a stand and a bench;
- connection of the rafters with the strut and the stand.
The most complex element of the roof frame, according to the author, is the roof truss, which is distinguished by the fact that:
- assembled on the ground, and then transported to the roof, since this is the only way to successfully fit one wooden part to another;
The roof truss consists of at least three elements
The ridge knot also has several features:
- formed as a result of connecting two opposite rafters due to special cuts or notches;
There are many methods for creating a ridge knot.
The rafters and mauerlat become a single link, which is characterized by the following:
- the connection occurs due to cutting in each rafter leg, corresponding to the shape of the element that serves as a support for it;
The rafters are secured to the mauerlat so that they do not move to the side
A module of purlins, racks and beams is formed by driving construction brackets, steel dowels or overlays made of steel strips into the places of their connections.
An assembly of a beam, a rack and a purlin allows you to divide the load between the external and internal walls of the building
Struts, racks and rafters are assembled into a single module, creating cuttings. To prevent their connection from being weak, construction staples are used.
An assembly of struts, posts and rafters allows you to soften the pressure on the internal wall of the house
Installation ↑
To construct the murlat, wooden beams are used, which are laid in a plane parallel to the future ridge. They begin to install it during the construction of walls. For example, in the case of brickwork, you can do the following:
- closer to the top, approximately 4–6 rows below the edge, lay a thick wire at intervals of 1 m; the wire is firmly fixed inside the masonry in the center; the length of the free ends should be sufficient to subsequently wrap around and tie around the support beam without any problems; after construction is completed, visible parts of the fasteners are hidden, for example, by applying a layer of plaster.
To prevent rotting of the murlat beams, they are waterproofed by laying rolled material such as roofing felt.
When arranging the Mauerlat along the perimeter of the walls, it is necessary to check not only the reliability of the fixation, but also the horizontalness of the support beam.
Combined system: alternating supported rafters
Today, this version of the roof is also practiced, which consists of several especially strong trusses located at a distance of 3-5 meters from each other, and the gap between them is filled with construction pairs.
In simple terms, several powerful main trusses, two or three, are installed on the roof, and they support the entire run. And already in the space between the main trusses, ordinary rafters rest on such purlins, according to a simpler scheme.
Those. here, not all rafters rest on the floor beams, but only some, and the rest rest on the mauerlat. This way the entire load is perfectly distributed! And the concept of such a system is simple: the main trusses are made according to the hanging rafters scheme, and the secondary rafter legs are made according to the layered principle, relying only on the beam:
In fact, the whole secret of such a combined system is that here the layered rafters are laid directly on the triangular hinged arches. In this cunning way, bending stresses completely disappear from hanging rafters, and only tensile stresses remain. And this suggests that here it is possible to significantly reduce the cross-section of the rafter elements. In other words – save money!
As you probably already guessed, in your case, the method of supporting the rafters on the floor beams will depend on what kind of object you are building: a garage, a bathhouse, a country house or an entire country complex. In any case, all these methods have been tested, are actively used in practice today and deserve attention no less than the more familiar use of the classic Mauerlat.
Features of creating a roof project
Errors when creating a rafter system can lead to roof collapse and leaks. At the design stage, it is important to correctly set the angle of the roof so that it can withstand the load from snow and other precipitation. In addition, you need to consider the distance between the elements so that the roof has an optimal weight.
When preparing your project, pay attention to the following points:
- roof shape;
- roofing material used;
- locations of internal supports;
- rafter system;
- at what angle the roof slope will be located;
- distance between walls.
The appearance of the future roof will depend on these points. The use of such a structural element as a Mauerlat depends on the material of the walls of the house and the distance between them. If it is less than six meters, then this beam does not need to be laid.
Base armored belt
A base or foundation reinforced belt, made along the upper edge of the foundation, is needed for houses made of cellular concrete blocks, but the need for this stiffening belt is determined by the design of the foundation and the bearing capacity of the underlying soils. If the foundation soils are strong (rocky, coarse-grained, compacted coarse sands without water saturation) and not prone to heaving, as well as in the case when the foundation is made in the form of a floating slab, then an armored belt for the bottom row of blocks is not necessary. In cases where there are subsidence or weak soils at the base of the site (fine and pulverized sand, peat, loess, loam and clay with a high groundwater level), reinforcing belts are necessary.