Today, a huge variety of technologies are used in the field of apartment design, each of which has its own characteristics, subtleties and nuances. A wide range of options for interior decoration, including work with ceilings, is explained by the variety of finishing materials. Each category of consumers has its own specific segment of goods and services. Many of us, due to limited financial resources, try to limit ourselves to budget types of design; others, for example, use expensive materials and technologies for the ceiling.
However, there is always a “golden mean” - methods and options for finishing ceilings, which can safely be called the optimal solution in all respects. We are talking about using fiberglass for gluing to the ceiling. In this case, it is quite cheap in comparison with suspended ceiling systems and at the same time, thorough, beautiful and practical. What kind of material is this and what is the secret of this technology, we will find out in more detail.
What is fiberglass?
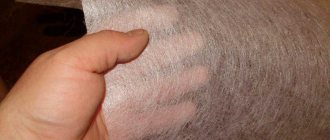
The material is a canvas used for painting or putty. It is made from fiberglass threads, which are pressed during the production process. Fiberglass has the appearance of a mesh. It is also called differently the cobweb.
Fiberglass and glass wallpaper are considered environmentally friendly; they protect the wall from the appearance of fungi and mold.
The material protects surfaces from cracks.
The product is presented on the market in the form of rolls, the width of which is 1 m, and the length can be 20 or 50 m. The density of the structure ranges between 20 - 60 g/m2.
Fiberglass has two sides that differ from each other. The back has fibers that increase the adhesion of the material to the surface. The front side is smooth, which makes it easy to carry out painting work.
Even if the sides of the fiberglass are mixed up and used for other purposes, there will not be much difference in the finishing.
Fiberglass can be with simple and complex weaving. The first type is used to prepare the surface for plastering, the second - for painting.
Step-by-step instruction
After preparing the necessary materials and tools, you can begin roughing the surface. After gluing the fiberglass, 48 hours later you can begin decorative finishing.
Required materials and tools
It is important to prevent glass fiber from coming into contact with mucous membranes and exposed skin. Therefore, stock up:
- latex gloves;
- respirator;
- safety glasses;
- tight clothing that covers the neck and ankles.
Materials you will need:
- fiberglass with a density of 40 g/m2 (2-3 rolls of 50 m per 100 m2);
- glue for fiberglass (on average 0.25 kg/m2);
- polymer putty (from 25 kg);
- universal deep penetration primer (from 1 l).
Required tools:
- scissors or stationery knife;
- container for mixing the solution;
- thread roller (maklovitsa);
- plastic spatula 45 cm wide;
- the same, but metal 45 cm.
Attention
The surface is painted with a nylon roller. To reinforce joints and cracks, you will need serpyanka or silicone sealant. Paint - water-based, acrylic, latex or silicone in the required shade.
Primer and removal of surface defects
The preparatory stage involves priming and eliminating minor surface defects. If fiberglass is glued over OSB, then it is necessary to sand off the factory protective coating of the board.
Preparation:
- prime concrete walls with concrete contact in 1 layer, using a thread or nylon roller;
- in other cases, a layer of deep penetrating primer is applied;
- fill shallow cracks, seams, grooves (less than 5 mm) with silicone sealant;
- Cover minor cracks, caps and places for self-tapping screws with a layer of putty;
- make cross-shaped movements with a spatula until the crack is filled;
- depressions over 5 mm are covered with putty, in which the serpyanka is embedded;
- after applying the mesh, cover it with a second layer of composition, wait until it dries completely;
- Apply the primer again, wait until it dries completely (no more than 8 hours).
It is recommended to apply the final layer of primer (before pasting) no later than 4 hours before starting work. It is better to sand significant defects if the surface is being prepared for painting. Minor ones will disappear under the canvas.
Advice
After sanding, the base must be dusted with a vacuum cleaner. In the outer corners, perforated corners can be fixed with putty.
How to glue cobwebs to drywall or OSB?
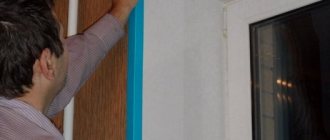
Marking the canvas is similar to the method of wallpapering. The roll is stretched on the floor and cut to the height of the wall. The glue is applied to the base, not to the material. Before painting, the strips are glued end to end, and the sticker starts from the corner.
Stages of work:
- dilute the glue for fiberglass canvas according to the instructions, let it sit for 3-4 minutes;
- mark vertical lines on the wall along the width of the roll (1 m);
- Using a dowel, apply a strip of glue along the width of the canvas with a margin of 5 cm (width - 105-110 cm);
- apply glue in a layer of at least 1.5 mm, avoid gaps or unevenness;
- attach the canvas to the upper edge of the wall, press tightly, fix;
- Use a plastic spatula to remove bubbles using a herringbone motion;
- pressing the edges with a metal spatula, cut off the excess from the bottom;
- stick the canvas around the perimeter of the room.
When attaching fiberglass to the ceiling, the canvas is cut into several fragments. Painting and puttying of the material can be done no earlier than 48 hours later. 3-4 hours before the start of work, it is covered with penetrating soil.
Do not allow the material to join at the seams of plasterboard or OSB - they must be covered with a solid sheet. Otherwise, the putty or paint in these places will crack.
Surface painting
There are 2 ways to paint fiberglass canvas - with and without putty. In the second case, it will be difficult to achieve a uniform surface, which will significantly increase paint consumption. This option is suitable when it is necessary to preserve the relief of the web and if the joints of the fiberglass are invisible. If this is not necessary, apply 3-4 layers of putty before painting.
It is important to sand and prime the plastered surface a maximum of 3-4 hours before starting work. The paint is applied with a short-nap roller in 1-2 layers. For this, water-based, latex or acrylic compositions are used. The second layer is applied 8-12 hours after applying the first. Hard-to-reach places are painted with a soft brush.
Attention
Fiberglass canvas can be painted without putty with compounds that are suitable for glass wallpaper. These are water-dispersion paints with antiseptic and modifying additives.
Advantages
Fiberglass wallpaper is considered environmentally friendly, since synthetic raw materials are not used in its production. Their advantages also include the following:
- Moisture resistance - due to their structure they do not absorb moisture.
- Fire resistance - the material does not burn.
- Strength - the tensile strength of glass wallpaper is several times better than that of a simple vinyl sheet.
- Durability – service life reaches 25 years.
- Practicality - installation will not cause any difficulties.
Fiberglass protects walls from the formation of fungi and mold. It can be painted more than once. The integrity of its structure is not compromised by such influences. The cost of fiberglass is optimal, which further increases its popularity.
The scope of application of the material is quite extensive. It is effectively used in finishing rooms with high air humidity and low temperature conditions.
Rules of care
After completion of the work, the fiberglass must be properly monitored:
- After gluing the wallpaper, it is recommended to paint it;
- can be cleaned with non-aggressive detergents;
- Avoid damaging the material with sharp objects.
If the wallpaper was glued correctly, the fiberglass will serve you for a very long time. At the same time, delighting you and your guests with the excellent appearance of the walls and ceiling. As practice shows, it is better to glue fiberglass once than to re-glue regular wallpaper every five years.
Choosing between drywall and OSB, in-depth analysis
Correct gluing of artificial stone onto drywall
Installation methods
Fiberglass or glass wallpaper are rolled materials. Their installation is carried out only using adhesive solutions. You can also use simple glue for non-woven or vinyl wallpaper.
The choice of product directly depends on the quality characteristics of the surface being coated.
Fiberglass is glued to drywall using an adhesive solution, as well as non-woven and vinyl wallpaper.
If you need to install fiberglass on plasterboard walls, it is better to use specialized products. They will help securely secure the material.
Tips and tricks
Tips from the experts:
- It is better to prime the walls with a roller. To avoid gaps in the ceiling, use a paint brush.
- if perforated corners are installed, then they need to be covered with sickle or fiberglass.
- Do not confuse fiberglass with glass wallpaper - the latter do not reinforce the surface and do not prevent cracking.
- Strengthen the fixation of the web by coating it with a layer of glue diluted in water immediately after installation.
- If the decorative finish requires gloss, then choose latex paint.
- Cover one wall without interruption, close windows and doors tightly, and avoid drafts.
- After priming, no fiberglass dust will form, so you can remove the respirator and safety glasses before painting.
- Unglued canvas is fragile, so try not to bend or stretch it across the surface.
When working with fiberglass, it is important to follow safety precautions. After contact with the skin and mucous membranes, the components of the material cause itching, irritation, and pain. It is advisable to putty the canvas, otherwise the consumption of decorative building materials will increase significantly.
Preparing drywall for installation of glass wallpaper
The work process will not cause any difficulties. It is necessary to clean the surface of the gypsum board from dust and other deposits.
Rules for making a wooden frame for drywall
After this, the surface is plastered. It is necessary to properly process the joints of the material using a special sickle tape. All surface defects are covered with putty. And after it dries, sand it with sandpaper.
To ensure normal adhesion of fiberglass and drywall, the entire rough surface must be treated with putty.
After this, layers of primer are applied. They should dry well and saturate the plasterboard. If there is old finish on the surface, it must be removed. Then perform plastering, puttying, sanding and priming.
Preparing wallpaper glue
How to glue: French glue “Quelyd” is reliable
After purchasing fiberglass, you need to select glue. There is a special glue for this type of wallpaper. You can also use glue for heavy or non-woven wallpaper. The glue is prepared immediately before gluing the glass wallpaper.
How to glue glass wallpaper to the ceiling: the process of preparing wallpaper glue
Important! The adhesive composition must be prepared exactly following the manufacturer's instructions. The dry adhesive mixture is poured into the required amount of warm water and mixed well. The finished glue should stand for about 10-15 minutes to swell. After this, the glue needs to be stirred again.
You can also purchase ready-made glue.
Types of installation
There are two ways to glue the material: joint to joint or overlap. Their choice directly depends on the light source in the room. It is necessary to immediately assess the situation and determine what will be less noticeable: the joints or seams of the fiberglass strips.
The glass sheet must be glued to the plasterboard surface, joint to joint.
This is due to the fact that the rough surface made of HA perfectly absorbs moisture. After impregnating the fiberglass with glue, its structure will begin to swell. In some places there may be excess material that needs to be trimmed. It is better to avoid such modifications, as the structure of the canvas is disrupted. This will lead to loss of technical characteristics of the material.
Tools for installing fiberglass
You can carry out work on gluing the surface of the HA yourself. To do this you will need the following tools:
- roulette;
- rollers and brush;
- pencil;
- scissors;
- container for mixing the adhesive solution.
You will also need a rag to remove excess glue from the surface of the material.
One roller is used to apply the solution to glass wallpaper and the wall, the second is used to smooth the material on the surface. It must remain dry.
Work process
The first step in installing glass fiber will be preparing the adhesive solution. If it is presented in the form of a concentrate, you must add a certain amount of liquid to it (indicated on the product packaging). Ready-made mixtures are much more effective and practical.
Next, rolls of fiberglass are prepared. Pre-measure the height of the room. Strips of material are cut according to this parameter. It is worth considering that the ceiling height in the room may fluctuate slightly. It is for this reason that it is better to cut the rolls after applying them to the wall surface.
When choosing an adhesive for installing fiberglass, it is better to give preference to ready-made mixtures; they are more effective.
Glue is applied to the surface of the glass fiber and the back side of the fiberglass. The product should be absorbed into the structure of glass wallpaper and drywall.
Some repairmen advise not to spare the adhesive solution when applying. This should not be done, since HA will absorb excess moisture. Bubbles will appear on its surface, which will negatively affect the quality of finishing work.
The impregnated fiberglass is then applied to the wall and pressed tightly. It is necessary to smooth it with a rag and a dry roller. It is better to start the gluing process from the top of the wall, gradually lowering.
It is necessary to glue the material onto the GC with small gaps between the strips - 2 - 3 mm. This is due to the fact that the structure of the fabric has the ability to expand when exposed to moisture. Once the adhesive solution dries, these gaps will not be visible. The fiberglass will be distributed evenly over the drywall.
It is necessary to take into account that the room must have an optimal temperature when carrying out work. Drafts must be avoided, as they can cause the glass sheet to move away from the wall over time.
Pasting the ceiling for painting
Considering that the work is carried out indoors, the use of interior paints will be the best design option. They are able to favorably highlight the structure of the material, dry quickly, and also do not have any foul odors.
The best result when painting fiberglass is achieved using a medium-pile roller, well soaked in paint. To ensure that all bulges and depressions are evenly covered with paint, the roller is passed alternately in the horizontal and then vertical directions. To achieve a durable and especially beautiful surface, the next layer of paint should be applied to the dried layer.
