Anchoring of floor slabs is carried out during the construction of buildings made of brick, aerated concrete or reinforced concrete. Such ceilings are installed between floors, above basements, under attics. Anchoring is carried out after installing the floors on each floor, while the anchors are placed at a distance of up to three meters from each other, and they, in turn, act as fasteners for the mounted slabs between each other and on each of the walls.
Floor slab anchor
An anchor is a metal fastener made of galvanized or stainless steel, brass or other metal alloy. It is integrated into the base and secures a load-bearing element of the building, such as a floor slab. Such fasteners are used during the construction of objects for various purposes. These can be single or multi-storey buildings, industrial buildings, garage structures, etc. Anchors significantly improve strength and stability, and also extend the service life of buildings. For seismically active regions, the slinging scheme is not only advisable, but also simply necessary, because during underground tremors with high amplitude, reinforced interfloor ceilings will fail more slowly, which will help save more than one human life.
Putty for concrete
In many apartments (mostly in new houses), the floor slabs are laid quite evenly, and their joints are securely sealed; As a rule, a cement-sand screed is placed on top. This may leave defects. The method of elimination depends on their nature, as well as on the type of floor covering chosen.
Local influxes of mortar on the screed from the developer can be cut off with a chisel, and small holes and marks from the rule can be removed using cement-polymer or polymer putty on concrete and thus obtain a ready-made base for laying tiles, laminate or parquet boards. It is not advisable to lay roll coverings directly on the rough screed , since the slightest defects appear on them (finish leveling with a bulk mixture is necessary). If a solid board, adhesive parquet board or piece parquet is chosen as a covering, it is necessary to ensure high tear strength of the putty. A two-component epoxy putty is perfect for this purpose, but you need to carefully prepare the base - remove dust, degrease it, and sometimes prime it with a strengthening primer.
Permissible difference in floor slabs SNIP
High-quality repairs are not an abstract category, characterized by the degree of aesthetic pleasure of the customer after a visit to the finished object. Here you cannot do without exact correspondences and perfectly verified values. All this information has long been collected in special lists - building codes and regulations (SNiP) , a set of construction rules (SP). These are the ones we strictly adhere to in the process of work. The main SNiPs and SPs related to repairs and finishing are collected in this table.
I. Gender
| Screed. Maximum permissible thickness deviation compared to the design value | 10% | SNiP 3.04.01-87, clause 4.43 |
| The depth of unevenness (screed clearance) under linoleum, laminate or parquet, under coatings on a cement-adhesive layer. Maximum value when checking with a 2-meter rod | 2 mm | SNiP 3.04.01-87, clause 4.24, SP 29.13330.2011 “Floors” clause 8.13 |
| Screed clearance (depth of unevenness) under waterproofing when checking with a 2-meter lath | 4 mm | SNiP 3.04.01-87, clause 4.24, SP 29.13330.2011 “Floors” clause 8.13 |
| Screed clearance (depth of unevenness) under other floor coverings when checked with a 2-meter lath | 6 mm | SNiP 3.04.01-87, clause 4.24 |
| Deviation from the horizontal (slope of the floor level) in relation to the area of the room | 0.2%, 50 mm | SNiP 3.04.01-87, clause 4.24 |
| Ceramic tile. Deviation of coating thickness from the design value | 10% | SNiP 3.04.01-88, clause 4.43 |
| Clearance (depth of irregularities) when checking with a 2-meter rod | 4 mm | SNiP 3.04.01-87, clause 4.43 |
| Ledges between two adjacent tiles | 1 mm | SNiP 3.04.01-87, clause 4.43 |
| Deviation from the horizontal (slope of the floor level) in relation to the area of the room | 0.2%, 50 mm | SNiP 3.04.01-87, clause 4.43 |
| Seam width | 6 mm | SNiP 3.04.01-87, clause 4.43 |
| Piece parquet. Plank gluing area | at least 80% | SNiP 3.04.01-87, clause 4.38 |
| Deviation from the horizontal (slope of the floor level) in relation to the area of the room | 0.2%, 50 mm | SNiP 3.04.01-87, clause 4.43 |
| Deviation from plane (when measured with a 2-meter rod) | 2 mm | SNiP 3.04.01-87, clause 4.43 |
| Gaps between adjacent planks | 3 mm | SNiP 3.04.01-87, clause 4.43 |
Some parameters of the quality of the screed (floor covering) can be checked without the use of tools. Visually - you need to make sure there are no swellings, potholes, cracks (only hairline cracks are allowed), auditorily - there is a uniform ringing sound when tapped. If the sound is dull, this indicates a lack of adhesion to the base: such areas need to be repositioned. If there is a monolithic screed, it is necessary to ensure that it is separated from the walls and partitions by soundproofing material.
II. Ceiling
| Maximum deviation | SNiP | |
| Dropped ceilings. Bends between slabs (panels, slats) | 2 mm | SNiP 3.04.01-87 clause 3.66 |
| Deviation from horizontal by 1 m | 1.5 mm | SNiP 3.04.01-87 clause 3.66 |
| Number of deviations from horizontal per 1 m | 7 | SNiP 3.04.01-87 clause 3.66 |
When checking the quality of the ceiling covering, you must make sure that there are no horizontal panel joints not provided for in the design. The lined surface must be flat (without sagging), rigid (without vibration of the panels). When gluing the ceiling panels there should be no peeling. For a suspended ceiling made of plasterboard, cracks are unacceptable.
III. Plastering works (SNiP 3.04.01-87, clause 3.12)
| Maximum deviation | |||
| Simple plaster | Improved | High Quality | |
| Depth of unevenness when applying a 2-meter strip | 5 mm | 3 mm | 2 mm |
| The number of irregularities when applying a 2-meter strip | 3 | 2 | 2 |
| Deviation from the vertical (horizontal) over the entire height (length) of the surface | 15 mm | 10 mm | 5 mm |
| Deviation of pillars, slopes, pilasters, usenki, husks for the entire element | 10 mm | 5 mm | 3 mm |
| Deviation of the radius of curved surfaces from the design | 10 mm | 7 mm | 5 mm |
| Deviation of slope width from design | — | 3 mm | 2 mm |
When checking the quality of work, you need to make sure that there is a uniform ringing sound when tapping. A dull sound is an indicator of poor adhesion of the plaster to the base. The presence of shells, cracks, efflorescence, and traces of tools is not allowed.
IV. Ceramic tile cladding
| Maximum deviation | SNiP | |
| Amount of chips in seams | 0.5 mm | SNiP 3.04.01-87, clause 3.67 |
| Deviations from the vertical per 1 m length | 1.5 mm | SNiP 3.04.01-87, clause 3.62 |
| Deviation from vertical by floor height | 4 mm | SNiP 3.04.01-87, clause 3.62 |
| Irregularities of the plane | 2 mm | SNiP 3.04.01-87, clause 3.62 |
| Deviations of seams vertically and horizontally per 1 m length | 1.5 mm | SNiP 3.04.01-87, clause 3.62 |
| Deviations of seams vertically and horizontally along the entire length of the row | 3 mm | SNiP 3.04.01-87, clause 3.62 |
| Deviation of seam width from the design value | 0.5 mm | SNiP 3.04.01-87, clause 3.62 |
| Number of unevenness (measured with a 2-meter rod) | 2 | SNiP 3.04.01-87, clause 3.62 |
| Seam thickness | 2.5 +/- 0.5 mm | SNiP 3.04.01-87, clause 3.62 |
When checking the quality of work, you need to make sure that all seams are uniform and uniform.
V. Painting works (SNiP 3.04.01-87, clause 3.12, 3.28, 3.67)
| Maximum deviation | |||
| Simple painting. | Improved | High Quality | |
| Deviations from the vertical and horizontal for the entire height or length of the room | 15 mm | 10 mm | 5 mm |
| Number of deviations from vertical (horizontal) | 3 | 2 | 2 |
| Unevenness of the plane (depth or height) | 5 mm | 3 mm | 2 mm |
| Deviations of husks, slopes, pilasters, appendages for the entire element | 10 mm | 5 mm | 3 mm |
| Deviations of radii of curved surfaces | 10 mm | 7 mm | 5 mm |
| Deviations of slope width from the design value | — | 3 mm | 2 mm |
| Humidity level of the base (plastered or puttied) | 8% | ||
| Coating thickness | not less than 25 microns | ||
When checking the quality of work, you need to make sure there are no stains, splashes, drips, or wrinkles. It is not permissible for the lower layers of paint to show through.
VI. Wallpaper works
| Maximum deviation | SNiP | |
| Residual moisture of the base | 8% | SNiP 3.04.01-87 clause 3.12 |
| Edge offsets | 0.5 mm | SNiP 3.04.01-87 clause 3.67 |
The presence of peelings, air bubbles, gaps, additional stickers, stains, as well as wallpapering baseboards, sockets, and switches are considered unacceptable. If there is a pattern on the wallpaper, you need to make sure it fits exactly.
Thin layer levelers
If there is a ledge, hill or slope on the screed made by the developer or the previous owners of the apartment, but the difference does not exceed 20 mm, for leveling it is advisable to use bulk solutions from ready-made mixtures, such as weber.vetonit 4100, Unis Horizon, Ceresit CN 68. They are easy to apply, that is, in fact, they spread over the surface themselves - you just need to help them a little with a spatula and expel the air with a needle roller. Such solutions dry very quickly, and after 4-12 hours the base can withstand foot traffic, and after 1-3 weeks (depending on the thickness of the layer) the coating can be laid.
Self-leveling mixtures
Self-leveling mixtures can be combined with any coating, but are quite expensive and, as a rule, can only be applied in a thin layer - no more than 30 mm. Read the instructions for using the mixture carefully! Many materials of this type impose specific requirements on the base, for example, they require dust removal, but exclude the application of adhesive concrete-contact primers.
Wet screed
Significant unevenness is usually eliminated with the help of a screed, the installation of which in a new building should be carried out according to a standard design, and in secondary housing requires prior approval from the housing inspection authorities. Before pouring a wet screed, it is necessary to reliably waterproof the ceiling with an approach to the walls, otherwise water from the solution will leak into the voids of the building structures (this can cause a short circuit in the wiring within two floors) and into the room below. In addition, when installing the screed, it is necessary to ensure insulation of impact and structural noise. Rolled bitumen-based materials with a thickness of more than 4 mm or special two-layer substrates, for example “Antistuk”, “Tekhnoelast Acoustic” or “Shumanet-100” will help to perform both tasks at once. All joints of hydro-noise insulation strips (slabs) are glued with mastic or special tape.
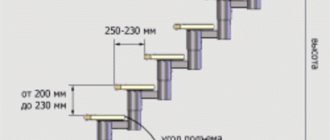
Calculation of the support parameter
Regulates the amount of support of floor slabs on the walls of SNiP (otherwise, a set of norms and rules), which distinguishes the following types of slab sizes:
- modular - the width of the span into which the structure is installed;
- constructive - the actual size of the ceiling slab from one end to the other.
For example, if the modular floor length is 6.0 m, then the actual length is 5.98 m. To obtain a room size of 5.7 m, a slab should be installed with a support of 12 cm. The optimal calculation of the support of the floor slab on the wall is also important for preserving warmth in the room. If the end is too close to the outer surface of the wall, cold air will penetrate inside. This design gives a cold floor in winter.
Cement-sand screed
Its optimal average thickness is 40 mm, the minimum local thickness is 20 mm. It is advisable to reinforce the structure with steel road mesh, and prepare the concrete from a factory mixture in bags. When the design thickness of the screed is more than 40 mm, lightweight concrete is used, most often expanded clay concrete, less often - more expensive concrete with foam glass.
It is important to dry the screed properly by covering it with film or periodically moistening it. Windows cannot be opened wide; only ventilation through vents or inclined sashes is allowed. The average maturation period for a wet screed is a month, but before laying the coating, be sure to check the residual moisture of the concrete with an electronic moisture meter.
With experienced builders, provided they use non-shrinking mixtures (for example, veber.vetonit 5000), the screed turns out to be quite smooth; it is quite possible to lay laminate and interlocking parquet boards on it (on top of the substrate).
However, often the base layer requires finishing leveling with a self-leveling solution. Usually it is carried out after 7-14 days, when sand concrete (expanded clay concrete) has gained about 70% strength, but some levelers can only be laid on a completely dry base.
Semi-dry screed
It dries in no more than a week and does not threaten leaks into the apartment on the floor below (this does not mean that you can do without a waterproofing and soundproofing layer). However, not all workers have experience using this technology, which increases the risk of defects.
Theoretically, when installing a semi-dry screed, special equipment should be used - a concrete mixer, a pneumatic blower, tamping and troweling machines. But in practice, work is often carried out manually, simply trying to ensure that the water-cement ratio does not exceed 0.2 (instead of the usual 0.3-0.5). Such a mixture is difficult to lay and level, and the density and strength of concrete without machine compaction will be lower than with a traditional recipe. Therefore, reinforcing polypropylene fibers are mixed into the water (approximately 100 g per 10 l). It is still advisable to level the layer using a trowel, although it is also possible to use self-leveling levelers.
A serious disadvantage of semi-dry screed is that only its thin top layer is strong enough, so it is not suitable for some finishing coatings, such as parquet and large-format tiles.
What problems might arise?
One of the problems that may arise at the stage of reconstruction of the floor is an incorrect inspection of the slab, and as a result, meaningless repairs. It happens that the cracks found at first glance seem harmless and builders easily seal them with sealant, mortar and other materials, but everything turns out to be more complicated. An unexamined defect actually results in negative consequences that lead to emergency conditions of the building.
For example, a longitudinal crack was discovered on the ceiling. It was not measured with a special device, and the strength of the concrete around the defect was not measured. It was decided to cover the crack with concrete solution.
After the repair, for several months everything met the standards, but six months later the crack appeared with renewed vigor and it had to be repaired with other materials and using other tools.
Another problem is the use of low-quality consumables that do not meet the stated standards. This can also include improper preparation of a solution for concreting a crack or incorrect technology for sealing the defect. All this leads to the fact that after some time the floor will have to be repaired again.
Dry prefabricated screed
A prefabricated screed consists of dry backfill and sheet flooring; it is inferior in strength and reliability to concrete screeds, but it can be assembled very quickly. The backfill screed weighs little, provides additional noise and heat insulation, and its thickness can be varied between 40-100 mm.
For leveling backfill, expanded clay gravel of a specially selected fraction (to reduce shrinkage), which is laid on top of a vapor barrier film and leveled along the beacons, is best suited. Next, lay sheets on a gypsum or cement base (most often GVLV 12.5 mm thick); they are laid in two or three layers and fastened with screws, and then the joints are puttied. It is also possible to use ready-made two-layer floor elements with stepped edges.
Sealing seams between floors
After the optimal size for supporting the floor slabs on the walls has been determined, and the reinforced concrete structures themselves have been installed, the seams between them should be sealed.
- The formwork is constructed from wooden boards, into which the mortar is then poured.
- Large gaps can be sealed with fragments of reinforcement, fragments of bricks and other materials. They are compacted into the cracks, which are then covered with concrete mortar.
It is important to seal the voids formed when installing slabs immediately. This greatly simplifies the finishing work that will be carried out upon completion of construction.
The future strength and durability of the structure depends on the correct calculation of the amount of support of the ceiling on the wall. Therefore, this process is regulated by SNiP rules and is carried out by experienced designers.
Floor on joists
When it is necessary to create a reliable base for a wooden covering and the load on the floor cannot be significantly increased, logs or (much less often) so-called modular raised floors are used. These structures make it possible to eliminate any unevenness in the ceiling, but with a significant additional loss of ceiling height - at least 50 mm (the minimum intrinsic thickness of the structure).
The easiest way to make logs is from high-grade coniferous timber and level them using plastic wedges. Aluminum products on adjustable screw supports will cost several times more.
The tongue-and-groove floorboard is attached directly to the joists (with this design, their cross-section must be at least 50 × 50 mm), and the parquet and parquet boards are attached to plywood flooring with a thickness of 16 mm or more. It is advisable to fill the space between the joists with expanded clay, mineral wool or soft wood-fiber boards - this will improve heat and sound insulation.
Supporting unit for a slab on a brick wall
When constructing brick buildings, the masonry is carried out close to the future ceiling, and it is important to leave small niches for installing ceilings. The support unit for the floor slab on the wall is created taking into account the following conditions:
- The ends of the slabs should not rest on the brickwork. For example, with an overlap of 12 cm, the width of the niche should be 13 cm;
- the composition of the mortar for laying and fixing the floors must be identical;
- voids formed in the channels should be filled with concrete liners. They are manufactured at the factory along with the plates.
The minimum support of floor slabs on a brick wall is not standardized if the reinforced concrete product is placed on one side of the end walls. The installation is carried out so that the masonry, which will be higher than the ceiling, does not fall on the formed extreme voids.
Modular raised floor
Modular raised floors help to quickly level out any differences in floor level and implement non-standard planning solutions. They are expensive and in apartments they are used mainly for solving non-standard problems, for example, constructing podiums of considerable height or laying under the floor ducts of a ventilation and air conditioning system based on low-power units.
The main parts of the raised floor are supports, stringers and slabs. The most common slab size is 600 × 600 mm, and the height of the supports varies from 50 mm to 1.5 m.
The supports can be made of plastic (hard PVC, polyamide), steel or a combination of these materials. Floor elements are mainly made from high-density chipboard with a thickness of 38 mm. To prevent the emission of formaldehyde, they are lined with aluminum foil along the plane and with PVC tape along the edges. The cost of a set of parts starts from 2200 rubles. for 1 m2.
A more environmentally friendly solution is slabs made of reinforced gypsum (on company websites you can find the name “Calcium Sulfate”), reinforced with steel sheets, but they are twice as expensive as chipboard ones.
Source
Slinging process
An interfloor connection is the anchoring of hollow reinforced concrete panels, which is performed after each floor, taking into account the attic and basement. In this case, the slabs are connected to each other and to the load-bearing wall. The fixation scheme depends on the presence or absence of special mounting loops on the ceilings and the base itself. If the building is built from high-density elements, L-shaped fasteners are used for slinging, the bend length of which is 30–40 cm, and they are installed at a distance of 3 m from each other. Adjacent panels are fixed with transverse fastenings, and the outer ones with diagonal fastenings.
The anchoring procedure looks like this:
- the edge of the fastening element is bent in the shape of a loop, to which the panel eye clings;
- adjacent anchors should be pulled together as much as possible, and then welded to each other and to the mounting loops;
- the seams between the panels and hinges are sealed with a mortar mixture.
Anchor diagram
In buildings built from hollow building materials, the scheme for slinging the bases is carried out in the same way as in the previous case, but here it is necessary to lay a concrete belt around the perimeter of the building. This is a so-called ring anchor, which lies in the same plane with the floors, and it also fastens them to each other and to the walls. Such fasteners consist of a reinforced frame poured into concrete.
Using an anchor, the load-bearing panels, which are not equipped with eyes, are also tied, and then a square steel plate (50x50mm or 100x100mm) is attached to the plates, and a metal pin is welded to it. Its second end is placed in the belt. The ceiling is further strengthened by creating a connecting ligament on the inner wall. If it is necessary to strengthen the anchoring of reinforced concrete products, metal pins, reinforcement bars and hooks are used.
Leveling a concrete floor with your own hands
Author: Nikolay Strelkovsky
A flat floor is necessary in any room. Laying various floor coverings is only possible on a smooth surface; moreover, due to unevenness and slope, problems will certainly arise with the installation of doors, furniture and equipment. That is why no major renovation is complete without leveling the floor.
How to level a concrete floor
In apartments, offices, garages and even some private houses, concrete slabs are used as the basis for the floor. They are not level by themselves, and they can also lie on a slope, so it is customary to begin repair work by leveling this concrete base. There are quite a lot of ways. The choice depends on the condition of the coating, the magnitude of the differences and the wishes of the developer himself.
Before you start work, you need to prepare the foundation. This, by the way, will help you decide on the choice of alignment method.
Common problems and errors
If technical construction standards regarding the anchoring of floors are not observed, the following errors may occur:
- Cracking of the fastening base . It is a consequence of the wrong choice of fasteners for a specific surface, improper installation, high load, low base capacity. Requires major repairs and urgent replacement of the connection.
- Anchor breakage (fracture) . The choice of low-quality material, violation of the technique of working with it, high loads, due to errors in calculations, can lead to failure of the fasteners. Here the anchor is knocked out from the place of fastening, the base is filled with cement mortar, and after drying, using grooves or working with a drill, a new fastener is installed.
- The latch is pulled out . It occurs as a result of incorrect installation and errors in the selection of products, failure of the fastening system, or a load calculated incorrectly. Therefore, when choosing an anchor, pay attention to the technical characteristics of the products, markings, type and degree of dynamic loads for them.
- Complete destruction . Occurs in weak, unfortified areas. Therefore, during the construction of floors, it is important to reinforce the walls and floors so that working with anchor fasteners strengthens the wall and firmly connects all the elements. Here welding and cement composition serve only as a fixing moment.
Screed over the floors helps protect reinforcement and anchoring elements from corrosion.
Preparing a concrete floor for leveling
First you need to remove the remnants of the old coating
Existing deep cracks should be widened, primed and rubbed with mortar.
The joints of the slabs and the junction of the walls and the floor are covered with special compounds.
Finding out the difference in height
Search for zero level
Floor installation
The installation of floors is carried out by a team of four people:
- crane operator who delivers the slab,
- a rigger who rigs slabs,
- two installers involved in coordinating the slab and placing it in a given location.
Supporting floor slabs on a brick wall is one of the most important procedures that requires strict compliance with standards.
Before carrying out installation work, it is imperative to level the ridge of the brickwork. If this is not done, the slab will be unstable. The gaps that appear between the slabs are sealed with cement mortar.
Leveling the floor with self-leveling mixtures
Leveling the floor with self-leveling mixtures
This leveling method is good when you need to bring an almost flat floor to perfection. The height difference should not be more than 3 cm.
Pros: the method is relatively inexpensive, easy to implement, and does not require any special skills or special tools. The finished coating is durable, smooth and dries quickly. It does not need to be leveled, since the liquid spreads on its own.
Cons: perhaps there are none, except for the fact that such mixtures cannot be used to level floors with a large difference in height.
Process technology
The prepared floor must be primed with a special compound.
Glue damper tape around the entire perimeter of the room
Leveling the floor with cement-sand screed
Leveling the floor with cement-sand screed
The oldest and most popular way to achieve a level floor. It allows you to smooth out height differences of 3 cm, but at the same time, the thickness of the screed itself must be at least 3 cm, otherwise the coating will not be strong enough. This alignment can be used for large rooms.
Pros: if all stages of work are carried out correctly, you will get a strong, even screed that will fit under any coating.
Disadvantages: this method is the dirtiest, most labor-intensive and time-consuming of all, and besides, it does not give any room for error - you will have to redo everything again.
Process technology
This screed, with its large thickness, will have significant weight, so it is not recommended to do it with a height difference of more than 10 cm. However, for those who still chose it, there is a way out: using expanded clay. You can add it to the mortar and first lay out the mixture with expanded clay on the floor, and then spread a thin layer of ordinary mortar over it over the beacons.
The second method is to lay out an expanded clay cushion, which is then filled with cement laitance, dried and covered with a layer of mortar.
Both methods are good when you want to make a cement screed without creating a significant load on the floor slabs. There may also be a situation where the base has a significant slope, and the cement-sand filling will have not only significant weight, but also its uneven distribution, which is not very good for load-bearing structures.
Purpose of floors
Reinforced concrete floor slabs are one of the main load-bearing structures of a building, so they receive enough attention during construction. The main function of reinforced concrete floors is to transfer and distribute the load to its own weight, and then to other elements of the building.
Based on their location, these building structures are divided into interfloor, basement and attic. The slabs are manufactured in a factory and come in several types:
- prefabricated monolithic;
- multi-hollow;
- made from heavy grades of concrete.
The main requirements that high-quality floors must have are strength, rigidity, fire resistance, sound and water resistance.
Most floor slabs are made with voids; this design is considered the most optimal in terms of weight and quality. Laying takes place on the load-bearing walls of the building, the pitch of which can be up to 9 m.
Floor extension
Leveling the floor using plywood along the joists
Pros: this method is most suitable for apartments on the first floors, since a layer of insulation can be placed between the joists. With this leveling there is no dirt, moreover, it does not require any drying time and will be ready for use immediately.
Cons: the method is quite labor-intensive, and also significantly raises the floor. In apartments with low ceilings, this will narrow the space.
Process technology
Laying the selected insulation in the cells between the joists
Leveling the concrete floor is mandatory for all rooms where it is necessary to get rid of slopes and unevenness. Depending on the wishes of the developer, available materials and the condition of the floor, you can choose the optimal method. All available options are quite accessible to anyone who wants to do this work themselves, and the efforts will pay off with a durable and beautiful floor.
Did you like the article? Save so you don't lose or share with friends!
Source
Consumables and equipment
Performing high-quality fasteners requires the following consumables and tools:
cement (concrete) mortar, concrete mixer, containers, shovels, construction mixer;- selected anchors (bolts, plates, screws, screws) and reinforcement for a specific type of floor (tying wire, rods);
- rubber mallet and regular hammer;
- corners, pegs, construction cords, channels;
- drill, screwdriver, grinder, spatula, trowels;
- adhesive composition (if necessary, if the hole for the anchors will be filled with glue);
- materials for further finishing (starting and finishing putty, plaster, paint, etc.);
- a simple pencil, a tape measure, beacons, a laser range finder.
During the work, construction clothing, shoes, and rags are also needed.
If anchoring is carried out by a construction company working under a contract, then it itself provides consumables to the customer at a lower price than on the market (purchased in bulk from manufacturers), and the workers have the tools in stock.
Floors: main types of floors
One of the most important structural components of any building is the floor system - not the final decorative coating, but the entire “pie” consisting of several layers. There are several types of floors, differing in raw materials, manufacturing method and characteristics. Everyone faced with construction or major reconstruction makes a choice in favor of one of the systems based on their capabilities, preferences and building parameters. Conveniently, some designs involve the simultaneous creation of an underfloor heating circuit - single or additional. Let's consider the main floor systems in demand among users of the FORUMHOUSE portal:
Floors on the ground
Monolithic flooring is a multilayer structure installed directly on the ground inside the perimeter of the foundation, a type of concrete screed.
The system consists of the following layers:
Compacted soil - it needs to be leveled. Depending on the level, the soil is added or extra centimeters are removed. The more thoroughly the surface is compacted and leveled, the stronger and more reliable the screed will be.
Backfill – sand is most often used. If, due to the height of the “pie”, a thick layer is required, it is recommended to backfill in several approaches with tamping each layer (10-15 cm). In order to level and compact the soil and bedding as much as possible, a layer of coarse crushed stone is poured and compacted on top of the sand. It is also possible to use a general layer of ASG instead of individual layers of sand and crushed stone; compaction is required regardless of the type of backfill. A vibrating plate, in several approaches with changing the direction of movement, is the best friend of floors on the ground.
Rough screed - a layer of concrete several centimeters without reinforcement. It is relevant for strong pressures of groundwater and when creating in-depth structures - in basements, ground floors. Bituminous waterproofing is fused over the screed, sealing the surface and requiring a flat, rigid base. If we are talking about ordinary floors on the ground and there are no problems with waterlogging, they can do without installing this layer.
Waterproofing - cuts off moisture that will come from below; various materials are used, but in most cases it is a thick film (from 150 microns), overlapped with a margin (15-20 cm), in one or two layers. The joints are taped with tape for tightness, and 20 cm of film is placed on the walls.
Insulation – to insulate the ceiling, slab materials (PSB-25 or EPPS, with a thickness of 100 mm or more) are used, laid end-to-end on top of the waterproofing. When using extruded polystyrene foam, another layer of film is needed on top to prevent direct contact with the cement mortar. Polystyrene foam is not afraid of such a neighborhood.
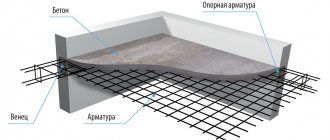
Screed - the thickness of the concrete layer and the type of mortar used are calculated based on the expected loads, on average it is 50 mm. The screed is reinforced with a metal mesh with a thickness of 4 mm. The thicker the screed layer and the greater the expected loads, the thicker the mesh should be. To ensure that the concrete layer protecting the filling from external influences is uniform, special plastic stands or improvised devices are used. To maintain the filling level, beacons are used, installed at an equal distance.
With a standard pie, there are two ways to create a floor on the ground - with the combination of the slab and foundation (rigid screed) and through a damper tape (floating screed), more information about the damper tape can be found in the material “Dry screed...”. In the first case, the structure turns out to be dependent on the possible shrinkage of the foundation, in the second the screed lives its own life and is not subject to deformation.
But it was not without its drawbacks - the process is very labor-intensive (one of the forum users caused disc protrusion without calculating his own strength), and the inability to install communications in the ground, and the rise in cost per square meter with large volumes of backfill. This is one of the most popular types of flooring, mastered by portal participants.
The screed is floating, we have been living with this floor for several years, no problems or disadvantages have been noticed, everything is fine.
Another FORUMHOUSE user chose ground floors as the best option for heat conservation.
And this craftsman built a concrete foundation that has served faithfully for two decades.
Floors with joists
Beam floor, as opposed to a monolithic concrete slab. When creating floors using joists, the base is a “lattice” of longitudinal elements - wooden, metal or reinforced concrete beams.
Depending on the type of foundation, beams are installed in special grooves (left during pouring or laying, cut into wooden bases) or laid on top. If the beams are in contact with metal, concrete or brick, you need to make additional waterproofing at the joints (resin, roofing felt, film).
A typical beam floor pie consists of the following layers:
Floor beams - the spacing between elements depends on the expected loads and span length, on average - 1 m.
Logs (sheathing) - wooden beams laid perpendicular to the beams; the greater the distance between the beams, the stronger the logs should be. To maintain the level with curved beams, wooden spacers are used; the distance from the wall to the joist is 20 cm. When calculating the step, this nuance is taken into account. When the distance between the beams is less than 80 cm, you can immediately install the subfloor, without logs.
Features of installation of floors for buildings made of aerated concrete
The slab ceiling is supported on the wall by a circular reinforced belt, which is mounted along its perimeter. Such a monolithic concrete strip covering the entire building is required if the support value is less than 12 cm. The following parameters for the reinforced belt are recommended:
- thickness 12 cm;
- width 25 cm;
- the support depth is the same as for reinforced concrete floors.
In combination with strong reinforced concrete slabs, the reinforced belt creates a rigid structure that provides sufficient resistance to the structure of emergency impacts, temperature changes and shrinkage deformations.
If the amount of support of the ceiling on the wall is more than 12 cm, then the building does not need an additional reinforced belt. In such cases, it is enough to construct a reinforced belt from a ring anchor along the outer perimeter of the slabs.