A novice stove maker always wants to build some outlandish stove. Preferably simple. And also beautiful and effective. It is a pity that there are not so many orders of such constructions.
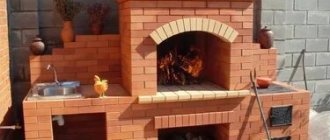
Among them, a fireplace stove with a bread chamber stands out, operating according to a scheme popular in Scandinavian countries. The scheme is not without drawbacks, but has a high degree of universalism. There is a massive universal heating stove, a decorative fireplace, and a chamber for baking bread. Simple design, multifunctionality, relative compactness. A good option for a country house, capable of heating an area of approximately 25-30 square meters.
We offer a procedure that allows you to assemble the stove yourself, having only minimal stove craft skills. A simple basic skill in working with clay and brick is sufficient for the performer. The rest is simple.
Characteristics of heating stoves
Heating stoves are designed for heating residential premises. Their designs were changed several times; multi-turn heating stoves with successive vertical smoke circulations were replaced by single-turn heating stoves with one ascending chimney and several downwards.
Schemes of gas movement in household stoves a - multi-turn stove with vertical channels; b - single-turn furnace; c - stove with upper and lower heating chambers; d - stove with enhanced bottom heating with upper and lower heating chambers
Single-turn furnaces heat the outer walls more evenly. When installing a grate in the firebox of such stoves, the efficiency increases to 70-75%.
The disadvantage of single-turn furnaces is that their upper part heats up more than the lower part. Because of this, uniform heating of the rooms does not occur with a minimum temperature difference between the floor and the ceiling.
Heating stoves of various sizes and designs with increased bottom heating, given in this article, when used correctly, provide uniform heating of rooms with a minimum temperature difference between the floor and the ceiling of 2-3°C.
By their design, these furnaces consist of two furnaces, placed one on top of the other and connected to each other by one connecting vertical channel. In heating furnaces of these designs, intensive heating of the lower part of the furnace occurs.
Hot flue gases move through the furnace mass as follows. Coming out of the firebox (see Fig. 1), they first heat the lower part of the furnace, then, rising along the vertical connecting channel, they heat the upper part of the furnace. In vertical longitudinal and cross sections, arrows show the movement of hot flue gases in individual parts of the furnace body.
In furnaces of these designs, flue gases travel the same distance before exiting into the chimney as they move through the furnace mass as in single-circuit furnaces with one ascending and several descending channels. Flue gases in heating stoves of this design travel a short distance, overcoming a small gas resistance. In an array of furnaces of such designs, flue gases move according to the principle of “free” gas movement, as discussed below.
“Free” movement of gases
The heating stoves presented in this article refer to thick-walled, moderately heated stoves with increased heat transfer from their lower part. The combustion of these furnaces lasts only 45-60 minutes; fuel is placed in them in 3-4 stages. Typically, these stoves are heated once a day, but at low outside temperatures (up to 35-40°C), it is advisable to heat the stoves twice a day - in the morning and in the evening. With a two-time firebox, normal temperature in the rooms is ensured with a daily fluctuation of 2-3°C.
These stoves are very fuel efficient; their efficiency increases especially when installing hermetic combustion and blower doors. Fuel costs are reduced by half or more compared to the operation of multi-circuit furnaces. It is advisable to use anthracite as fuel, and in its absence, you can use coal, coal briquettes, peat briquettes and any firewood. When preparing firewood, the length of the logs must be adjusted to the size of the firebox of the stove.
Below is the detailed procedure for laying a heating stove measuring 770x640 mm. The masonry of the remaining heating stoves is basically similar to the masonry of the mentioned stove, so their masonry will be described more briefly.
Kinds
According to their purpose and design features, blacksmiths can be divided into several types:
- Heating. The devices are designed for efficient and safe heating of premises.
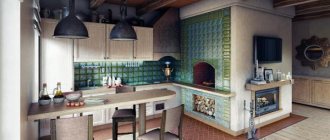
- Cooking. Used for cooking. This includes ovens for baking bread and bakery products.
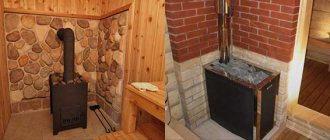
- Bathhouses. The Kuznetsov bathhouse stove is designed for simultaneous heating of the main bathhouse premises. Such devices have high heat transfer with minimal fuel consumption.
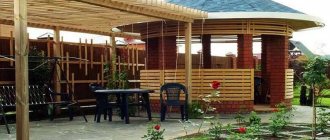
- Street. A stove complex consisting of a grill or barbecue for outdoor cooking.
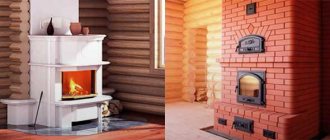
- Fireplace. The equipment is used as a decorative element of the interior or as an additional heating option. Some fireplace stoves are equipped with special loungers for a pleasant leisure time.
The most popular are complex devices that are distinguished by their multitasking. A striking example is the Kuznetsov heating and cooking stove, which is intended both for heating residential premises and for preparing food.
Despite their functional features, all stoves operate on the same principle - effective distribution of heated gases in the bell into separate streams.
It is noteworthy that stove hoods can be equipped with additional equipment - electric heaters, hot water tanks, steam generators, oven and stove.
A competently designed and constructed Kuznetsov sauna stove will provide reliable heating in all functional rooms: steam room, washing room, dressing room, rest room. In addition, it will allow you to quickly heat water, accumulate hot steam and purify the air.
Heating stove with bottom heating size 770×640 mm
The heating furnace has dimensions, mm: 770x640x2310 (Fig. 1,a).
Rice. 1. Heating stove with bottom heating, size 770×640 mm a - facade; b - sections A-A, B-B, B-C; c - masonry 1-17 rows; 1 - ash chamber; 2 — blower door; 3 - grate; 4 - combustion door; 5 - firebox; 6 - smoke valve.
Rice. 1. Continuation: g - masonry 18-35 rows
Material consumption (without foundation and pipe):
- red brick - 220 pcs.;
- fire-resistant brick - 170 pcs.;
- red clay - 10 buckets;
- refractory clay - 50 kg;
- sand - 5 buckets;
- combustion door - 250×210 mm;
- blower door - 250×140 mm;
- smoke valve - 130×250 mm;
- grate - 380×250 mm;
- cleaning doors measuring 130×140 mm - 6 pcs.;
- pre-furnace sheet - 500×700 mm.
Refractory brick, if unavailable, can be replaced with ordinary red selected first-grade brick.
Before you start laying a stove, you should purchase the necessary stove equipment and only then begin work, focusing on their dimensions.
The stove can be built by one stove within 16-18 hours; in addition, it takes about 4-5 hours to carry the material and prepare the clay-sand solution.
The size of the stove is small, but it provides heating for a room with a floor area of up to 16 m². The heat output of the furnace with a one-time firebox is 2.8 kW (2400 kcal/h), and with a two-time firebox - 3.5 kW (3000 kcal/h).
The stove has a simple design, increased heating in the lower zone, the fuel for it is anthracite, coal, coal briquettes, peat briquettes, and firewood. Hot flue gases in the furnace move through a well-developed chimney system, heating its internal walls.
In Fig. 1, b shows vertical sections of the furnace along A-A, B-B and B-C, and the rows show the sequence in which the bricks are laid and the installation of furnace appliances is carried out in each row.
The vertical sections show firebox 1, ash chamber 2, grate 3, combustion door 4, ash door 5, smoke valve 6, and cleaning holes.
The arrows indicate the direction of movement of hot flue gases in the heating furnace, and the dashed lines indicate the movement of cold room air in the heated furnace before the smoke valve is completely closed.
The hot flue gases of the heating stove rise from the firebox to the firebox overlap and from the top hole.
Laying the fifth row is not difficult, you just need to pay attention to the correct alternation of seams. This row forms a firebox measuring 250x380 mm.
During the laying of the sixth row, the fire door is installed and secured to the masonry. Before installing the combustion door, it is prepared for installation. The laying of the seventh and eighth rows is carried out according to the procedures. Laying the stove from the ninth to the seventeenth row is not difficult, you just need to follow the rules for bandaging the seams. The eighteenth row covers the firebox and the descending channel. There remains only one channel measuring 130x130 mm. The nineteenth row is laid out with ordinary red brick; the masonry of this row is similar to the masonry of the eighteenth row. During the laying of the twentieth row, cleaning holes are installed.
The twenty-first row is laid out in order. The twenty-second row is covered by cleaning doors. The twenty-third row must be laid out strictly in order. The masonry of this row forms the beginning of the chimney system.
The laying of the stove from the twenty-fourth to twenty-seventh rows is the same, you just need to strictly follow the rules for bandaging the seams. The laying of the furnace from the twenty-eighth to the thirtieth row is carried out according to the order. The thirty-first row covers the top of the stove, leaving a chimney channel measuring 130x250 mm. The thirty-second and thirty-third rows also cover the top of the stove, but they only follow the rules for bandaging the seams. The thirty-fourth row shows masonry (a channel of five bricks and the installation of a smoke damper measuring 130x250 mm.
The chimney begins with the masonry of the thirty-fifth row Laying the pipe is not difficult. The pipe is laid out “fivefold”, observing in detail the rules for ligating the seams, with an internal pipe size of 130×250 mm strictly vertically. When passing through the ceiling and roof, fire safety measures must be observed. After finishing the laying of the stove and chimney, they are dried with test fireboxes, and after drying they are plastered and whitewashed.
Video description
Another option for creating a stove is shown in the video:
- Further, in the twelfth row, exactly 18 bricks are used.
With their help, the door of the cleaning compartment is closed and the formation of the rear wall of the fireplace chamber continues.
- At the next stage - for the thirteenth row, 19 bricks are used.
When using blocks in a fireplace compartment, they are pulled out and cut away. The same row allows you to raise the walls of the open hob.
- Also 19 bricks are used in the next, twentieth row.
They begin to form a shelf above the fireplace insert. To do this, each brick is pushed 3 cm not only forward, but also to the side. The result is an overhanging row over the firebox.
- Further, in the twenty-first row, 20.5 bricks are used.
With their help, the walls of the cooking compartment are completed and the construction of the fireplace mantel continues.
- Then, in the twenty-second row, 15.5 bricks are laid.
They are reinforced with a steel angle above the cooking chamber. Metal strips are also used above this compartment. They are installed in the middle and rear part, the so-called ceiling of the cooking chamber. The elements are needed to subsequently cover the entire tier.
Heating stove with bottom heating size 770×770 mm
The heating stove has dimensions, mm: 770x770x2310 (see Fig. 2).
Rice. 2. Heating stove with bottom heating, size 770×770 mm a - facade; b - sections A-A, B-B; c - masonry 1-13 rows; d - sections B-C, D-G; d - masonry 14-35 rows; 1 - smoke valve; 2 — holes for cleaning; 3 - combustion door; 4 — blower door; 5 - firebox; 6 — grate; 7 - ash chamber
Rice. 2. Heating stove with bottom heating, size 770×770 mm g - sections B-C, D-G; d - masonry 14-35 rows; 1 - smoke valve; 2 — holes for cleaning; 3 - combustion door; 4 — blower door; 5 - firebox; 6 — grate; 7 - ash chamber
Material consumption (excluding foundation and pipes) is as follows:
- red brick – 230 pcs.,
- fire-resistant brick - 210 pcs.,
- red clay - 12 buckets,
- fireproof clay - 6 buckets,
- sand - 7 buckets,
- fire door - 250×210 mm,
- blower door - 250×140 mm,
- smoke valve - 130×250 mm,
- grate - 300×252 mm,
- cleaning doors size 130×140 mm - 6 pcs.,
- pre-furnace sheet - 500×700 mm.
The stove can be built by one stove within 18-20 hours; in addition, it takes about 5 hours to carry the material and prepare the clay-sand solution.
The stove is designed to heat a room up to 20 m². The heat output of the furnace with a one-time firebox (with anthracite consumption of up to 12.2 kg) is about 3 kW (2600 kcal/h). The heat output of the lower part of the furnace is 2.3 kW (2000 kcal/h). The heat output of the stove with double firing increases to 3.7 kW (3200 kcal/h).
It is advisable to use anthracite and coal as fuel, but in their absence, you can use firewood, coal briquettes and peat briquettes.
The laying of the furnace in rows does not differ from the previous heating furnace with dimensions of 770x640 mm.
Kuznetsov's fireplace stove: ordering
Kuznetsov's fireplace stove is a large heat storage device. A brick structure that looks like a fireplace and is as warm as a stove. Due to its mass, the fireplace stove heats the room in a unique way.
The construction of fireplace stoves is a complex matter, but if you wish, you can do everything yourself. To begin such a complex process, you must have the procedures at hand. Kuznetsov's fireplace stove has a lot of advantages.
Advantages of fireplace stoves:
- The beauty and grace of stonework;
- Efficiency of brick heater;
- Low carbon monoxide and soot emissions;
- Long-term maintenance of a comfortable temperature in the house;
- Economical.
Some fireplace lovers make them look like works of art by decorating them with grates and decorative elements, using the services of a blacksmith. You can feel a pleasant feeling of radiant heat if you equip your country house or cottage with such a fireplace stove.
Heating stove with bottom heating size 890×890 mm
The heating stove has dimensions, mm: 890x890x2310.
Material consumption (excluding foundation and pipes) is as follows:
- red brick - 340 pcs.,
- fire-resistant brick - 270 pcs.,
- red clay - 16 buckets,
- fireproof clay - 7 buckets,
- sand - 10 buckets,
- fire door - 250×210 mm,
- blower door - 250×140 mm,
- smoke valve - 130×250 mm,
- grate - 380-252 mm,
- cleaning doors measuring 130×140 mm - 10 pcs.,
- pre-furnace sheet - 500×700 mm.
The stove can be built by one stove within 24 hours; in addition, it takes about 6 hours to carry the material and prepare the clay-sand solution.
The stove is designed to heat a room up to 25-30 m2. The heat output of the furnace with a one-time firebox is about 3.7 kW (3200 kcal/h), and with a two-time firebox - 4.7 kW (4000 kcal/h). Drawings of sections of the furnace and the order of masonry are shown in Fig. 3.
Rice. 3. Heating stove with bottom heating, size 890×890 mm a - facade; b - masonry 1-16 rows;
Rice. 3. Continuation in - sections A-A, B-B, C-C, D-G; g - 17 - 27 rows
Rice. 3. Continuation d - laying 28-35 rows
Laying a stove in rows is almost no different from laying a heating stove measuring 770x640 mm. Anthracite, hard coal, coal briquettes, peat briquettes and firewood can be used as fuel. In this furnace, the grate is designed for the use of firewood, coal briquettes and peat briquettes. When using anthracite and hard coal, the grate is laid flat at the back with three rows of refractory bricks.
Recommendations for self-construction
If you decide to build a stove according to one of Kuznetsov’s plans with your own hands, get ready for careful and scrupulous work. On the diagrams you will find a graphic representation of each row, but before starting laying you need to become familiar with the features of the technique, in particular:
- selection and pre-processing of bricks;
- purchase of metal parts (plates, dampers, doors, valves);
- determining the most suitable location;
- preparation of the base and foundation;
- possibility of installing a chimney, etc.
Fireclay refractory brick (Sh-5, ShB-8) is recognized as the best material for the internal masonry of “smiths”, and ceramics (M-150) for external decoration. To strengthen brick walls, metal elements (rebar, wire) are used. In order for the stove to function with maximum heat output, experienced craftsmen hone not only their skills, but also every brick - literally. They polish every detail, which is why projects completed by professionals look flawless.
Fireclay brick masonry
Having the author's order in hand, we recommend not to experiment, but to follow the designated order. Deviations from the diagram do not guarantee complete heat transfer.
Heating stove with bottom heating, size 1020×890 mm
The heating stove has dimensions, mm: 1020x890x2240.
Material consumption (excluding foundation and pipes) is as follows:
- red brick - 570 pcs.,
- fire-resistant brick - 100 pcs.,
- red clay - 20 buckets,
- fireproof clay - 3 buckets,
- sand - 12 buckets,
- fire door - 250×210 mm,
- blower door - 250×140 mm,
- smoke valve - 130×250 mm,
- grate - 380×252 mm,
- cleaning doors measuring 130×140 mm - 7 pcs.,
- pre-furnace sheet - 500×700 mm.
The stove can be folded by one stove within 24 hours; in addition, it will take about 6 hours to carry the material and prepare the solution.
The stove is designed to heat a room up to 35-40 m². The heat output of the furnace with a one-time firebox is 4 kW (3400 kcal/h), and with a two-time firebox it is about 5 kW (4300 kcal/h).
In this furnace, the grate is designed to use firewood and coal briquettes as fuel. When burning anthracite and hard coal, the grate is laid flat at the back with refractory bricks in three rows.
Drawings of sections and the order of the furnace masonry are shown in Fig. 4. The furnace is laid according to the procedures, observing the rules for bandaging the seams.
Rice. 4. Heating stove size 890×1020 mm a - facade and sections A-A, B-B; b - masonry 1-6 rows
Rice. 4. Continuation in - sections B-C, D-G, D-D; g - masonry 7-14, 16 rows
Rice. 4. Continuation d - laying 15, 17-34 rows and cutting pipes
Rice. 4. Continuation e - laying 35-44 rows
From the thirty-sixth to the forty-third row, the masonry of pipe cutting with an internal pipe section of 130 × 250 mm is shown. The forty-second and forty-third rows must be laid out in the same way as the forty-first row, making sure to follow the rules for dressing the seams (the order of rows 42 and 43 is not given). The masonry of the forty-third row is similar to the masonry of the forty-first row.
Second thermal load
Nothing works on bare principles. In order for a theoretically absolutely correct stove to heat, dry and cook well, it must also be made correctly in the material. In relation to bell-type furnaces (and especially double-bell furnaces), this means that the thermal load on the material must be high. Making a bell furnace massive, with thick walls, is like lighting a fire in a cave. To feel the warmth, you need to sit next to the fire, and there will be soot...
c309b8141378ec4433e1fa6a65105e41.jpe
eb9a96611664c70a0b926656370364e4.jpe
Take a look at fig. On it are drawings and orders of some Kuznetsov stoves: a bathhouse. heating and cooking. a double-circuit hot water boiler and an improved Russian stove with a stove bench. Not being an experienced stove maker, it is clear that the material per unit of output power (500 W * sq. m of outer surface) in the Kuznetsov stove uses one and a half to two times less than in traditional ones. In general, any bell-type oven is “emptier” inside than a channel oven of equal power.
Orders of some Kuznetsov furnaces
On the one hand, this is good; bricks and mortar cost money. But on the other hand, it requires careful development and adherence to construction technology (see below). The heat load, which would not cause a pile of cobblestones to move, would destroy a thin brick wall even during the accelerating fire.
Structural mechanics are also important for Kuznetsov furnaces. The strength of the wall with clay mortar decreases much faster when its thickness decreases than with cement-sand mortar. Therefore, the foundation for these furnaces must be done especially carefully in strict accordance with the author’s recommendations. They must be strictly followed during construction.
Note: I.V. Kuznetsov allows freely copying his materials for himself, for construction, but objects to republications. However, the pictures in Fig. small. An amateur cannot build anything using them, but a master knows where to get full-fledged drawings. Therefore, we hope that Igor Viktorovich will forgive us this small borrowing for the benefit of the cause.
Heating stove with bottom heating size 1160×890 mm
The heating stove has dimensions, mm: 1160x890x2240.
Material consumption is as follows:
- red brick - 580 pcs.,
- fire-resistant brick - 140 pcs.,
- red clay - 22 buckets,
- fireproof clay - 5 buckets,
- sand - 13 buckets,
- fire door - 250×210 mm,
- blower door - 250×140 mm,
- smoke valve - 130×250 mm,
- grate - 380×252 mm,
- cleaning doors measuring 130×140 mm - 9 pcs.,
- pre-furnace sheet - 500×700 mm.
The stove can be built by one stove within 26 hours; in addition, it will take about 6 hours to prepare the clay-sand mortar and carry the material.
The stove is designed to heat a room up to 45 m2. The heat output of the furnace with a one-time firebox is 4.3 kW (3700 kcal/h), and with a two-time firebox - 5.4 kW (4600 kcal/h).
In this furnace, the grate is designed to use firewood, coal briquettes and peat briquettes as fuel. When using anthracite and hard coal, the grate is laid at the back with refractory bricks on the edge.
Drawings of sections and order of masonry are shown in Fig. 5.
Rice. 5. Heating stove with bottom heating, size 1160×890 mm a - facade; b - masonry 1-12 rows
Rice. 5. Continuation in - sections A-A, B-B, D-G; g - masonry 13-18 rows
Rice. 5. Continuation d - sections B-C, D-D, E-E; e - masonry 19-28 rows; 1 - firebox; 2 - ash chamber; 3 - grate; 4 - combustion door; 5 — blower door; 6 — cleaning holes; 7 - smoke valve
Rice. 5. Continuation - masonry 29-32 rows
When laying the second row, it is necessary to strictly adhere to the order, since this row forms a system of chimneys for the lower heating chamber. The bottom of the ash chamber is laid with masonry of the fourth and fifth rows. When laying the sixth row, a blower door is attached to the masonry.
Otherwise, the laying of the stove is not difficult and is similar to the laying of previous stoves, but you must strictly adhere to the procedures: you should not make unjustified narrowing of the chimneys. The pipe is placed in five bricks with an internal size of 130x250 mm.
More about round ones
Round stoves theoretically have a lot of advantages, but they are not very convenient in the house. However, there is also a significant demand for compact mobile ovens, and here the extremely high efficiency of round multi-caps can be a decisive factor, because when the size of the oven decreases, its efficiency drops sharply due to the square-cube law.
Such furnaces, of course, would have to be made of metal. This solves the problem of cleaning; the stove can be made collapsible. But the choice of metals suitable for the ratio of heat capacity and thermal conductivity is extremely limited. The only inexpensive ones are cast iron, but it is heavy and fragile.
However, there is a lighter and stronger metal material with similar properties. These are products of powder metallurgy. In relation to scissor knives, “powdered crap” is quite justified, but for a stove in which nothing works for shear, powdered parts can be a godsend.
The second problem, which has already been mentioned, is the heat-resistant lining on the arch of the first cap. If it can be solved, then perhaps the works and efforts of Igor Viktorovich Kuznetsov will bear fruit that is more extensive and significant than it now seems.
Heating stove with bottom heating size 1290×510 mm
The heating stove has dimensions, mm: 1290x510x2310 (see Fig. 6).
Rice. 6. Heating stove size 510×1290 mm a - facade; b - sections A-A; c - masonry 1-5 rows; 1 - foundation in the ground; 2 - soil; 3 - smoke valve; 4 - cutting; 5 - ceiling; 6 - combustion door; 7 — blower door; 8 - waterproofing; 9 - external foundation; 10 - firebox; 11 - ash chamber; 12 — grate; 13 - holes for cleaning
Rice. 6. Continuation of d - masonry 6-30, 33 rows
Rice. 6. Continuation d - masonry 31,32, 34-40 rows
Material consumption (without foundation and pipe) is as follows:
- red brick - 400 pcs.
- fire-resistant brick - 220 pcs.,
- red clay - 16 buckets,
- fireproof clay - 10 buckets,
- sand - 11 buckets,
- fire door - 250×210 mm.,
- blower door - 250×140 mm,
- smoke valve 130×250 mm,
- grate - 300×250 mm,
- cleaning doors measuring 130×140 mm - 4 pcs.,
- pre-furnace sheet - 550×700 mm.
The stove can be folded by one stove within 24 hours; in addition, it will take about 6 hours to prepare the solution and carry the material.
The heat output of the stove with a one-time firebox is about 3.8 kW (3300 kcal/h), with a two-time firebox - 5.1 kW 14,400 kcal/h)^ The stove is designed for heating a room up to 35 m2. It is advisable to lay the furnace from the fourth to the eighteenth row using refractory bricks. With proper operation, the efficiency of this furnace can be up to 80%, and when using hermetic (furnace and blower) doors it reaches 85%.
The laying of the stove is simple, it is carried out according to the procedures, while observing the correct alternation of seams.
Video description
You can clearly see one of the options for arranging a Swedish stove without a fireplace compartment in the following video:
- The next, tenth row is created with bricks in the amount of 17.5 pieces.
They cover the front part of the place where the oven will be. The blocks are mounted directly on metal strips. Their installation allows you to combine the space above the firebox and oven. In this case, cutouts are first made at the top of the bricks used. They will allow you to subsequently lay the cast iron hob.
On a note! At the same stage, a place is designed where in the future a small door will be installed, allowing the upper part of the fireplace chamber to be cleaned.
- For the next, eleventh row, use 18.5 bricks.
From these they begin to build the walls of the brewing compartment, where there is already a cast iron panel. The brick blocks laid on the right should close the gap between the fixed cooking plate and the already created wall. At the same time, the blocks that are used to create the back wall of the fireplace chamber are pushed forward 4 cm and then pulled together. This allows you to continue creating the inclined surface.
Heating stove with bottom heating, size 1650×510 mm
The heating stove has dimensions, mm: 1650x510x2310.
Material consumption (excluding foundation and chimney) is as follows:
- red brick - 640 pcs.,
- red clay - 22 buckets,
- sand - 12 buckets,
- fire door - 250×210 mm,
- blower door - 140×250 mm,
- smoke valve - 130×250 mm,
- grate - 300×250 mm,
- cleaning doors measuring 130×140 mm - 7 pcs.,
- pre-furnace sheet - 500×700 mm.
The stove can be built by one stove within 26 hours; in addition, it will take about 6 hours to prepare the clay-sand mortar and carry the material. 2
The stove is designed to heat a room up to 50 m2. The heat output of the furnace with a single firebox is 5 kW (4300 kcal/h), with two fireboxes per day - about 6.2 kW (5300 kcal/h). All types of solid fuel can be used in this stove, but when using anthracite and coal, it is advisable to line the stove from the ninth row until the firebox is covered with refractory bricks, and in its absence, the firebox should be laid out using selected red bricks in these rows.
Drawings of sections and ordering are shown in Fig. 7.
Rice. 7. Heating stove with bottom heating, size 1650×510 mm a - facade and sections G-G, D-D, E-E; b - masonry 1-8 rows
Rice. 7. Continuation in - sections A-A, B-B, B-C; g - masonry 9-17 rows
Rice. 7. Continuation d - masonry 18-35 rows
Laying the stove is not particularly difficult. The fifth row determines the main dimensions of the chimneys of the lower heating chamber; this row covers the bottom of the ash chamber. The twenty-fifth row also determines the main dimensions of the chimneys of the upper heating chamber. In a cross-section of the furnace, the inside is visible, as in an x-ray (see horizontal section of the furnace).
Necessary materials
Before starting construction, you need to buy all the required materials and prepare the necessary tools in order to stop construction.
Fire brick
Materials for the construction of the furnace:
- refractory bricks - for the construction of a firebox,
- fireproof mastic - for the firebox,
- ceramic brick (grade minimum m150),
- cement, sand and clay - to create the base and brickwork,
- wooden material - for formwork,
- wooden blocks 50x50 - installed in the corners for even masonry,
- metal corners, fittings, wire, plates,
- special foil for the base,
Tools for the construction of “Kuznetsovka”:
- drill with a whisk for mixing the solution,
- shovel and bayonet,
- Master OK,
- big or small grinder,
- large building level,
- roulette,
- bushhammer,
- solution container,
- saw (hand or electric saw).
This is what the minimum set of tools will look like, without which it will not be possible to achieve the desired result.
Heating stove with bottom heating size 2250×510 mm
The heating stove has dimensions, mm: 2250x510x2480.
Material consumption (excluding foundation and chimney) is as follows:
- red brick - 740 pcs.,
- fire-resistant brick - 40 pcs.,
- red clay - 25 buckets,
- fireproof clay - 1 bucket,
- sand - 15 buckets,
- fire door - 250×210 mm,
- blower door - 250×140 mm,
- smoke valve - 130×250 mm,
- grate - 380×252 mm,
- cleaning doors measuring 130×140 mm - 7 pcs.,
- pre-furnace sheet - 500×700 mm.
The stove can be built by one stove within 30 hours; in addition, it will take about 8 hours to prepare the clay-sand mortar and carry the materials.
The heat output of the furnace with a one-time firebox per day is 6 kW (5100 kcal/h), with a two-time firebox - about 7.1 kW (6100 kcal/h). The stove is designed for heating a room up to 60 m². Drawings of sections and ordering are shown in Fig. 8.
Rice. 8. Heating stove with bottom heating, size 2250×510 mm a - facade; b - sections A-A, B-B, B-C; c - masonry 1-6, 8 rows
Rice. 8. Heating stove with bottom heating, size 2250×510 mm g - section G-G; d - masonry 7 - 18 rows
Rice. 8. Heating stove with bottom heating size 2250×510 mm e - masonry 19-36 rows
When laying the fifth row, it is necessary to strictly adhere to the order, since this row determines the main dimensions of the chimneys of the lower heating chamber. The twenty-third row also determines the main dimensions of the chimneys of the upper heating chamber. It is not recommended to reduce or increase the size of chimneys when laying subsequent rows.
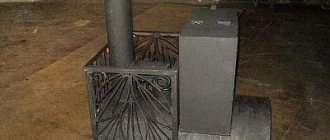
Classic stove and water heating
Standard wood-burning stoves for the home can be combined with a water heating circuit, significantly increasing the performance properties of such buildings.
This option helps to reduce the disadvantages of stove heating, which is possible thanks to the use of modern technologies, and is associated with additional benefits:
- significant increase in useful heating area;
- ensuring uniform heat distribution;
- all elements of the furnace are involved in heating;
- after the combustion process is stopped, the heat is retained.
The design of a water-heated furnace is complemented by a heat exchanger, which ensures heating of the coolant and its effective circulation.
Heating stove with bottom heating size 1880×640 mm
The heating stove has dimensions, mm: 1880x640x2380.
Material consumption (excluding foundation and chimney) is as follows:
- red brick - 950 pcs.,
- fire-resistant brick - 40 pcs.,
- red clay - 29 buckets,
- fireproof clay - 1 bucket,
- sand - 17 buckets,
- fire door - 250×210 mm,
- blower door - 140×250 mm,
- smoke valve - 130×250 mm,
- grate - 380×250 mm,
- doors for cleaning holes measuring 130×140 mm - 12 pcs.,
- pre-furnace sheet - 500×700 mm.
The stove can be folded by one stove maker within 36 hours; In addition, it will take about 10 hours to prepare the solution and carry the material.
The heat output of the stove with a single firebox per day is about 5.5 kW (4700 kcal/h), with two fireboxes - 6.6 kW (5700 kcal/h).^The stove is designed for heating a room up to 55 m2. All types of solid fuel can be used in this stove. The grate is designed for use as fuel with firewood, coal briquettes and peat briquettes. When using anthracite or hard coal as fuel in this furnace, the grate is laid on the edge with refractory bricks.
Drawings of the furnace sections and arrangement are shown in Fig. 9. The arrows indicate the movement of flue gases in the furnace chimneys.
Rice. 9. Heating stove with bottom heating, size 1880×640 mm a - facade and section A-A; b - masonry 1-5 rows
Rice. 9. Heating stove with bottom heating, size 1880×640 mm (c) sections B-B, B-C, D-G, D-D, E-E; g - smooth 6-10 rows
Rice. 9. Heating stove with bottom heating, size 1880×640 mm d - masonry 11-28 rows
Rice. 9. Heating stove with bottom heating size 1880×640 mm e - masonry 29-36 rows
Laying a stove is not particularly difficult, but first you need to carefully study the drawings of sections and the order of brick laying.
From the horizontal section (according to A-A Fig. 9, b) it can be seen that there is a horizontal chimney under the ash chamber. The firebox is made of refractory brick.
When laying the second row, you must strictly adhere to the order. The masonry of the fifth row determines the main dimensions of the chimneys of the lower heating chamber. The laying of the twenty-first row must also be carried out strictly in order; a chimney with a width of 130 mm is left here near the vertical channel. The masonry of the twenty-fourth row also determines the main dimensions of the chimneys of the upper heating chamber. The remaining rows of the furnace masonry are similar to the masonry of previous furnaces.
The benefits of stove heating and its disadvantages
When choosing a stove for heating your home or cooking, you must be sure to familiarize yourself with the advantages of such functional designs:
- a classic wood-burning stove can be assembled quickly enough without the need for large financial outlays, provided the project is properly prepared;
- the universal design can be easily combined with a fireplace, bringing special notes of comfort and coziness to the interior design of the living room;
- the possibility of installing an autonomous heating system that operates without access to centralized and public communications;
- choosing an inexpensive and most economical type of fuel when selecting a program to reduce energy costs (additional insulation);
- a practical possibility of combining stove and water heating to distribute the coolant throughout the entire area of the room.
Preparation before construction of the stove
After choosing a model of the furnace structure, the master carries out preparatory processes before starting installation of the heating structure. At this stage, a place for the construction of the stove is selected, and individual elements are purchased.
Cast iron parts for the stove Source glavspec.ru
The efficiency of a heating brick structure largely depends on the location of the structure. When choosing it, they are guided by existing fire safety requirements. If the walls of the house are built of wood, then the following rules are observed:
- The minimum distance from the stove to the wooden walls should be 10 cm.
- A heat-resistant basalt or asbestos layer is created between the wall of the building and the stove structure when the heating structure is built into a previously prepared niche.
- The minimum distance from the chimney to the floor beams and rafters should be 15 cm.
Preparatory work also includes the construction of a foundation for the furnace structure. The durability of the entire heating structure depends on its strength.
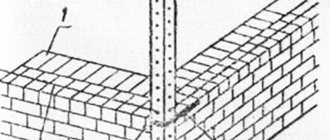
Important! The reinforced concrete base of the stove should not be monolithically connected to the foundation of the house. After all, the shrinkage of these two structures may differ, because unequal loads will act on them. When they are combined, it is possible that cracks will appear on the walls of the stove and the house due to mutual influence.
The stove foundation is not connected to the base of the house Source ad-cd.net
A bell-type heating structure is a dome stove. Regardless of the name, a building for heating premises can be built in a house that has long been put into operation. However, in this case, the floor is dismantled to construct a pit in which the foundation will be poured.
Important! The perimeter of a monolithic concrete foundation should be 0.5-0.8 cm larger than the base of the furnace.
Sometimes houses are built on a slab foundation. Therefore, the furnace structure also has to be built on the same foundation. To minimize the likelihood of deformation of structures, experts recommend building a lightweight stove. This is exactly what “Kuznetsovka” is.
On a note! It is recommended to bury the reinforced concrete base of the stove structure at least 30-50 cm into the soil.
Useful tips for laying swedes
- During the entire laying process, try to monitor the thickness of the seam. It should be 5 mm.
Seam between firebox and masonry
- To prevent the brick from absorbing moisture from the mortar during laying, it is recommended to wet it before construction work. It is enough to dip it in water for at least 1 minute so that it absorbs a sufficient amount of moisture.
- Do not forget to check the vertical and horizontal evenness of the masonry. To do this, use a building level and a plumb line. Use corners to check the evenness of the corners of the oven.
- After laying the stove, wait 2 weeks until it dries well. If you build a stove in the summer, it will dry out naturally. In cold weather, use a fan.
- Any furnace master will tell you that the less metal in the furnace, the better.
Leave a gap between the seams
But for hanging masonry you cannot do without metal corners, because arched vaults are not suitable here (Swedish vaults are distinguished by their compactness). The only condition that must be observed is that you cannot do anything close to the iron or place the iron on bare brick. In all places where it is planned to join metal parts with brick, a layer of mortar of 5-6 mm should be laid.
- When laying the hob on a brick, it is necessary to lay a layer of clay mortar on it. This will protect the brick from heating.
Swedish stove
By following our detailed instructions, you will definitely be able to arrange the oven correctly. A useful video will help you clearly understand the masonry scheme.
The main advantages of the Swedish
What is most attractive about the design of the Swedish stove is the efficiency of fuel combustion.
Thanks to a successful technical design, coal, firewood, reeds or small wood burns in the firebox, forming a large mass of thermal energy.
Unlike a traditional Russian stove, which takes a lot of time before it starts giving off heat, a Swedish stove heats up very quickly. Thanks to this, within 10-15 minutes after laying and lighting firewood, the room is filled with warmth.
Swedish: advantages
At the same time, it not only quickly warms up the room, but also retains heat. To do this, after the firewood has died down, it is necessary to close the valve tightly. Otherwise, all the heat that has accumulated in the oven will quickly come out.
Like the popular Dutch oven, the Swede is very compact and does not take up much space in the house, which is indispensable in small country houses where the location of a large Russian stove simply does not make sense.
In addition, the cooking hob and oven provide additional comfort and increase the functionality of the oven.
Advantages of a Swedish woman:
- compact dimensions;
- functionality (hob, oven, water heating, etc.);
- fuel efficiency;
- the ability to warm two rooms at the same time.
But, speaking about the advantages of the Swede, it would be unfair not to notice some of her shortcomings.
The design of the Swedish stove is very demanding in terms of the choice of material. If ordinary fireclay brick is suitable for creating a Russian stove, then you need to stock up on very high-quality materials, otherwise the efficiency of the heating apparatus will be greatly reduced.
In addition, the design of such a furnace is quite complex and requires certain knowledge and a very subtle, scrupulous approach. After installation and launch, it will be very difficult to eliminate your mistakes.
Preparatory work
First of all, you need to choose a place to build a furnace.
The easiest way to do this is before building a house - then both the stove and the building are designed together so that three or at least two rooms are heated. With a ready-made house, the situation is more complicated. In this case, they tend to build the stove into an interior partition, since installing it into a load-bearing wall requires complex calculations and dangerous, time-consuming work (part of the wall will have to be dismantled, keeping the load from being blocked by a system of lintels and columns). You can, of course, limit yourself to a simple wall-mounted arrangement, but then only one room will be heated.
A reinforced concrete foundation must be built at the selected location. Its dimensions must exceed the dimensions of the oven by at least 100 mm on each side. It is not allowed to combine the foundation of the furnace with the foundation of the building - both structures give different settlements and one of the foundations will pull the other along with it, causing it to skew.
A reinforced concrete foundation must be installed under the furnace.
The depth of the foundation depends on the bearing capacity of the soil, the depth of its freezing, and the method of operation of the building (periodically/continuously). Typically, in buildings with year-round habitation of people located on stable ground, the foundation is deepened by 400–600 mm. Crushed stone should be poured onto the bottom of the excavation as a reinforcing layer, and a sand cushion should be placed on top of it.
Then everything is done using traditional technology - they install the formwork, fix the reinforcement frame and fill it with concrete. You should proceed to the construction of the furnace only after the concrete has fully matured and gained sufficient strength - this usually takes about a month.